2009 PORSCHE PANAMERA window
[x] Cancel search: windowPage 51 of 343

Seats, Mirrors and Steering Wheel
49
Function of the air bag systemAir bags are a supplemental safety system. Your
primary protection comes from your safety belts.
The front air bags are triggered during a frontal
collision of sufficient force and direction.
In the event of a side impact of corresponding
force, the side air bag on the impact side is
triggered.
The inflation process generates the amount of gas
required to fill the air bags at the necessary
pressure in fractions of a second.
Air bags help to protect the head and body, while
simultaneously damping the motion of the driver
and passenger in the impact direction in the event
of a frontal impact or side impact.
In order to help provide protection in severe
collisions which can cause death and serious
injury, air bags must inflate extremely rapidly.
Such high speed inflation has a negative but
unavoidable side effect, which is that it can and
does cause injuries, including facial and arm
abrasions, bruising and broken bones. You can
help minimize such injuries by always wearing your
safety belts.
There are many types of accidents in which air
bags are not expected to deploy. These include
accidents where the air bags would provide no
benefit, such as a rear impact against your
vehicle. Other accidents where the air bags are
designed not to deploy are those where the risk of
injury from the air bag deployment could exceed any protective benefits, such as in low speed
accidents or higher speed accidents where the
vehicle decelerates over a longer time. Since air
bag deployment does not occur in all accidents,
this further emphasizes the need for you and your
passengers to always wear safety belts.
Your vehicle is equipped with a crash sensing and
diagnostic module. This module will record the
use of the seat belt restraint system by the driver
and front passenger when the air bags and/or belt
tentioner are triggered.
Precondition for activating the restraint systems:
f
Ignition is switched on.
Advanced air bagYour vehicle is equipped with occupant sensing for
the passenger's seat in accordance with
U.S. Federal Motor Vehicle Safety Standard 208.
Depending on the weight, body positioning and
shape acting on the passenger's seat, the
passenger's air bag will automatically be switched
on and off.
Depending on the angle and force of impact, the
passenger's air bag which is switched-on will be
triggered during a collision.
Precondition for switching the passenger's air bag
on and off, depending on weight, body positioning
and shape:
fIgnition is switched on.
Danger!
Risk of serious personal injury or death due
to the passenger air bag not triggering.
Improper handling of occupant sensing can
unintentionally impair switching the
passenger's air bag off and on.
If the weight on the passenger's seat is
reduced significantly, e.g., by supporting
weight on the armrest, the passenger's air
bag can be switched off.
f Select an upright seat position, and do not
support weight on the armrests or lean out of
the window.
Always keep feet in the footwell while driving.
Do not put feet on the dashboard or the seat
area. Do not lean against the inside of the door
or outside the window while the vehicle is
moving.
f If a child restraint system is installed on the passenger’s seat, do not adjust the seat.
Page 61 of 343

Seats, Mirrors and Steering Wheel
59
If the electrical adjustment facility fails
f Adjust the mirror by pressing on the
mirror face.Folding in exterior mirrorsfPress button D.
Both exterior mirrors fold in automatically.
If the electrical adjustment facility fails
f Fold in mirrors manually.Folding out exterior mirrorsfPress button D.
Both exterior mirrors unfold automatically.
Folding exterior mirrors in and out
automaticallyThe exterior-mirrors can be folded in automatically
after the vehicle is locked.
Folding exterior mirrors in automatically
f Press and hold the button on the car key for
at least 1 second.
or
On vehicles with Porsche Entry & Drive, press
and hold the locking button in the handle on the
driver’s door for at least 1 second.
The exterior mirrors fold in.
Folding exterior mirr ors out automatically
f Switch on ignition.
The exterior mirrors fold out.
Note
The exterior mirrors do not fold out automatically
after the ignition is switch ed on if they were folded
in manually using the button D.
If the electrical adj ustment facility fails
f Unfold mirrors manually.
Storing exterior mirror settingsOn vehicles with driver or comfort memory,
individual exterior mirror settings can be stored on
the person buttons on the driver’s side and on the
car key.
For further information on retrieving and storing
vehicle settings:
f Please see the chapter “STORING VEHICLE
SETTINGS” on page 40.Exterior mirror heatingThe exterior mirror heating is activated
automatically when the heated rear window is
switched on while the engine is running.
For information on switch ing on the heated rear
window:
f Please see the chapter “HEATED REAR
WINDOW/EXTERIOR MIRROR HEATING” on
page 84.
Page 62 of 343

60
Seats, Mirrors and Steering Wheel
Automatic anti-dazzle exterior mirrorThe exterior mirrors change to anti-dazzle
position automatically in synchronisation with
the interior mirror.
For information on the automatic anti-dazzle
function of the interior mirror:
fPlease see the chapter “AUTOMATIC ANTI-
DAZZLE INTERIOR MIRROR” on page 60.Swivelling down mirror glass as
parking aid When reverse gear is engaged, the mirror on the
passenger’s side swivels down slightly to show
the curb area.
f Please see the chapter “SWIVELLING DOWN
MIRROR GLASS AS PARKING AID” on
page 242.
Automatic anti-dazzle interior mirrorSensors on the front and rear sides of the interior
mirror measure the incident light. The mirrors
automatically change to anti-dazzle position or
revert to their normal state, depending on the light
intensity.
Note on operation
The incidental light within the detection area
of the light sensor C must not be restricted
(e.g. by stickers on the rear window or items
of luggage in the luggage compartment). Switching off automatic anti-dazzle function
f
Press button B.
The indicator light A goes out.
Note on operation
The anti-dazzle function switches off
automatically if:
– Reverse gear is engaged or
– Interior lighting is switched on.
Switching on automatic anti-dazzle function
f Press button B.
Indicator light A lights up.
Warning!
Risk of injury. Electrolyte fluid may escape
from broken mirror glass. This fluid irritates
the skin and eyes.
f If the electrolyte fluid sh ould come into contact
with the skin or eyes, rinse it off immediately
with clean water.
Seek medical attention if necessary.
Risk of damage to paintwork, leather, plastic
parts and clothing. Electrolyte fluid can be
removed only while it is still wet.
f Clean the affected parts with water.
Page 66 of 343
64
Seats, Mirrors and Steering Wheel
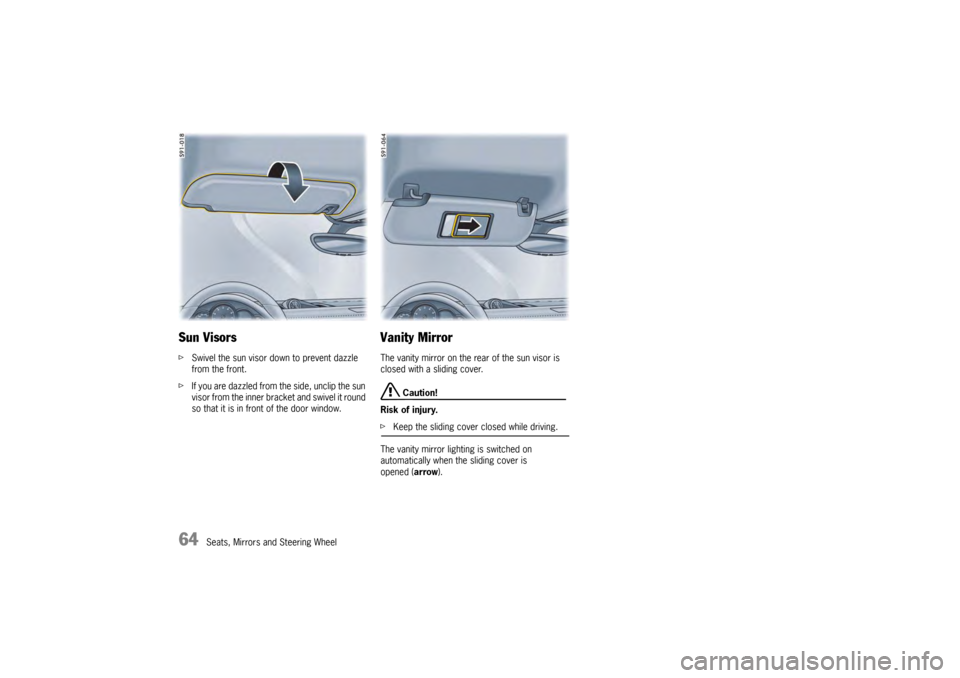
Sun VisorsfSwivel the sun visor down to prevent dazzle
from the front.
f If you are dazzled from the side, unclip the sun
visor from the inner brac ket and swivel it round
so that it is in front of the door window.
Vanity MirrorThe vanity mirror on the rear of the sun visor is
closed with a sliding cover.
Caution!
Risk of injury.
f Keep the sliding cover closed while driving.
The vanity mirror lighting is switched on
automatically when the sliding cover is
opened (arrow ).
Page 67 of 343
Seats, Mirrors and Steering Wheel
65
Roll-Up Sunblinds, Rear Side
WindowsNote on operation
The roll-up sunblinds on the rear side windows can
be raised or lowered only when the rear side
windows are closed.
If child protection is activated, the roll-up sunblinds
on the rear side windows can only be operated
using the roll-up sunblind button in the front center
console or the power window buttons in the
driver’s door.
For information on child protection:
f Please see the chapter “DISABLING THE
CONTROLS IN THE REAR” on page 88.
For information on the roll-up sunblind button:
f Please see the chapter “RAISING/LOWERING
ROLL-UP SUNBLIND ON REAR WINDOW” on
page 66.
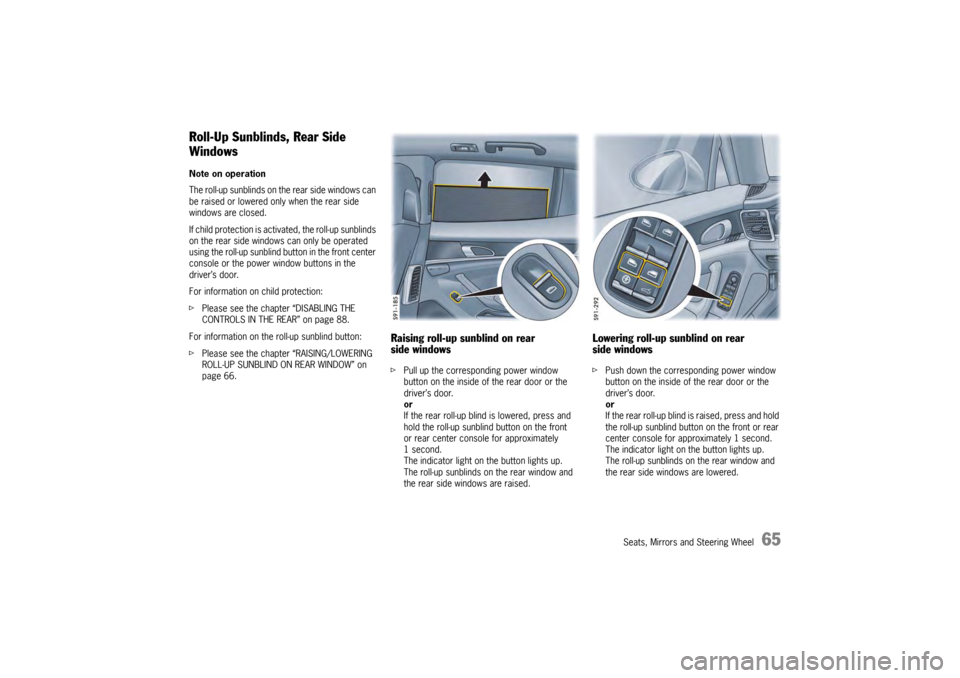
Raising roll-up sunblind on rear
side windowsfPull up the corresponding power window
button on the inside of the rear door or the
driver’s door.
or
If the rear roll-up blind is lowered, press and
hold the roll-up sunblind button on the front
or rear center console for approximately
1second.
The indicator light on the button lights up.
The roll-up sunblinds on the rear window and
the rear side windows are raised.
Lowering roll-up sunblind on rear
side windowsf Push down the corresponding power window
button on the inside of the rear door or the
driver’s door.
or
If the rear roll-up blind is raised, press and hold
the roll-up sunblind button on the front or rear
center console for approximately 1 second.
The indicator light on the button lights up.
The roll-up sunblinds on the rear window and
the rear side windows are lowered.
Page 68 of 343
66
Seats, Mirrors and Steering Wheel
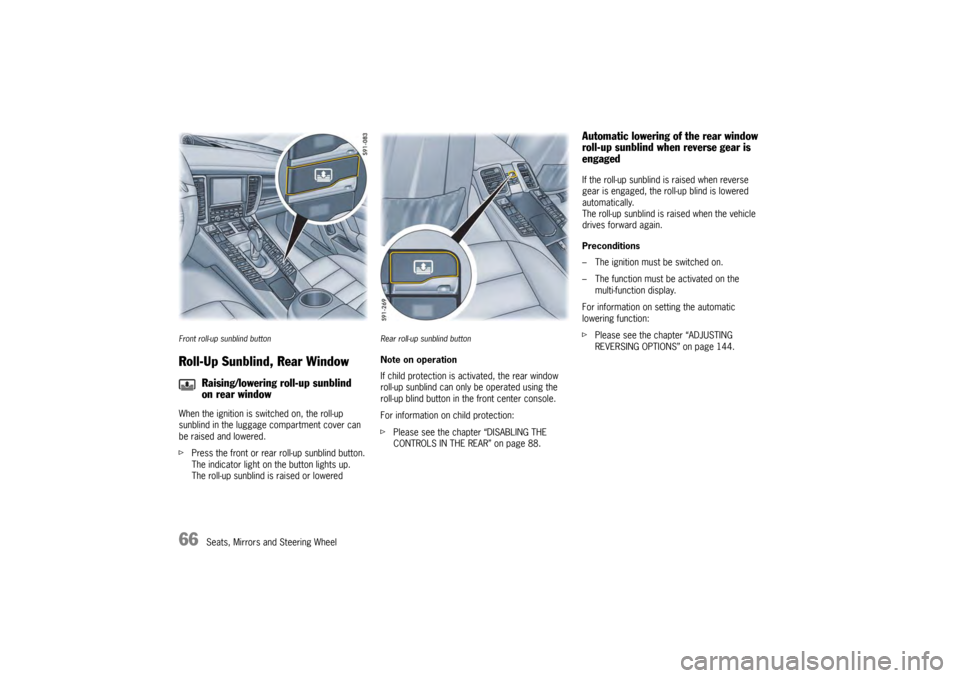
Front roll-up sunblind buttonRoll-Up Sunblind, Rear WindowWhen the ignition is switched on, the roll-up
sunblind in the luggage compartment cover can
be raised and lowered.
fPress the front or rear roll-up sunblind button.
The indicator light on the button lights up.
The roll-up sunblind is raised or lowered
Rear roll-up sunblind buttonNote on operation
If child protection is ac tivated, the rear window
roll-up sunblind can only be operated using the
roll-up blind button in the front center console.
For information on child protection:
f Please see the chapter “DISABLING THE
CONTROLS IN THE REAR” on page 88.
Automatic lowering of the rear window
roll-up sunblind when reverse gear is
engagedIf the roll-up sunblind is raised when reverse
gear is engaged, the roll-up blind is lowered
automatically.
The roll-up sunblind is raised when the vehicle
drives forward again.
Preconditions
– The ignition must be switched on.
– The function must be activated on the
multi-function display.
For information on setting the automatic
lowering function:
f Please see the chapter “ADJUSTING
REVERSING OPTIONS” on page 144.
Raising/lowering roll-up sunblind
on rear window
Page 69 of 343
Air Conditioning
67
Air Conditioning
Brief Overview – Front Control Panel
........ 68
Brief Overview – Rear Control Panel
(4-Zone Air-Conditionin g) ............................... 69
Overview of Air Condit ioning.......................... 70
General Functions ... ..................................... 71
Automatically Controlled Air Conditioning........ 76
Air Vents...................... ................................ 82
Heated Rear Window/Exterior Mirror
Heating ........................................... ............ 84
Page 75 of 343
Air Conditioning
73
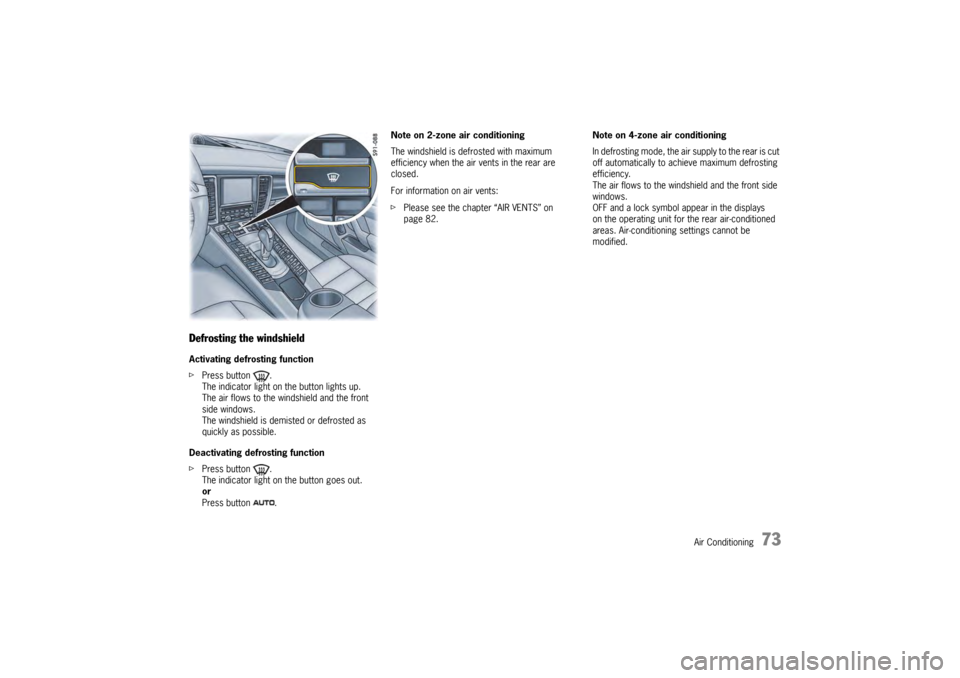
Defrosting the windshieldActivating defrosting function
fPress button .
The indicator light on the button lights up.
The air flows to the windshield and the front
side windows.
The windshield is demisted or defrosted as
quickly as possible.
Deactivating defrosting function
f Press button .
The indicator light on the button goes out.
or
Press button . Note on 2-zone air conditioning
The windshield is defrosted with maximum
efficiency when the air vents in the rear are
closed.
For information on air vents:
f
Please see the chapter “AIR VENTS” on
page 82. Note on 4-zone air conditioning
In defrosting mode, the air
supply to the rear is cut
off automatically to achieve maximum defrosting
efficiency.
The air flows to the windshield and the front side
windows.
OFF and a lock symbol appear in the displays
on the operating unit for the rear air-conditioned
areas. Air-conditioning settings cannot be
modified.