2009 PORSCHE PANAMERA air condition
[x] Cancel search: air conditionPage 84 of 343
82
Air Conditioning
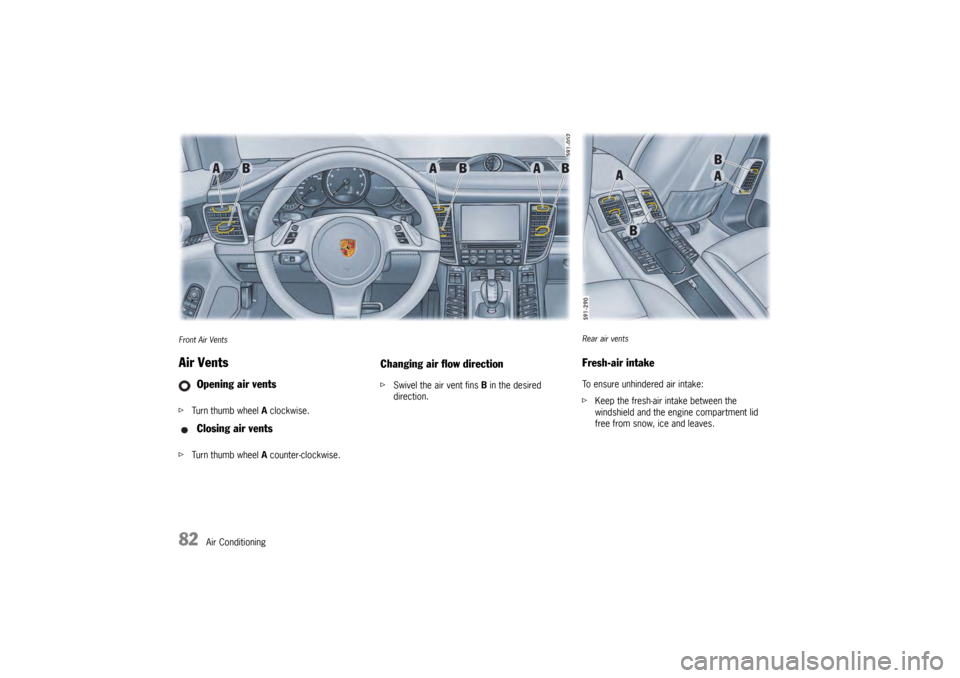
Front Air VentsAir VentsfTurn thumb wheel A clockwise.
f Turn thumb wheel A counter-clockwise.
Changing air flow directionf Swivel the air vent fins B in the desired
direction.
Opening air vents
Closing air vents
Rear air ventsFresh-air intakeTo ensure unhindered air intake:
fKeep the fresh-air intake between the
windshield and the engine compartment lid
free from snow, ice and leaves.
Page 85 of 343
Air Conditioning
83
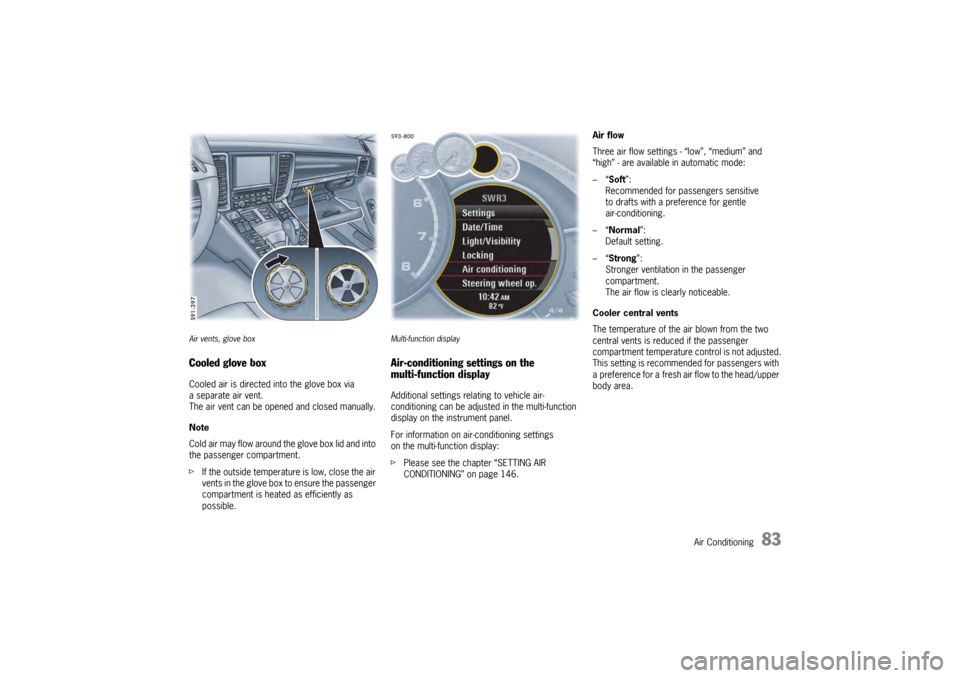
Air vents, glove boxCooled glove boxCooled air is directed into the glove box via
a separate air vent.
The air vent can be opened and closed manually.
Note
Cold air may flow around the glove box lid and into
the passenger compartment.
f If the outside temperatur e is low, close the air
vents in the glove box to ensure the passenger
compartment is heated as efficiently as
possible.
Multi-function displayAir-conditioning settings on the
multi-function displayAdditional settings relating to vehicle air-
conditioning can be adjusted in the multi-function
display on the instrument panel.
For information on air-conditioning settings
on the multi-function display:
f Please see the chapter “SETTING AIR
CONDITIONING” on page 146. Air flow
Three air flow settings - “low”, “medium” and
“high” - are available in automatic mode:
–“
Soft ”:
Recommended for passengers sensitive
to drafts with a preference for gentle
air-conditioning.
–“ Normal”:
Default setting.
–“ Strong ”:
Stronger ventilation in the passenger
compartment.
The air flow is clearly noticeable.
Cooler central vents
The temperature of the air blown from the two
central vents is reduced if the passenger
compartment temperature control is not adjusted.
This setting is recommended for passengers with
a preference for a fresh air flow to the head/upper
body area.
Page 86 of 343
84
Air Conditioning
Extended ventilation panelFor information on the extended ventilation panel:
fPlease see the chapter “EXTENDED
VENTILATION PANEL” on page 81.
Automatic air-recirculation
For information on automatic air-recirculation
mode:
f Please see the chapter “AIR-RECIRCULATION
MODE” on page 74.
Heated Rear Window/
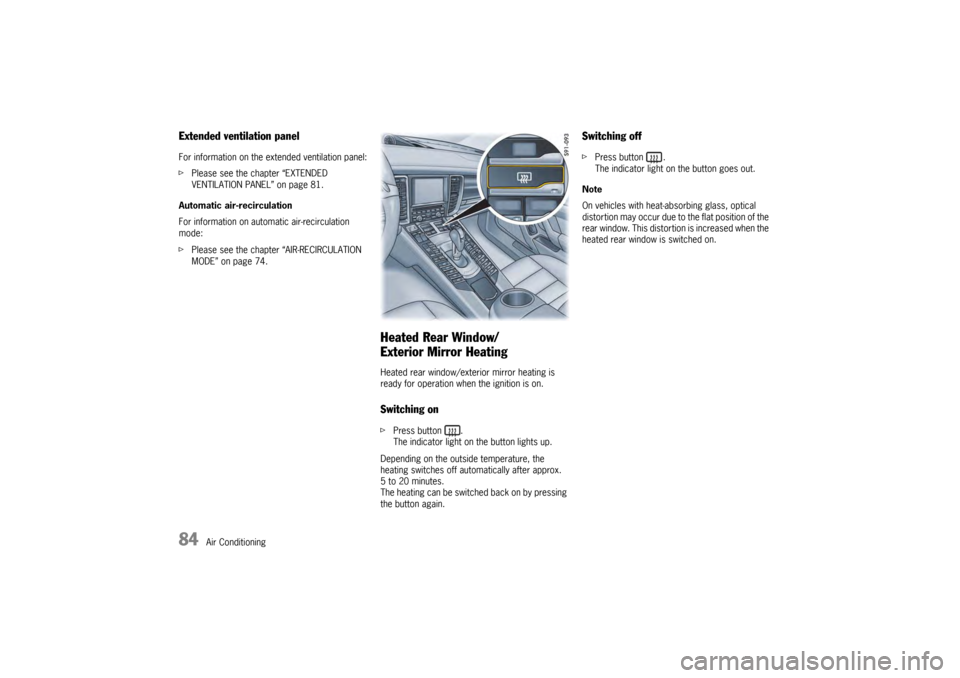
Exterior Mirror HeatingHeated rear window/exterior mirror heating is
ready for operation when the ignition is on.Switching onfPress button .
The indicator light on the button lights up.
Depending on the outside temperature, the
heating switches off automatically after approx.
5 to 20 minutes.
The heating can be switched back on by pressing
the button again.
Switching offf Press button .
The indicator light on the button goes out.
Note
On vehicles with heat-absorbing glass, optical
distortion may occur due to the flat position of the
rear window. This distortion is increased when the
heated rear window is switched on.
Page 120 of 343

118
Instrument Panel and Multi-Function DisplayVehicle
Audio
Navigation
Map
Phone
Trip
Tire pressure
Sport Chrono
ACC
Info
Oil level
Settings
Limits
Station/track
Destination input
Start/Stop route guidance
Manual zoom
Show destination/position
Auto zoom
3D map
North up
Answer/Reject/End
Phonebook
Previous calls
Received calls
since
consecutive
to destination
Fill info
Tire info
Charge
Comfort press.
Adjust
Start
Stop
Round
IntMessages
Service intervals
Level
Ø Consumption
Display
Light/visibility
Locking
Air conditioning
Date/Time
Units
Language
Volume
Steering wheel op.
Fact. settings
Limit 1/Limit 2
Last destination
Stored destinations
POIs
Res.
Reset
Menu scope
Audio
Vehicle menu
Upper line
PCM display
Lower line
Shift request
Brightness
Exterior lights
Interior lights
Wiper
Revers. opt.
Door unlock
Door lock
Comfort Entry
Climate style
Vent. panel
Center cooler
Automatic air circ.
Time
Date
Summer time
Time Chrono
Speedometer
Temperature
Tire pressure
Boost pressure
Consumption
German/French …
ParkAssist
Warn. tones
Multif. key
Current speed
Setting the speed
Page 140 of 343

138
Instrument Panel and Multi-Function Display
Vehicle Settings on the Multi-
Function DisplayDifferent settings can be adjusted in the
multi-function display on the instrument panel
depending on the vehicle equipment.
On vehicles with comfort memory, the settings are
stored on the car key or the person buttons in the
driver’s door.
For information on the comfort memory:
fPlease see the chapter “COMFORT MEMORY”
on page 40.
Selecting settings menu
Setting optionsThe following vehicle functions can be adapted
individually:
–“ Display ”
Adapt the appearance of the multi-function
display, see page 139.
–“ Light/Visibility ”
Adjust the vehicle lighting, wipers and
reversing options, see page 142.
–“ Locking ”
Adjust the locking settings, see page 145.
–“ Air conditioning ”
Adapt the air conditioning, see page 146.
–“ Date/time ”
Set the date and time, see page 147.
–“ Units ”
Set the units of measurement on the
instruments and display, see page 149.
–“ Language”
Set the language of the multi-function display
and the instrument panel, see page 150. –“
Volume ”
Adjust the volume of the warning and
information tones, see page 150.
–“ Steering wheel operation”
Change the MFS button assignment on the
multi-function steering wheel, see page 151.
–“ Reset ”
Reset to factory settings, see page 139.
Selecting setting options or activating
vehicle functionsA symbol positioned in front of a setting option
indicates whether the option is selected or
a vehicle function is activated.
Selecting one of several options
Option is selected.
Option is not selected.
Activating and deactivating functions Function is activated.
Function is deactivated.
1.Select
> “Vehicle ”
> “ Settings ”
and confirm.
Page 148 of 343
146
Instrument Panel and Multi-Function Display
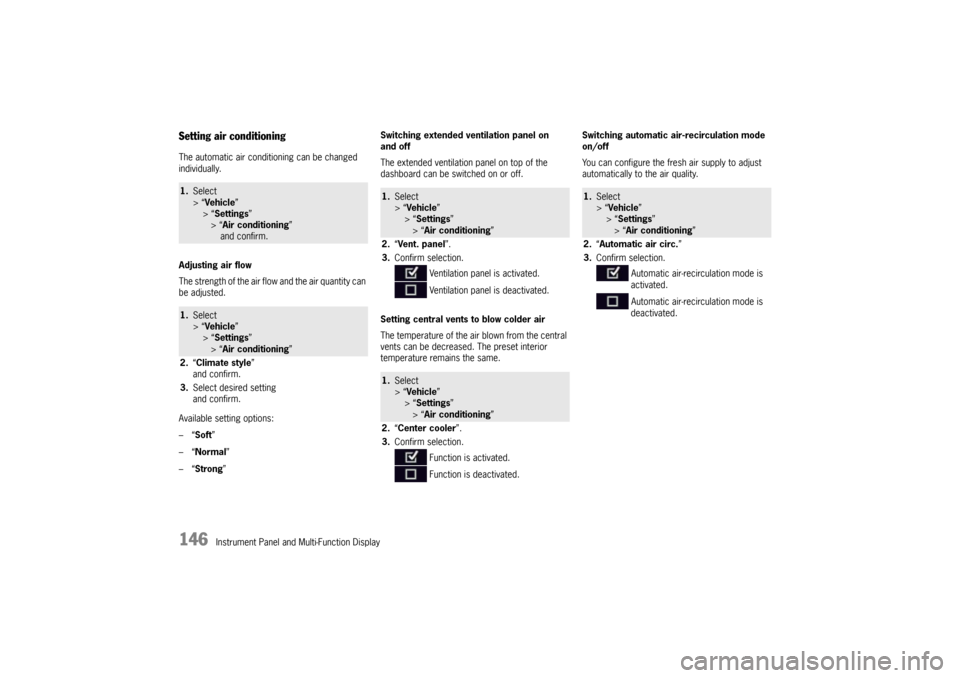
Setting air conditioningThe automatic air conditioning can be changed
individually.
Adjusting air flow
The strength of the air flow and the air quantity can
be adjusted.
Available setting options:
–“ Soft ”
–“ Normal”
–“ Strong ” Switching extended ventilation panel on
and off
The extended ventilation panel on top of the
dashboard can be switched on or off.
Setting central vents
to blow colder air
The temperature of the air blown from the central
vents can be decreased. The preset interior
temperature remains the same. Switching automatic air-recirculation mode
on/off
You can configure the fresh air supply to adjust
automatically to the air quality.1.
Select
> “Vehicle ”
> “ Settings ”
> “Air conditioning ”
and confirm.1. Select
> “Vehicle ”
> “ Settings ”
> “Air conditioning ”
2. “Climate style”
and confirm.
3. Select desired setting
and confirm.
1.Select
> “Vehicle ”
> “ Settings ”
> “Air conditioning ”
2. “Vent. panel ”.
3. Confirm selection.
Ventilation panel is activated.
Ventilation panel is deactivated.1.Select
> “Vehicle ”
> “ Settings ”
> “Air conditioning ”
2. “Center cooler ”.
3. Confirm selection.
Function is activated.
Function is deactivated.
1.Select
> “Vehicle ”
> “Settings ”
> “Air conditioning ”
2. “Automatic air circ. ”
3. Confirm selection.
Automatic air-recirculation mode is
activated.
Automatic air-recirculation mode is
deactivated.
Page 151 of 343
Instrument Panel and Multi-Function Display
149
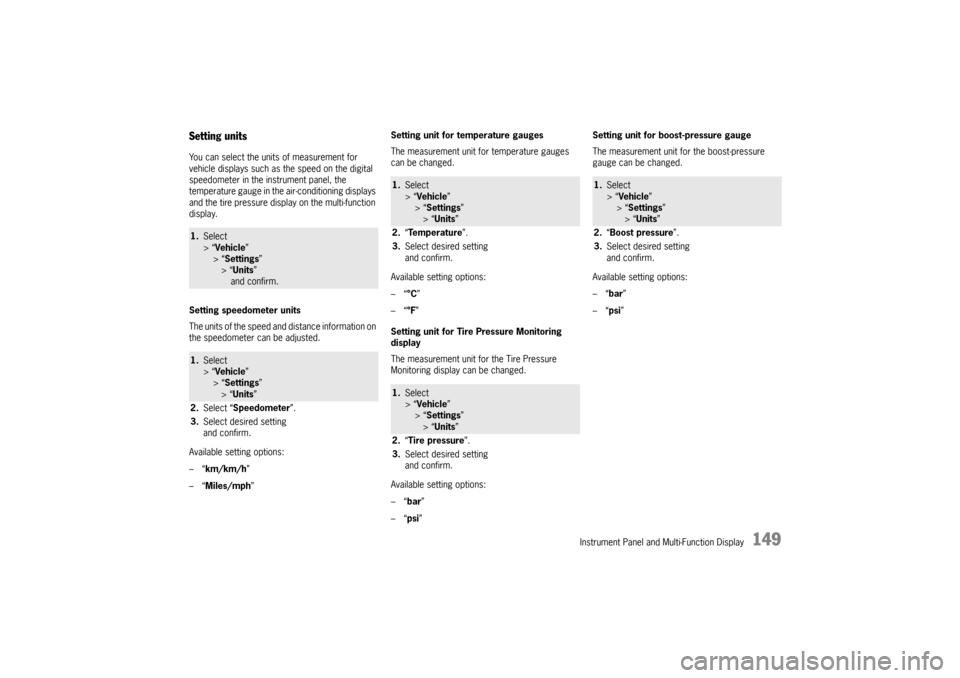
Setting unitsYou can select the units of measurement for
vehicle displays such as the speed on the digital
speedometer in the instrument panel, the
temperature gauge in the air-conditioning displays
and the tire pressure display on the multi-function
display.
Setting speedometer units
The units of the speed and distance information on
the speedometer can be adjusted.
Available setting options:
–“ km/km/h ”
–“ Miles/mph” Setting unit for temperature gauges
The measurement unit for temperature gauges
can be changed.
Available setting options:
–“
°C”
–“ °F”
Setting unit for Tire Pressure Monitoring
display
The measurement unit for the Tire Pressure
Monitoring display can be changed.
Available setting options:
–“ bar”
–“ psi” Setting unit for boost-pressure gauge
The measurement unit for the boost-pressure
gauge can be changed.
Available setting options:
–“
bar”
–“ psi” 1. Select
> “Vehicle ”
> “ Settings ”
> “Units ”
and confirm.1. Select
> “Vehicle ”
> “ Settings ”
> “Units ”
2. Select “ Speedometer ”.
3. Select desired setting
and confirm.
1.Select
> “Vehicle ”
> “Settings ”
> “ Units ”
2. “Temperature ”.
3. Select desired setting
and confirm.1.Select
> “Vehicle ”
> “Settings ”
> “ Units ”
2. “Tire pressure ”.
3. Select desired setting
and confirm.
1.Select
> “Vehicle ”
> “ Settings ”
> “Units ”
2. “Boost pressure ”.
3. Select desired setting
and confirm.
Page 171 of 343

Driving and Driving Safety
169
Auto Start Stop FunctionThe engine stops automatically when the vehicle is
stopped, e.g. at traffic lights or in a traffic jam.
The Auto Start Stop function thus helps to
save fuel.
The ignition stays on even when the engine
switches off automatically. All safety functions
are still available.Stopping the engineThe Auto Start Stop function stops the engine
as soon as the vehicle stops moving.
1. Use the footbrake to hold the vehicle in place.
2. Keep the footbrake pressed.or
Move PDK selector lever to position P.
Preconditions for stopping the engine
– Engine compartment lid closed.
– Driver detected: driver’s seat belt fastened and driver’s door closed.
– PDK selector lever in position D, N or P or
transmission range 1 or 2 selected manually.
– Engine, transmission and battery are at operating temperature.
– Vehicle was driven at a speed of more than approx. 1 mph (2 km/h) for at least
1.5 seconds since the engine last stopped
automatically.
Starting the engineThe Auto Start Stop func tion starts the engine:
f In PDK selector-lever position D, N or manually
selected transmission range 1 or 2:
Release the footbrake.
or
Press the accelerator.
or
f Move PDK selector lever to position R.
You can drive off normally.
Note
The engine will start automatically in certain
situations, e.g. if the vehicle starts rolling, if air
conditioning causes reduced comfort, or if the
brake booster vacuum is reduced.
Starting the engine manually after leaving
the vehicle
If the driver’s seat belt is unbuckled or the driver’s
door is opened after the engine was stopped
automatically, the engine will not start
automatically.
Furthermore, if the brake is released, the engine
has to be started manually.
The message “Please start engine manually”
will appear on the multi-function display in the
instrument panel.
f Please see the chapter “OVERVIEW OF
WARNING MESSAGES” on page 152.
Exceptions for the Auto Start Stop
functionThe Auto Start Stop function is not available in the
following situations, for example:
– When Sport mode is activated.
– When PSM is off.
– In Maneuvering mode.
– When AC MAX mode is activated.
– When the “Windshield defrost” function is active.
– While adjusting the chassis level.
– When the rear fog light is on.
The Auto Start Stop fu nction is available with
limited functionality in the following situations,
for example:
– If the air conditioning or passenger compartment heating is operated at a high
setting or if the defrost function is run for long
time periods.
– If the battery charging condition is low.
– On upward or downward slopes.
– During internal vehicle test procedures, e.g. automatic engine checks.
Note
If one of these situations arises after the engine
has stopped automatically, the engine can be
restarted automatically.