Page 234 of 436

Before Driving
The RSE is designed for rear seat passengers only.
The driver cannot safely view the video screen
while driving and should not try to do so.
In severe or extreme weather conditions the RSE
system might not work until the temperature is within
the operating range. The operating range for the RSE
system is above−4°F (−20°C) or below 140°F (60°C).
If the temperature of the vehicle is outside of this range,
heat or cool the vehicle until the temperature is within the
operating range of the RSE system.
Headphones
The RSE includes two sets of wireless headphones that
are only dedicated to this system. These headphones
are used to listen to the DVD radio or an auxiliary device
connected to the RCA jacks. The wireless headphones
have an ON/OFF switch and a volume control.
To use the headphones, turn the switch to ON. An
indicator light located on the headphones illuminates.
If the light does not illuminate, the batteries might need
to be replaced. See “Battery Replacement” later in
this section for more information. Switch the headphones
to OFF when not in use.
The infrared transmitters are located in the display
below the video screen. The headphones shut off
automatically to save the battery power if the RSEsystem and RSA are shut off or if the headphones
are out of range of the transmitters for more than
three minutes. If you move too far forward or step out
of the vehicle, the headphones lose the audio signal.
To adjust the volume on the headphones, use the
volume control located on the right side.
For optimal audio performance, the headphones must
be worn correctly. Headphones should be worn with
headband over the top of the head for best audio
reception. The symbol L (Left) appears on the upper left
side, above the ear pad and should be positioned on the
left ear. The symbol R (Right) appears on the upper right
side, above the ear pad and should be positioned on the
right ear.
Notice:Do not store the headphones in heat or
direct sunlight. This could damage the headphones
and repairs will not be covered by the warranty.
Storage in extreme cold can weaken the batteries.
Keep the headphones stored in a cool, dry place.
The foam ear pads attached to the headphones can
become worn or damaged if they are not handled or
stored properly. If the foam ear pads do become
damaged or worn out, the pads can be replaced
separately from the headphone set. It is not necessary
to replace the complete headphone set. The headphone
replacement foam ear pads can be ordered in pairs.
See your dealer/retailer for more information.
3-110
Page 235 of 436

Battery Replacement
To change the batteries on the headphones, do the
following:
1. Turn the screw to loosen the battery door located
on the left side of the headphones. Slide the
battery door open.
2. Replace the two batteries in the compartment.
Make sure that they are installed correctly,
using the diagram on the inside of the battery
compartment.
3. Replace the battery door and tighten the door
screw.
If the headphones are to be stored for a long period of
time, remove the batteries and keep them in a cool,
dry place.
Audio/Video (A/V) Jacks
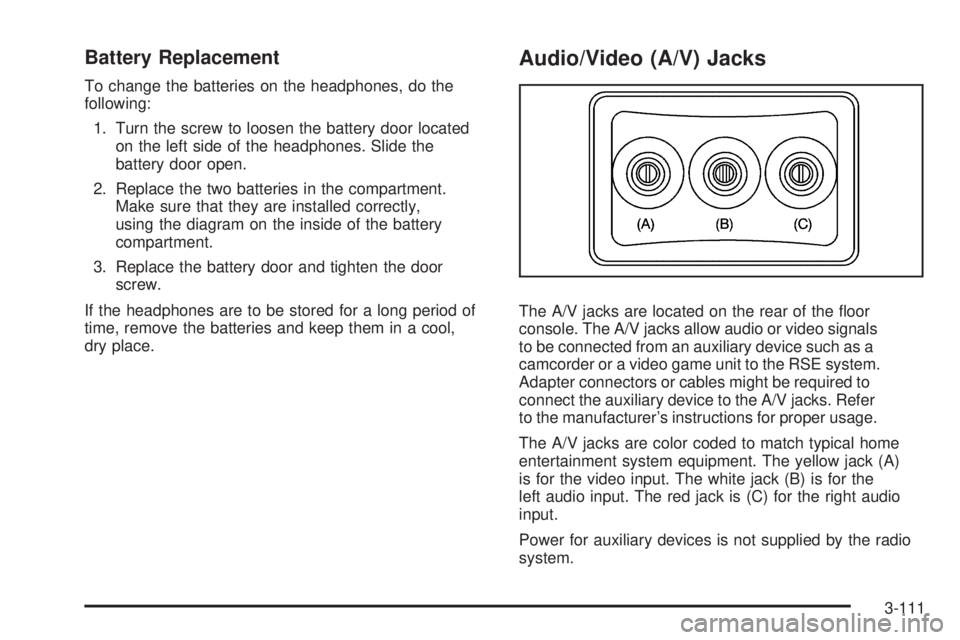
The A/V jacks are located on the rear of the �oor
console. The A/V jacks allow audio or video signals
to be connected from an auxiliary device such as a
camcorder or a video game unit to the RSE system.
Adapter connectors or cables might be required to
connect the auxiliary device to the A/V jacks. Refer
to the manufacturer’s instructions for proper usage.
The A/V jacks are color coded to match typical home
entertainment system equipment. The yellow jack (A)
is for the video input. The white jack (B) is for the
left audio input. The red jack is (C) for the right audio
input.
Power for auxiliary devices is not supplied by the radio
system.
3-111
Page 240 of 436

\(Clear):Press this button within three seconds after
inputting a numeric selection, to clear all numeric inputs.
}10 (Double Digit Entries):Press this button to
select chapter or track numbers greater than 9.
Press this button before inputting the number.
If the remote control becomes lost or damaged,
a new universal remote control can be purchased.
If this happens, make sure the universal remote
control uses a code set of Toshiba
®.
Battery Replacement
To change the remote control batteries, do the following:
1. Slide the rear cover back on the remote control.
2. Replace the two batteries in the compartment.
Make sure that they are installed correctly,
using the diagram on the inside of the battery
compartment.
3. Replace the battery cover.
If the remote control is to be stored for a long period
of time, remove the batteries and keep them in a cool,
dry place.
Problem Recommended Action
No power. The ignition might not be
turned ON/RUN or in
ACC/ACCESSORY.
The picture does not
�ll the screen. There
are black borders on
the top and bottom or
on both sides or it looks
stretched out.Check the display mode
settings in the setup menu
by pressing the display
menu button on the remote
control.
In auxiliary mode, the
picture moves or scrolls.Check the auxiliary input
connections at both
devices.
The remote control does
not work.Check to make sure there
is no obstruction between
the remote control and
the transmitter window.
Check the batteries to
make sure they are not
dead or installed
incorrectly.
After stopping the player,
I push Play but sometimes
the DVD starts where I left
off and sometimes at the
beginning.If the stop button was
pressed one time, the DVD
player resumes playing
where the DVD was
stopped. If the stop button
was pressed two times
the DVD player begins to
play from the beginning
of the DVD.
3-116
Page 379 of 436
Fuses Usage
1 Cooling Fan 2
2 Cooling Fan 1
3 Auxiliary Power
4 Rear HVAC
5 Spare
6 Sun Roof
7 Antilock Brake System
8 Air Conditioning Clutch
9 Driver Side Low-Beam
10 Daytime Running Lamp 2
11 Passenger Side High-Beam
12 Passenger Side Park Lamp
13 Horn
14 Driver Side Park Lamp
15 Starter
16Electronic Throttle Control,
Engine Control Module
17 Emission Device 1
18 Even Coils, Injectors
19 Odd Coils, Injectors
20 Emission Device 2
21 Spare
22 Powertrain Control Module, Ignition
23 TransmissionFuses Usage
24 Mass Air�ow Sensor
25 Airbag Display
26 Spare
27 Stoplamp
28 Passenger Side Low-Beam
29 Driver Side High-Beam
30 Battery Main 3
32 Spare
33 Engine Control Module, Battery
34Transmission Control Module,
Battery
35 Trailer Park Lamp
36 Front Wiper
37Driver Side Trailer Stoplamp,
Turn Signal
38 Spare
39 Fuel Pump
40 Not Used
41 All-Wheel Drive
42 Regulated Voltage Control
43Passenger Side Trailer Stoplamp,
Turn Signal
44 Spare
45 Front, Rear Washer
5-95