2009 OPEL ZAFIRA service
[x] Cancel search: servicePage 1 of 228

Introduction
.................................... 2
In brief ............................................ 6
Keys, doors and windows ............27
Seats, restraints ........................... 44
Storage ........................................ 67
Instruments and controls .............77
Lighting ...................................... 108
Infotainment system ...................115
Climate control ........................... 118
Driving and operating .................127
Vehicle care ............................... 154
Service and maintenance ..........192
Technical data ........................... 207
Index .......................................... 224
Contents
Page 3 of 228

Introduction 3
Vehicle specific data
Please enter your vehicle’s data on
the previous page to keep it easily
accessible. This information is
available under the sections "Service
and Maintenance" and "Technical
data" as well as on the identification
plate.
Introduction
Your vehicle is a designed
combination
of advanced technology,
safety, environmental friendliness
and economy.
This Owner’s Manual provides you
with all the necessary information to
enable you to drive your vehicle
safely and efficiently.
Make sure your passengers are
aware of the possible risk of accident
and injury which may result from
improper use of the vehicle.
You must always comply with the
specific laws and regulations of the
country that you are in. These laws
may differ from the information in this
Owner’s Manual. When this Owner’s Manual refers to
a
workshop visit, we recommend your
Opel Service Partner.
All Opel Service Partners provide
first-class service at reasonable
prices. Experienced mechanics
trained by Opel work according to
specific Opel instructions.
The customer literature pack should
always be kept ready to hand in the
vehicle glovebox.
Using this manual
■ The "In brief" section will give you an initial overview.
■ The table of contents at the beginning of this manual and within
each chapter shows where the
information is located.
■ The index will enable you to search for specific information.
■ Yellow arrows in the illustrations serve as points of reference or
indicate some action to be
performed. ■ Black arrows in the illustrations
indicate a reaction or a second
action to be performed.
■
This Owner’s Manual depicts left-hand drive vehicles. Operation is
similar for right-hand drive vehicles.
■ The Owner’s Manual uses the factory engine designations. The
corresponding sales designations
can be found in the chapter
"Technical data".
■ Directional data, e.g. left or right, or front or back, always relate to the
direction of travel.
■ Depending on the model variant, country variant, integrated special
equipment and accessories, the
scope of equipment of your vehicle
can differ from the descriptions in
these Owner’s Manual.
Page 31 of 228

Keys, doors and windows
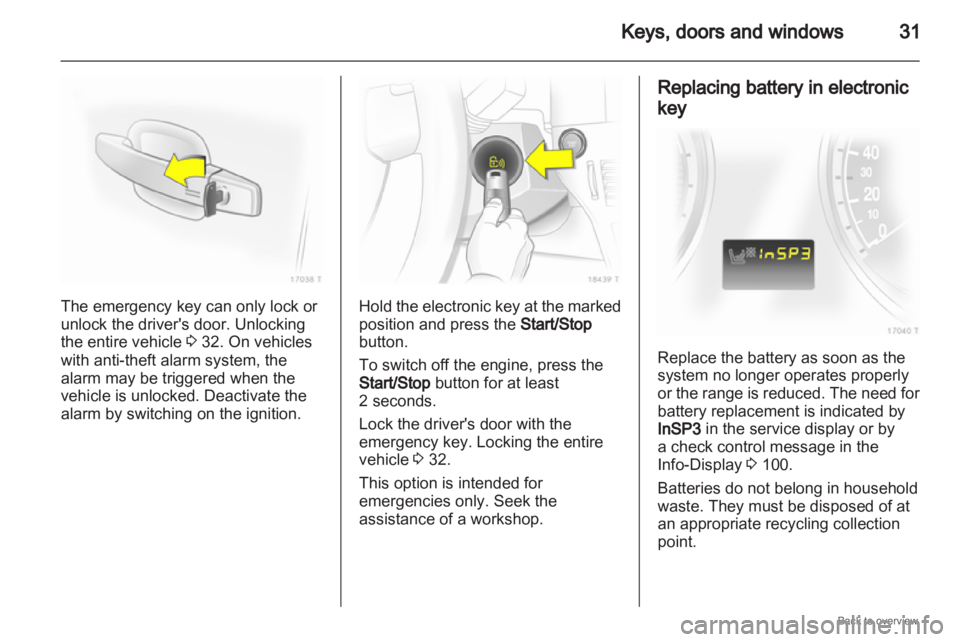
31The emergency key can only lock or
unlock the driver's door. Unlocking
the entire vehicle
3 32. On vehicles
with anti-theft alarm system, the
alarm may be triggered when the
vehicle is unlocked. Deactivate the
alarm by switching on the ignition. Hold the electronic key at the marked
position and press the
Start/Stop
button.
To switch off the engine, press the
Start/Stop button for at least
2 seconds.
Lock the driver's door with the
emergency key. Locking the entire
vehicle 3 32.
This option is intended for
emergencies only. Seek the
assistance of a workshop. Replacing battery in electronic
key
Replace the battery as soon as the
system no longer operates properly
or
the range is reduced. The need for
battery replacement is indicated by
InSP3 in the service display or by
a check control message in the
Info-Display 3 100.
Batteries do not belong in household
waste. They must be disposed of at
an appropriate recycling collection
point.
Page 85 of 228

Instruments and controls
85
If the natural gas tanks are not
refuelled, the system must be
manually switched to petrol operation
before the engine is started up again.
This will prevent damage to the
catalytic converter (overheating
caused by irregular fuel supply).
If the selector switch is operated
several times within a short time
a switchover block is activated. The
engine remains in the current
operating mode. The block remains
active until the ignition is switched off.
A slight loss of power and torque can
be expected in petrol operation. You
must therefore adapt your driving
style (e.g. during overtaking
manoeuvres) and vehicle loads (e.g.
towing loads) accordingly.
Every six months run the petrol tank
down until control indicator Y
illuminates and refuel. This is
necessary to maintain fuel quality as
well as system function necessary for
petrol operation.
Fill the tank completely at regular
intervals to prevent corrosion in the
tank. Service display
The message InSP appears when it
is time for servicing. Further
information
3 192.
Control indicators
The control indicators described are
not present in all vehicles. The
description applies to all instrument
versions. When the ignition is
switched on, most control indicators
will
illuminate briefly as a functionality
test. The control indicator colours mean:
Red = Danger, important
reminder,
Yellow = Warning, information, fault,
Green = Confirmation of activation,
Blue = Confirmation of activation.
Page 88 of 228

88
Instruments and controls 9
Danger If a child restraint system is fitted
and the control indicator is not
illuminated while driving, the front
and side airbag for the front
passenger seat are not
deactivated.
Flashes
Fault in system or child restraint
system with transponders defective
or improperly fitted
3 61.9
Danger Flashing of the control indicator
while driving indicates a fault.
Have the cause of the fault
remedied by a workshop
immediately.
Child restraint system with
transponders
3 65.
Charging system
p illuminates red. It illuminates when the ignition is
switched
on and goes out shortly after
the engine starts.
Illuminates when the engine is
running
Stop, switch off engine. Battery is not
charging. Engine cooling may be
interrupted. In diesel engines, power
to the brake servo unit may be cut.
Seek the assistance of a workshop.
Malfunction indicator light
Z illuminates or flashes yellow.
It illuminates when the ignition is
switched on and goes out shortly after
the engine starts.
Illuminates when the engine is
running
Fault in the emission control system.
The permitted emission limits may be
exceeded. Immediately seek the
assistance of a workshop. Flashes when the engine is
running
Fault that could lead to catalytic
converter damage. Ease up on the
throttle until the flashing stops. Seek
the immediate assistance of
a workshop.
Service vehicle soon
A
illuminates or flashes yellow.
Illuminates when the engine is
running
Fault in engine or transmission
electronics. The electronics switch to
an emergency running programme.
Fuel consumption may be increased
and the vehicle handling may be
impaired.
If
the fault persists after restarting the
vehicle, consult a workshop.
Illuminates together with InSP4
in the service display
Seek the assistance of a workshop for
draining the diesel fuel filter.
Page 126 of 228

126
Climate control
Air conditioning regular
operation
In order to ensure continuously
efficient performance, cooling must
be operated for a few minutes once
a month, irrespective of the weather
and time of year. Operation with
cooling is not possible when outside
temperature is low.
Service
For
optimal cooling performance, it is
recommended that the climate control
system be checked annually, starting
three years after initial vehicle
registration.
■ Functionality and pressure test
■ Heating functionality
■ Leakage check
■ Check of drive belts
■ Cleaning of condenser and evaporator drainage
■ Performance check
Page 143 of 228

Driving and operating
143
Hold the SPORT button depressed
for about 4 seconds. Control indicator
v illuminates. ESPoff also appears in
the service display. 9
Warning Do not deactivate ESP®
Plus
if
a
run-flat tyre 3 has lost pressure.ESP®
Plus
is reactivated by pressing
the SPORT
button. ESPon appears in
the service display. ESP® Plus
is also
reactivated the next time the ignition
is switched on.
Sport mode 3 143.
Interactive driving system
Interactive driving system (IDS Plus
)
combines the electronic stability
program (ESP® Plus
) with the antilock
brake system (ABS) and continuous
damping control (CDC) to improve
driving dynamics and vehicle safety. Sport mode
Suspension and steering become
more direct and provide better
contact with the road surface. The
engine reacts more quickly to
accelerator pedal movements.
Automatic
gear changing is also more
responsive.
Control indicator IDSPlus
3 91.
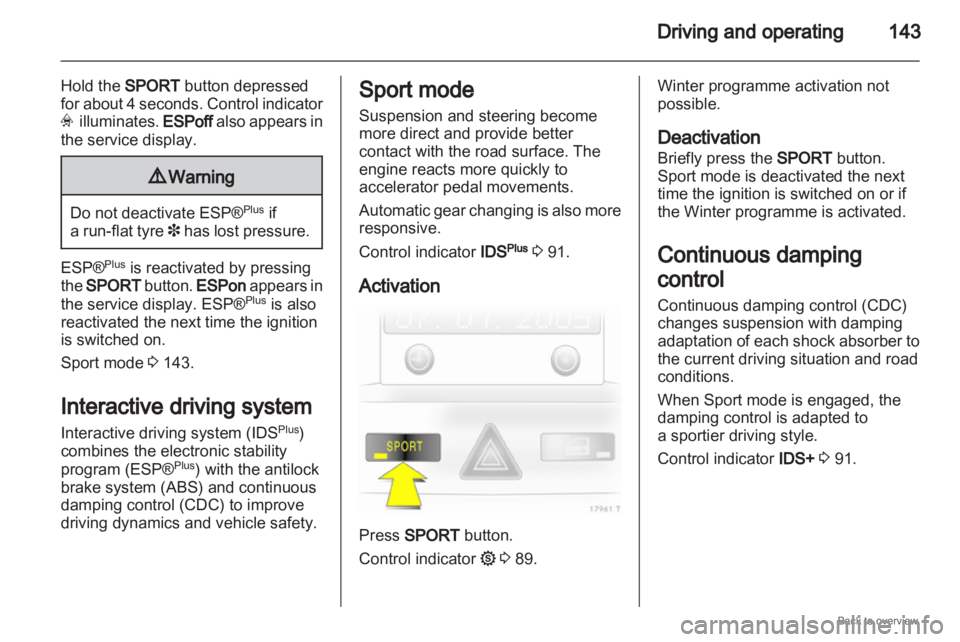
Activation Press SPORT button.
Control indicator
1 3 89. Winter programme activation not
possible.
Deactivation
Briefly press the SPORT button.
Sport mode is deactivated the next
time the ignition is switched on or if
the Winter programme is activated.
Continuous damping
control
Continuous damping control (CDC)
changes suspension with damping
adaptation
of each shock absorber to
the current driving situation and road
conditions.
When Sport mode is engaged, the
damping control is adapted to
a sportier driving style.
Control indicator IDS+ 3 91.
Page 159 of 228

Vehicle care
159
Batteries do not belong in household
waste. They must be disposed of at
an appropriate recycling collection
point.
Laying up the vehicle for more than
4 weeks can lead to battery
discharge.
Disconnect the clamp from
the negative terminal of the vehicle
battery.
Ensure the ignition is switched off
before connecting or disconnecting
the vehicle battery.
Diesel fuel system
bleeding
If the tank has been run dry, the diesel
fuel system must be bled. Switch on
the ignition three times for 15 seconds
at a time. Then start the engine for
a maximum of 40 seconds. Repeat
this process after no less than
5 seconds. If the engine fails to start,
seek the assistance of a workshop. Wiper blade replacement
Service setting for front
windscreen wipers
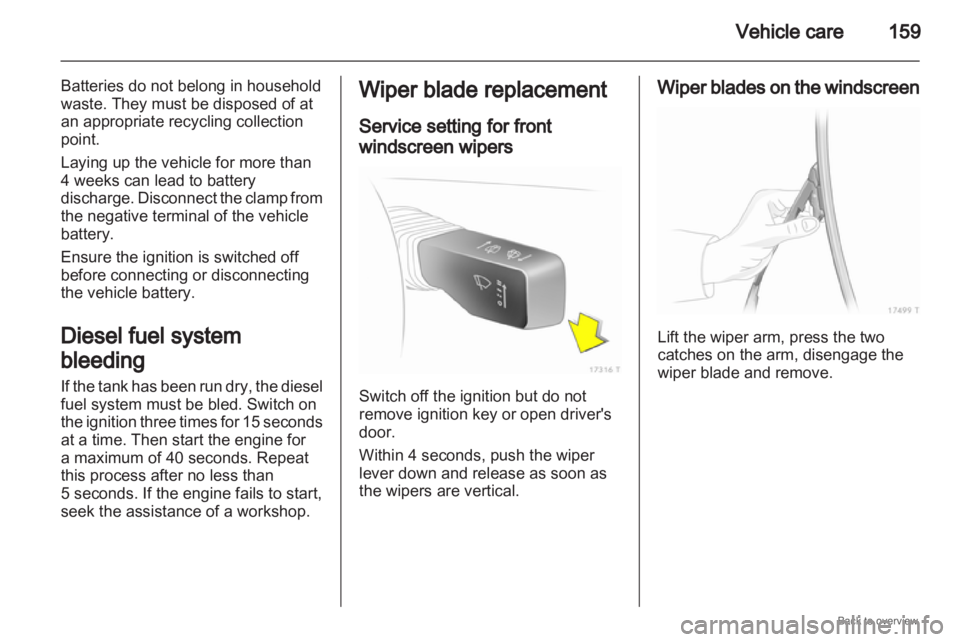
Switch off the ignition but do not
remove ignition key or open driver's
door.
Within 4 seconds, push the wiper
lever down and release as soon as
the wipers are vertical. Wiper blades on the windscreen
Lift the wiper arm, press the two
catches on the arm, disengage the
wiper blade and remove.