Page 144 of 228
144
Driving and operating
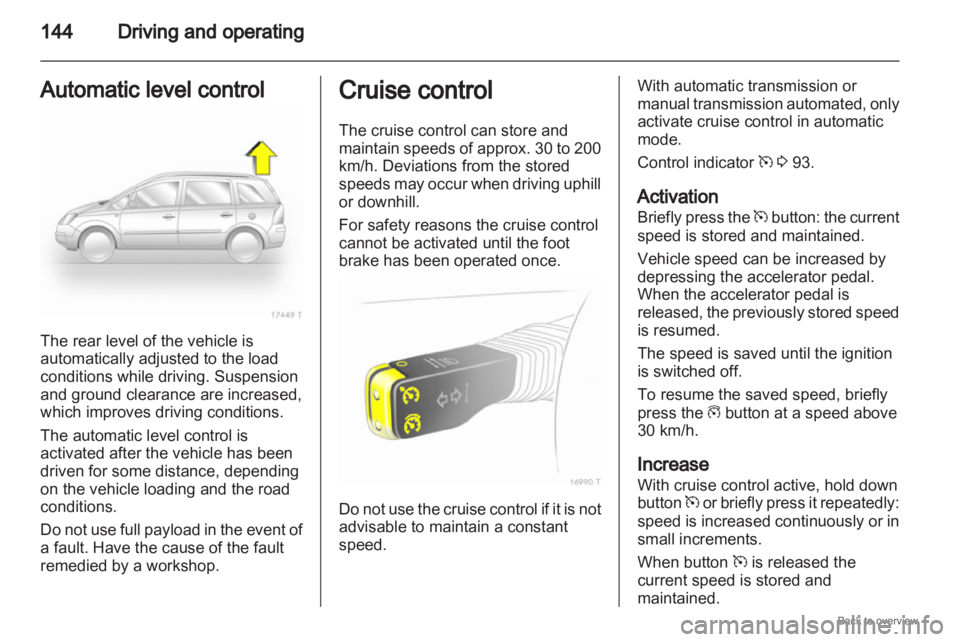
Automatic level control The rear level of the vehicle is
automatically adjusted to the load
conditions while driving. Suspension
and ground clearance are increased,
which improves driving conditions.
The automatic level control is
activated after the vehicle has been
driven for some distance, depending
on the vehicle loading and the road
conditions.
Do
not use full payload in the event of
a fault. Have the cause of the fault
remedied by a workshop. Cruise control
The cruise control can store and
maintain
speeds of approx. 30 to 200
km/h. Deviations from the stored
speeds may occur when driving uphill
or downhill.
For safety reasons the cruise control
cannot be activated until the foot
brake has been operated once. Do not use the cruise control if it is not
advisable to maintain a constant
speed. With automatic transmission or
manual
transmission automated, only
activate cruise control in automatic
mode.
Control indicator m 3 93.
Activation
Briefly press the m button: the current
speed is stored and maintained.
Vehicle speed can be increased by
depressing the accelerator pedal.
When the accelerator pedal is
released, the previously stored speed
is resumed.
The speed is saved until the ignition
is switched off.
To resume the saved speed, briefly
press the g button at a speed above
30 km/h.
Increase
With cruise control active, hold down
button m or briefly press it repeatedly:
speed is increased continuously or in
small increments.
When button m is released the
current speed is stored and
maintained.
Page 170 of 228

170
Vehicle care
No. Circuit
27
Heating, air conditioning
system, air quality sensor
28 –
29 Power steering
30 Engine electronics
31 Rear window wiper
32 Brake light switch
33 Headlight range adjustment,
light switch, clutch switch,
instrument, driver's door
module
34 Steering column control unit
35 Infotainment system
36 Cigarette lighter, front power
outlet Fuse assignments in
conjunction with load
compartment
fuse box version B
No. Circuit
1
ABS
2 ABS
3 Interior fan electronic climate
control
4 Interior fan heating and air
conditioning system
5 Radiator fan
6 Radiator fan
7 Windscreen washer system
8 Horn
9 Headlamp washer system
10 Emergency unlocking of central
locking system
11 –
12 – No. Circuit
13
Fog light
14 Windscreen wipers
15 Windscreen wipers
16 Control module electronics,
Open&Start system, ABS,
brake light switch
17 Diesel fuel filter heating
18 Starter
19 Transmission electronics
20 Air conditioning system
21 Engine electronics
22 Engine electronics
23 Adaptive Forward Lighting,
headlight range adjustment
24 Fuel pump
25 Transmission electronics
26 Engine electronics
27 Power steering
Page 171 of 228
Vehicle care
171
No. Circuit
28
Transmission electronics
29 Transmission electronics
30 Engine electronics
31 Adaptive Forward Lighting,
headlight range adjustment
32 Brake system, air conditioning
system, clutch switch
33 Adaptive Forward Lighting,
headlight range adjustment,
light switch
34 Steering column control unit
35 Infotainment system
36 Mobile telephone, digital radio,
infotainment system, display Load compartment fuse
box
The fuse box is behind a cover. Press
the locking tabs forward and remove
the cover.
Do not store any objects behind the
cover.
Depending on the equipment, there
are two different fuse boxes.
Fuse box version A
To replace a fuse, remove the
relevant protective cap. No. Circuit
1
Fog light
2 Rear power outlet
3 Load compartment power outlet
4 Reversing lamps
5 Rear power windows
6 Air conditioning system
7 Front power windows
8 Heated exterior mirrors
Page 186 of 228
186
Vehicle care
■ Wear eye protection and protective
clothing when handling a battery.
■ Use a booster battery with the same voltage (12 volts). Its capacity
(Ah) must not be much less than
that of the discharged battery.
■ Use jump leads with insulated terminals and a cross section of at
least 16 mm 2
(25 mm 2
for diesel
engines).
■ Do not disconnect the discharged battery from the vehicle.
■ Switch off all unnecessary electrical consumers.
■ Do not lean over the battery during jump starting.
■ Do not allow the terminals of one lead to touch those of the other
lead.
■ The vehicles must not come into contact with each other during the
jump starting process.
■ Apply the handbrake, transmission in neutral, automatic transmission
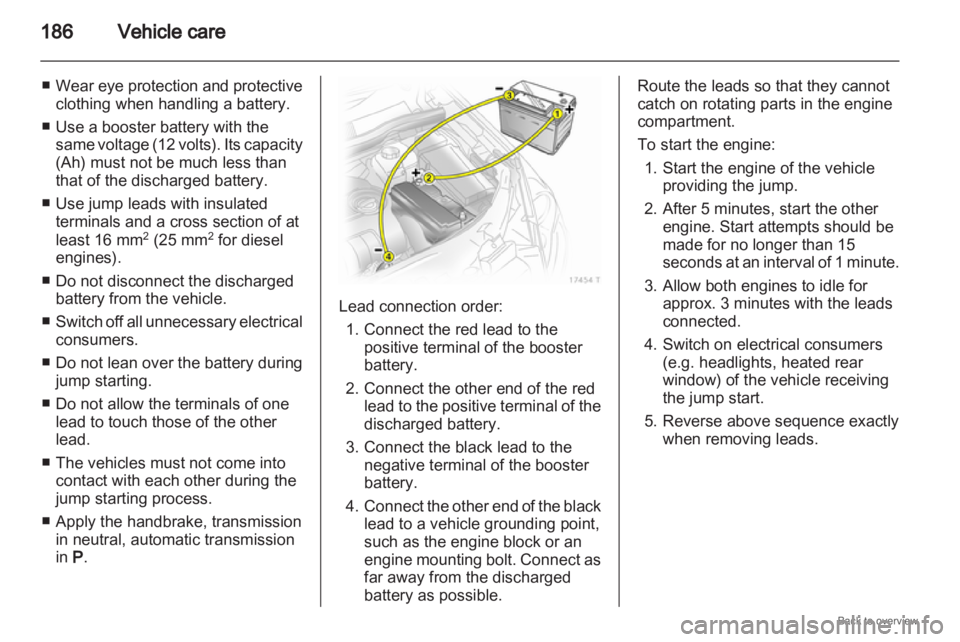
in P. Lead connection order:
1.
Connect the red lead to thepositive terminal of the booster
battery.
2. Connect the other end of the red lead to the positive terminal of the
discharged battery.
3. Connect the black lead to the negative terminal of the booster
battery.
4. Connect the other end of the black lead to a vehicle grounding point,
such as the engine block or an
engine mounting bolt. Connect as
far away from the discharged
battery as possible. Route the leads so that they cannot
catch on rotating parts in the engine
compartment.
To start the engine:
1.
Start the engine of the vehicleproviding the jump.
2. After 5 minutes, start the other engine. Start attempts should be
made for no longer than 15
seconds at an interval of 1 minute.
3. Allow both engines to idle for approx. 3 minutes with the leads
connected.
4. Switch on electrical consumers (e.g. headlights, heated rear
window) of the vehicle receiving
the jump start.
5. Reverse above sequence exactly when removing leads.
Page 187 of 228
Vehicle care
187
Towing
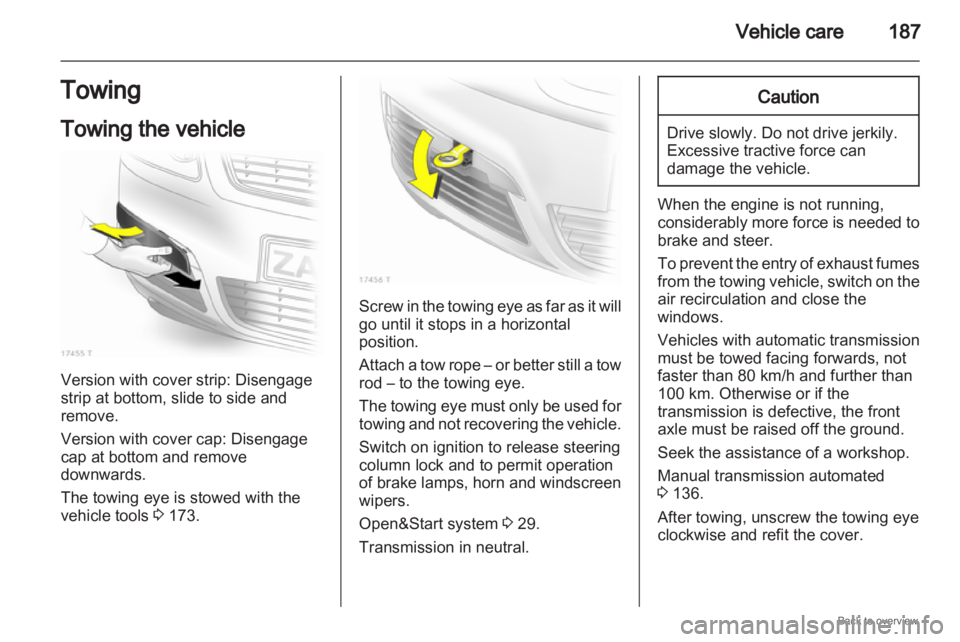
Towing the vehicle Version with cover strip: Disengage
strip at bottom, slide to side and
remove.
Version with cover cap: Disengage
cap at bottom and remove
downwards.
The towing eye is stowed with the
vehicle tools
3 173. Screw in the towing eye as far as it will
go until it stops in a horizontal
position.
Attach
a tow rope – or better still a tow
rod – to the towing eye.
The towing eye must only be used for
towing and not recovering the vehicle.
Switch on ignition to release steering
column lock and to permit operation
of brake lamps, horn and windscreen
wipers.
Open&Start system 3 29.
Transmission in neutral. Caution
Drive slowly. Do not drive jerkily.
Excessive tractive force can
damage the vehicle.
When the engine is not running,
considerably
more force is needed to
brake and steer.
To prevent the entry of exhaust fumes
from the towing vehicle, switch on the
air recirculation and close the
windows.
Vehicles with automatic transmission
must be towed facing forwards, not
faster than 80 km/h and further than
100 km. Otherwise or if the
transmission is defective, the front
axle must be raised off the ground.
Seek the assistance of a workshop.
Manual transmission automated
3 136.
After towing, unscrew the towing eye
clockwise and refit the cover.
Page 197 of 228

Service and maintenance
197Service operations by year
1)
km ( x 1000) 1) 1
30 2
60 3
90 4
120 5
150
Replace and drain fuel filter, diesel (grade EN 590) X X
Replace fuel filter, external, CNG (grade EN 228), Z 16 YNG Every 4 years / 60.000 km
Check and adjust parking brake (no weight on wheels); visually inspect wheel mounting
and suspension springs front and rear, brake lines, brake pressure hoses, fuel lines,
gas lines of CNG vehicles, level control and exhaust system X X
Check exterior of body/underbody corrosion protection and note any damage in the
Service Booklet X X X X X
+o
Visually inspect front and rear wheel brakes
2)
, if a tyre pressure monitoring system is
fitted, do not swap wheels over X X
Annual service check if annual mileage exceeds 20 000 km
Engine, transmission (AT, MT), inspect air-conditioning compressor for leaks
2) X X X X X
Visually inspect folding covers on steering, tie rods and axle drive X X X X X
Tie rod and supporting joint checking X X X X X
+ Change brake and clutch fluid automated manual transmission (MTA) Every 2 years
2)
In case of too high consumption / leakage, perform additional work with customer's agreement.
Page 202 of 228

202
Service and maintenanceService operations by year
3)
km ( x 1000) 1) 1
15 2
30 3
45 4
60 5
75
+o
Visually inspect front and rear wheel brakes
4)
, if a tyre pressure monitoring system is
fitted, do not swap wheels over X X
Annual service check if annual mileage exceeds 20 000 km
Engine, transmission (AT, MT), inspect air-conditioning compressor for leaks
4) X X X X X
Visually inspect folding covers on steering, tie rods and axle drive X X X X X
Tie rod and supporting joint checking X X X X X
+ Change brake and clutch fluid automated manual transmission (MTA) Every 2 years
Undo wheel fastening (take care if tyre pressure monitoring system is present) and
tighten to torque: 110 Nm.
The wheel bolt taper should be greased or oiled lightly during assembly.
Check tyre condition. Check/correct tyre pressure (including spare wheel)
With tyre repair system - check completeness and expiry date of kit. Replace sealant
bottle every 4 years. X X
+
Annual service check if annual mileage exceeds 20 000 km
Visually inspect first-aid kit, (presence in designated stowage compartment,
completeness and expiry date), lashing eyes and warning triangle Every 2 years
Check/correct headlamp adjustment (including auxiliary headlamps) X X
4)
In case of too high consumption / leakage, perform additional work with customer's agreement.
Page 212 of 228
212
Technical data
Performance
Engine Z16XEP Z16XER Z16XE1 Z16YNG Z18XER Z20LER
Top speed
2)
[km/h]
Manual transmission 177 185 177 165 197 225
Manual transmission automated –– – – 197 –
Automatic transmission – – – – – –
Engine Z20LEH Z22YH A17DTJ A17DTR Z19DTL Z19DT
Top speed
2)
[km/h]
Manual transmission 231 200 179 189 174 186
Manual transmission automated –– – –––
Automatic transmission – 190 – – – 182
2)
The maximum speed indicated is achievable at kerb weight (without driver) plus 200 kg payload. Optional equipment
could reduce the specified maximum speed of the vehicle.

![OPEL ZAFIRA 2009 Owners Manual 212
Technical data
Performance
Engine Z16XEP Z16XER Z16XE1 Z16YNG Z18XER Z20LER
Top speed
2)
[km/h]
Manual transmission 177 185 177 165 197 225
Manual transmission automated –– – – 197 –
Au](/manual-img/37/58241/w960_58241-211.png "OPEL ZAFIRA 2009 Owners Manual 212
Technical data
Performance
Engine Z16XEP Z16XER Z16XE1 Z16YNG Z18XER Z20LER
Top speed
2)
[km/h]
Manual transmission 177 185 177 165 197 225
Manual transmission automated –– – – 197 –
Au")