2009 OPEL ZAFIRA towing
[x] Cancel search: towingPage 53 of 228

Seats, restraints
53
Slide the seat rearward until it is
upright and audibly engages. Support
the top of the backrest with your hand.
Slide the second seat row to the
required position and engage.
Seat belts 3 55.
Stow the load compartment cover by
installing it behind the third row of
seats 3 69.
Stowing seats
Remove the load compartment cover
3 69.
Push the lever forward and slide the
second seat row forward to the mark.
Press the catch to release and slide
the head restraints of the third seat
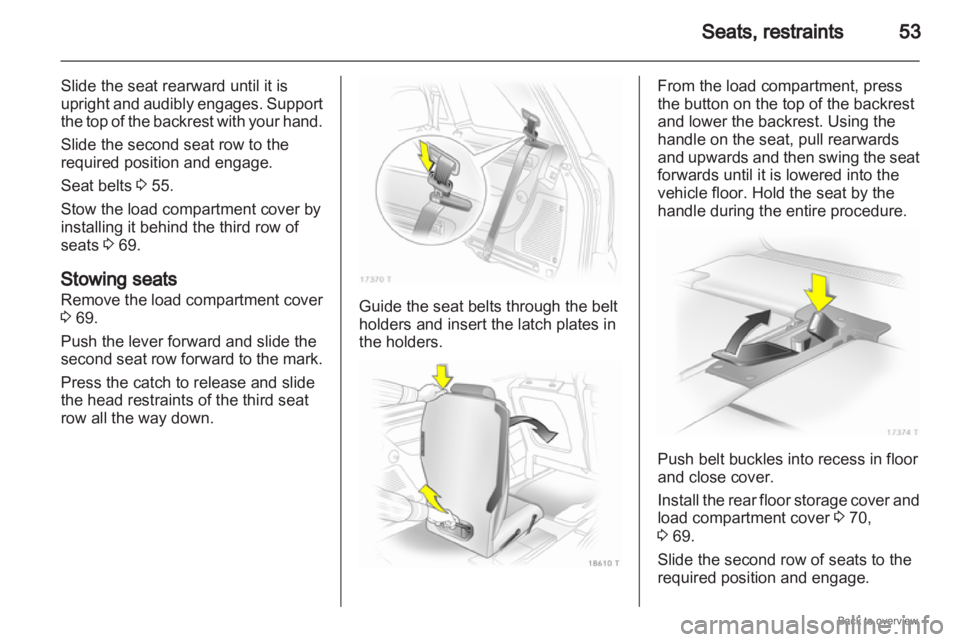
row all the way down. Guide the seat belts through the belt
holders and insert the latch plates in
the holders. From the load compartment, press
the button on the top of the backrest
and lower the backrest. Using the
handle on the seat, pull rearwards
and
upwards and then swing the seat
forwards until it is lowered into the
vehicle floor. Hold the seat by the
handle during the entire procedure. Push belt buckles into recess in floor
and close cover.
Install
the rear floor storage cover and
load compartment cover 3 70,
3 69.
Slide the second row of seats to the
required position and engage.
Page 70 of 228

70
Storage
Installation
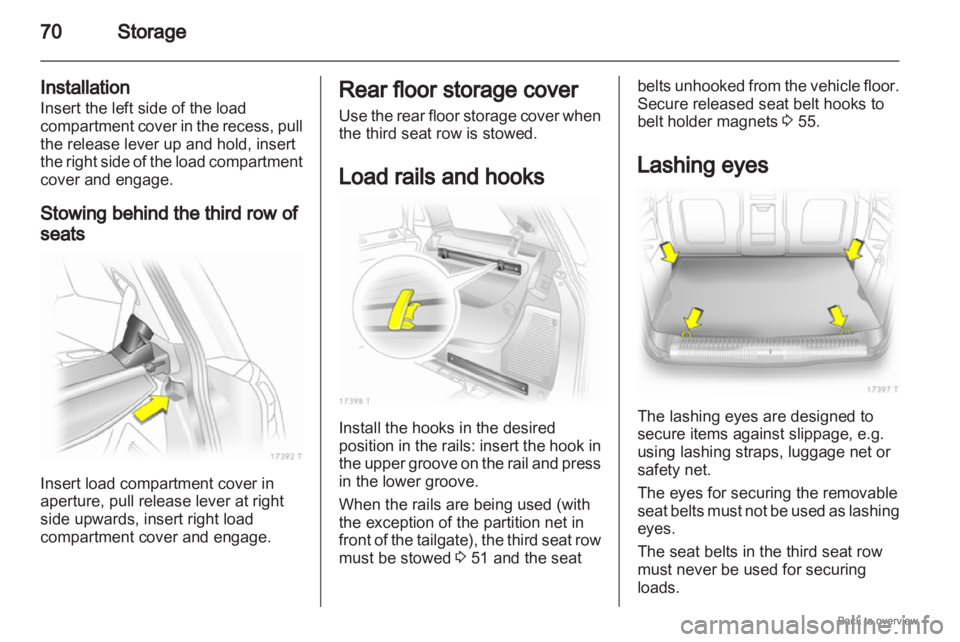
Insert the left side of the load
compartment cover in the recess, pull
the release lever up and hold, insert
the right side of the load compartment
cover and engage.
Stowing behind the third row of
seats Insert load compartment cover in
aperture, pull release lever at right
side upwards, insert right load
compartment cover and engage. Rear floor storage cover
Use
the rear floor storage cover when
the third seat row is stowed.
Load rails and hooks Install the hooks in the desired
position
in the rails: insert the hook in
the upper groove on the rail and press
in the lower groove.
When the rails are being used (with
the exception of the partition net in
front of the tailgate), the third seat row
must be stowed 3 51 and the seat belts unhooked from the vehicle floor.
Secure released seat belt hooks to
belt holder magnets
3 55.
Lashing eyes The lashing eyes are designed to
secure items against slippage, e.g.
using lashing straps, luggage net or
safety net.
The eyes for securing the removable
seat
belts must not be used as lashing
eyes.
The seat belts in the third seat row
must never be used for securing
loads.
Page 85 of 228

Instruments and controls
85
If the natural gas tanks are not
refuelled, the system must be
manually switched to petrol operation
before the engine is started up again.
This will prevent damage to the
catalytic converter (overheating
caused by irregular fuel supply).
If the selector switch is operated
several times within a short time
a switchover block is activated. The
engine remains in the current
operating mode. The block remains
active until the ignition is switched off.
A slight loss of power and torque can
be expected in petrol operation. You
must therefore adapt your driving
style (e.g. during overtaking
manoeuvres) and vehicle loads (e.g.
towing loads) accordingly.
Every six months run the petrol tank
down until control indicator Y
illuminates and refuel. This is
necessary to maintain fuel quality as
well as system function necessary for
petrol operation.
Fill the tank completely at regular
intervals to prevent corrosion in the
tank. Service display
The message InSP appears when it
is time for servicing. Further
information
3 192.
Control indicators
The control indicators described are
not present in all vehicles. The
description applies to all instrument
versions. When the ignition is
switched on, most control indicators
will
illuminate briefly as a functionality
test. The control indicator colours mean:
Red = Danger, important
reminder,
Yellow = Warning, information, fault,
Green = Confirmation of activation,
Blue = Confirmation of activation.
Page 112 of 228

112
Lighting
Rear fog lights The rear fog light can only be
switched on when both the ignition
and headlights or parking lights (with
front fog lights) are on.
Operated with the r button.
The vehicle rear fog light is
deactivated when towing. Parking lights
When parked, the parking lights on
one side can be activated:
1. Set light switch to 7 or AUTO .
2.
Ignition off.
3. Move turn signal lever all the way up (right parking lights) or down
(left parking lights).
Confirmed by a signal and the
corresponding turn signal control
indicator.
To switch it off, switch on the ignition
or move the turn signal lever in the
opposite direction. Reversing lights
The reversing lights come on when
the ignition is on and reverse gear is
selected.
Misted light covers
The
inside of the light covers may mist
up briefly in poor, wet and cold
weather conditions, in heavy rain or
after washing. The mist disappears
quickly by itself; to help, switch on the
headlights.
Page 127 of 228

Driving and operating
127
Driving and operating
Driving hints ............................... 127
Starting and operating ...............127
Engine exhaust .......................... 129
Automatic transmission
.............. 131
Manual transmission ..................136
Manual transmission
automated .................................. 136
Brakes ........................................ 140
Ride control systems .................142
Cruise control ............................. 144
Object detection systems ........... 145
Fuel ............................................ 146
Towing ....................................... 149 Driving hints
Control of the vehicle
Never coast with engine not
running
Many
systems will not function in this
situation (e.g. brake servo unit, power
steering). Driving in this manner is
a danger to yourself and others.
Pedals
To ensure the pedal travel is
uninhibited, there must be no mats in
the area of the pedals. Starting and operating
New vehicle running-in
Do not brake unnecessarily hard for
the first few journeys.
During the first drive, smoke may
occur because of wax and oil
evaporating off the exhaust system.
Park the vehicle in the open for
a while after the first drive and avoid
inhaling the fumes.
Fuel
and engine oil consumption may
be higher during the running-in
period.
Page 130 of 228

130
Driving and operating
consumption may be higher during
this period. The emission of smells
and smoke during this process is
normal. Under certain driving conditions, e.g.
short distances, the system cannot
clean itself automatically.
If the filter requires cleaning and
previous driving conditions did not
enable automatic cleaning, control
indicator
!
flashes. Continue driving,
keeping engine speed above 2000
revolutions per minute. Shift down if
necessary. Diesel particle filter
cleaning is then started. Stopping the journey or switching off
the engine during cleaning is not
recommended. Cleaning takes place
quickest at high engine speeds and
loads. The control indicator ! extinguishes
as soon as the self-cleaning
operation is complete.
Catalytic converter
The catalytic converter reduces the
amount of harmful substances in the
exhaust gas.
Caution
Fuel grades other than those listed
on pages
3 146, 3 209 could
damage the catalytic converter or
electronic components.
Unburnt petrol will overheat and
damage the catalytic converter.
Therefore avoid excessive use of
the starter, running the fuel tank
dry and starting the engine by
pushing or towing. In the event of misfiring, uneven
engine
running, a reduction in engine
performance or other unusual
problems, have the cause of the fault
rectified by a workshop as soon as
possible. In an emergency, driving
Page 140 of 228

140
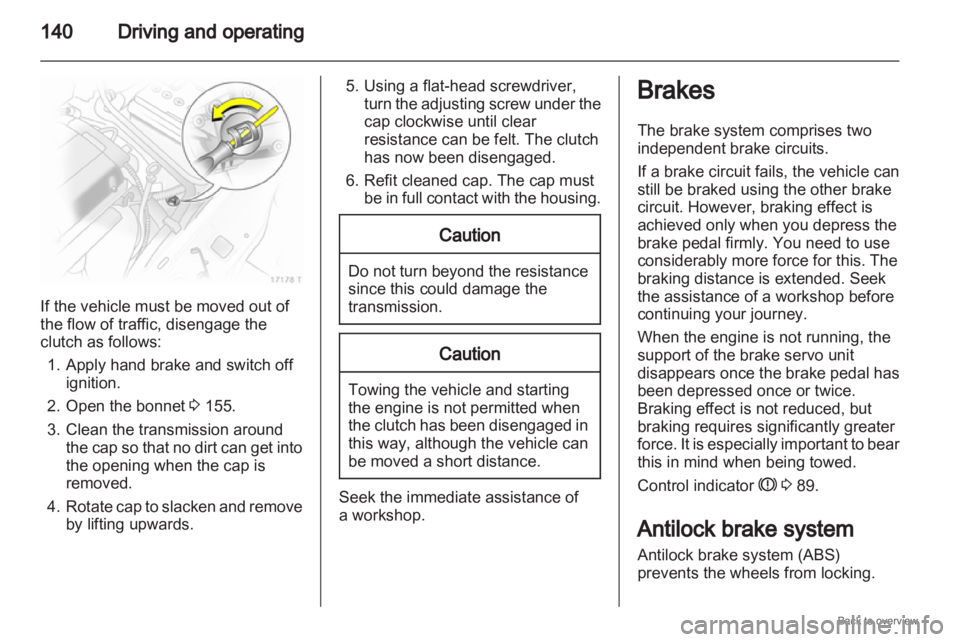
Driving and operatingIf the vehicle must be moved out of
the flow of traffic, disengage the
clutch as follows:
1.
Apply hand brake and switch offignition.
2. Open the bonnet 3 155.
3. Clean the transmission around the cap so that no dirt can get into
the opening when the cap is
removed.
4. Rotate cap to slacken and remove by lifting upwards. 5. Using a flat-head screwdriver,
turn
the adjusting screw under the
cap clockwise until clear
resistance can be felt. The clutch
has now been disengaged.
6. Refit cleaned cap. The cap must be in full contact with the housing. Caution
Do not turn beyond the resistance
since this could damage the
transmission.
Caution
Towing the vehicle and starting
the engine is not permitted when
the
clutch has been disengaged in
this way, although the vehicle can
be moved a short distance. Seek the immediate assistance of
a workshop. Brakes
The brake system comprises two
independent brake circuits.
If a brake circuit fails, the vehicle can
still be braked using the other brake
circuit. However, braking effect is
achieved only when you depress the
brake pedal firmly. You need to use
considerably more force for this. The
braking distance is extended. Seek
the assistance of a workshop before
continuing your journey.
When the engine is not running, the
support of the brake servo unit
disappears
once the brake pedal has
been depressed once or twice.
Braking effect is not reduced, but
braking requires significantly greater
force. It is especially important to bear
this in mind when being towed.
Control indicator R 3 89.
Antilock brake system
Antilock brake system (ABS)
prevents the wheels from locking.
Page 146 of 228

146
Driving and operating
The system can also be activated at
low speed by pressing the r button.
An obstacle is indicated by buzzers.
The interval between the buzzers
becomes shorter as the vehicle gets
closer to the obstacle. When the
distance is less than 30 cm, the
buzzer is continuous. 9
Warning Under certain circumstances,
various reflective surfaces on
objects or clothing as well as
external
noise sources may cause
the system to fail to detect
obstacles. Deactivation
Deactivate the system by pressing
the r button.
The system automatically switches
itself off when the vehicle is driven
above a certain speed.
Towing equipment
The system automatically considers
a factory-fitted towing equipment. The rear parking sensors are
deactivated when towing.
Fuel
Fuel for petrol engines
Only
use unleaded fuel that complies
with DIN EN 228.
Fuels with ethanol content greater
than 5% may only be used if the
vehicle has been specifically
developed and approved for these
fuels.
Use fuel with the recommended
octane rating 3 209. Use of fuel with
too low an octane rating can reduce
engine power and torque and slightly
increases fuel consumption. Caution
Use of fuel with too low an octane
rating could lead to uncontrolled
combustion and engine damage.
Fuel for diesel engines
Only use diesel fuel that complies
with
DIN EN 590. The fuel must have
low sulphur content (max. 50 ppm).