2009 OPEL ZAFIRA run flat
[x] Cancel search: run flatPage 90 of 228

90
Instruments and controls
It illuminates for a few seconds when
the ignition is switched on.
Flashing during driving
The system has kicked in. Engine
output may be reduced and the
vehicle may be braked automatically
to a small degree 3 142.
Illuminates while driving
The system is switched off or a fault
is present. Continued driving is
possible. Driving stability, however,
may deteriorate depending on road
surface conditions.
Have the cause of the fault remedied
by a workshop.
ESP® Plus
3 142.
Engine coolant
temperature
W illuminates red.
Illuminates when the engine is
running
Stop, switch off engine. Caution
Coolant temperature too high.
Check coolant level immediately
3 157.
If there is sufficient coolant, consult
a workshop.
Preheating and diesel
particle filter
!
illuminates or flashes yellow.
Illuminated
Preheating activated. Only activates
when outside temperature is low.
Flashes
( in
vehicles fitted with a diesel particle
filter).
Control indicator ! flashes if the filter
requires cleaning and previous
driving conditions did not permit
automatic cleaning. Continue driving
and if possible do not allow engine
speed to drop below 2000 rpm. The control indicator
! goes off as
soon
as the self-cleaning operation is
complete.
Diesel particle filter 3 129.
Deflation detection system
and tyre pressure
monitoring system
w illuminates or flashes red or yellow.
Control indicator lights red
Tyre pressure loss. Stop immediately
and check tyre pressure. A maximum
speed of 80 km/h is permitted for run-
flat tyres 3 174.
Control indicator lights yellow
Fault in system or tyre without
pressure sensor mounted (e. g. spare
wheel). Consult a workshop.
Flashes
Flashes three times to indicate
system initialisation.
Deflation detection system 3 177,
tyre pressure monitoring system
3 176.
Page 102 of 228

102
Instruments and controls
Reduce speed and check tyre
pressure at the next opportunity. Tyre
pressure monitoring system 3 176.
Check tyre pressure 3 175, 3 220.If there is a considerable loss of
pressure, a corresponding message
appears indicating the tyre.
Steer out of flow of traffic as quickly
as possible without endangering
other vehicles. Stop and check the
tyres. Mount the spare wheel
3 182.
If run-flat tyres are fitted, maximum
speed is 80 km/h. Information
3 174. Tyre pressure monitoring
system 3 176. Washer fluid level
Low washer fluid level. Top up
washer fluid
3 158. Trip computer
Trip computer in Board-
Info-Display
Access the data by pressing the
BC
button on the infotainment system or
the
left adjuster wheel on the steering
wheel.
Some information appears in the
display in an abbreviated form.
Once an audio function has been
selected, the lower row of the trip
computer function is displayed
furthermore.
Page 140 of 228

140
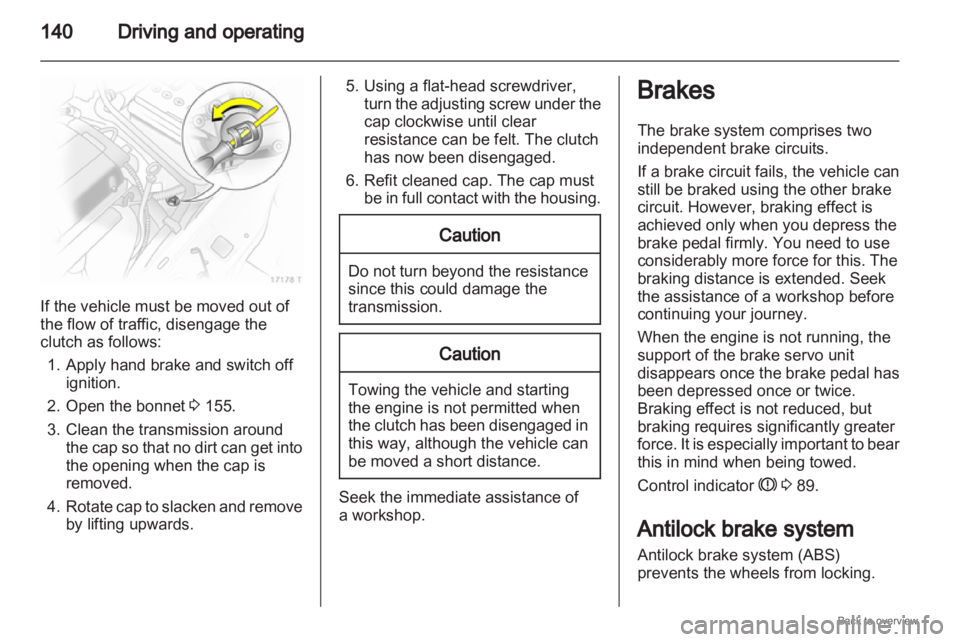
Driving and operatingIf the vehicle must be moved out of
the flow of traffic, disengage the
clutch as follows:
1.
Apply hand brake and switch offignition.
2. Open the bonnet 3 155.
3. Clean the transmission around the cap so that no dirt can get into
the opening when the cap is
removed.
4. Rotate cap to slacken and remove by lifting upwards. 5. Using a flat-head screwdriver,
turn
the adjusting screw under the
cap clockwise until clear
resistance can be felt. The clutch
has now been disengaged.
6. Refit cleaned cap. The cap must be in full contact with the housing. Caution
Do not turn beyond the resistance
since this could damage the
transmission.
Caution
Towing the vehicle and starting
the engine is not permitted when
the
clutch has been disengaged in
this way, although the vehicle can
be moved a short distance. Seek the immediate assistance of
a workshop. Brakes
The brake system comprises two
independent brake circuits.
If a brake circuit fails, the vehicle can
still be braked using the other brake
circuit. However, braking effect is
achieved only when you depress the
brake pedal firmly. You need to use
considerably more force for this. The
braking distance is extended. Seek
the assistance of a workshop before
continuing your journey.
When the engine is not running, the
support of the brake servo unit
disappears
once the brake pedal has
been depressed once or twice.
Braking effect is not reduced, but
braking requires significantly greater
force. It is especially important to bear
this in mind when being towed.
Control indicator R 3 89.
Antilock brake system
Antilock brake system (ABS)
prevents the wheels from locking.
Page 143 of 228

Driving and operating
143
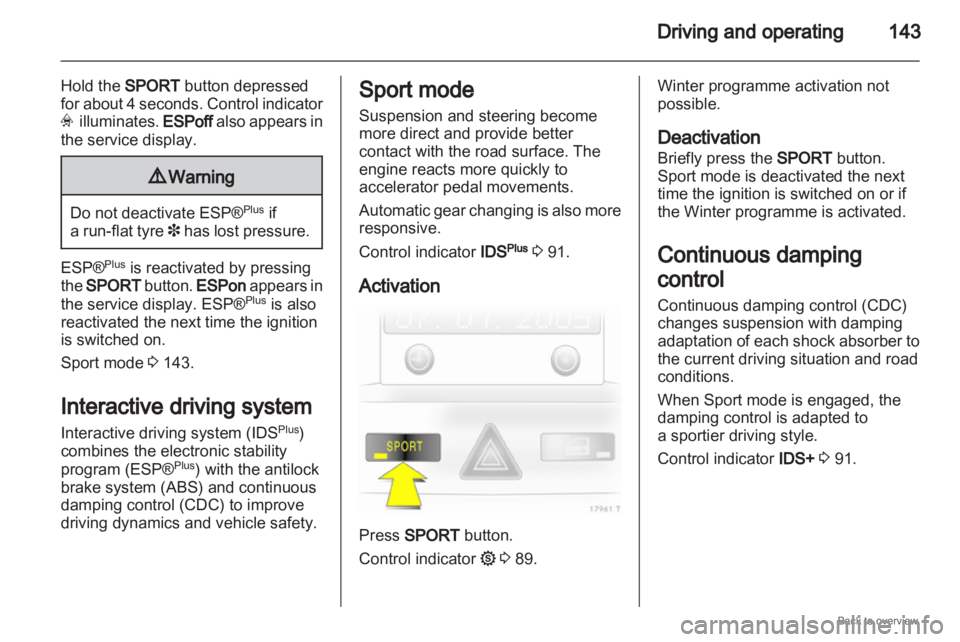
Hold the SPORT button depressed
for about 4 seconds. Control indicator
v illuminates. ESPoff also appears in
the service display. 9
Warning Do not deactivate ESP®
Plus
if
a
run-flat tyre 3 has lost pressure.ESP®
Plus
is reactivated by pressing
the SPORT
button. ESPon appears in
the service display. ESP® Plus
is also
reactivated the next time the ignition
is switched on.
Sport mode 3 143.
Interactive driving system
Interactive driving system (IDS Plus
)
combines the electronic stability
program (ESP® Plus
) with the antilock
brake system (ABS) and continuous
damping control (CDC) to improve
driving dynamics and vehicle safety. Sport mode
Suspension and steering become
more direct and provide better
contact with the road surface. The
engine reacts more quickly to
accelerator pedal movements.
Automatic
gear changing is also more
responsive.
Control indicator IDSPlus
3 91.
Activation Press SPORT button.
Control indicator
1 3 89. Winter programme activation not
possible.
Deactivation
Briefly press the SPORT button.
Sport mode is deactivated the next
time the ignition is switched on or if
the Winter programme is activated.
Continuous damping
control
Continuous damping control (CDC)
changes suspension with damping
adaptation
of each shock absorber to
the current driving situation and road
conditions.
When Sport mode is engaged, the
damping control is adapted to
a sportier driving style.
Control indicator IDS+ 3 91.
Page 174 of 228

174
Vehicle careThe jack and the vehicle tools are in
a pouch, secured to the stowage
compartment in the floor of the load
compartment with a rubber strap.
To close the lid, insert the lugs on its
front rim into the recesses and lock
into place. Wheels and tyres
Tyre condition, wheel condition
Drive over edges slowly and at right
angles if possible. Driving over sharp
edges can cause tyre and wheel
damage.
Do not trap tyres on the kerb
when parking.
Regularly check the wheels for
damage. Seek the assistance of
a workshop in the event of damage or
unusual wear.
Tyres
Tyres of size 225/45 R 17 are only
permitted if the vehicle is equipped
with electronic stability program.
Winter tyres
Winter tyres improve driving safety at
temperatures below 7 °C.
Tyres of size 225/40 R 18, 225/40 ZR
18 and 235/35 R 19 must not be used
as winter tyres. Winter tyres may only be used on the
Zafira OPC on special alloy wheels
approved by Opel.
Run-flat winter tyres may only be
used on factory approved alloy
wheels.
In accordance with country-specific
regulations, affix the speed sticker in
the driver's field of view.
Run-flat tyres
Run-flat tyres have reinforced, self-
supporting sidewalls, which ensure
that the tyres always have a certain
amount of driveability, even when
there is no pressure.
Run-flat tyres are only permitted on
vehicles with electronic stability
program
and tyre pressure monitoring
system or deflation detection system. Caution
Check tyre pressures regularly
even if run-flat tyres are fitted.
Page 175 of 228

Vehicle care
175
Depending on tyre manufacturer, run-
flat tyres can be identified from
a marking on the tyre wall. E.g. ROF
= RunonFlat for Goodyear or SSR
= Self Supporting Runflat Tyre for
Continental.
Use of run-flat tyres is only permitted
in combination with factory approved
alloy wheels.
Do not use a tyre repair kit.
The ECO tyre pressure must not be
used.
Run-flat tyres must not be combined
with standard tyres.
If converting to standard tyres, note
that the vehicle is not equipped with
a spare wheel or tyre repair kit.
Driving with a damaged tyre
A
loss in tyre pressure is indicated by
the tyre pressure monitoring system
or the deflation detection system.
If a tyre has no pressure, continued
driving is possible
■ at a speed of max. 80 km/h
■ up to a distance of 80 km 9
Warning The vehicle will be more difficult to
steer and handle. Braking
distance will be longer.
Adapt driving style and speed to
the changed conditions.
Tyre designations
E.g. 195/65 R 15 91 H
195
=Tyre width, mm
65 =Cross-section ratio (tyre
height to tyre width), %
R = Belt type: Radial
RF =Type: RunFlat
15 =Wheel diameter, inches
91 =Load index e.g. 91 is
equivalent to 618 kg
H = Speed code letter
Speed code letter:
Q = up to 160 km/h
S = up to 180 km/h
T = up to 190 km/h
H = up to 210 km/h
V = up to 240 km/h
W = up to 270 km/h Tyre pressure
Check the pressure of cold tyres at
least every 14 days and before any
long journey. Do not forget the spare
wheel. This also applies to vehicles
with tyre pressure monitoring.
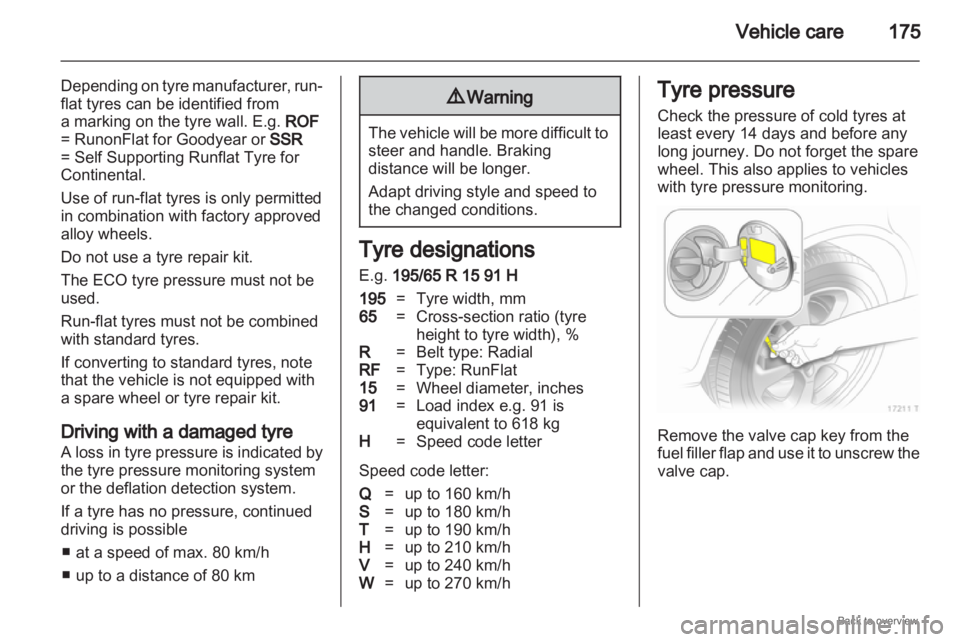
Remove the valve cap key from the
fuel
filler flap and use it to unscrew the
valve cap.
Page 176 of 228

176
Vehicle careOn vehicles with tyre pressure
monitoring
system, screw the adapter
to the valve.
Tyre pressure 3 220 and on the label
on the inside of the fuel filler flap.
The tyre pressure data refer to cold
tyres. It applies to summer and winter
tyres.
Always inflate the spare wheel to the
pressure specified for full load.
The ECO tyre pressure serves to
achieve the smallest amount of fuel
consumption possible. It must not be
used with run-flat tyres. Incorrect tyre pressures will impair
safety, vehicle handling, comfort and
fuel economy and will increase tyre
wear.
9
Warning If the pressure is too low, this can
result in considerable tyre warm-
up
and internal damage, leading to
tread separation and even to tyre
blow-out at high speeds. Tyre pressure monitoring
system
The tyre pressure monitoring system
continually checks the pressure of all
four wheels when vehicle speed
exceeds a certain limit.
All wheels must be equipped with
pressure sensors and the tyres must
have the prescribed pressure.
Otherwise, the tyre pressure will be
monitored by the deflation detection
system 3 177.
The current tyre pressures can be
shown in the Info-Display
3 107. Vehicle messages, tyre pressure
3 101.
Control indicator
w 3 90.
If a complete set of wheels without
sensors is mounted (e.g. four winter
tyres), no error message will be
displayed. The tyre pressure
monitoring system is not operational.
Retrofitting of sensors is possible.
The use of commercially available
liquid tyre repair kits can impair the
function of the system. Factory
approved systems can be used.
External high-power radio equipment
could disrupt the tyre pressure
monitoring system.
Page 180 of 228

180
Vehicle care
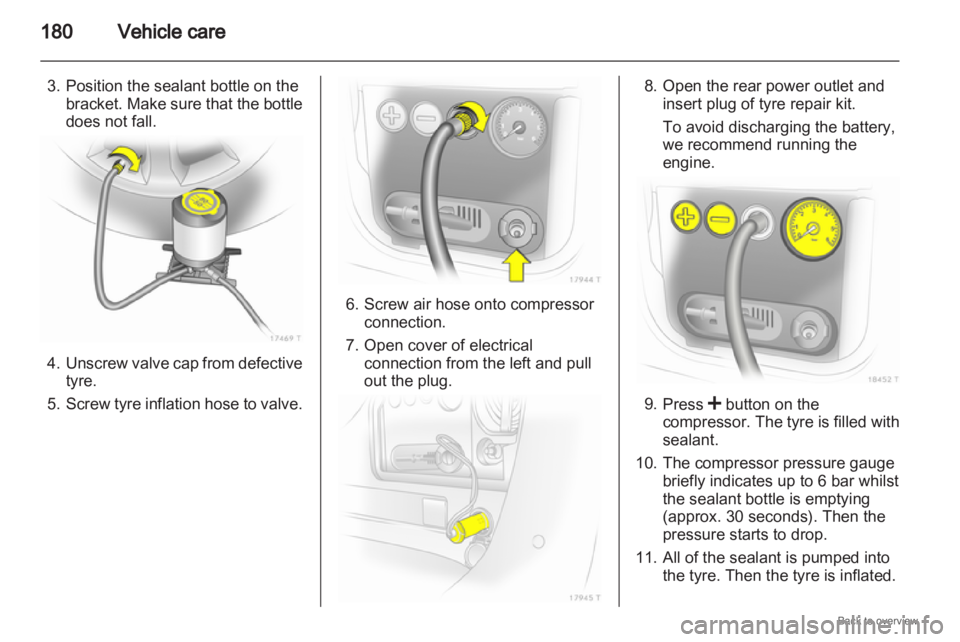
3. Position the sealant bottle on the bracket. Make sure that the bottle
does not fall. 4. Unscrew
valve cap from defective
tyre.
5. Screw tyre inflation hose to valve. 6. Screw air hose onto compressor
connection.
7.
Open cover of electricalconnection from the left and pull
out the plug. 8. Open the rear power outlet and
insert plug of tyre repair kit.
To avoid discharging the battery,
we recommend running the
engine. 9.
Press < button on the
compressor.
The tyre is filled with
sealant.
10. The compressor pressure gauge briefly indicates up to 6 bar whilst
the sealant bottle is emptying
(approx. 30 seconds). Then the
pressure starts to drop.
11. All of the sealant is pumped into the tyre. Then the tyre is inflated.