Page 7 of 228
In brief 7
Seat adjustment
Seat positioning Pull handle, slide seat, release
handle.
Seat adjustment 3 46, Seat position
3 46. Seat backrests
Turn handwheel. Do not lean on seat
when adjusting.
Seat adjustment 3 46, Seat position
3 46, Folding front passenger seat
backrest 3 48. Seat height
Lever pumping motion
up: = higher
down: = lower
Seats 3 46, Seat position 3 46.
Page 8 of 228
8
In brief
Seat inclination Pull lever, adjust inclination by
shifting body weight. Release lever
and audibly engage seat in position.
Seats 3 46, Seat position 3 46. Head restraint adjustment
Press release button, adjust height,
engage.
Head restraints
3 44. Seat belt
Pull out the seat belt and engage in
belt
buckle. The seat belt must not be
twisted and must fit close against the
body. The backrest must not be tilted
back too far (maximum approx. 25 °).
To release belt, press red button on
belt buckle.
Seat belts 3 54, Airbag system
3 57, Seat position 3 46.
Page 44 of 228
44
Seats, restraints
Seats, restraints
Head restraints ............................ 44
Front seats ................................... 46
Rear seats ................................... 49
Seat belts ..................................... 54
Airbag system .............................. 57
Child restraints ............................. 62 Head restraints
Position
9
Warning Only drive with the head restraint
set to the proper position.
The middle of the head restraint
should be at eye level. If this is not
possible for extremely tall persons,
set to highest position, and set to
lowest position for small persons. Adjustment
Head restraints with release button
Press the button, adjust height and
engage.
Page 46 of 228

46
Seats, restraints
Front seats
Seat position 9
Warning Only drive with the seat correctly
adjusted.
■ Sit with your buttocks as far back
against the backrest as possible.
Adjust the distance between the
seat and the pedals so that your
legs are slightly angled when tromping the pedals. Slide the
passenger seat as far back as
possible.
■
Sit with your shoulders as far back against the backrest as possible.
Set the backrest rake so that you
can easily reach the steering wheel
with your arms slightly bent.
Maintain contact between your
shoulders and the backrest when
turning the steering wheel. Do not
angle the backrest too far back. We
recommend a maximum rake of
approx. 25 °.
■ Adjust the steering wheel 3 77.
■ Set seat height high enough to have a clear field of vision on all
sides and of all display instruments.
There should be at least one hand
of clearance between your head
and the headlining. Your thighs
should rest lightly on the seat
without pressing into it.
■ Adjust the head restraint 3 44.
■ Adjust the height of the seat belt 3 55. ■ Adjust the thigh support so that
there is a space about two fingers
wide between the edge of the seat
and the hollow of the knee.
■ Adjust
the lumbar support so that it
supports the natural shape of the
spine.
Seat adjustment 9
Warning Never adjust seats while driving as
they could move uncontrollably.
Seat positioning
Page 47 of 228
Seats, restraints
47
Pull handle, slide seat, release
handle.
Seat backrests Turn handwheel. Do not lean on seat
when adjusting. Seat height
Lever pumping motion
up = higher
down = lower Seat inclination
Pull lever, adjust inclination by
shifting body weight. Release lever
and audibly engage seat in position.
Page 55 of 228

Seats, restraints
55
Triggered belt tensioners must be
replaced by a workshop. Belt
tensioners can only be triggered
once. Note
Do not affix or install accessories or
other objects that may interfere with
the operation of the belt tensioners.
Do not make any modifications to
belt tensioner components as this
will invalidate the vehicle type
approval.
Three-point seat belt
Fitting Withdraw belt from reel, guide it
untwisted across the body and
engage the latch plate in the buckle.
Tension the lap belt regularly whilst
driving by tugging the shoulder belt.
Loose or bulky clothing prevents the
belt from fitting snugly. Do not place
objects such as handbags or mobile
phones between the belt and your
body.
9
Warning The belt must not rest against hard
or fragile objects in the pockets of
your clothing. Height adjustment
1. Pull belt out slightly.
2.
Press button.
3. Adjust height and engage.
Adjust the height so that the belt lies
across the shoulder. It must not lie
across the throat or upper arm.
Do not adjust while driving.
Page 63 of 228

Seats, restraints
63
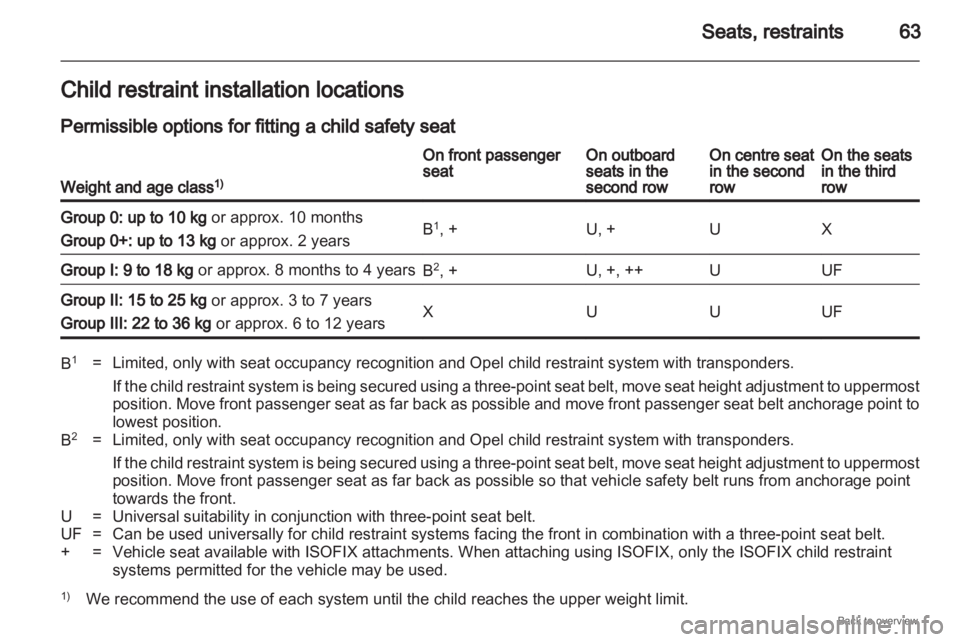
Child restraint installation locations
Permissible options for fitting a child safety seat
Weight and age class 1) On front passenger
seat On outboard
seats in the
second row On centre seat
in the second
row On the seats
in the third
row
Group 0: up to 10 kg or approx. 10 months
Group 0+: up to 13 kg or approx. 2 years
B
1
, + U, + U X
Group I: 9 to 18 kg or approx. 8 months to 4 years
B
2
, + U, +, ++ U UF
Group II: 15 to 25 kg or approx. 3 to 7 years
Group III: 22 to 36 kg or approx. 6 to 12 years
X U U UF
B
1
= Limited, only with seat occupancy recognition and Opel child restraint system with transponders.
If the child restraint system is being secured using a three-point seat belt, move seat height adjustment to uppermost
position. Move front passenger seat as far back as possible and move front passenger seat belt anchorage point to
lowest position.
B 2
= Limited, only with seat occupancy recognition and Opel child restraint system with transponders.
If
the child restraint system is being secured using a three-point seat belt, move seat height adjustment to uppermost
position. Move front passenger seat as far back as possible so that vehicle safety belt runs from anchorage point
towards the front.
U = Universal suitability in conjunction with three-point seat belt.
UF = Can be used universally for child restraint systems facing the front in combination with a three-point seat belt.
+ = Vehicle seat available with ISOFIX attachments. When attaching using ISOFIX, only the ISOFIX child restraint systems permitted for the vehicle may be used.
1) We recommend the use of each system until the child reaches the upper weight limit.
Page 175 of 228

Vehicle care
175
Depending on tyre manufacturer, run-
flat tyres can be identified from
a marking on the tyre wall. E.g. ROF
= RunonFlat for Goodyear or SSR
= Self Supporting Runflat Tyre for
Continental.
Use of run-flat tyres is only permitted
in combination with factory approved
alloy wheels.
Do not use a tyre repair kit.
The ECO tyre pressure must not be
used.
Run-flat tyres must not be combined
with standard tyres.
If converting to standard tyres, note
that the vehicle is not equipped with
a spare wheel or tyre repair kit.
Driving with a damaged tyre
A
loss in tyre pressure is indicated by
the tyre pressure monitoring system
or the deflation detection system.
If a tyre has no pressure, continued
driving is possible
■ at a speed of max. 80 km/h
■ up to a distance of 80 km 9
Warning The vehicle will be more difficult to
steer and handle. Braking
distance will be longer.
Adapt driving style and speed to
the changed conditions.
Tyre designations
E.g. 195/65 R 15 91 H
195
=Tyre width, mm
65 =Cross-section ratio (tyre
height to tyre width), %
R = Belt type: Radial
RF =Type: RunFlat
15 =Wheel diameter, inches
91 =Load index e.g. 91 is
equivalent to 618 kg
H = Speed code letter
Speed code letter:
Q = up to 160 km/h
S = up to 180 km/h
T = up to 190 km/h
H = up to 210 km/h
V = up to 240 km/h
W = up to 270 km/h Tyre pressure
Check the pressure of cold tyres at
least every 14 days and before any
long journey. Do not forget the spare
wheel. This also applies to vehicles
with tyre pressure monitoring.
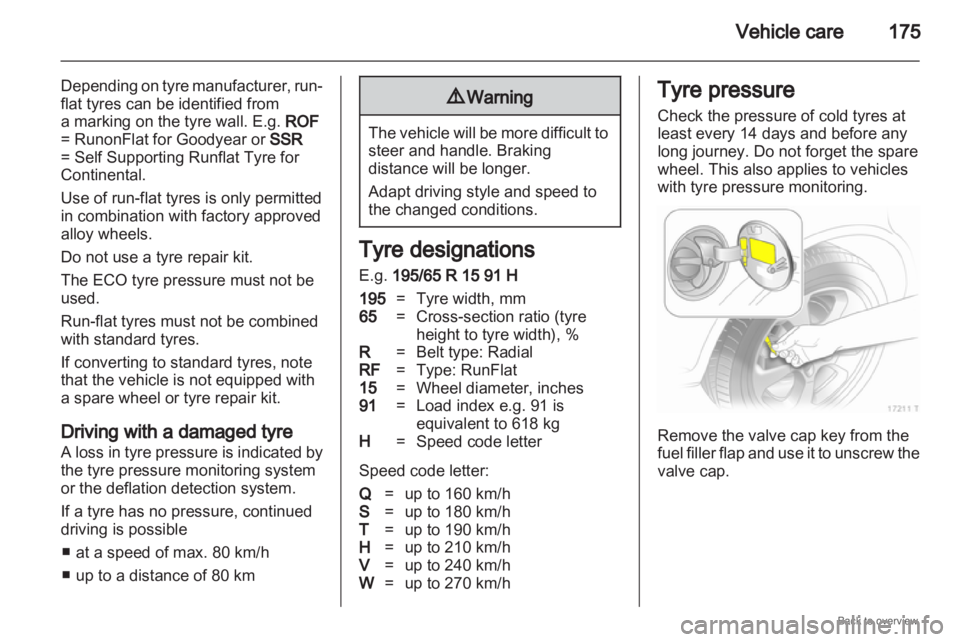
Remove the valve cap key from the
fuel
filler flap and use it to unscrew the
valve cap.