2009 NISSAN TIIDA glove box
[x] Cancel search: glove boxPage 460 of 4331
Trouble Diagnosis Flow Chart " .
Configuration INFOID:0000000004306841
DESCRIPTION
CONFIGURATION has three functions as follows:
• READ CONFIGURATION is the function to read (e xtract) vehicle configuration of current BCM.
• WRITE CONFIGURATION-Manual selection is the functi on to select and write vehicle configuration on BCM
manually.
• WRITE CONFIGURATION-Config file is the function to write vehicle configuration with the data extracted
from current BCM.
• For READ CONFIGURATION and WRIT E CONFIGURATION-Config file, refer to CONSULT-III Operation
Manual.
• For WRITE CONFIGURATION-Manual selection using the following flow chart, identify the correct model
and configuration list. Confirm and/or change setting value for each item according to the configuration list.
Depending on CONSULT-III software version being used, some or all of the write configuration items shown
in the following configuration lists may be displayed. If an item does not appear on the CONSULT-III WRITE
CONFIGURATION-Manual selection screen(s), then it is an auto setting item and it cannot be manually set
or changed.
NOTE:
Confirm vehicle model on IDENTI FICATION PLATE. Refer to GI-43, " Model Variation " .
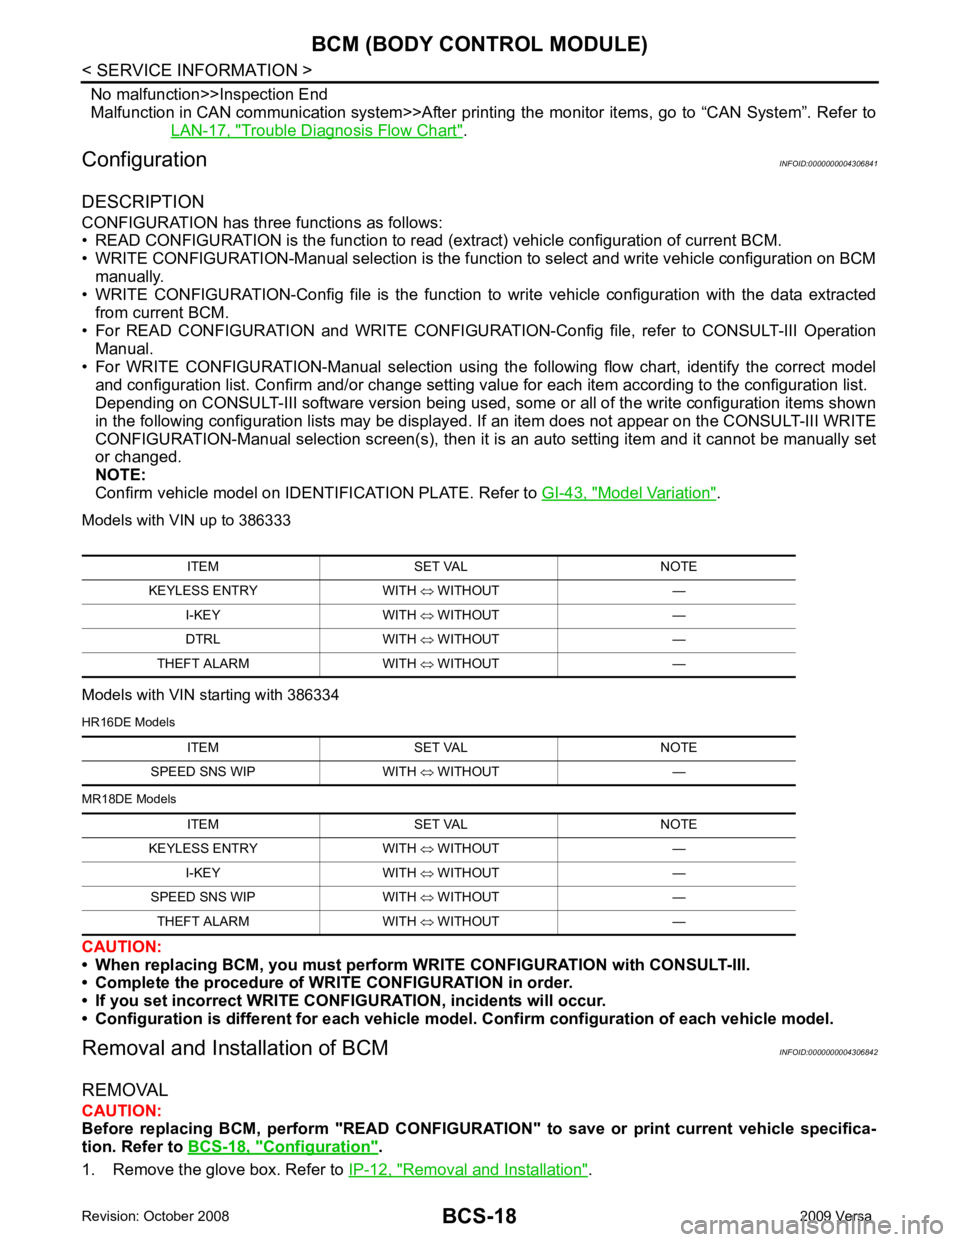
Models with VIN up to 386333
Models with VIN starting with 386334
HR16DE Models
MR18DE Models
CAUTION:
• When replacing BCM, you must perform WRITE CONFIGURATION with CONSULT-III.
• Complete the procedure of WRITE CONFIGURATION in order.
• If you set incorrect WRITE CONF IGURATION, incidents will occur.
• Configuration is different for each vehicle mode l. Confirm configuration of each vehicle model.
Removal and Installation of BCM INFOID:0000000004306842
REMOVAL
CAUTION:
Before replacing BCM, perform "READ CONFIGURATI ON" to save or print current vehicle specifica-
tion. Refer to BCS-18, " Configuration " .
1. Remove the glove box. Refer to IP-12, " Removal and Installation " .
ITEM SET VAL NOTE
KEYLESS ENTRY WITH ⇔ WITHOUT —
I-KEY WITH ⇔ WITHOUT —
DTRL WITH ⇔ WITHOUT —
THEFT ALARM WITH ⇔ WITHOUT — ITEM SET VAL NOTE
SPEED SNS WIP WITH ⇔ WITHOUT —
ITEM SET VAL NOTE
KEYLESS ENTRY WITH ⇔ WITHOUT —
I-KEY WITH ⇔ WITHOUT —
SPEED SNS WIP WITH ⇔ WITHOUT —
THEFT ALARM WITH ⇔ WITHOUT —
Page 546 of 4331
BL
N
O P
• When registering an additional keyfob, the existing ID codes
in memory may or may not be erased. If five ID
codes are stored in memory, when an additional code is registered, only the oldest code is erased. If less
than five ID codes are stored in memory, when an additional ID code is registered, the new ID code is added
and no ID codes are erased.
• If you need to activate more than two additional new keyfobs, repeat the procedure “Additional ID code
entry” for each new keyfob.
• Entry of maximum five ID codes is allowed. When mo re than five ID codes are entered, the oldest ID code
will be erased.
• Even if same ID code that is already in the memory is input, the same ID code can be entered. The code is
counted as an additional code.
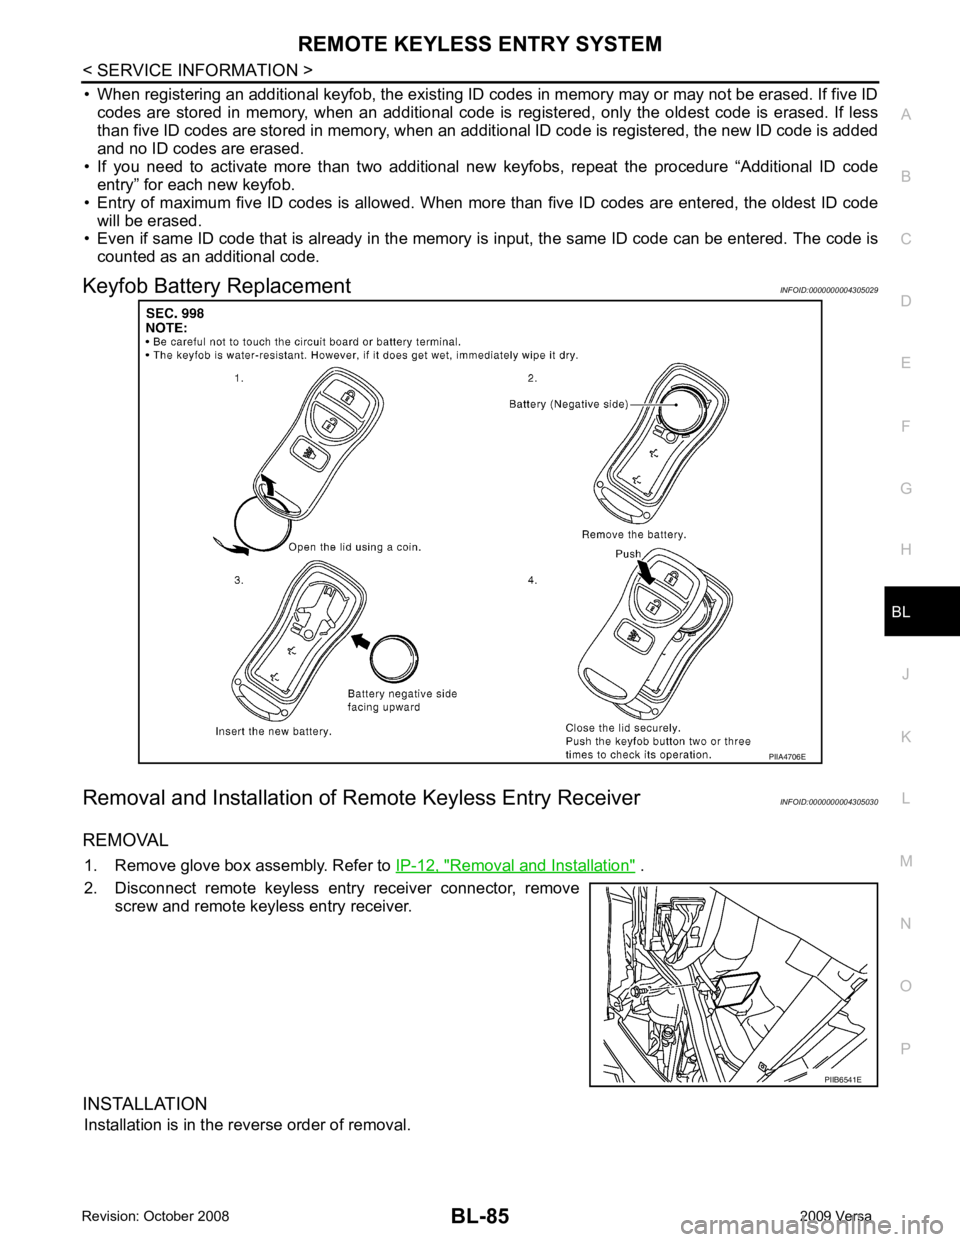
Keyfob Battery Replacement INFOID:0000000004305029
Removal and Installation of Re mote Keyless Entry Receiver INFOID:0000000004305030
REMOVAL 1. Remove glove box assembly. Refer to IP-12, " Removal and Installation " .
2. Disconnect remote keyless entry receiver connector, remove screw and remote keyless entry receiver.
INSTALLATION Installation is in the reverse order of removal. PIIB6541E
Page 3316 of 4331
GW
N
O P
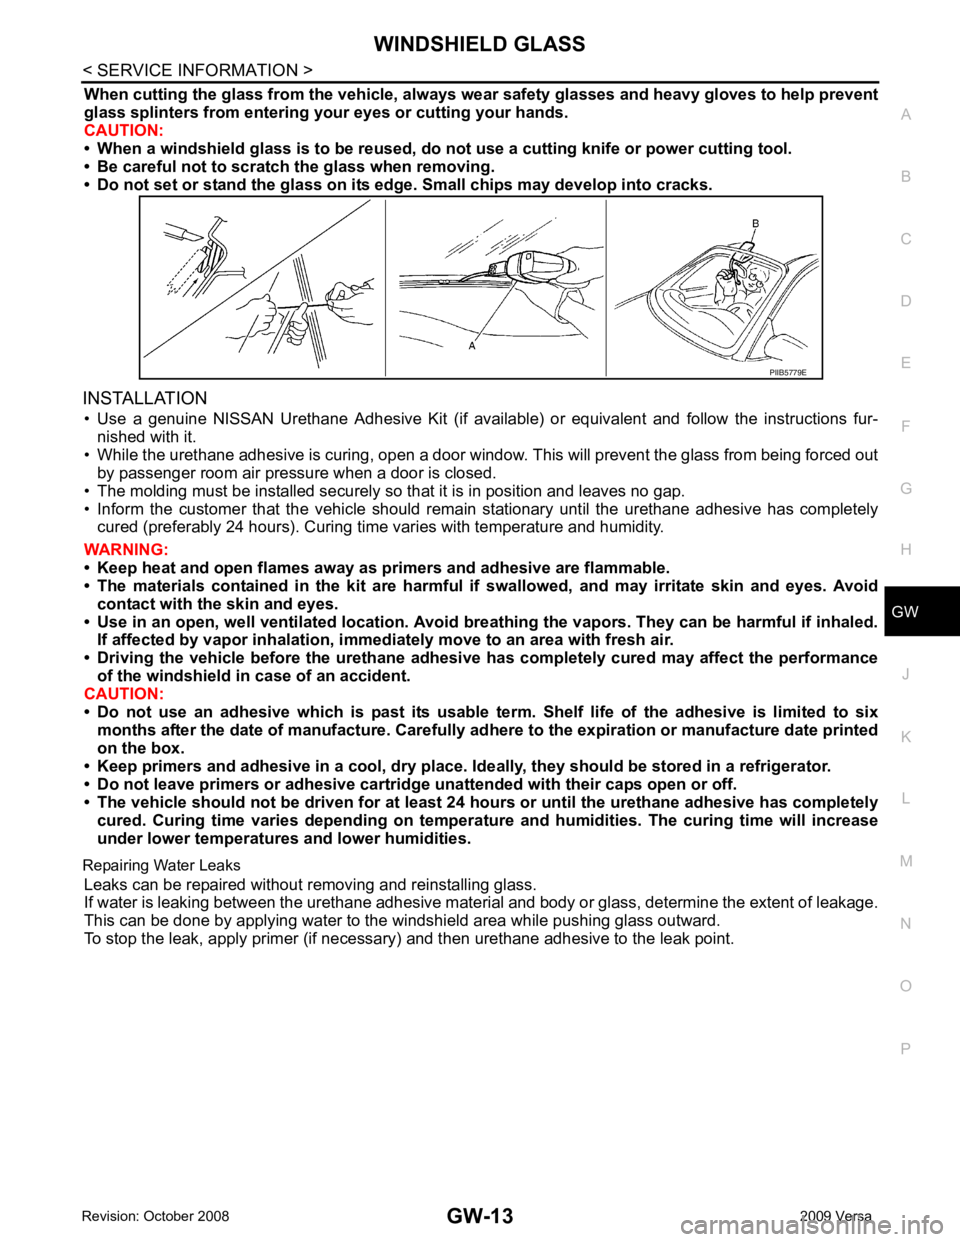
When cutting the glass from the vehicle, always
wear safety glasses and heavy gloves to help prevent
glass splinters from entering your eyes or cutting your hands.
CAUTION:
• When a windshield glass is to be reused, do no t use a cutting knife or power cutting tool.
• Be careful not to scratch the glass when removing.
• Do not set or stand the glass on its ed ge. Small chips may develop into cracks.
INSTALLATION • Use a genuine NISSAN Urethane Adhesive Kit (if availabl e) or equivalent and follow the instructions fur-
nished with it.
• While the urethane adhesive is curing, open a door window . This will prevent the glass from being forced out
by passenger room air pressure when a door is closed.
• The molding must be installed securely so that it is in position and leaves no gap.
• Inform the customer that the vehicle should rema in stationary until the urethane adhesive has completely
cured (preferably 24 hours). Curing time varies with temperature and humidity.
WARNING:
• Keep heat and open flames away as primers and adhesive are flammable.
• The materials contained in the kit are harmful if swallowed, and may irritate skin and eyes. Avoid
contact with the skin and eyes.
• Use in an open, well ventilated lo cation. Avoid breathing the vapors. They can be harmful if inhaled.
If affected by vapor inhalation, imme diately move to an area with fresh air.
• Driving the vehicle before the urethane adhesive has completely cured may affect the performance
of the windshield in case of an accident.
CAUTION:
• Do not use an adhesive which is past its usable te rm. Shelf life of the adhesive is limited to six
months after the date of manufacture. Carefully ad here to the expiration or manufacture date printed
on the box.
• Keep primers and adhesive in a cool, dry place. Id eally, they should be stored in a refrigerator.
• Do not leave primers or adhesive cartridge unattended with their caps open or off.
• The vehicle should not be driven for at least 24 hours or until the urethane adhesive has completely
cured. Curing time varies depend ing on temperature and humidities. The curing time will increase
under lower temperatures and lower humidities.
Repairing Water Leaks Leaks can be repaired without removing and reinstalling glass.
If water is leaking between the urethane adhesive material and body or glass, determine the extent of leakage.
This can be done by applying water to the windshield area while pushing glass outward.
To stop the leak, apply primer (if necessary ) and then urethane adhesive to the leak point.
Page 3322 of 4331
GW
N
O P
POWER WINDOW SYSTEM
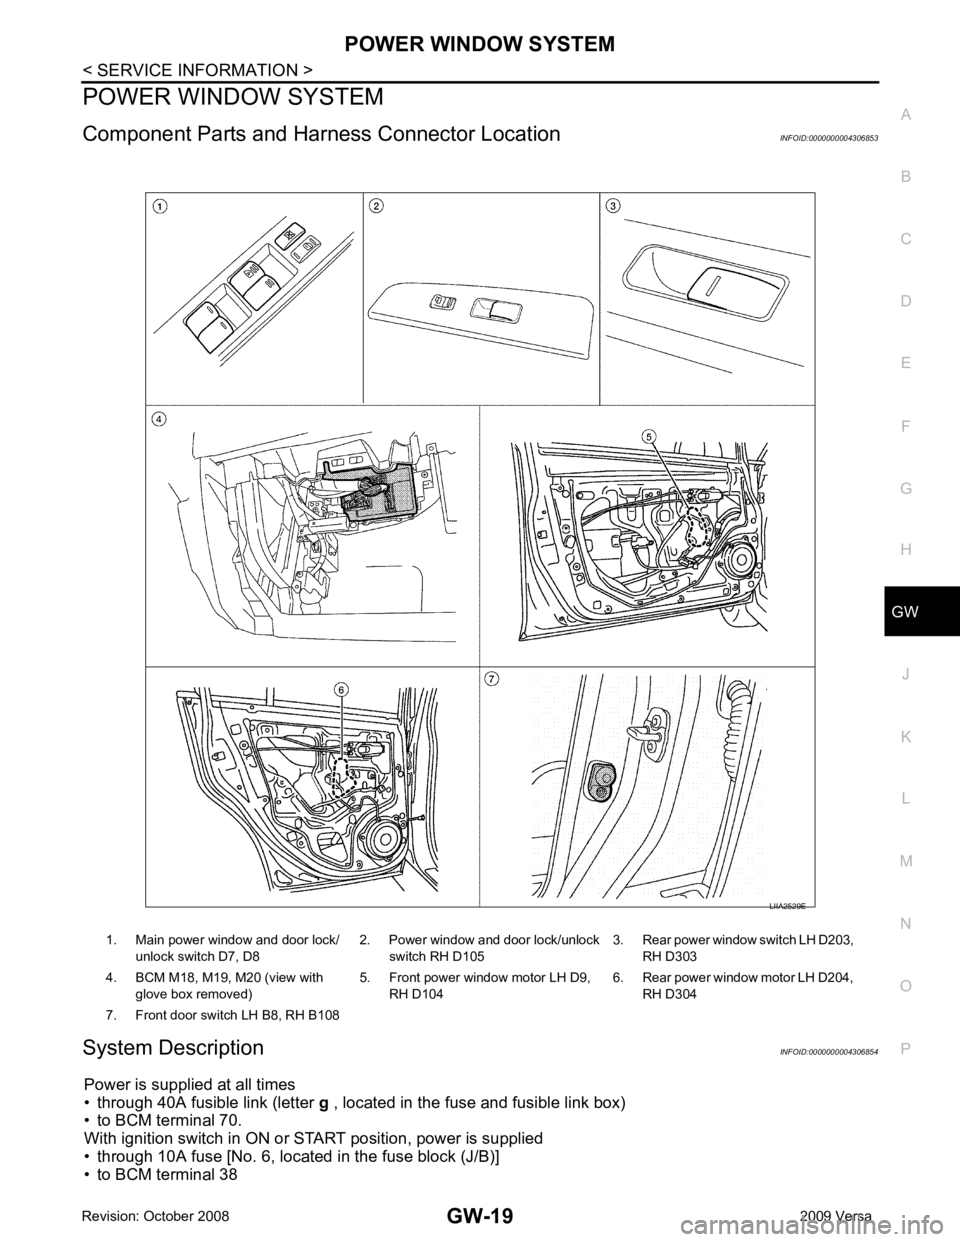
Component Parts and Har ness Connector Location INFOID:0000000004306853
System Description INFOID:0000000004306854
Power is supplied at all times
• through 40A fusible link (letter g , located in the fuse and fusible link box)
• to BCM terminal 70.
With ignition switch in ON or START position, power is supplied
• through 10A fuse [No. 6, located in the fuse block (J/B)]
• to BCM terminal 38 1. Main power window and door lock/
unlock switch D7, D8 2. Power window and door lock/unlock
switch RH D105 3. Rear power window switch LH D203,
RH D303
4. BCM M18, M19, M20 (view with glove box removed) 5. Front power window motor LH D9,
RH D104 6. Rear power window motor LH D204,
RH D304
7. Front door switch LH B8, RH B108
Page 3354 of 4331
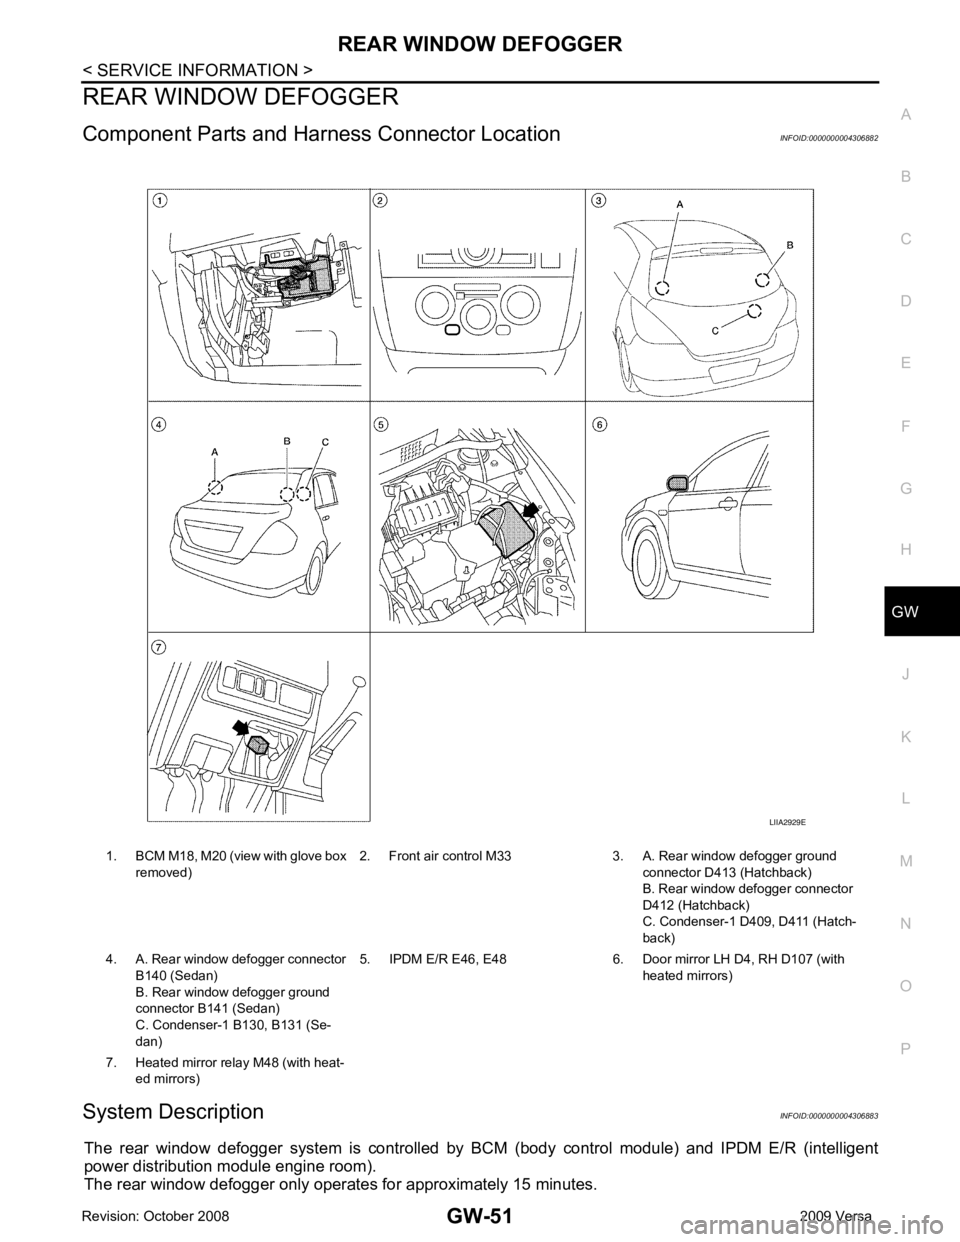
GW
N
O P
REAR WINDOW DEFOGGER
Component Parts and Har ness Connector Location INFOID:0000000004306882
System Description INFOID:0000000004306883
The rear window defogger system is controlled by BCM (body control module) and IPDM E/R (intelligent
power distribution module engine room).
The rear window defogger only operates for approximately 15 minutes. 1. BCM M18, M20 (view with glove box
removed) 2. Front air control M33 3. A. Rear window defogger ground
connector D413 (Hatchback)
B. Rear window defogger connector
D412 (Hatchback)
C. Condenser-1 D4 09, D411 (Hatch-
back)
4. A. Rear window defogger connector B140 (Sedan)
B. Rear window defogger ground
connector B141 (Sedan)
C. Condenser-1 B130, B131 (Se-
dan) 5. IPDM E/R E46, E48 6. Door mirror LH D4, RH D107 (with
heated mirrors)
7. Heated mirror relay M48 (with heat- ed mirrors)
Page 3382 of 4331
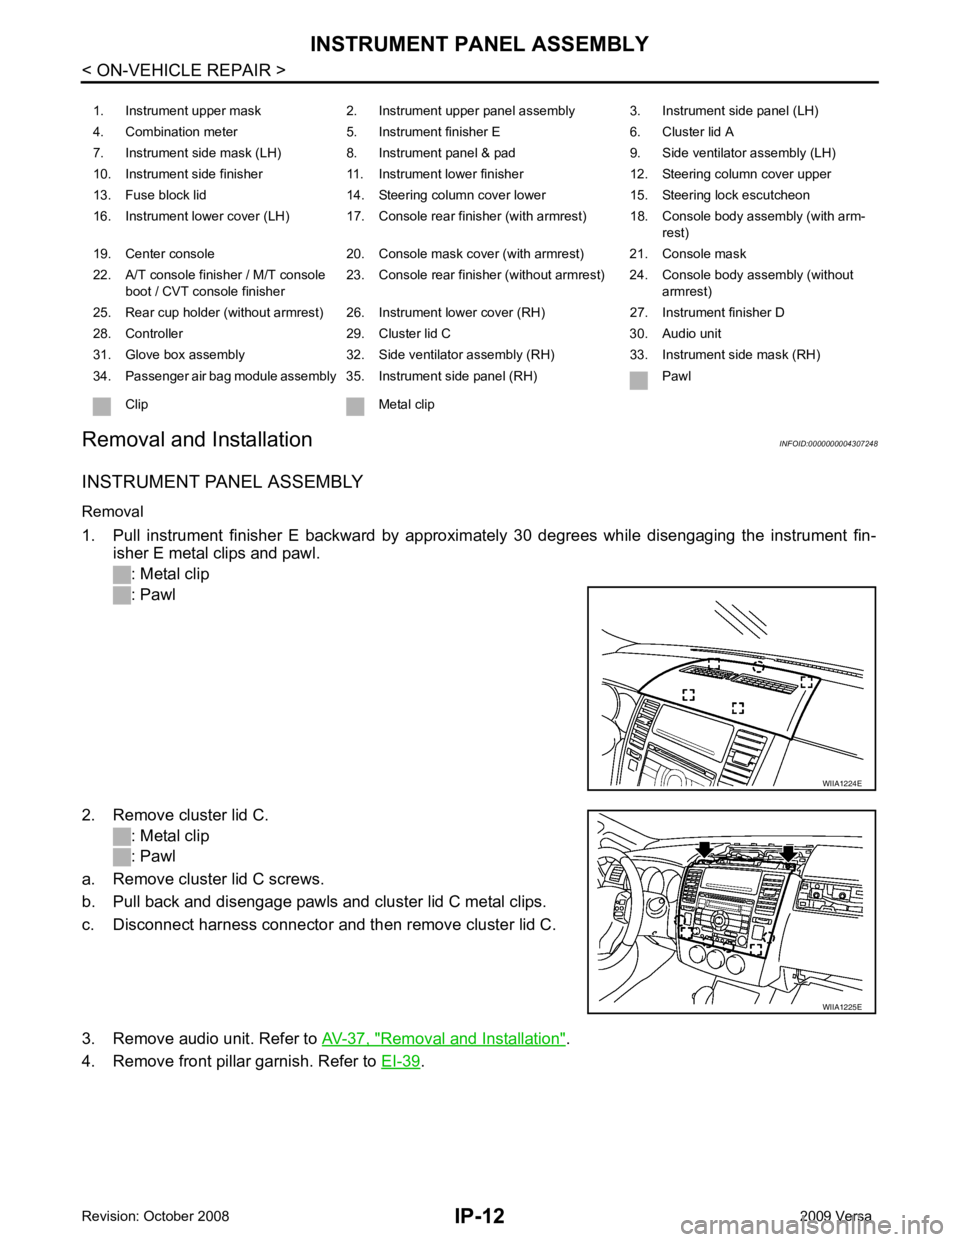
Removal and Installation " .
4. Remove front pillar garnish. Refer to EI-39 .
1. Instrument upper mask 2. Instrument upper panel assembly 3. Instrument side panel (LH)
4. Combination meter 5. Instrument finisher E 6. Cluster lid A
7. Instrument side mask (LH) 8. Instrument panel & pad 9. Side ventilator assembly (LH)
10. Instrument side finisher 11. Instrument lower finisher 12. Steering column cover upper
13. Fuse block lid 14. Steering column cover lower 15. Steering lock escutcheon
16. Instrument lower cover (LH) 17. Console rear finisher (with armrest) 18. Console body assembly (with arm- rest)
19. Center console 20. Console mask cover (with armrest) 21. Console mask
22. A/T console finisher / M/T console boot / CVT console finisher 23. Console rear finisher (without armrest) 24. Console body assembly (without
armrest)
25. Rear cup holder (without armrest) 26. Instrument lower cover (RH) 27. Instrument finisher D
28. Controller 29. Cluster lid C 30. Audio unit
31. Glove box assembly 32. Side ventilator assembly (RH) 33. Instrument side mask (RH)
34. Passenger air bag module assembly 35. Instrument side panel (RH) Pawl
Clip Metal clip WIIA1225E
Page 3384 of 4331
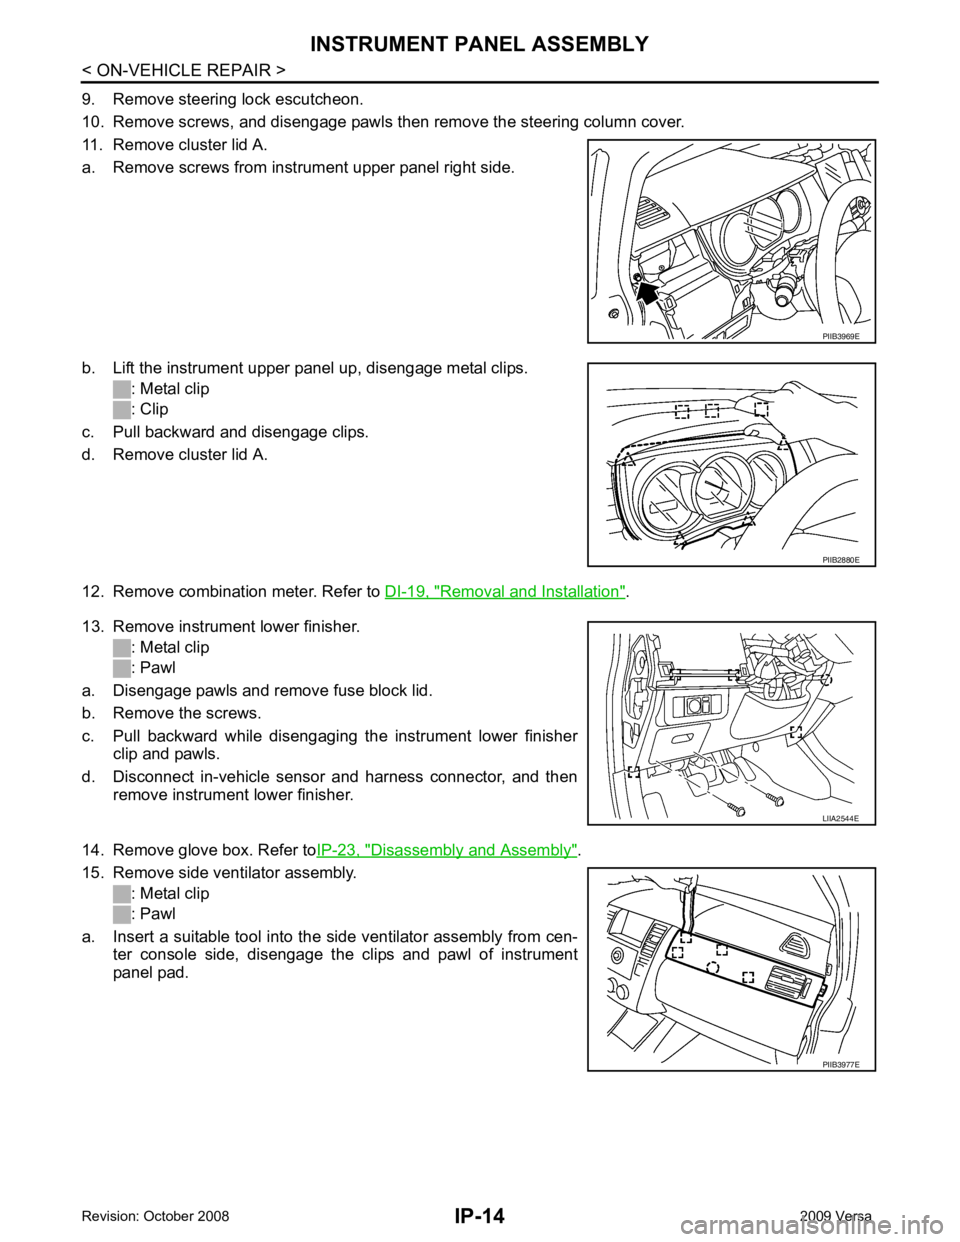
Removal and Installation " .
13. Remove instrument lower finisher. : Metal clip
: Pawl
a. Disengage pawls and remove fuse block lid.
b. Remove the screws.
c. Pull backward while disengaging the instrument lower finisher clip and pawls.
d. Disconnect in-vehicle sensor and harness connector, and then remove instrument lower finisher.
14. Remove glove box. Refer to IP-23, " Disassembly and Assembly " .
15. Remove side ventilator assembly. : Metal clip
: Pawl
a. Insert a suitable tool into the side ventilator assembly from cen- ter console side, disengage the clips and pawl of instrument
panel pad. PIIB2880E
PIIB3977E
Page 3385 of 4331
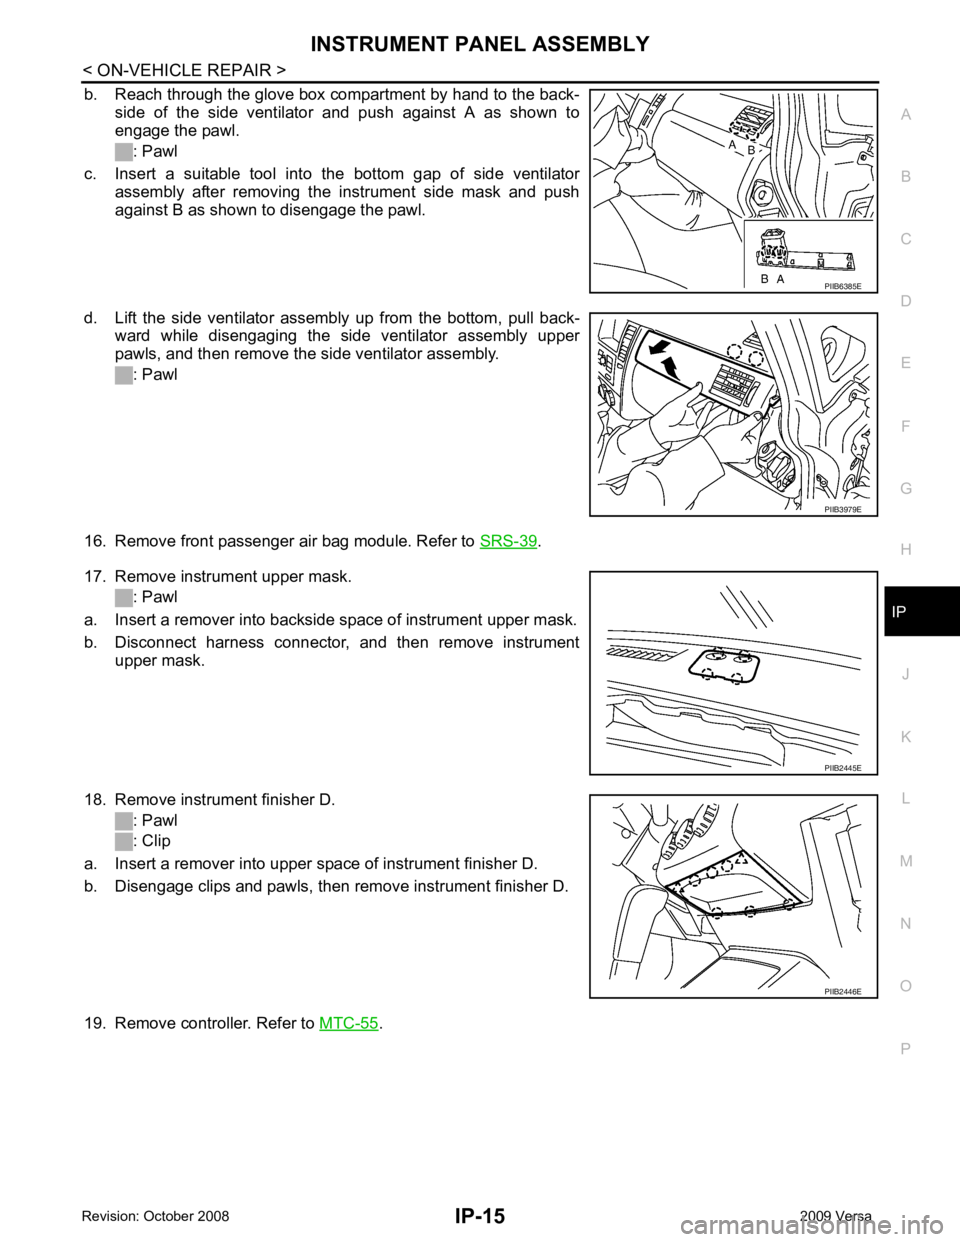
IP
N
O P
b. Reach through the glove box compartment by hand to the back-
side of the side ventilator and push against A as shown to
engage the pawl.
: Pawl
c. Insert a suitable tool into the bottom gap of side ventilator assembly after removing the instrument side mask and push
against B as shown to disengage the pawl.
d. Lift the side ventilator assembly up from the bottom, pull back- ward while disengaging the side ventilator assembly upper
pawls, and then remove the side ventilator assembly.
: Pawl
16. Remove front passenger air bag module. Refer to SRS-39 .
17. Remove instrument upper mask. : Pawl
a. Insert a remover into backside space of instrument upper mask.
b. Disconnect harness connector, and then remove instrument upper mask.
18. Remove instrument finisher D. : Pawl
: Clip
a. Insert a remover into upper space of instrument finisher D.
b. Disengage clips and pawls, then remove instrument finisher D.
19. Remove controller. Refer to MTC-55 . PIIB3979E
PIIB2446E