Page 873 of 4331

BRC
N
O P
• When installing front wheel sensor, press rubber gr
ommets of strut bracket and body all the way in
until they get locked, and be careful not to apply a twist to harness. Harness should not be twisted
after installation. (Install it with harness paint ma rk on body side grommet facing front of vehicle,
and the strut side grommet facing outside of vehicle.)
REAR WHEEL SENSOR
Removal CAUTION:
• As much as possible, avoid rotati ng wheel sensor when removing it. Pull wheel sensors out without
pulling on sensor harness.
• Take care to avoid damaging wheel sensor edges or rotor teeth. Remove wheel sensor first before
removing front or rear wheel hub. This is to avo id damage to wheel sensor wiring and loss of sensor
function.
1. Disconnect the rear wheel sensor connector.
2. Remove the rear wheel sensor.
Installation Installation is in the reverse order of removal.
CAUTION:
• When installing, make sure there is no foreign mate rial such as iron chips on and in the mounting
hole of the wheel sensor. Make sure no foreign material has been caught in the sensor rotor. Remove
any foreign material and clean the mount.
• When installing rear wheel sensor, press rubber grommets of suspension arm bracket and harness
of side member all the way in until they get locked , and be careful not to apply a twist to harness.
Harness should not be twisted after installati on. (Aim the paint mark upward of vehicle.)
Page 876 of 4331
Bleeding Brake System " .
CAUTION:
After installing harness connector in the ABS actuato r and electric unit (control unit), make sure the
connector is securely locked.
Page 881 of 4331

CL
N
O P
CLUTCH PEDAL
On-vehicle Inspec tion and Adjustment INFOID:0000000004305168
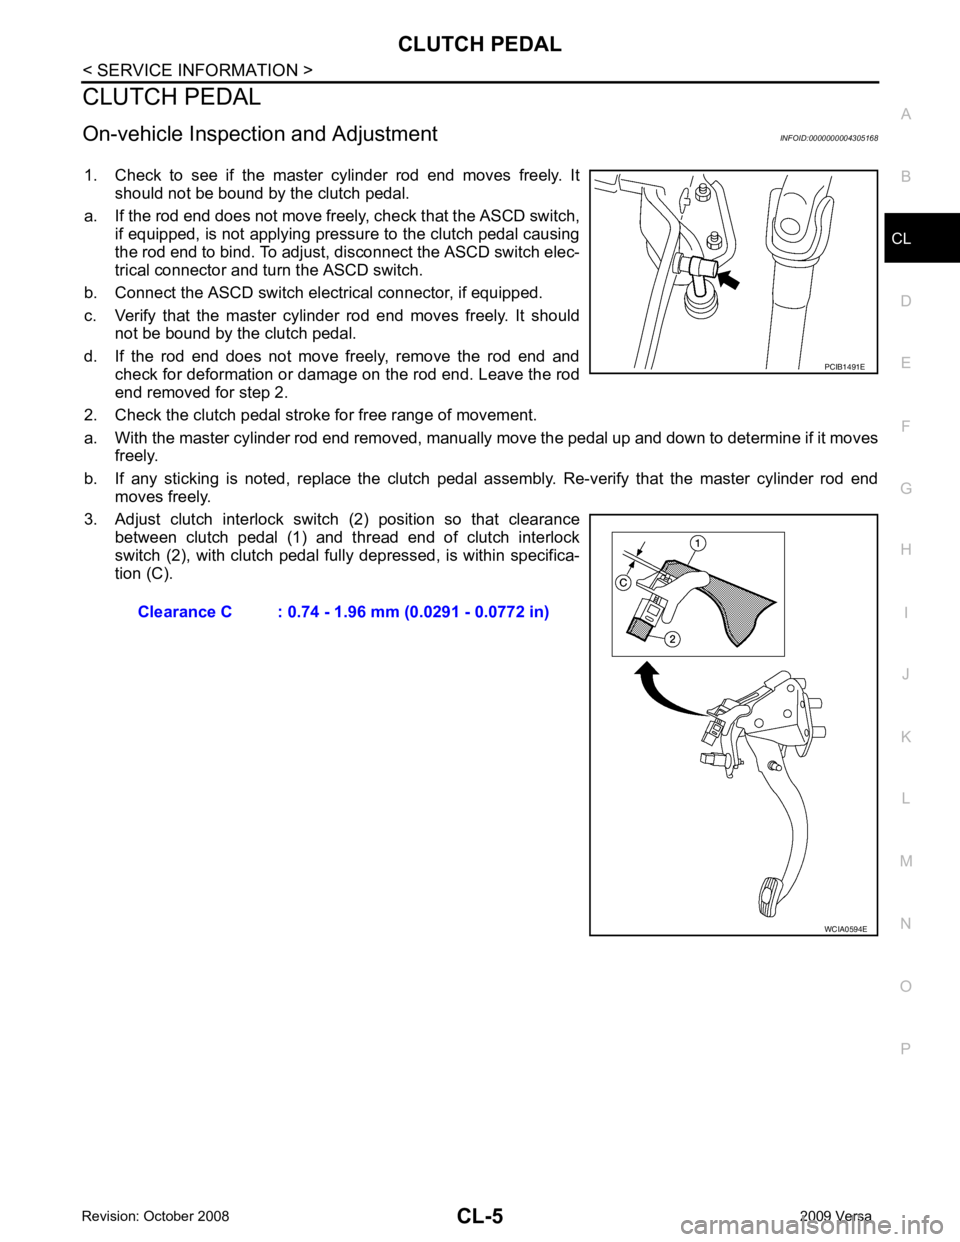
1. Check to see if the master cylinder rod end moves freely. It should not be bound by the clutch pedal.
a. If the rod end does not move freel y, check that the ASCD switch,
if equipped, is not applying pressure to the clutch pedal causing
the rod end to bind. To adjust, disconnect the ASCD switch elec-
trical connector and turn the ASCD switch.
b. Connect the ASCD switch electrical connector, if equipped.
c. Verify that the master cylinder rod end moves freely. It should not be bound by the clutch pedal.
d. If the rod end does not move freely, remove the rod end and check for deformation or damage on the rod end. Leave the rod
end removed for step 2.
2. Check the clutch pedal stroke for free range of movement.
a. With the master cylinder rod end removed, manually move the pedal up and down to determine if it moves
freely.
b. If any sticking is noted, replace the clutch pedal assembly. Re-verify that the master cylinder rod end
moves freely.
3. Adjust clutch interlock switch (2) position so that clearance between clutch pedal (1) and thread end of clutch interlock
switch (2), with clutch pedal fully depressed, is within specifica-
tion (C).
Clearance C : 0.74 - 1.96 mm (0.0291 - 0.0772 in) WCIA0594E
Page 883 of 4331
CL
N
O P
REMOVAL
1. Remove instrument lower finisher. Refer to IP-12, " Removal and Installation " .
2. Disconnect clutch interlock switch and ASCD clutch switch harness connectors, if equipped.
3. Remove clutch switch harness clamp from clutch pedal assembly.
4. Disconnect master cylinder rod end from clutch pedal lever.
5. Remove clutch pedal assembly nuts, and then remove clutch pedal assembly.
INSPECTION AFTER REMOVAL Check clutch pedal for bend, damage or a cracked weld. If bend, damage or a cracked weld is found, replace
clutch pedal assembly.
INSTALLATION Installation is in the reverse order of removal.
• After installing the clutch switches, adjust the switch positions. Refer to CL-5, " On-vehicle Inspection and
Adjustment " .
1. Clutch pedal assembly 2. Lock nut 3. Clutch interlock switch
4. ASCD clutch switch 5. Lock nut
Page 885 of 4331
CL
N
O P
5. Slide the clutch tube (1) in the direction of the arrow as shown to
the dimension (A). (For RS5F91R transaxle models)
2: bleeding connector
6. Slide bleeding connector (1) in the direction of the arrow as shown to the dimension (A). (For RS6F94R transaxle models)
2: clutch housing
7. Depress the clutch pedal soon and hold it, and then bleed air from the piping. wait for 5 seconds.
CAUTION:
Hold the clutch pedal down to prevent air from getting back
into the clutch system.
8. Return the clutch tube and lock pin to their original positions.
9. Release clutch pedal and wait for 5 seconds.
10. Repeat steps 3 to 8 until no bubbles are observed in the clutch fluid. Dimension (A) : 5 mm (0.20 in)
Page 886 of 4331

CL-10< SERVICE INFORMATION >
CLUTCH MASTER CYLINDER
CLUTCH MASTER CYLINDER
Removal and Installation INFOID:0000000004305171
REMOVAL
1. Remove the battery, battery tray and brackets. Refer to SC-5 .
2. Remove the air cleaner and air duct. Refer to EM-26, " Removal and Installation " (HR16DE models),
EM-139, " Removal and Installation " (MR18DE models).
3. Use one of the following methods to remove hose from master cylinder. • Drain clutch fluid from reservoir tank and remove hose.
• Remove hose from master cylinder. Immediately plug hose and reservoir tank to prevent clutch fluid
from dripping.
CAUTION:
Do not spill clutch fluid onto painted surfaces. If it spills, wi pe up immediately and wash the
affected area with water.
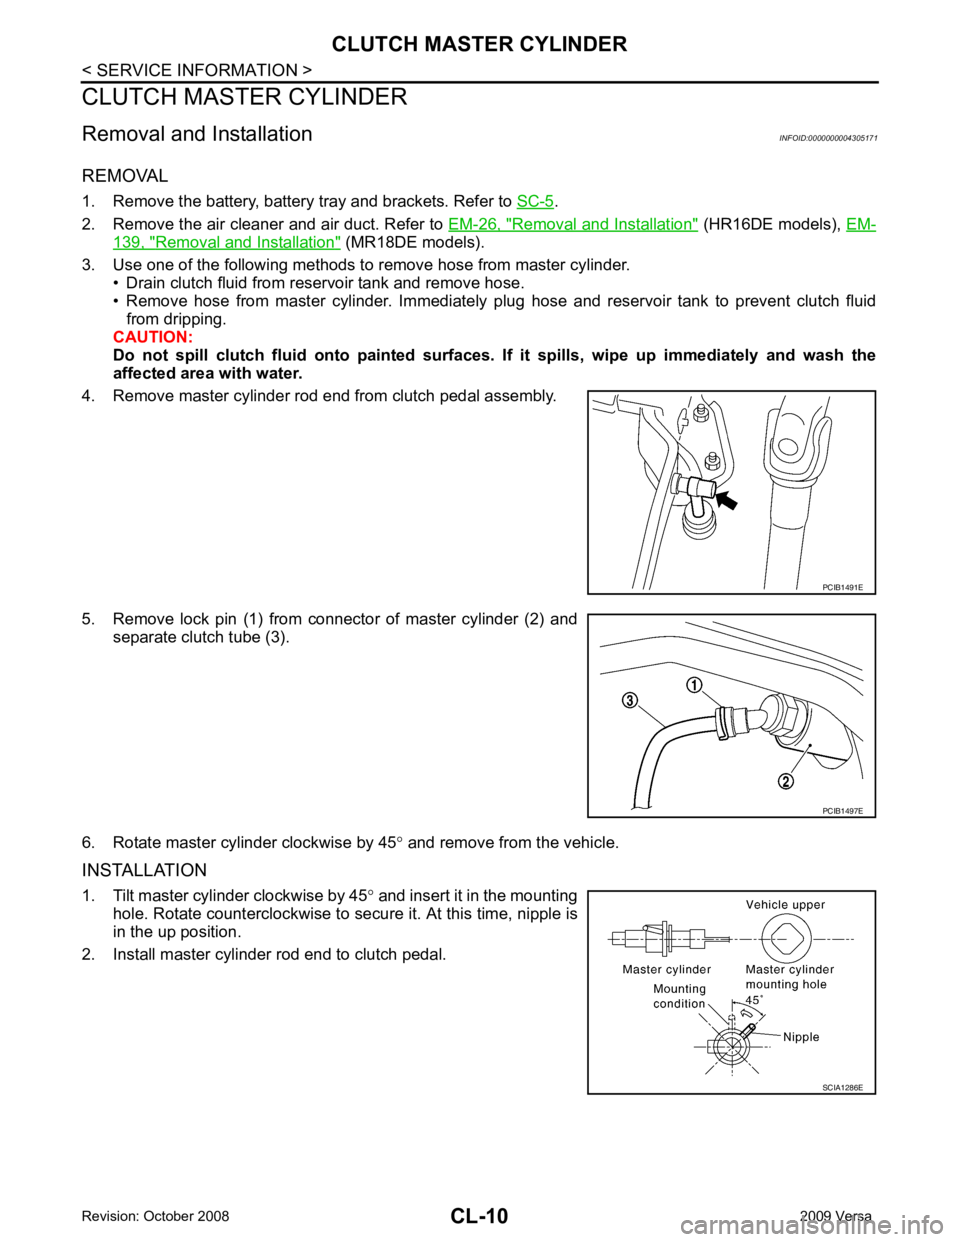
4. Remove master cylinder rod end from clutch pedal assembly.
5. Remove lock pin (1) from connector of master cylinder (2) and separate clutch tube (3).
6. Rotate master cylinder clockwise by 45 ° and remove from the vehicle.
INSTALLATION
1. Tilt master cylinder clockwise by 45 ° and insert it in the mounting
hole. Rotate counterclockwise to secure it. At this time, nipple is
in the up position.
2. Install master cylinder rod end to clutch pedal. PCIB1491E
PCIB1497E
SCIA1286E
Page 887 of 4331
CL
N
O P
3. Install clutch tube (1) fully into connector of master cylinder (2).
4. Install lock pin (3) fully into connector of master cylinder (2).
5. Fill with new clutch fluid and bleed air from the system. Refer to CL-8 .
6. After completing this procedure, inspect clutch pedal operation. Refer to CL-5, " On-vehicle Inspection and Adjustment " .
7. Install the air cleaner and air duct. Refer to EM-26, " Removal
and Installation " (HR16DE models),
EM-139, " Removal and
Installation " (MR18DE models).
8. Install the battery. Refer to SC-5 .
Page 890 of 4331

.
2. Remove the air cleaner and air duct. Refer to EM-26, " Removal and Installation " (HR16DE models),
EM-139, " Removal and Installation " (MR18DE models).
3. Use one of the following methods to remove hose from clutch master cylinder. • Drain clutch fluid from reservoir tank and remove hose.
• Remove hose from clutch master cylinder. Immediat ely plug hose and reservoir tank to prevent clutch
fluid from dripping.
CAUTION:
Do not spill clutch fluid onto painted surfaces. If it spills, wi pe up immediately and wash the
affected area with water.
4. Remove clutch tube lock pin from clutch master cylinder.
5. Remove clutch tube lock pin at clutch housing.
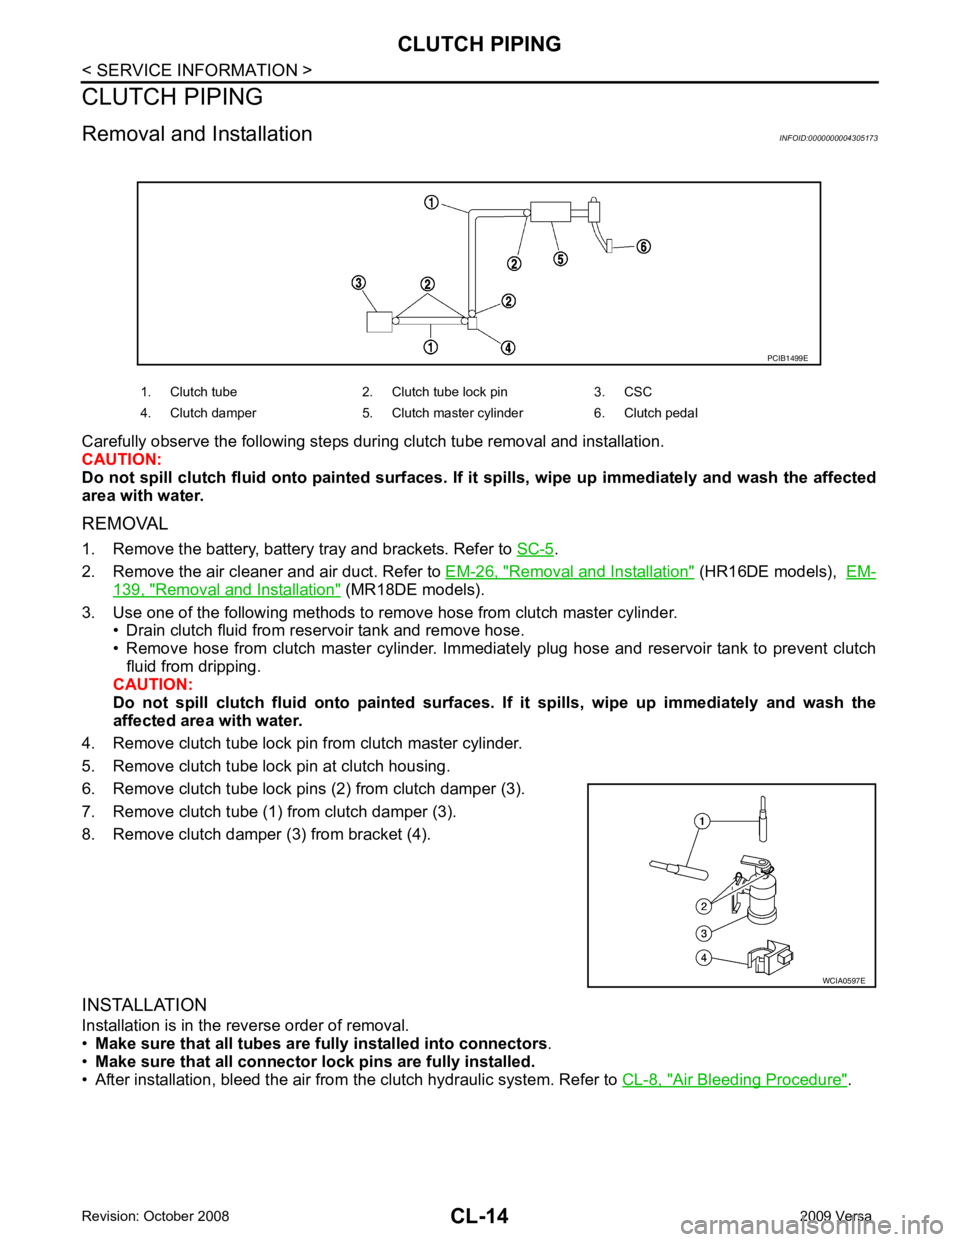
6. Remove clutch tube lock pins (2) from clutch damper (3).
7. Remove clutch tube (1) from clutch damper (3).
8. Remove clutch damper (3) from bracket (4).
INSTALLATION
Installation is in the reverse order of removal.
• Make sure that all tubes are fu lly installed into connectors.
• Make sure that all connector lock pins are fully installed.
• After installation, bleed the air from the clutch hydraulic system. Refer to CL-8, " Air Bleeding Procedure " .
1. Clutch tube 2. Clutch tube lock pin 3. CSC
4. Clutch damper 5. Clutch master cylinder 6. Clutch pedal WCIA0597E