2009 NISSAN TIIDA break
[x] Cancel search: breakPage 2378 of 4331
![NISSAN TIIDA 2009 Service Repair Manual EC-1022< SERVICE INFOMATION >
[MR TYPE 2]
PRECAUTIONS
• Be sure to connect rubber tubes properly afte r work. A misconnected or disconnected rubber tube
may cause the MIL to light up d NISSAN TIIDA 2009 Service Repair Manual EC-1022< SERVICE INFOMATION >
[MR TYPE 2]
PRECAUTIONS
• Be sure to connect rubber tubes properly afte r work. A misconnected or disconnected rubber tube
may cause the MIL to light up d](/manual-img/5/57398/w960_57398-2377.png)
EC-1022< SERVICE INFOMATION >
[MR TYPE 2]
PRECAUTIONS
• Be sure to connect rubber tubes properly afte r work. A misconnected or disconnected rubber tube
may cause the MIL to light up due to the malfunction of the fuel injection system, etc.
• Be sure to erase the unnecessary malfunction info rmation (repairs completed) from the ECM and
TCM (Transmission control module) before returning the vehicle to the customer.
Precaution INFOID:0000000004499902
• Always use a 12 volt battery as power source.
• Do not attempt to disconnect battery cables while engine is
running.
• Before connecting or disconnecting the ECM harness con-
nector, turn ignition switch OFF and disconnect negative bat-
tery cable. Failure to do so may damage the ECM because
battery voltage is applied to ECM even if ignition switch is
turned OFF.
• Before removing parts, turn ig nition switch OFF and then dis-
connect negative battery cable.
• Do not disassemble ECM.
• If battery cable is disconnected, the memory will return to the
initial ECM values.
The ECM will now start to self-c ontrol at its initial values.
Engine operation can vary slight ly in this case. However, this
is not an indication of a malf unction. Do not replace parts
because of a slight variation.
• If the battery is disconnected, the following emission-related
diagnostic information will be lost within 24 hours.
- Diagnostic trouble codes
- 1st trip diagnostic trouble codes
- Freeze frame data
- 1st trip freeze frame data
- System readiness test (SRT) codes
- Test values
• When connecting ECM harness connector, fasten (B) it
securely with a lever (1) as far as it will go as shown in the fig-
ure.
- ECM (2)
- Loosen (A)
• When connecting or disconnect ing pin connectors into or
from ECM, take care not to damage pin terminals (bend or
break).
Make sure that there are not any bends or breaks on ECM pin
terminal, when connecting pin connectors.
• Securely connect ECM harness connectors.
A poor connection can cause an extremely high (surge) volt-
age to develop in coil and co ndenser, thus resulting in dam-
age to ICs.
• Keep engine control system harness at least 10 cm (4 in) away
from adjacent harness, to preven t engine control system mal-
functions due to receiving exter nal noise, degraded operation
of ICs, etc. SEF289H
PBIA9222J
PBIB2947E
PBIB0090E
Page 2493 of 4331

EC
NP
O
• Disconnection, looseness, and cracks in air duct
• Looseness of oil filler cap
• Disconnection of oil level gauge
• Open stuck, breakage, hose disconnection, or cracks of PCV valve
• Disconnection or cracks of EVAP purge hose, open stuck of EVAP canister purge volume control solenoid
valve
• Malfunctioning seal of rocker cover gasket
• Disconnection, looseness, or cracks of hoses, such as vacuum hose, connecting to intake air system parts
• Malfunctioning seal of intake air system, etc.
>> GO TO 30. OK >>
INSPECTION END
NG >> Detect malfunctioning part according to EC-1095, " Symptom Matrix Chart " .
OK >>
INSPECTION END
NG >> Detect malfunctioning part according to EC-1095, " Symptom Matrix Chart " .
Page 2953 of 4331
![NISSAN TIIDA 2009 Service Repair Manual EM-6< PRECAUTION >
[HR16DE]
PRECAUTIONS
Parts Requiring Angular Tightening INFOID:0000000004784265
• Use an angle wrench for the final tightening of the following engine parts:
- Cylinder head bolt NISSAN TIIDA 2009 Service Repair Manual EM-6< PRECAUTION >
[HR16DE]
PRECAUTIONS
Parts Requiring Angular Tightening INFOID:0000000004784265
• Use an angle wrench for the final tightening of the following engine parts:
- Cylinder head bolt](/manual-img/5/57398/w960_57398-2952.png)
EM-6< PRECAUTION >
[HR16DE]
PRECAUTIONS
Parts Requiring Angular Tightening INFOID:0000000004784265
• Use an angle wrench for the final tightening of the following engine parts:
- Cylinder head bolts
- Camshaft sprocket (INT)
- Main bearing cap bolts
- Connecting rod cap nuts
- Crankshaft pulley bolt (No angle wrench is required as the bolt flange is provided with notches for angular
tightening)
• Do not use a torque value for final tightening.
• The torque value for these parts are for a preliminary step.
• Ensure thread and seat surfaces are clean and coated with engine oil.
Precaution for Liquid Gasket INFOID:0000000004784266
REMOVAL OF LIQUID GASKET SEALING
• After removing the bolts and nuts, separate the mating surface and remove the sealant using Tool.
CAUTION:
Be careful not to damage the mating surfaces.
• In areas where the cutter is difficult to use, use a plastic hammer to
lightly tap (1) the cutter where the RTV Silicone Sealant is applied.
Use a plastic hammer to slide the cutter (2) by tapping on the side.
CAUTION:
If for some unavoidable reason a tool such as a flat-bladed
screwdriver is used, be careful not to damage the mating sur-
faces.
LIQUID GASKET APPLICATION PROCEDURE
1. Using a scraper, remove the old Silicone RTV Sealant adhering to the gasket application surface and the mating surface.
• Remove the sealant completely from the groove of the gasket application surface, bolts, and bolt holes.
2. Thoroughly clean the gasket application surface and the mating surface and remove adhering moisture, grease and foreign
materials.
3. Attach the sealant t ube to the tube presser.
Use Genuine Silicone RTV Seal ant or equivalent. Refer to
GI-42, " Recommended Chemical
Product and Sealant " .
4. Apply the sealant without breaks to the specified location using Tool.
• If there is a groove for the s ealant application, apply the seal-
ant to the groove.
• As for the bolt holes, normally apply the sealant inside the holes. If specified, it should be applied outside the holes. Make
sure to read the text of this manual.
• Within five minutes of the seal ant application, install the mat-
ing component.
• If the sealant protrudes, wipe it off immediately.
• Do not retighten after the installation. Tool number : KV10112100 (BT-8653-A)
Tool number : KV10111100 (J-37228) WBIA0566E
PBIC0003E
Tool number WS39930000 ( – )
WBIA0567E
Page 3075 of 4331
![NISSAN TIIDA 2009 Service Repair Manual EM-128< SERVICE INFORMATION >
[MR18DE]
PRECAUTIONS
Parts Requiring Angular Tightening INFOID:0000000004307117
• Use an angle wrench for the final tightening of the following engine parts:
- Cylinde NISSAN TIIDA 2009 Service Repair Manual EM-128< SERVICE INFORMATION >
[MR18DE]
PRECAUTIONS
Parts Requiring Angular Tightening INFOID:0000000004307117
• Use an angle wrench for the final tightening of the following engine parts:
- Cylinde](/manual-img/5/57398/w960_57398-3074.png)
EM-128< SERVICE INFORMATION >
[MR18DE]
PRECAUTIONS
Parts Requiring Angular Tightening INFOID:0000000004307117
• Use an angle wrench for the final tightening of the following engine parts:
- Cylinder head bolts
- Camshaft sprocket (INT)
- Main bearing cap bolts
- Connecting rod cap nuts
- Crankshaft pulley bolt (No angle wrench is required as the bolt flange is provided with notches for angular
tightening)
• Do not use a torque value for final tightening.
• The torque value for these parts are for a preliminary step.
• Ensure thread and seat surfaces are clean and coated with engine oil.
Precaution for Liquid Gasket INFOID:0000000004307118
REMOVAL OF LIQUID GASKET SEALING
• After removing the bolts and nuts, separate the mating surface and remove the sealant using Tool.
CAUTION:
Be careful not to damage the mating surfaces.
• In areas where the cutter is difficult to use, use a plastic hammer to
lightly tap (1) the cutter where the RTV Silicone Sealant is applied.
Use a plastic hammer to slide the cutter (2) by tapping on the side.
CAUTION:
If for some unavoidable reason a tool such as a flat-bladed
screwdriver is used, be careful not to damage the mating sur-
faces.
LIQUID GASKET APPLICATION PROCEDURE
1. Using a scraper, remove the old Silicone RTV Sealant adhering to the gasket application surface and the mating surface.
• Remove the sealant completely from the groove of the gasket application surface, bolts, and bolt holes.
2. Thoroughly clean the gasket application surface and the mating surface and remove adhering moisture, grease and foreign
materials.
3. Attach the sealant t ube to the tube presser.
Use Genuine Silicone RTV Seal ant or equivalent. Refer to
GI-42, " Recommended Chemical
Product and Sealant " .
4. Apply the sealant without breaks to the specified location using Tool.
• If there is a groove for the s ealant application, apply the seal-
ant to the groove.
• As for the bolt holes, normally apply the sealant inside the holes. If specified, it should be applied outside the holes. Make
sure to read the text of this manual.
• Within five minutes of the seal ant application, install the mat-
ing component.
• If the sealant protrudes, wipe it off immediately.
• Do not retighten after the installation. Tool number : KV10112100 (BT-8653-A)
Tool number : KV10111100 (J-37228) WBIA0566E
PBIC0003E
Tool number WS39930000 ( – )
WBIA0567E
Page 3115 of 4331
![NISSAN TIIDA 2009 Service Repair Manual EM-168< SERVICE INFORMATION >
[MR18DE]
TIMING CHAIN
• Install front oil seal (2) using a suitable tool with outer diameter 57 mm (2.24 in) and inner diameter 45 mm (1.77 in) (A) to the
dimension sho NISSAN TIIDA 2009 Service Repair Manual EM-168< SERVICE INFORMATION >
[MR18DE]
TIMING CHAIN
• Install front oil seal (2) using a suitable tool with outer diameter 57 mm (2.24 in) and inner diameter 45 mm (1.77 in) (A) to the
dimension sho](/manual-img/5/57398/w960_57398-3114.png)
EM-168< SERVICE INFORMATION >
[MR18DE]
TIMING CHAIN
• Install front oil seal (2) using a suitable tool with outer diameter 57 mm (2.24 in) and inner diameter 45 mm (1.77 in) (A) to the
dimension shown.
CAUTION:
• Be careful not to damage front cover and crankshaft.
• Press-fit oil seal straight to avoid causing burrs or tilting.
• Never touch grease applied onto oil seal lip.
12. Install new O-ring to cylinder block. CAUTION:
Be sure O-rings are aligned properly.
13. Apply the sealant without breaks to the specified location using Tool.
Use Genuine Silicone RTV Seal ant or equivalent. Refer to
GI-42, " Recommended Chemical
Product and Sealant " .
14. Make sure that matching marks of timing chain and each sprocket are still aligned. CAUTION:
• Make sure O-ring on cylinder block is correctly installed.
• Be careful not to damage front oil seal by interference with front end of crankshaft.
1 : Front cover
: Engine front
Within 0.3 mm (0.012 in) toward engine front
Within 0.5 mm (0.020 in) toward engine rear PBIC3729E
Tool number WS39930000 ( – )
A : Liquid gasket application area
B : Liquid gasket
: Engine outside PBIC3959E
Page 3203 of 4331

FAX-8< SERVICE INFORMATION >
FRONT WHEEL HUB AND KNUCKLE
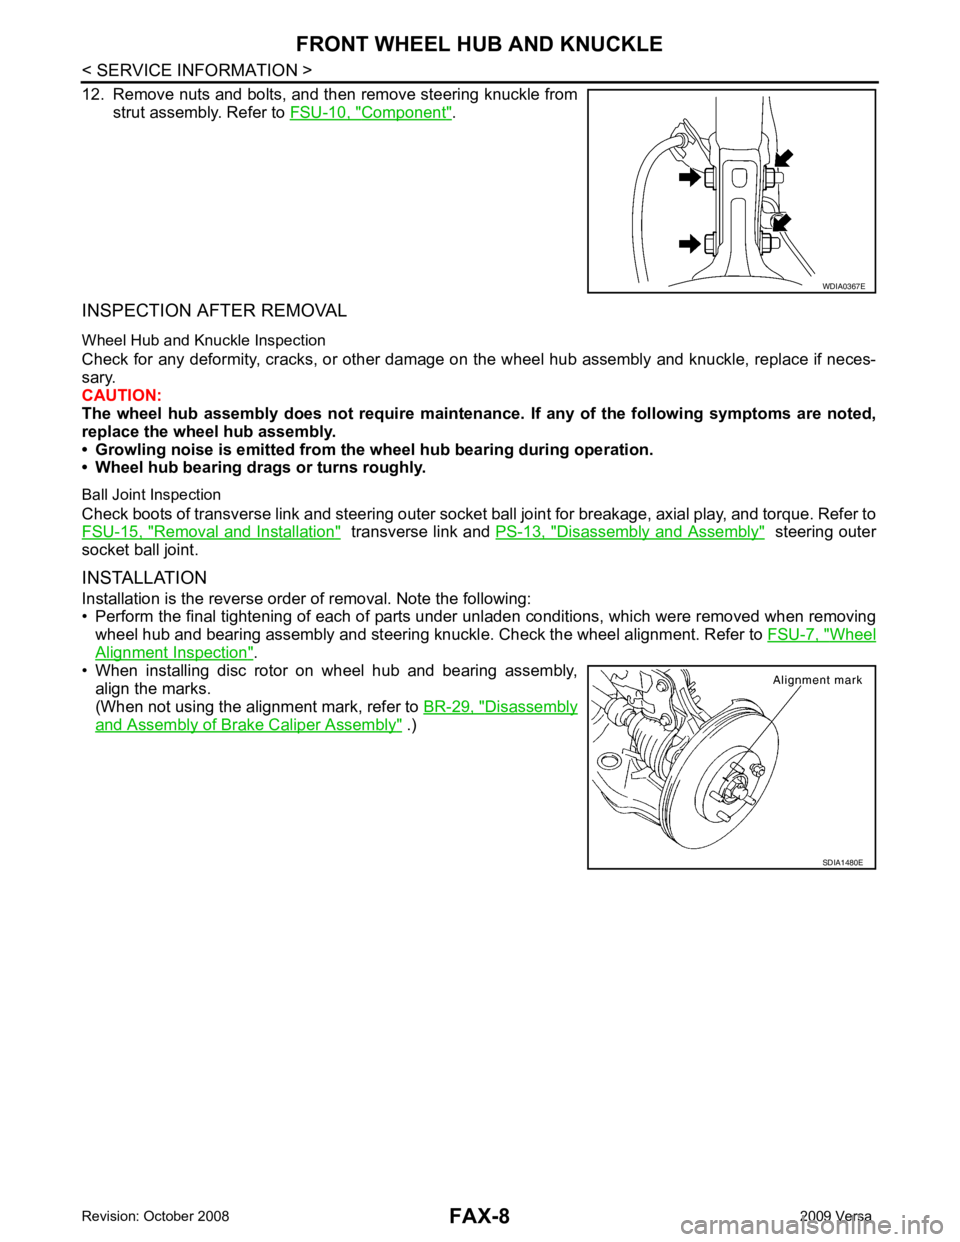
12. Remove nuts and bolts, and then remove steering knuckle from strut assembly. Refer to FSU-10, " Component " .
INSPECTION AFTER REMOVAL
Wheel Hub and Knuckle Inspection
Check for any deformity, cracks, or other damage on t he wheel hub assembly and knuckle, replace if neces-
sary.
CAUTION:
The wheel hub assembly does not require maintenance. If any of the following symptoms are noted,
replace the wheel hub assembly.
• Growling noise is emitted from the wheel hub bearing during operation.
• Wheel hub bearing drags or turns roughly.
Ball Joint Inspection
Check boots of transverse link and steering outer socket ball joint for breakage, axial play, and torque. Refer to
FSU-15, " Removal and Installation " transverse link and
PS-13, " Disassembly and Assembly " steering outer
socket ball joint.
INSTALLATION
Installation is the reverse order of removal. Note the following:
• Perform the final tightening of each of parts under unladen conditions, which were removed when removing
wheel hub and bearing assembly and steering knuckl e. Check the wheel alignment. Refer to FSU-7, " Wheel
Alignment Inspection " .
• When installing disc rotor on wheel hub and bearing assembly,
align the marks.
(When not using the alignment mark, refer to BR-29, " Disassembly
and Assembly of Brake Caliper Assembly " .) WDIA0367E
SDIA1480E
Page 3210 of 4331

FAX
N
O P
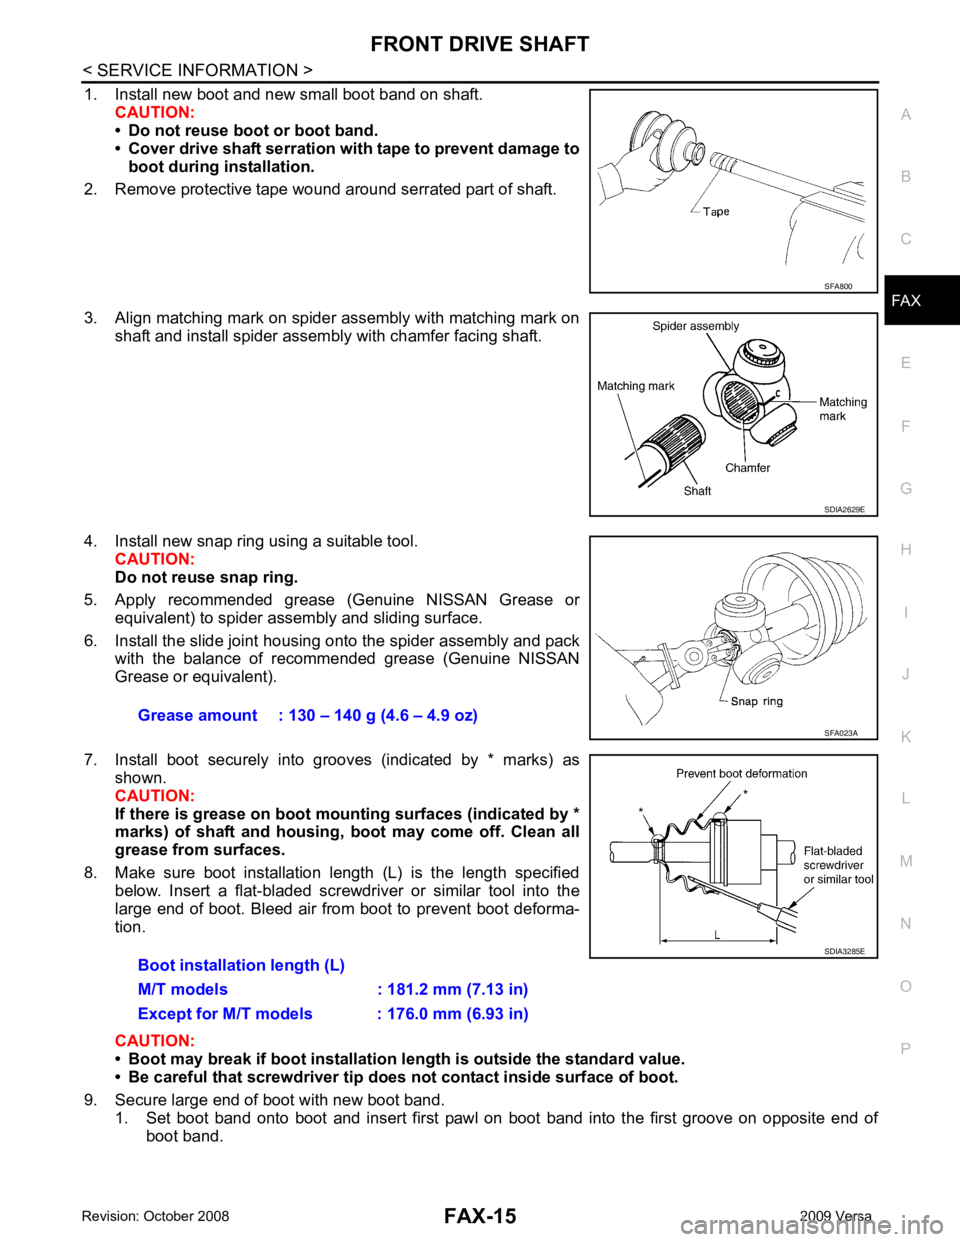
1. Install new boot and new small boot band on shaft.
CAUTION:
• Do not reuse boot or boot band.
• Cover drive shaft serration with tape to prevent damage to
boot during installation.
2. Remove protective tape wound around serrated part of shaft.
3. Align matching mark on spider assembly with matching mark on shaft and install spider assembly with chamfer facing shaft.
4. Install new snap ring using a suitable tool. CAUTION:
Do not reuse snap ring.
5. Apply recommended grease (Genuine NISSAN Grease or equivalent) to spider assembly and sliding surface.
6. Install the slide joint housing onto the spider assembly and pack with the balance of recommended grease (Genuine NISSAN
Grease or equivalent).
7. Install boot securely into grooves (indicated by * marks) as shown.
CAUTION:
If there is grease on boot mounting surfaces (indicated by *
marks) of shaft and housing, boot may come off. Clean all
grease from surfaces.
8. Make sure boot installation length (L) is the length specified below. Insert a flat-bladed screwdriver or similar tool into the
large end of boot. Bleed air from boot to prevent boot deforma-
tion.
CAUTION:
• Boot may break if boot installation le ngth is outside the standard value.
• Be careful that screwdriver tip does not contact inside surface of boot.
9. Secure large end of boot with new boot band. 1. Set boot band onto boot and insert first pawl on boot band into the first groove on opposite end of boot band.
Page 3212 of 4331

FRONT DRIVE SHAFT
FAX-17
< SERVICE INFORMATION >
C
E F
G H
I
J
K L
M A
B FAX
N
O P
4. Attach new circlip to shaft. Thread nut onto end of joint sub-
assembly and press fit using suitable tool.
CAUTION:
• Do not reuse circlip.
• Circlip must fit securely into shaft groove.
5. Insert the balance of new grease (Genuine NISSAN Grease or equivalent) listed below into housing from
large end of boot.
6. Install boot securely into grooves (indicated by * marks) as shown.
CAUTION:
If there is grease on boot mounting surfaces (indicated by *
marks) of shaft and housing, boot may come off. Remove
all grease from surfaces.
7. Make sure boot installation length (L) is the specified length indi- cated below. Insert a flat-bladed screwdriver or similar tool into
the large end of boot. Bleed air from boot to prevent boot defor-
mation.
CAUTION:
• Boot may break if boot installation le ngth is outside the standard value.
• Be careful that screwdriver tip does not contact inside surface of boot.
8. Install new large and small boot bands securely using Tool.
CAUTION:
• Do not reuse boot bands.
• Secure boot band so that dimension (M) meets specifica- tion as shown.
9. Rotate the joint sub assembly and confirm that the boot position is correct. If boot position is not correct,
remove the boot bands, reposition the boot and install new boot bands. RAC0049D
Grease amount : 70 – 90 g (2.5 – 3.2 oz)
Boot installation length (L) : 142 mm (5.59 in)
Tool number : KV40107300 ( — ) SDIA1505E
RAC1133D
Dimension (M) : 1.0 – 4.0 mm (0.039 – 0.157 in)
DSF0047D