2009 NISSAN LATIO ECU
[x] Cancel search: ECUPage 2743 of 4331
EC
NP
O
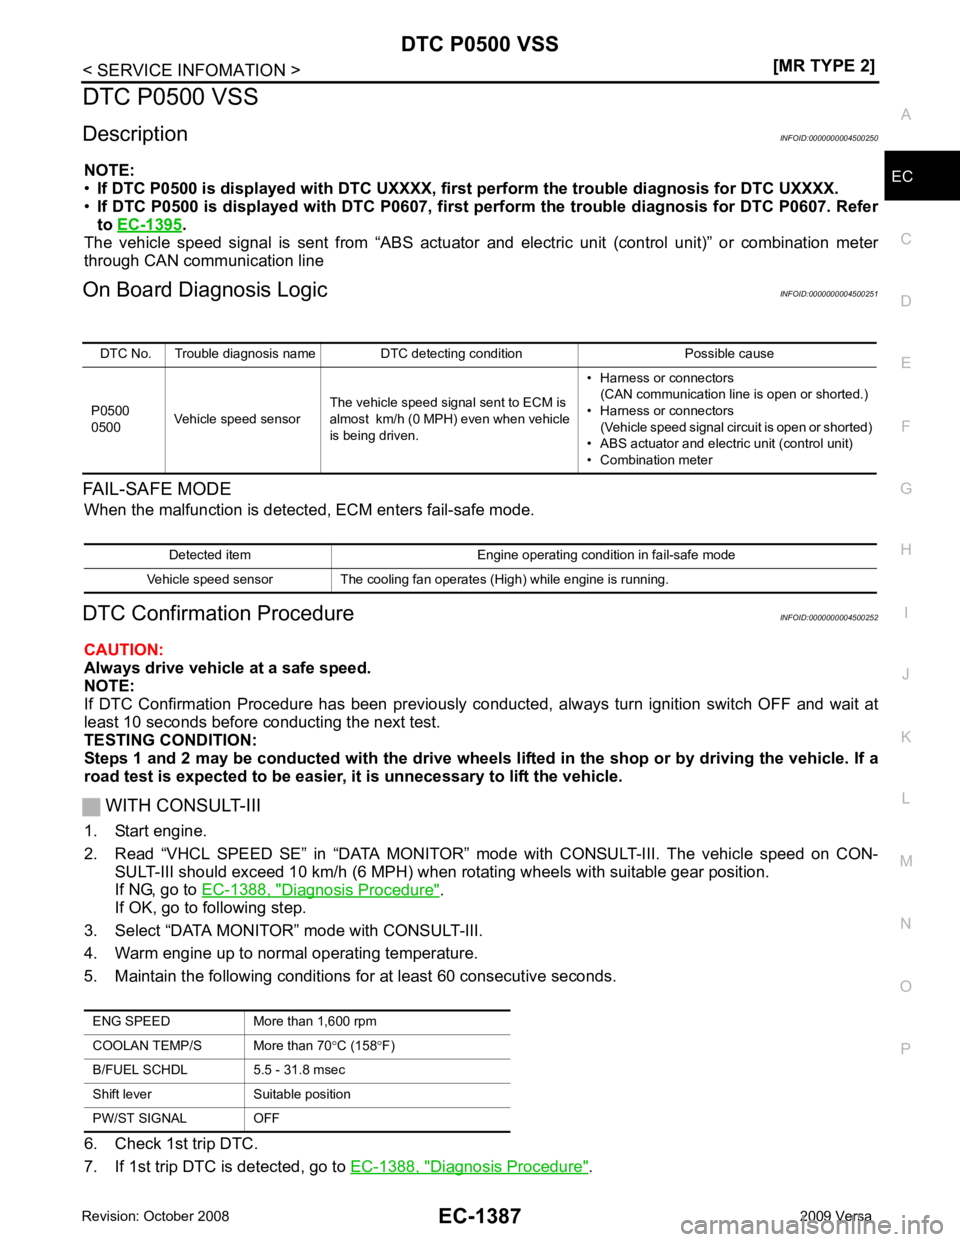
DTC P0500 VSS
Description INFOID:0000000004500250
NOTE:
• If DTC P0500 is displayed with DTC UXXXX, first perform the tr ouble diagnosis for DTC UXXXX.
• If DTC P0500 is displayed with DT C P0607, first perform the trouble diagnosis for DTC P0607. Refer
to EC-1395 .
The vehicle speed signal is sent from “ABS actuator and electric unit (control unit)” or combination meter
through CAN communication line
On Board Diagnosis Logic INFOID:0000000004500251
FAIL-SAFE MODE When the malfunction is detect ed, ECM enters fail-safe mode.
DTC Confirmation Procedure INFOID:0000000004500252
CAUTION:
Always drive vehicle at a safe speed.
NOTE:
If DTC Confirmation Procedure has been previously conduc ted, always turn ignition switch OFF and wait at
least 10 seconds before conducting the next test.
TESTING CONDITION:
Steps 1 and 2 may be conducted with the drive wheels li fted in the shop or by driving the vehicle. If a
road test is expected to be easier, it is unnecessary to lift the vehicle.
WITH CONSULT-III
1. Start engine.
2. Read “VHCL SPEED SE” in “DATA MONITOR” m ode with CONSULT-III. The vehicle speed on CON-
SULT-III should exceed 10 km/h (6 MPH) when rotating wheels with suitable gear position.
If NG, go to EC-1388, " Diagnosis Procedure " .
If OK, go to following step.
3. Select “DATA MONITOR” mode with CONSULT-III.
4. Warm engine up to normal operating temperature.
5. Maintain the following conditions for at least 60 consecutive seconds.
6. Check 1st trip DTC.
7. If 1st trip DTC is detected, go to EC-1388, " Diagnosis Procedure " .
DTC No. Trouble diagnosis name DTC detecting condition Possible cause
P0500
0500 Vehicle speed sensor The vehicle speed signal sent to ECM is
almost km/h (0 MPH) even when vehicle
is being driven. • Harness or connectors
(CAN communication line is open or shorted.)
• Harness or connectors (Vehicle speed signal circuit is open or shorted)
• ABS actuator and electric unit (control unit)
• Combination meter Detected item Engine operating condition in fail-safe mode
Vehicle speed sensor The cooling fan operates (High) while engine is running. ENG SPEED More than 1,600 rpm
COOLAN TEMP/S More than 70 °C (158 °F)
B/FUEL SCHDL 5.5 - 31.8 msec
Shift lever Suitable position
PW/ST SIGNAL OFF
Page 2757 of 4331
EC
NP
O
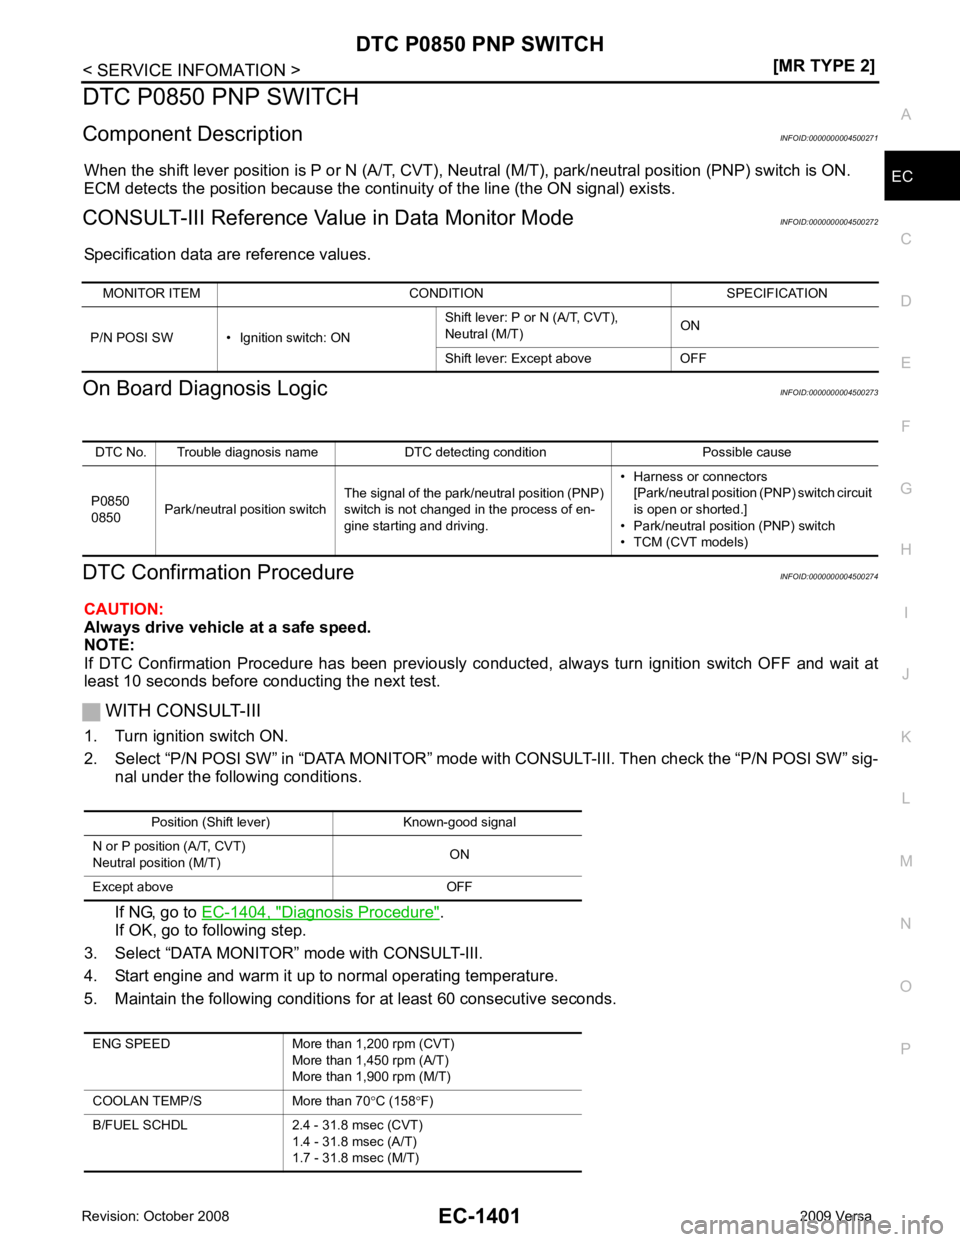
DTC P0850 PNP SWITCH
Component Description INFOID:0000000004500271
When the shift lever position is P or N (A/T, CVT), Neut ral (M/T), park/neutral position (PNP) switch is ON.
ECM detects the position because the continuity of the line (the ON signal) exists.
CONSULT-III Reference Val ue in Data Monitor Mode INFOID:0000000004500272
Specification data are reference values.
On Board Diagnosis Logic INFOID:0000000004500273
DTC Confirmation Procedure INFOID:0000000004500274
CAUTION:
Always drive vehicle at a safe speed.
NOTE:
If DTC Confirmation Procedure has been previously conduc ted, always turn ignition switch OFF and wait at
least 10 seconds before conducting the next test.
WITH CONSULT-III
1. Turn ignition switch ON.
2. Select “P/N POSI SW” in “DATA MONITOR” mode wit h CONSULT-III. Then check the “P/N POSI SW” sig-
nal under the following conditions.
If NG, go to EC-1404, " Diagnosis Procedure " .
If OK, go to following step.
3. Select “DATA MONITOR” mode with CONSULT-III.
4. Start engine and warm it up to normal operating temperature.
5. Maintain the following conditions for at least 60 consecutive seconds. MONITOR ITEM CONDITION SPECIFICATION
P/N POSI SW • Ignition switch: ON Shift lever: P or N (A/T, CVT),
Neutral (M/T) ON
Shift lever: Except above OFF DTC No. Trouble diagnosis name DTC detecting condition Possible cause
P0850
0850 Park/neutral position switch The signal of the park/neutral position (PNP)
switch is not changed in the process of en-
gine starting and driving. • Harness or connectors
[Park/neutral position (PNP) switch circuit
is open or shorted.]
• Park/neutral position (PNP) switch
• TCM (CVT models) Position (Shift lever) Known-good signal
N or P position (A/T, CVT)
Neutral position (M/T) ON
Except above OFF
ENG SPEED More than 1,200 rpm (CVT) More than 1,450 rpm (A/T)
More than 1,900 rpm (M/T)
COOLAN TEMP/S More than 70 °C (158 °F)
B/FUEL SCHDL 2.4 - 31.8 msec (CVT) 1.4 - 31.8 msec (A/T)
1.7 - 31.8 msec (M/T)
Page 2785 of 4331
![NISSAN LATIO 2009 Service Repair Manual DTC P1572 ASCD BRAKE SWITCH
EC-1429
< SERVICE INFOMATION >
[MR TYPE 2] C
D E
F
G H
I
J
K L
M A EC
NP
O
DTC P1572 ASCD BRAKE SWITCH
Component Description INFOID:0000000004500308
When the brake pedal NISSAN LATIO 2009 Service Repair Manual DTC P1572 ASCD BRAKE SWITCH
EC-1429
< SERVICE INFOMATION >
[MR TYPE 2] C
D E
F
G H
I
J
K L
M A EC
NP
O
DTC P1572 ASCD BRAKE SWITCH
Component Description INFOID:0000000004500308
When the brake pedal](/manual-img/5/57359/w960_57359-2784.png)
DTC P1572 ASCD BRAKE SWITCH
EC-1429
< SERVICE INFOMATION >
[MR TYPE 2] C
D E
F
G H
I
J
K L
M A EC
NP
O
DTC P1572 ASCD BRAKE SWITCH
Component Description INFOID:0000000004500308
When the brake pedal is depressed, ASCD brake switch (2) is
turned OFF and stop lamp switch (1) is turned ON. ECM detects the
state of the brake pedal by this input of two kinds (ON/OFF signal).
Refer to EC-1033 for the ASCD function.
CONSULT-III Reference Val ue in Data Monitor Mode INFOID:0000000004500309
Specification data are reference values.
On Board Diagnosis Logic INFOID:0000000004500310
This self-diagnosis has the on e trip detection logic.
The MIL will not light up for this diagnosis.
NOTE:
• If DTC P1572 is displayed with DT C P0605, first perform the trouble diagnosis for DTC P0605. Refer
to EC-1393 .
• This self-diagnosis has the one trip detection logic. When malfunction A is detected, DTC is not
stored in ECM memory. And in that case, 1st trip DTC and 1st trip freeze frame data are displayed.
1st trip DTC is erased when igniti on switch OFF. And even when ma lfunction A is detected in two
consecutive trips, DTC is not stored in ECM memory. BBIA0708E
MONITOR ITEM CONDITION SPECIFICATION
BRAKE SW1
(ASCD brake switch) • Ignition switch: ON• Brake pedal: Fully released (A/T, CVT)
• Brake pedal and clutch pedal: Fully re- leased (M/T) ON
• Brake pedal: Slightly depressed (A/T, CVT)
• Brake pedal and/or clutch pedal: Slight- ly depressed (M/T) OFF
BRAKE SW2
(Stop lamp switch) • Ignition switch: ONBrake pedal: Fully released OFF
Brake pedal: Slightly depressed ON DTC No.
Trouble diagnosis
name DTC detecting condition Possible cause
P1572
1572 ASCD brake switch A)
When the vehicle speed is above 30km/h (19
MPH), ON signals from the stop lamp switch
and the ASCD brake switch are sent to ECM
at the same time. • Harness or connectors
(Stop lamp switch circuit is shorted.)
• Harness or connectors (ASCD brake switch circuit is shorted.)
• Harness or connectors
(ASCD clutch switch circuit is shorted.)
(M/T)
• Stop lamp switch
• ASCD brake switch
• ASCD clutch switch (M/T)
• Incorrect stop lamp switch installation
• Incorrect ASCD brake switch installation
• Incorrect ASCD clutch switch installation (M/T)
• ECM
B)
ASCD brake switch signal is not sent to ECM
for extremely long time while the vehicle is
driving
Page 2786 of 4331
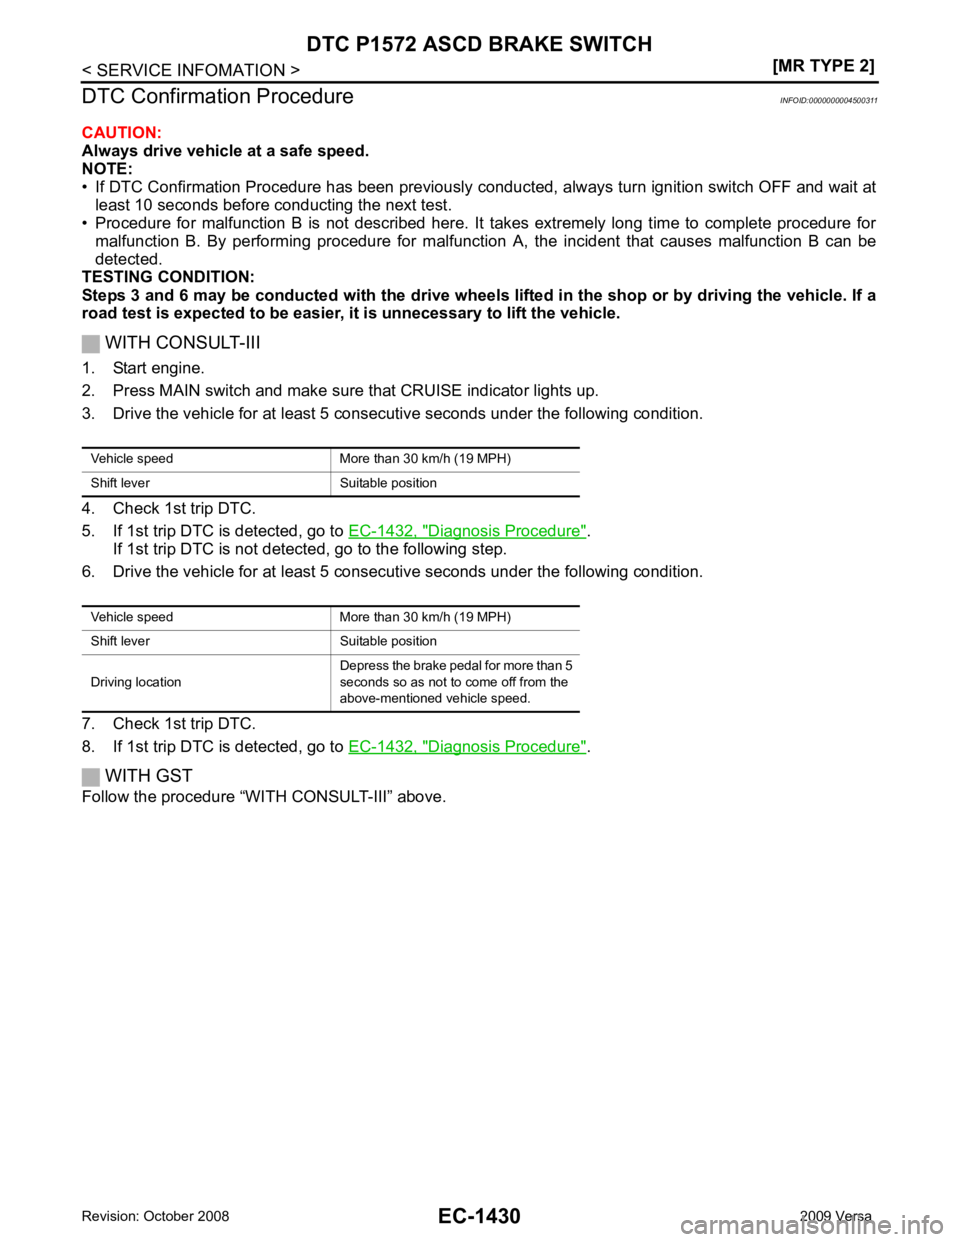
Diagnosis Procedure " .
If 1st trip DTC is not detec ted, go to the following step.
6. Drive the vehicle for at least 5 consecutive seconds under the following condition.
7. Check 1st trip DTC.
8. If 1st trip DTC is detected, go to EC-1432, " Diagnosis Procedure " .
WITH GST
Follow the procedure “WITH CONSULT-III” above.
Page 2898 of 4331
EI
N
O P
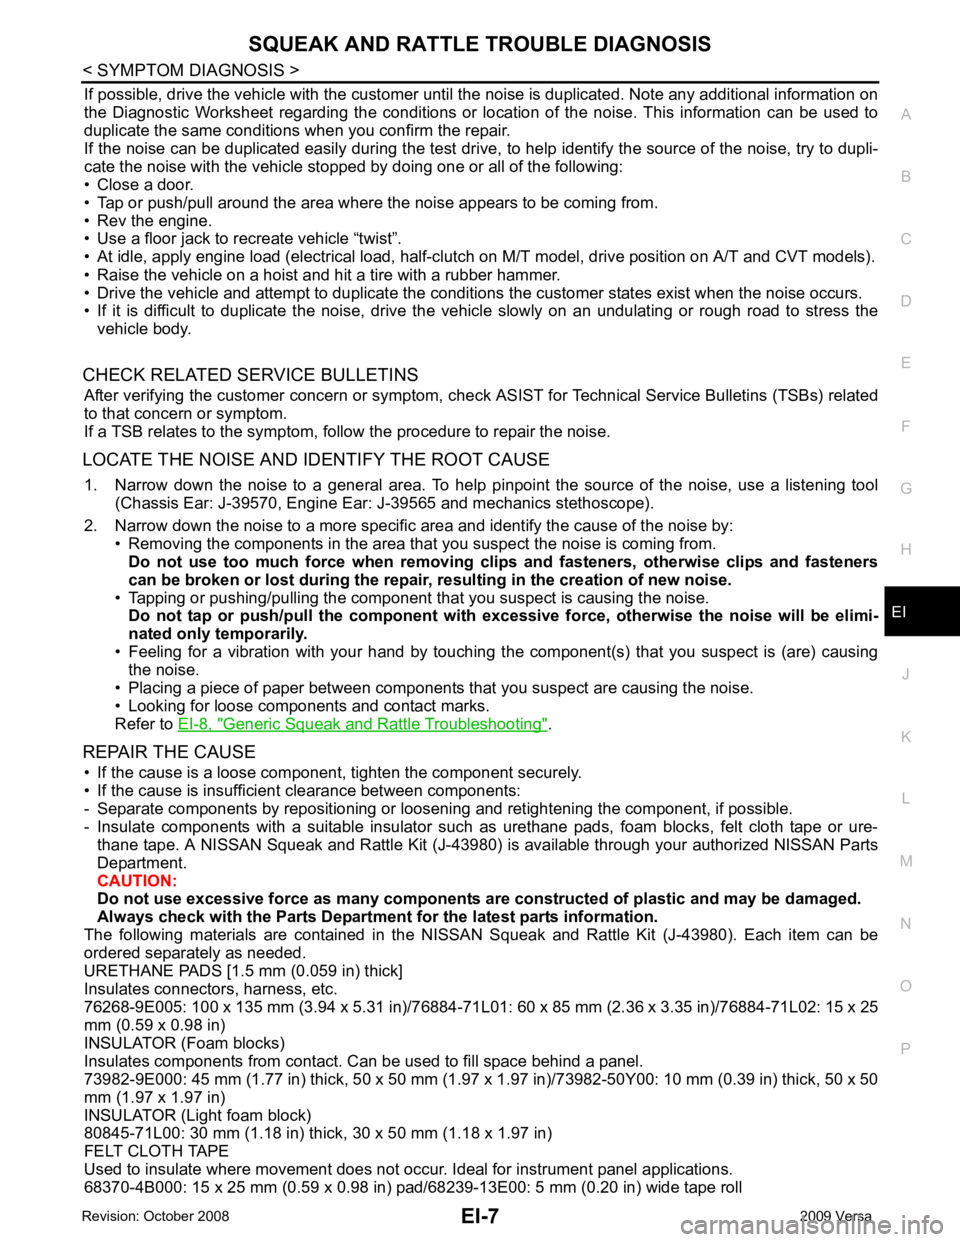
If possible, drive the vehicle with
the customer until the noise is duplicated. Note any additional information on
the Diagnostic Worksheet regarding the conditions or lo cation of the noise. This information can be used to
duplicate the same conditions when you confirm the repair.
If the noise can be duplicated easily during the test drive, to help identify the source of the noise, try to dupli-
cate the noise with the vehicle stopped by doing one or all of the following:
• Close a door.
• Tap or push/pull around the area where the noise appears to be coming from.
• Rev the engine.
• Use a floor jack to recreate vehicle “twist”.
• At idle, apply engine load (electrical load, half-clutch on M/T model, drive position on A/T and CVT models).
• Raise the vehicle on a hoist and hit a tire with a rubber hammer.
• Drive the vehicle and attempt to duplicate the conditions the customer states exist when the noise occurs.
• If it is difficult to duplicate the noise, drive the vehicle slowly on an undulating or rough road to stress the
vehicle body.
CHECK RELATED SERVICE BULLETINS After verifying the customer concern or symptom, che ck ASIST for Technical Service Bulletins (TSBs) related
to that concern or symptom.
If a TSB relates to the symptom, follow the procedure to repair the noise.
LOCATE THE NOISE AND IDENTIFY THE ROOT CAUSE 1. Narrow down the noise to a general area. To help pi npoint the source of the noise, use a listening tool
(Chassis Ear: J-39570, Engine Ear: J-39565 and mechanics stethoscope).
2. Narrow down the noise to a more specific area and identify the cause of the noise by: • Removing the components in the area that you suspect the noise is coming from.
Do not use too much force when removing clips and fasteners, otherwise clips and fasteners
can be broken or lost during the repair , resulting in the creation of new noise.
• Tapping or pushing/pulling the component that you suspect is causing the noise.
Do not tap or push/pull the component with excessi ve force, otherwise the noise will be elimi-
nated only temporarily.
• Feeling for a vibration with your hand by touching t he component(s) that you suspect is (are) causing
the noise.
• Placing a piece of paper between components that you suspect are causing the noise.
• Looking for loose components and contact marks.
Refer to EI-8, " Generic Squeak and Rattle Troubleshooting " .
REPAIR THE CAUSE • If the cause is a loose component, tighten the component securely.
• If the cause is insufficient clearance between components:
- Separate components by repositioning or loosening and retightening the component, if possible.
- Insulate components with a suitable insulator such as urethane pads, foam blocks, felt cloth tape or ure- thane tape. A NISSAN Squeak and Rattle Kit (J-43980) is available through your authorized NISSAN Parts
Department.
CAUTION:
Do not use excessive force as many components are constructed of plastic and may be damaged.
Always check with the Parts Department for the latest parts information.
The following materials are contained in the NISSA N Squeak and Rattle Kit (J-43980). Each item can be
ordered separately as needed.
URETHANE PADS [1.5 mm (0.059 in) thick]
Insulates connectors, harness, etc.
76268-9E005: 100 x 135 mm (3.94 x 5.31 in)/76884-71L01: 60 x 85 mm (2.36 x 3.35 in)/76884-71L02: 15 x 25
mm (0.59 x 0.98 in)
INSULATOR (Foam blocks)
Insulates components from contact. Can be used to fill space behind a panel.
73982-9E000: 45 mm (1.77 in) thick, 50 x 50 mm (1.97 x 1.97 in)/73982-50Y00: 10 mm (0.39 in) thick, 50 x 50
mm (1.97 x 1.97 in)
INSULATOR (Light foam block)
80845-71L00: 30 mm (1.18 in) thick, 30 x 50 mm (1.18 x 1.97 in)
FELT CLOTH TAPE
Used to insulate where movement does not occur. Ideal for instrument panel applications.
68370-4B000: 15 x 25 mm (0.59 x 0.98 in) pad/ 68239-13E00: 5 mm (0.20 in) wide tape roll
Page 2900 of 4331

EI
N
O P
3. The trunk lid torsion bars knocking together
4. A loose license plate or bracket
Most of these incidents can be repaired by adjusting, se curing or insulating the item(s) or component(s) caus-
ing the noise.
SUNROOF/HEADLINING Noises in the sunroof/headlining area can often be traced to one of the following:
1. Sunroof lid, rail, linkage or seals making a rattle or light knocking noise
2. Sun visor shaft shaking in the holder
3. Front or rear windshield touching headliner and squeaking
Again, pressing on the components to stop the noise while duplicating the conditions can isolate most of these
incidents. Repairs usually consist of insulating with felt cloth tape.
OVERHEAD CONSOLE (FRONT AND REAR) Overhead console noises are often caused by the cons ole panel clips not being engaged correctly. Most of
these incidents are repaired by pushing up on the c onsole at the clip locations until the clips engage.
In addition look for:
1. Loose harness or harness connectors.
2. Front console map/reading lamp lens loose.
3. Loose screws at console attachment points.
SEATS When isolating seat noise it's important to note the pos ition the seat is in and the load placed on the seat when
the noise is present. These conditions should be duplic ated when verifying and isolating the cause of the
noise.
Cause of seat noise include:
1. Headrest rods and holder
2. A squeak between the seat pad cushion and frame
3. The rear seatback lock and bracket
These noises can be isolated by moving or pressing on the suspected components while duplicating the con-
ditions under which the noise occurs. Most of thes e incidents can be repaired by repositioning the component
or applying urethane tape to the contact area.
UNDERHOOD Some interior noise may be caused by components under the hood or on the engine wall. The noise is then
transmitted into the passenger compartment.
Causes of transmitted underhood noise include:
1. Any component installed on the engine wall
2. Components that pass through the engine wall
3. Engine wall mounts and connectors
4. Loose radiator pins
5. Hood bumpers out of adjustment
6. Hood striker out of adjustment
These noises can be difficult to isolate since they cannot be reached from the interior of the vehicle. The best
method is to secure, move or insulate one component at a time and test drive the vehicle. Also, engine RPM
or load can be changed to isolate the noise. Repairs c an usually be made by moving, adjusting, securing, or
insulating the component causing the noise.
Page 2962 of 4331
![NISSAN LATIO 2009 Service Repair Manual DRIVE BELTS
EM-15
< ON-VEHICLE MAINTENANCE >
[HR16DE] C
D E
F
G H
I
J
K L
M A EM
NP
O
• When the lock nut is loosened excessively, the idle
r pulley tilts and the correct tension adju NISSAN LATIO 2009 Service Repair Manual DRIVE BELTS
EM-15
< ON-VEHICLE MAINTENANCE >
[HR16DE] C
D E
F
G H
I
J
K L
M A EM
NP
O
• When the lock nut is loosened excessively, the idle
r pulley tilts and the correct tension adju](/manual-img/5/57359/w960_57359-2961.png)
DRIVE BELTS
EM-15
< ON-VEHICLE MAINTENANCE >
[HR16DE] C
D E
F
G H
I
J
K L
M A EM
NP
O
• When the lock nut is loosened excessively, the idle
r pulley tilts and the correct tension adjust-
ment cannot be performed. Never loo sen it excessively (more than 45 degrees).
• Put a matching mark on the lock nut, and check turning angle with a protractor. Never visually
check the tightening angle.
2. Adjust the belt tension by turning the adjusting bolt. CAUTION:
• When checking immediately after in stallation, first adjust it to the specified value. Then, after
turning crankshaft two turns or more, re-adjust to the specified value to avoid variation in deflec-
tion between pulleys.
• When the tension adjustment is performed, the lo ck nut should be in the condition at step“2”. If
the tension adjustment is performed when the lo ck nut is loosened more than the standard, the
idler pulley tilts and the correct tens ion adjustment cannot be performed.
3. Tighten the idler pulley lock nut.
Removal and Installation INFOID:0000000004784271
REMOVAL 1. Loosen the idler pulley lock nut (A), and then adjust the belt ten- sion by turning the adjusting bolt (B).
2. Remove drive belt.
INSTALLATION 1. Pull the idler pulley in the loosening direction, and then tempo- rarily tighten the idler pulley lock nut (A) to the following torque.
NOTE:
Do not move the lock nut from the tightened position. Proceed to step “2”.
2. Install the drive belt to each pulley. CAUTION:
• Make sure that there is no oil, grease, or coolant, etc. in pulley grooves.
• Make sure that the belt is securely inside the groove on each pulley.
3. Adjust drive belt tension by turning the adjusting bolt. Refer to EM-14, " Tension Adjustment " .
CAUTION: Idler pulley lock nut : 34.8 N·m (3.5 kg-m, 26 ft-lb)
1 : Generator
2 : Water pump
3 : Crankshaft pulley
4 : A/C compressor (with A/C models)
: Idler pulley (without A/C models)
5 : Idler pulley
6 : Drive belt PBIC3643E
1 : Generator
2 : Water pump
3 : Crankshaft pulley
4 : A/C compressor (with A/C models)
: Idler pulley (without A/C models)
5 : Idler pulley
6 : Drive belt
B : Adjusting bolt
Idler pulley lock nut : 4.4 N·m (0.45 kg-m, 39 in-lb)
(temporary tightening) PBIC3643E
Page 2984 of 4331
EM
NP
O
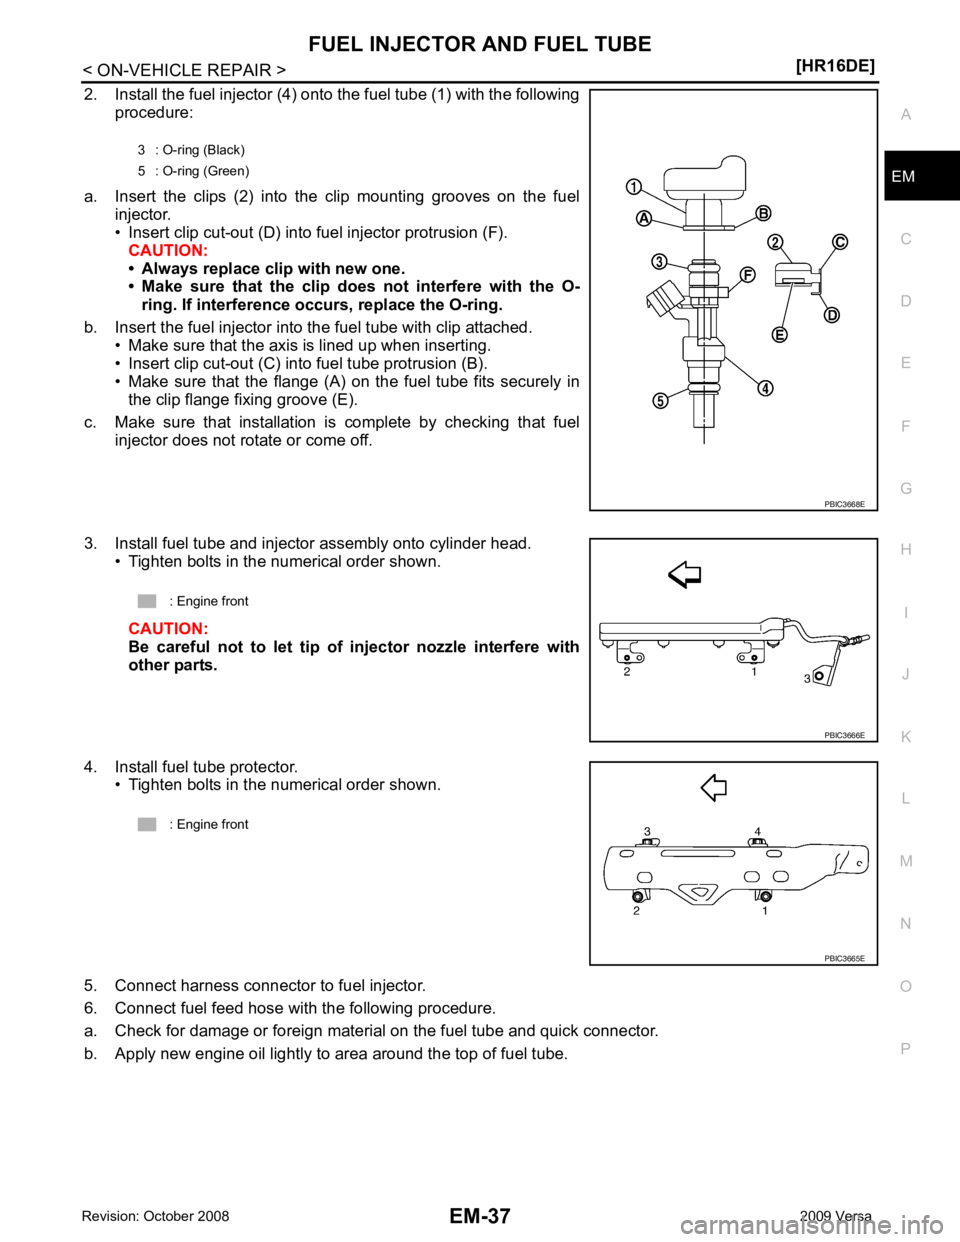
2. Install the fuel injector (4) onto the fuel tube (1) with the following
procedure:
a. Insert the clips (2) into the clip mounting grooves on the fuel injector.
• Insert clip cut-out (D) into fuel injector protrusion (F). CAUTION:
• Always replace clip with new one.
• Make sure that the clip do es not interfere with the O-
ring. If interference occurs, replace the O-ring.
b. Insert the fuel injector into the fuel tube with clip attached. • Make sure that the axis is lined up when inserting.
• Insert clip cut-out (C) into fuel tube protrusion (B).
• Make sure that the flange (A) on the fuel tube fits securely in the clip flange fixing groove (E).
c. Make sure that installation is complete by checking that fuel injector does not rotate or come off.
3. Install fuel tube and injector assembly onto cylinder head. • Tighten bolts in the numerical order shown.
CAUTION:
Be careful not to let tip of injector nozzle interfere with
other parts.
4. Install fuel tube protector. • Tighten bolts in the numerical order shown.
5. Connect harness connector to fuel injector.
6. Connect fuel feed hose with the following procedure.
a. Check for damage or foreign material on the fuel tube and quick connector.
b. Apply new engine oil lightly to area around the top of fuel tube. 3 : O-ring (Black)
5 : O-ring (Green)