2009 NISSAN LATIO oil pressure
[x] Cancel search: oil pressurePage 2970 of 4331
EM
NP
O
COMPRESSION PRESSURE
Inspection INFOID:0000000004784276
1. Warm up engine thoroughly. Then, stop it.
2. Release fuel pressure. Refer to EC-498, " Inspection " .
3. Remove ignition coil and spark plug from each cylinder. Refer to EM-46, " Exploded View " .
4. Connect an engine tachometer (not required in use of CONSULT-III).
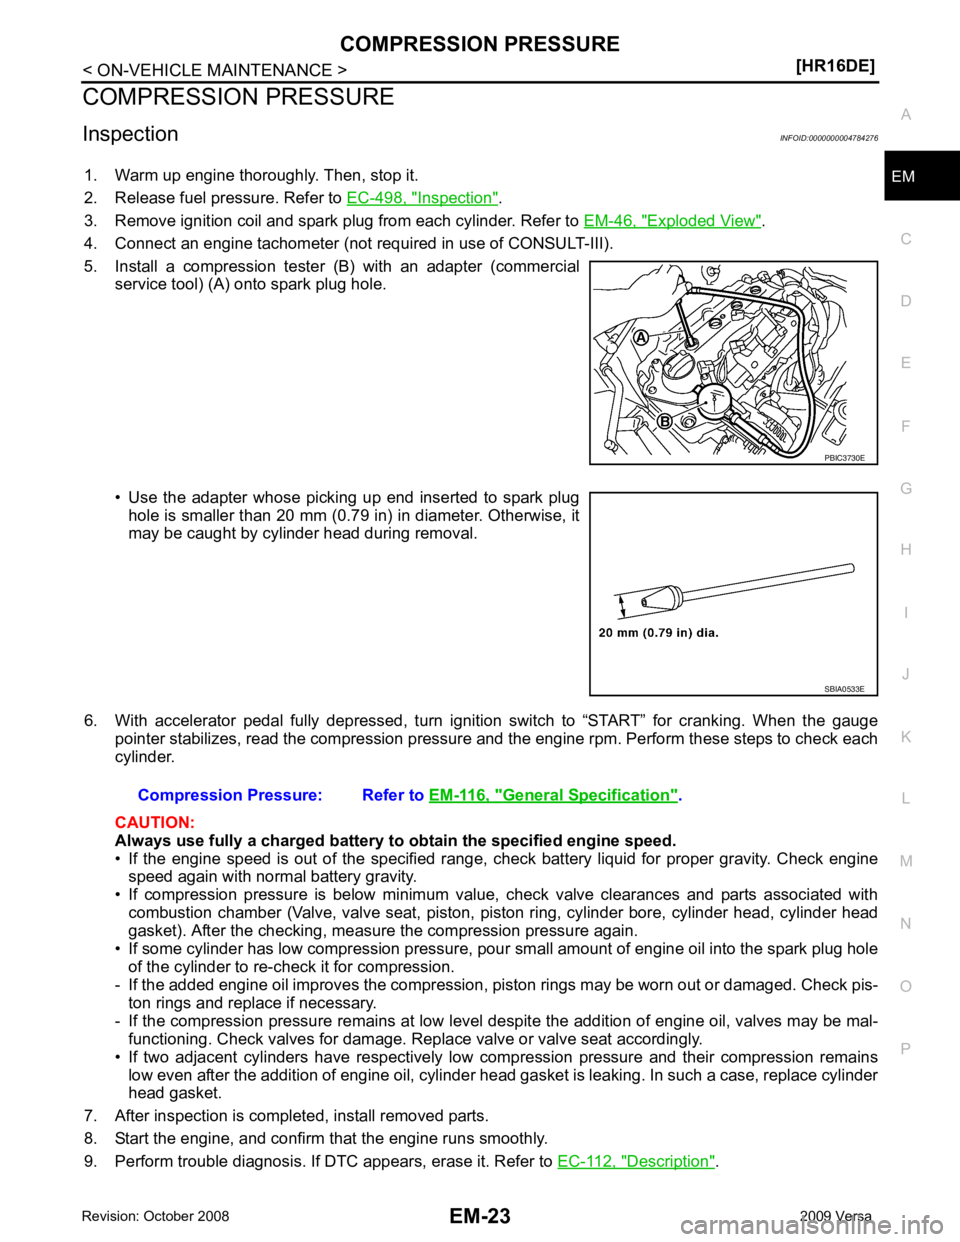
5. Install a compression tester (B) with an adapter (commercial service tool) (A) onto spark plug hole.
• Use the adapter whose picking up end inserted to spark plug hole is smaller than 20 mm (0.79 in) in diameter. Otherwise, it
may be caught by cylinder head during removal.
6. With accelerator pedal fully depressed, turn ignition switch to “START” for cranking. When the gauge pointer stabilizes, read the compression pressure and the engine rpm. Perform these steps to check each
cylinder.
CAUTION:
Always use fully a charged battery to obtain the specified engine speed.
• If the engine speed is out of the specified range, c heck battery liquid for proper gravity. Check engine
speed again with normal battery gravity.
• If compression pressure is below minimum value, check valve clearances and parts associated with combustion chamber (Valve, valve seat, piston, pi ston ring, cylinder bore, cylinder head, cylinder head
gasket). After the checking, measure the compression pressure again.
• If some cylinder has low compression pressure, pour small amount of engine oil into the spark plug hole
of the cylinder to re-check it for compression.
- If the added engine oil improves the compression, piston rings may be worn out or damaged. Check pis-
ton rings and replace if necessary.
- If the compression pressure remains at low level despite the addition of engine oil, valves may be mal- functioning. Check valves for damage. Replace valve or valve seat accordingly.
• If two adjacent cylinders have respectively low compression pressure and their compression remains low even after the addition of engine oil, cylinder head gasket is leaking. In such a case, replace cylinder
head gasket.
7. After inspection is completed, install removed parts.
8. Start the engine, and confirm that the engine runs smoothly.
9. Perform trouble diagnosis. If DTC appears, erase it. Refer to EC-112, " Description " . SBIA0533E
General Specification " .
Page 3004 of 4331
EM
NP
O
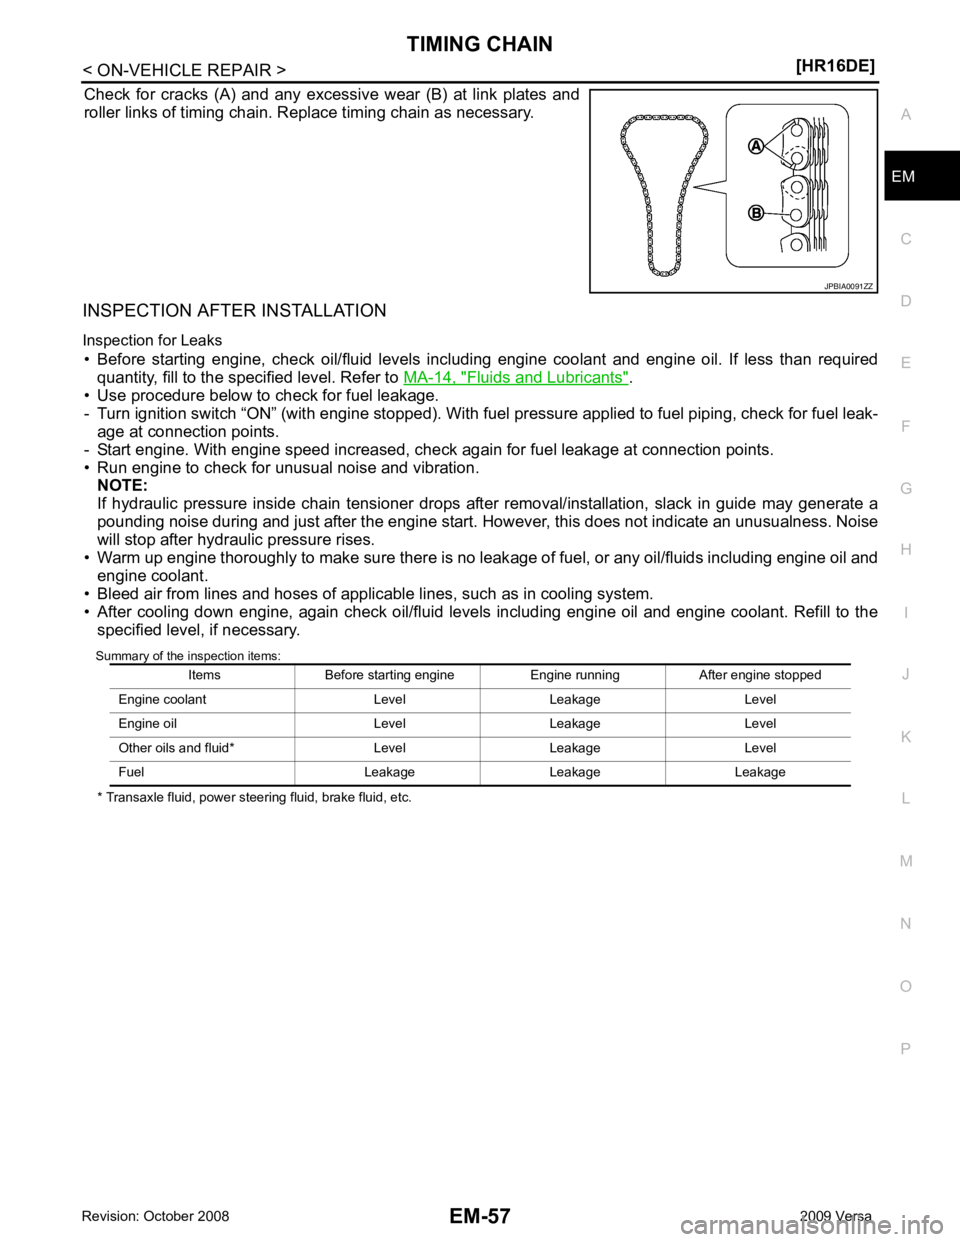
Check for cracks (A) and any excessive wear (B) at link plates and
roller links of timing chain. Replace timing chain as necessary.
INSPECTION AFTER INSTALLATION
Inspection for Leaks • Before starting engine, check oil/fluid levels incl uding engine coolant and engine oil. If less than required
quantity, fill to the specified level. Refer to MA-14, " Fluids and Lubricants " .
• Use procedure below to check for fuel leakage.
- Turn ignition switch “ON” (with engine stopped). With fuel pressure applied to fuel piping, check for fuel leak-
age at connection points.
- Start engine. With engine speed increased, check again for fuel leakage at connection points.
• Run engine to check for unusual noise and vibration. NOTE:
If hydraulic pressure inside chain tensioner drops after removal/installation, slack in guide may generate a
pounding noise during and just after the engine start. However, this does not indicate an unusualness. Noise
will stop after hydraulic pressure rises.
• Warm up engine thoroughly to make sure there is no leak age of fuel, or any oil/fluids including engine oil and
engine coolant.
• Bleed air from lines and hoses of applicable lines, such as in cooling system.
• After cooling down engine, again check oil/fluid levels including engine oil and engine coolant. Refill to the specified level, if necessary.
Summary of the inspection items:
* Transaxle fluid, power steering fluid, brake fluid, etc.
Page 3008 of 4331
EM
NP
O
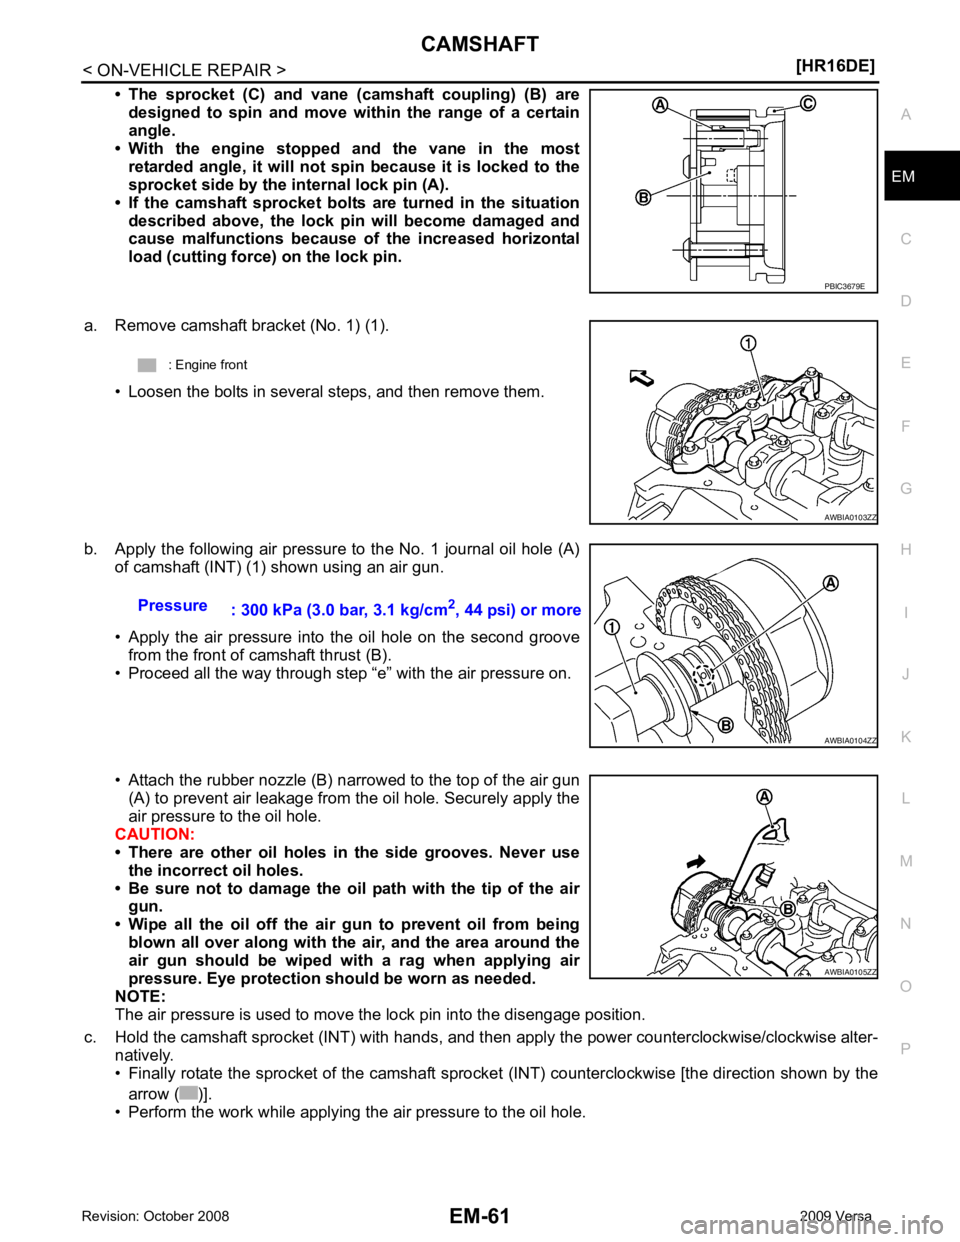
• The sprocket (C) and vane (camshaft coupling) (B) are
designed to spin and move wi thin the range of a certain
angle.
• With the engine stopped and the vane in the most
retarded angle, it will not sp in because it is locked to the
sprocket side by the internal lock pin (A).
• If the camshaft sprocket bolts are turned in the situation
described above, the lock pi n will become damaged and
cause malfunctions because of the increased horizontal
load (cutting force) on the lock pin.
a. Remove camshaft bracket (No. 1) (1). • Loosen the bolts in several steps, and then remove them.
b. Apply the following air pressure to the No. 1 journal oil hole (A) of camshaft (INT) (1) shown using an air gun.
• Apply the air pressure into the oil hole on the second groove from the front of camshaft thrust (B).
• Proceed all the way through step “e” with the air pressure on.
• Attach the rubber nozzle (B) narrowed to the top of the air gun (A) to prevent air leakage from the oil hole. Securely apply the
air pressure to the oil hole.
CAUTION:
• There are other oil holes in the side grooves. Never use
the incorrect oil holes.
• Be sure not to damage the oil path with the tip of the air
gun.
• Wipe all the oil off the air gun to prevent oil from being blown all over along with the air, and the area around the
air gun should be wiped wi th a rag when applying air
pressure. Eye protection should be worn as needed.
NOTE:
The air pressure is used to move the lock pin into the disengage position.
c. Hold the camshaft sprocket (INT) with hands, and then apply the power counterclockwise/clockwise alter-
natively.
• Finally rotate the sprocket of the camshaft sprocke t (INT) counterclockwise [the direction shown by the
arrow ( )].
• Perform the work while applying the air pressure to the oil hole. AWBIA0105ZZ
Page 3021 of 4331
Fluids and Lubricants " .
• Use procedure below to check for fuel leakage.
- Turn ignition switch “ON” (with engine stopped). With fuel pressure applied to fuel piping, check for fuel leak-
age at connection points.
- Start engine. With engine speed increased, che ck again for fuel leakage at connection points.
• Run engine to check for unusual noise and vibration. NOTE:
If hydraulic pressure inside timing chain tensioner drops after removal/installation, slack in the guide may
generate a pounding noise during and just after engine start. However, this is normal. Noise will stop after
hydraulic pressure rises.
• Warm up engine thoroughly to make sure there is no leakage of fuel, or any oil/fluids including engine oil and
engine coolant.
• Bleed air from lines and hoses of applicable lines, such as in cooling system.
• After cooling down engine, again check oil/fluid levels including engine oil and engine coolant. Refill to the
specified level, if necessary.
Summary of the inspection items:
*: Transmission/transaxle/CVT fluid, power steering fluid, brake fluid, etc.
Inspection of Camshaft Sprocket (INT) Oil Groove
CAUTION:
• Perform this inspection only when DTC P0011 is de tected in self-diagnostic results of CONSULT-III
and it is directed according to inspect ion procedure of EC section. Refer to EC-133, " Diagnosis Pro-
cedure " .
• Check when engine is cold so as to pr event burns from the splashing engine oil.
1. Check engine oil level. Refer to LU-7, " Inspection " .
2. Perform the following procedure so as to prevent the engine from being unintentionally started while
checking.
a. Release the fuel pressure. Refer to EC-498, " Inspection " .
b. Remove intake manifold. Refer to EM-28, " Exploded View " .
c. Disconnect ignition coil and injector harness connectors. Refer to EM-46, " Exploded View " .
3. Remove intake valve timing control solenoid valve. Refer to EM-49, " Exploded View " .
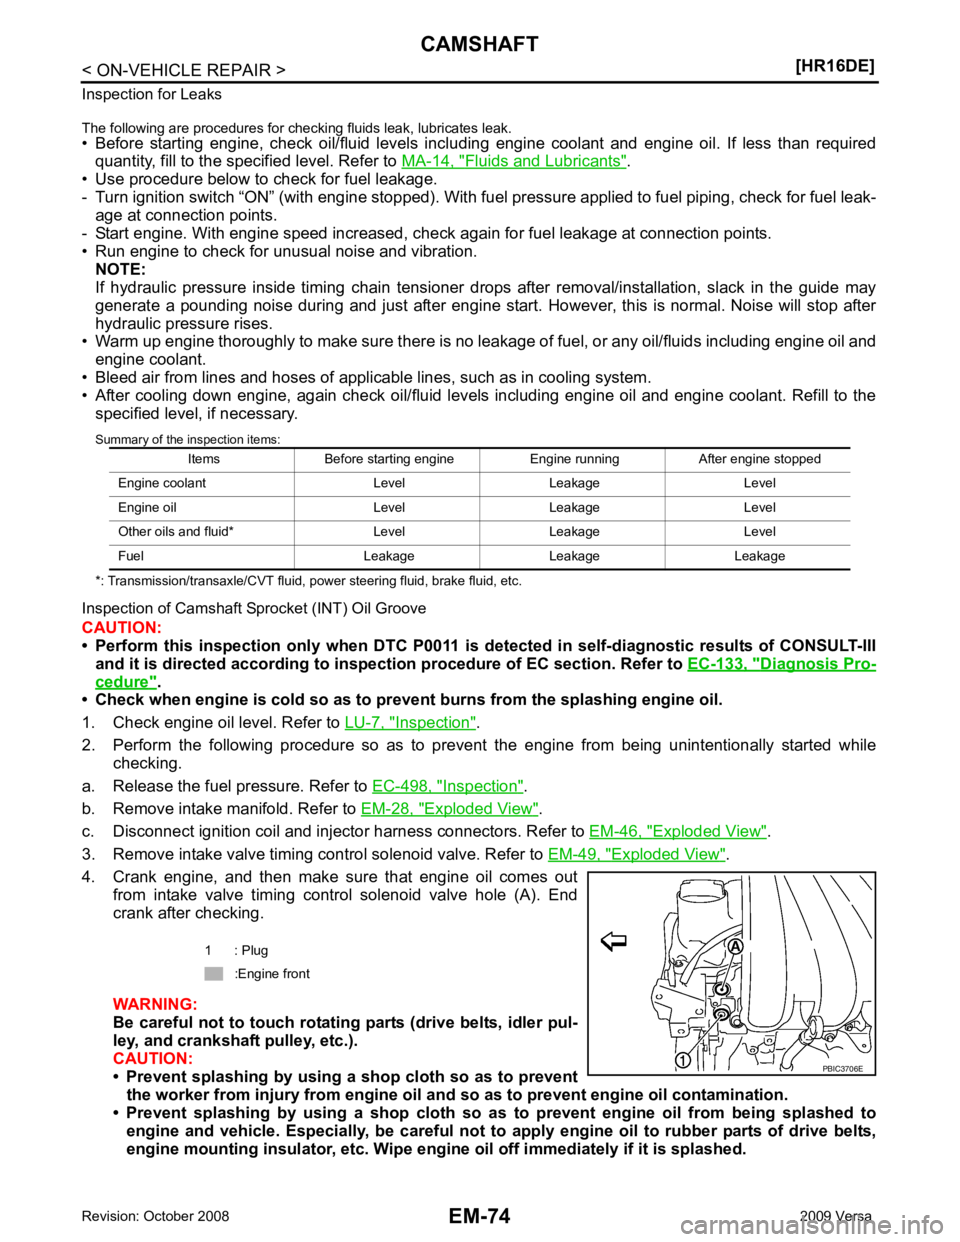
4. Crank engine, and then make sure that engine oil comes out from intake valve timing control solenoid valve hole (A). End
crank after checking.
WARNING:
Be careful not to touch rotating parts (drive belts, idler pul-
ley, and crankshaft pulley, etc.).
CAUTION:
• Prevent splashing by using a shop cloth so as to prevent
the worker from injury from engine oil an d so as to prevent engine oil contamination.
• Prevent splashing by using a shop cloth so as to prevent engine oil from being splashed to
engine and vehicle. Especially, be careful not to apply engine oil to rubber parts of drive belts,
engine mounting insulator, etc. Wipe engi ne oil off immediately if it is splashed.
Items Before starting engine Engine running After engine stopped
Engine coolant Level Leakage Level
Engine oil Level Leakage Level
Other oils and fluid* Level Leakage Level
Fuel Leakage Leakage Leakage 1 : Plug
:Engine front
Page 3026 of 4331
EM
NP
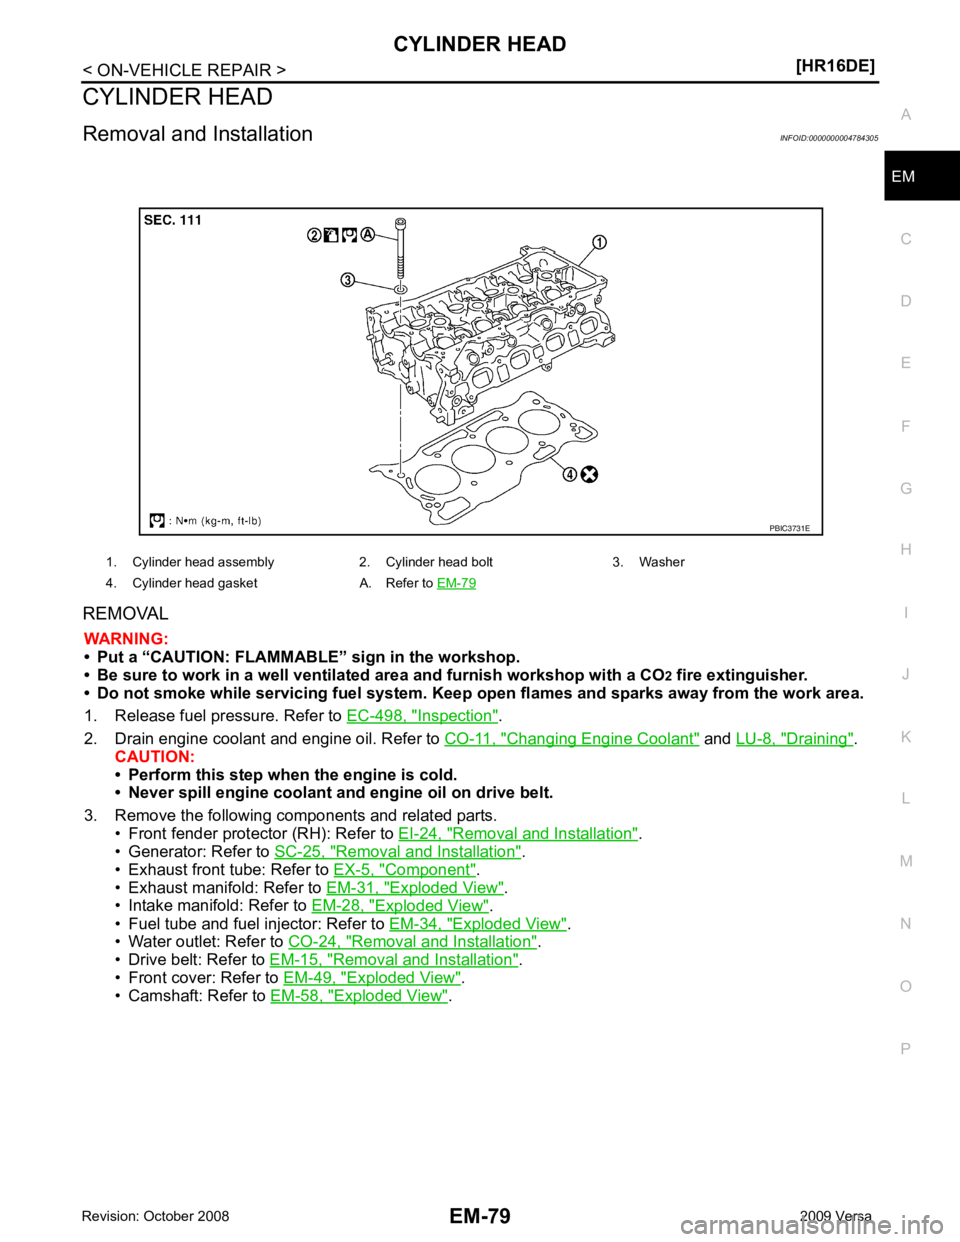
O
CYLINDER HEAD
Removal and Installation INFOID:0000000004784305
REMOVAL WARNING:
• Put a “CAUTION: FLAMMABLE” sign in the workshop.
• Be sure to work in a well ventila ted area and furnish workshop with a CO
2 fire extinguisher.
• Do not smoke while servicing fuel system. Keep open flames and sparks away from the work area.
1. Release fuel pressure. Refer to EC-498, " Inspection " .
2. Drain engine coolant and engine oil. Refer to CO-11, " Changing Engine Coolant " and
LU-8, " Draining " .
CAUTION:
• Perform this step when the engine is cold.
• Never spill engine coolant an d engine oil on drive belt.
3. Remove the following components and related parts. • Front fender protector (RH): Refer to EI-24, " Removal and Installation " .
• Generator: Refer to SC-25, " Removal and Installation " .
• Exhaust front tube: Refer to EX-5, " Component " .
• Exhaust manifold: Refer to EM-31, " Exploded View " .
• Intake manifold: Refer to EM-28, " Exploded View " .
• Fuel tube and fuel injector: Refer to EM-34, " Exploded View " .
• Water outlet: Refer to CO-24, " Removal and Installation " .
• Drive belt: Refer to EM-15, " Removal and Installation " .
• Front cover: Refer to EM-49, " Exploded View " .
• Camshaft: Refer to EM-58, " Exploded View " .
1. Cylinder head assembly 2. Cylinder head bolt 3. Washer
4. Cylinder head gasket A. Refer to EM-79
Page 3032 of 4331

EM
NP
O
• Set a try square (A) along the side of valve spring and rotate
spring. Measure the maximum clearance between the top of spring
and try square.
• If it exceeds the limit, replace valve spring.
Valve Spring Dimensions and Valve Spring Pressure Load • Check the valve spring pressure at specified spring height.
• If the installation load or load with valve open is out of the stan- dard, replace valve spring.
ASSEMBLY 1. Install the valve guide, if necessary. CAUTION:
Replace with oversize [0.2 mm (0.008 in)] valve guide.
a. Using suitable tool (A), ream cylinder head valve guide hole.
b. Heat cylinder head to 110 to 130 °C (230 to 266 °F) by soaking in
heated oil (A). B : Contact
Limit : Refer to EM-119, " Cylinder Head " .
Cylinder Head " .
Standard : Refer to EM-119, " Cylinder Head " .
Cylinder Head " .
PBIC3214J
Page 3034 of 4331

CYLINDER HEAD
EM-87
< ON-VEHICLE REPAIR >
[HR16DE] C
D E
F
G H
I
J
K L
M A EM
NP
O
d. Using suitable tool or valve seat grinder, finish seat to the speci-
fied dimensions. Refer to EM-119, " Cylinder Head " .
CAUTION:
When using the valve seat cutt er, firmly grip cutter handle
with both hands. Then, press on the contacting surface all
around the circumference to cu t in a single drive. Improper
pressure on with cutter or cu tting many different times may
result in stage valve seat.
e. Using compound, grind to adjust valve fitting.
f. Check again for normal contact. Refer to EM-82, " Disassembly and Assembly " .
3. Install valve oil seal. • Install with Tool (A) to match dimension as shown.
4. Install valve spring seat.
5. Install valve. • Install larger diameter to intake side.
6. Install valve spring. NOTE:
It can be installed in either direction.
7. Install valve spring retainer.
8. Install valve collet. • Compress valve spring with Tool (A). Install valve collet with amagnet hand (B).
CAUTION:
Be careful not to damage valve lifter holes.
• Tap valve stem edge lightly with a plastic hammer after instal-
lation to check its installed condition.
9. Install valve lifter.
10. Install spark plug with a suitable tool. SEM934C
Height “H” : 13.2 - 13.8 mm (0.520 - 0.543 in)
Tool number : KV10115600 (J-38958) PBIC3211J
Tool number : KV10116200 (J-26336-B)
: KV10115900 (J-26336-20)
: KV10109220 ( — ) PBIC3727E
Page 3038 of 4331
EM
NP
O
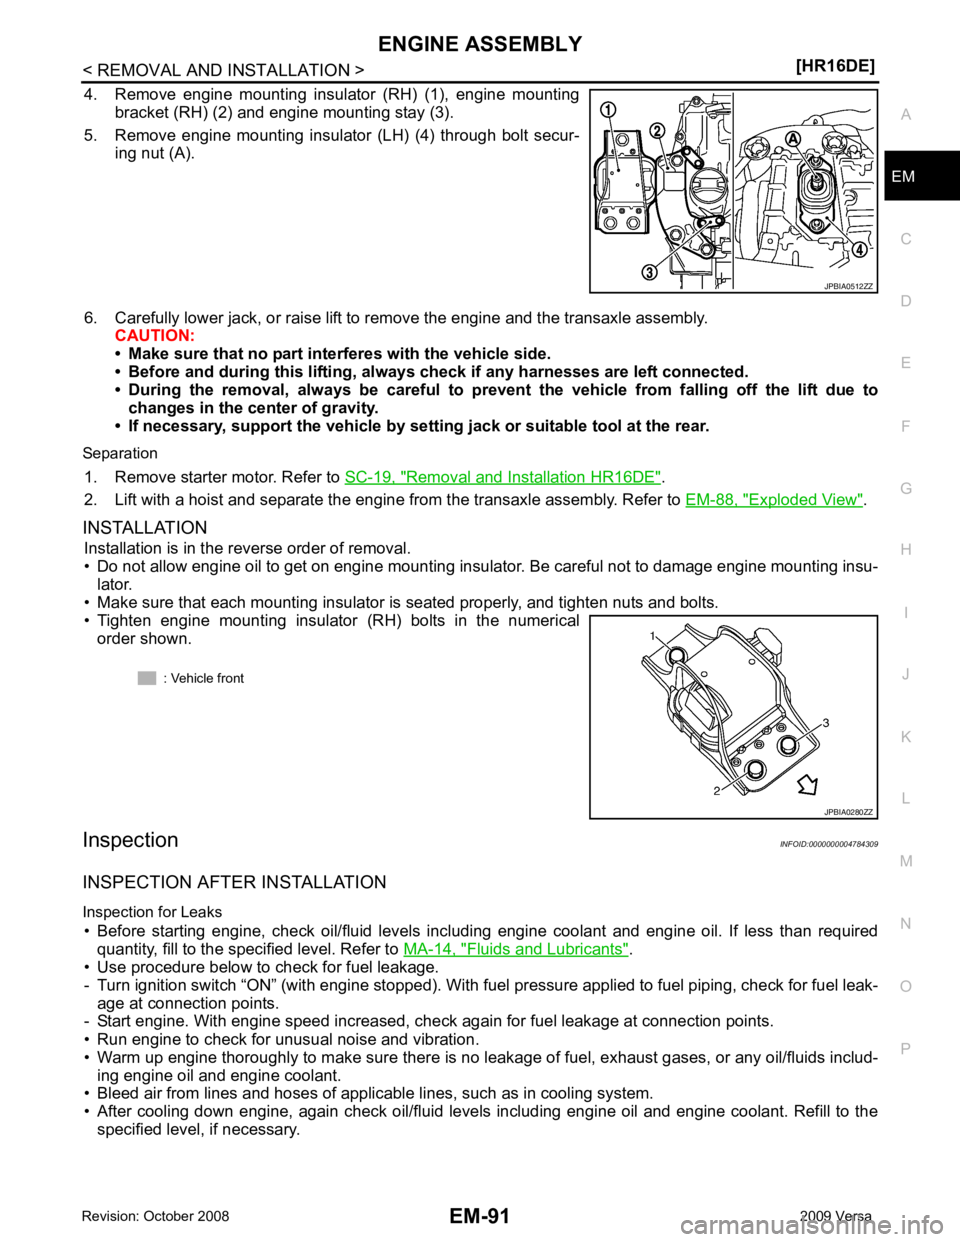
4. Remove engine mounting insulator (RH) (1), engine mounting
bracket (RH) (2) and engine mounting stay (3).
5. Remove engine mounting insulator (LH) (4) through bolt secur- ing nut (A).
6. Carefully lower jack, or raise lift to remove the engine and the transaxle assembly. CAUTION:
• Make sure that no part interferes with the vehicle side.
• Before and during this lifting, alw ays check if any harnesses are left connected.
• During the removal, always be careful to prevent the vehicle from falling off the lift due to
changes in the center of gravity.
• If necessary, support the vehicle by setting jack or suitable tool at the rear.
Separation 1. Remove starter motor. Refer to SC-19, " Removal and Installation HR16DE " .
2. Lift with a hoist and separate the engine from the transaxle assembly. Refer to EM-88, " Exploded View " .
INSTALLATION Installation is in the reverse order of removal.
• Do not allow engine oil to get on engine mounting insulator. Be careful not to damage engine mounting insu- lator.
• Make sure that each mounting insulator is seated properly, and tighten nuts and bolts.
• Tighten engine mounting insulator (RH) bolts in the numerical
order shown.
Inspection INFOID:0000000004784309
INSPECTION AFTER INSTALLATION
Inspection for Leaks • Before starting engine, check oil/fluid levels incl uding engine coolant and engine oil. If less than required
quantity, fill to the specified level. Refer to MA-14, " Fluids and Lubricants " .
• Use procedure below to check for fuel leakage.
- Turn ignition switch “ON” (with engine stopped). With fuel pressure applied to fuel piping, check for fuel leak-
age at connection points.
- Start engine. With engine speed increased, check again for fuel leakage at connection points.
• Run engine to check for unusual noise and vibration.
• Warm up engine thoroughly to make sure there is no leak age of fuel, exhaust gases, or any oil/fluids includ-
ing engine oil and engine coolant.
• Bleed air from lines and hoses of applicable lines, such as in cooling system.
• After cooling down engine, again check oil/fluid levels including engine oil and engine coolant. Refill to the specified level, if necessary.