2009 MITSUBISHI ASX display
[x] Cancel search: displayPage 140 of 368
![MITSUBISHI ASX 2009 1.G Owners Manual [Except for vehicles equipped with keyless
operation system]
The ignition switch is turned to the “LOCK”
or “ACC” position, or the key is removed
from the ignition switch.
[For veh MITSUBISHI ASX 2009 1.G Owners Manual [Except for vehicles equipped with keyless
operation system]
The ignition switch is turned to the “LOCK”
or “ACC” position, or the key is removed
from the ignition switch.
[For veh](/manual-img/19/7566/w960_7566-139.png)
[Except for vehicles equipped with keyless
operation system]
The ignition switch is turned to the “LOCK”
or “ACC” position, or the key is removed
from the ignition switch.
[For vehicles equipped with keyless opera-
tion system]
The operation mode is in OFF or ACC.
[When the engine was started using the key]
• If the key is removed and the driver’sdoor is opened, a buzzer sounds at a high
pitch intermittently to remind the driver
to turn off the lamps.
[When the engine was started using the key-
less operation function] • If the operation mode is put in OFF andthe driver’s door is opened, a buzzer
sounds at a high pitch intermittently to re-
mind the driver to turn off the lamps.
l If the following operation is performed while
the lamp switch is in the “ ”
position, the
lamps will remain on for about 3 minutes
while the driver’s door is shut and will then
automatically go out.
[Except for vehicles equipped with keyless
operation system]
The ignition switch is turned to the “LOCK”
or “ACC” position, or the key is removed
from the ignition switch.
[For vehicles equipped with keyless opera-
tion system]
The operation mode is in OFF or ACC.
NOTE l The lamp auto-cutout will not function when
the lamp switch is in the “ ” position.l
The
lamp auto-cutout function can also be dis-
abled.
For further information, we recommend you
to consult a MITSUBISHI MOTORS Author-
ized Service Point.
On vehicles equipped with MITSUBISHI
Multi-Communication System (MMCS),
screen operations can be used to make the ad-
justment. Refer to the separate owner’s man-
ual for details.
When you want to keep the lamps on: 1. In the following cases, turn the lamp switchto the “OFF” position.
[Except for vehicles equipped with keyless
operation system]
The ignition switch is in the “LOCK” or
“ACC” position.
[For vehicles equipped with keyless opera-
tion system]
The operation mode is in OFF or ACC.
2. Turn on the lamps with the switch in the
“ ”
or “ ” position again, then the
lamps will remain on.
NOTE l When the engine was started using the key, if
the driver’s door is opened and the key is re-
moved, the lamp monitor buzzer sounds at a
high pitch intermittently.
The buzzer stops when the driver’s door is
closed. (The warning is also displayed on the
multi-information display.)
The buzzer stops in the following manner.
• Turn the lamp switch to the “OFF” posi-tion.
• Close the driver’s door. l
When
the engine was started using the key-
less operation function, if the driver’s door is
opened and the operation mode is put in
OFF, the lamp monitor buzzer sounds at a
high pitch intermittently.
The buzzer stops when the driver’s door is
closed. (The warning is also displayed on the
multi-information display.)
The buzzer stops in the following manner. • Turn the lamp switch to the “OFF” posi-tion.
• Close the driver’s door.
Lamp monitor buzzer E00506100559
[When the engine was started using the key]
If
the driver’s door is opened when the key is in the
“LOCK” or “ACC” position or removed from the
ignition switch while the lamps are on, a buzzer
will sound to remind the driver to turn off the lamps.
[When the engine was started using the keyless op-
eration function]
If the driver’s door is opened when the operation
mode is in ACC or OFF with the lamps illumina-
ted, a buzzer will sound to remind the driver to turn
off the lamps.
In both cases, the buzzer will automatically stop if
the auto-cutoff function is activated, the lamp
switch is turned off, or the door is closed. Instruments and controls
3-46
3
Page 143 of 368

Vehi-
cle
condi- tion Switch
posi-tion “0” “0” “1” “2” “3” ●:1 person
:Full luggage loading
Switch position 0- Driver only/Driver + 1 front passenger
Switch position 1- 5 passengers (including driv- er)
Switch position 2- 5 passengers (including driv- er) + Full luggage loading
Switch position 3- Driver + Full luggage loading
Automatic headlamp levelling (vehi-
cles with discharge headlamps) E00517600453
This mechanism automatically adjusts the direction
of
the headlamps (beam position) depending on
changes in the condition of the vehicle, such as the
number of occupants or luggage weight. When the
headlamps are illuminated with the ignition switch
or the operation mode in ON, the beam position of
the headlamps is automatically adjusted when the
vehicle is stopped. Headlamp automatic levelling system warning dis-
play
Type 1 Type 2
If there is a fault in the automatic headlamp level-
ling
system, the warning display is displayed on
the information screen in the multi-information dis-
play. CAUTION
l
If
a warning is displayed, the system may
be malfunctioning, so we recommend you
to have your vehicle inspected. Turn-signal lever
E00506501231 1- Turn-signals
When
making a normal turn, use position
(1). The lever will return automatically when
cornering is completed.
2- Lane-change signals When moving the lever to (2) slightly to
change a lane, the turn-signal lamps and indi-
cation lamp in the instrument cluster will on-
ly flash while the lever is operated.
Also, when you move the lever to (2) slight-
ly then release it, the turn-signal lamps and in-
dication lamp in the instrument cluster will
flash 3 times.
NOTE l If the lamp flashes unusually quickly, the
bulb in a turn-signal lamp may have burned
out. We recommend you to have the vehicle
inspected.
l It is possible to activate the following func-
tions. Instruments and controls
3-49 3
Page 156 of 368
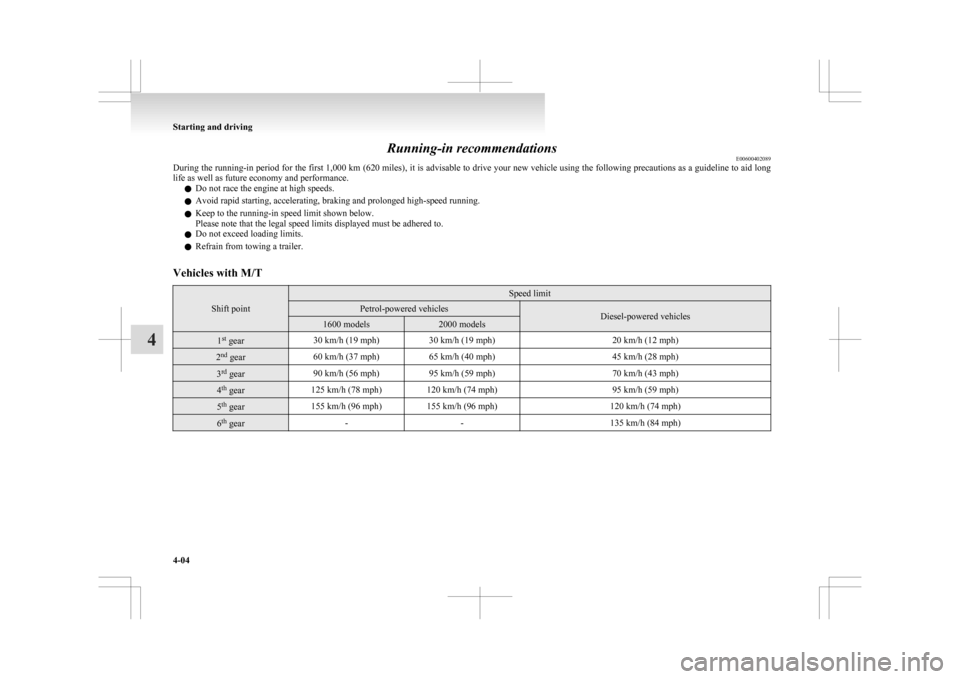
Running-in recommendations
E00600402089
During
the running-in period for the first 1,000 km (620 miles), it is advisable to drive your new vehicle using the following precautions as a guideline to aid long
life as well as future economy and performance.
l Do not race the engine at high speeds.
l Avoid rapid starting, accelerating, braking and prolonged high-speed running.
l Keep to the running-in speed limit shown below.
Please note that the legal speed limits displayed must be adhered to.
l Do not exceed loading limits.
l Refrain from towing a trailer.
Vehicles with M/T Shift point Speed limit
Petrol-powered vehicles
Diesel-powered vehicles
1600 models 2000 models
1
st
gear 30 km/h (19 mph)
30 km/h (19 mph) 20 km/h (12 mph)2
nd
gear 60 km/h (37 mph)
65 km/h (40 mph) 45 km/h (28 mph)3
rd
gear 90 km/h (56 mph)
95 km/h (59 mph) 70 km/h (43 mph)4
th
gear 125 km/h (78 mph) 120 km/h (74 mph)
95 km/h (59 mph)5
th
gear 155 km/h (96 mph) 155 km/h (96 mph)
120 km/h (74 mph)6
th
gear -
- 135 km/h (84 mph)Starting and driving
4-04
4
Page 158 of 368
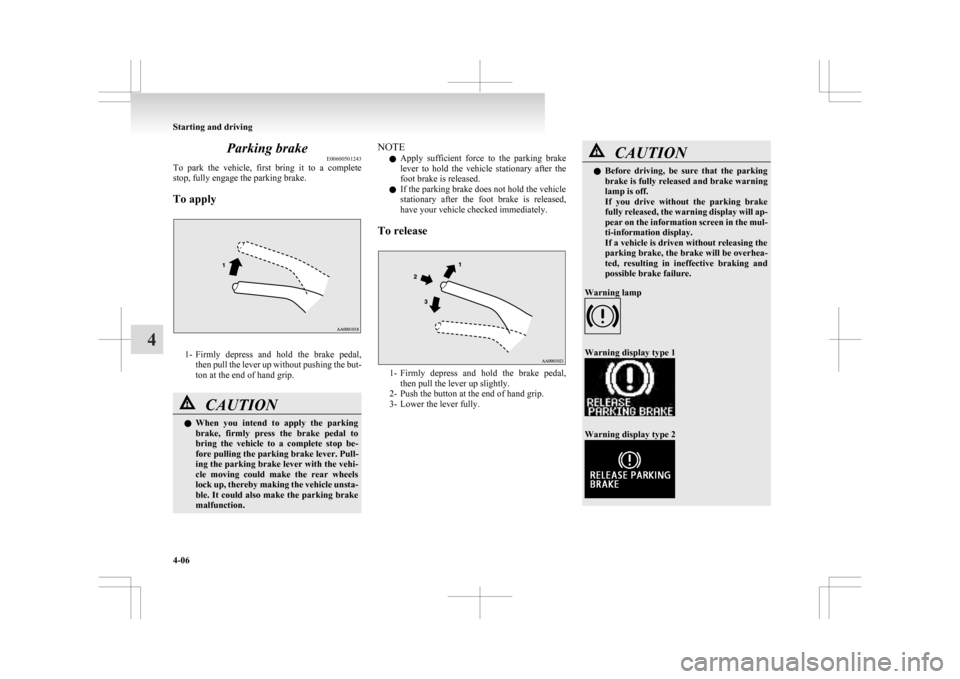
Parking brake
E00600501243
To
park the vehicle, first bring it to a complete
stop, fully engage the parking brake.
To apply 1- Firmly
depress and hold the brake pedal,
then pull the lever up without pushing the but-
ton at the end of hand grip. CAUTION
l
When
you intend to apply the parking
brake, firmly press the brake pedal to
bring the vehicle to a complete stop be-
fore pulling the parking brake lever. Pull-
ing the parking brake lever with the vehi-
cle moving could make the rear wheels
lock up, thereby making the vehicle unsta-
ble. It could also make the parking brake
malfunction. NOTE
l Apply
sufficient force to the parking brake
lever to hold the vehicle stationary after the
foot brake is released.
l If the parking brake does not hold the vehicle
stationary after the foot brake is released,
have your vehicle checked immediately.
To release 1- Firmly
depress and hold the brake pedal,
then pull the lever up slightly.
2- Push the button at the end of hand grip.
3- Lower the lever fully. CAUTION
l
Before
driving, be sure that the parking
brake is fully released and brake warning
lamp is off.
If you drive without the parking brake
fully released, the warning display will ap-
pear on the information screen in the mul-
ti-information display.
If a vehicle is driven without releasing the
parking brake, the brake will be overhea-
ted, resulting in ineffective braking and
possible brake failure.
Warning lamp Warning display type 1
Warning display type 2Starting and driving
4-06
4
Page 167 of 368
Fuel injection amount learning proc-
ess (diesel-powered vehicles)
E00627900043
To
keep exhaust emissions and engine noise low,
the engine very occasionally performs a learning
process for the fuel injection amount.
The engine sounds slightly different from usual
while the learning process is taking place. The
change in the engine sound does not indicate a fault. Diesel particulate filter (DPF)*
E00619800199
The
diesel particulate filter (DPF) is a device that
captures most of the particulate matter (PM) in the
exhaust emissions of the diesel engine. The DPF au-
tomatically burns away trapped PM during vehicle
operation. Under certain driving conditions, howev-
er, the DPF is not able to burn away all of the trap-
ped PM and, as a result, an excessive amount of
PM accumulates inside it. WARNING
l The DPF reaches very high temperatures.
Do
not park your vehicle in areas where
combustible materials such as dry grass
or leaves can come in contact with a hot
exhaust system since a fire could occur. CAUTION
l
Do
not use any type of fuel or engine oil
that is not specified for your vehicle. Al-
so, do not use any moisture-removing
agent or other fuel additive. Such substan-
ces could have a detrimental effect on the
DPF.
Refer to “Fuel selection” on page 02 and
“Engine oil” on page 8-04.
NOTE l To
minimize the likelihood of excessive ac-
cumulation of PM, try to avoid driving for
long periods at low speeds and repeatedly
driving short distances. l
The
engine sounds slightly different than usu-
al while the DPF automatically burns away
trapped PM. The change in the engine sound
does not indicate a fault.
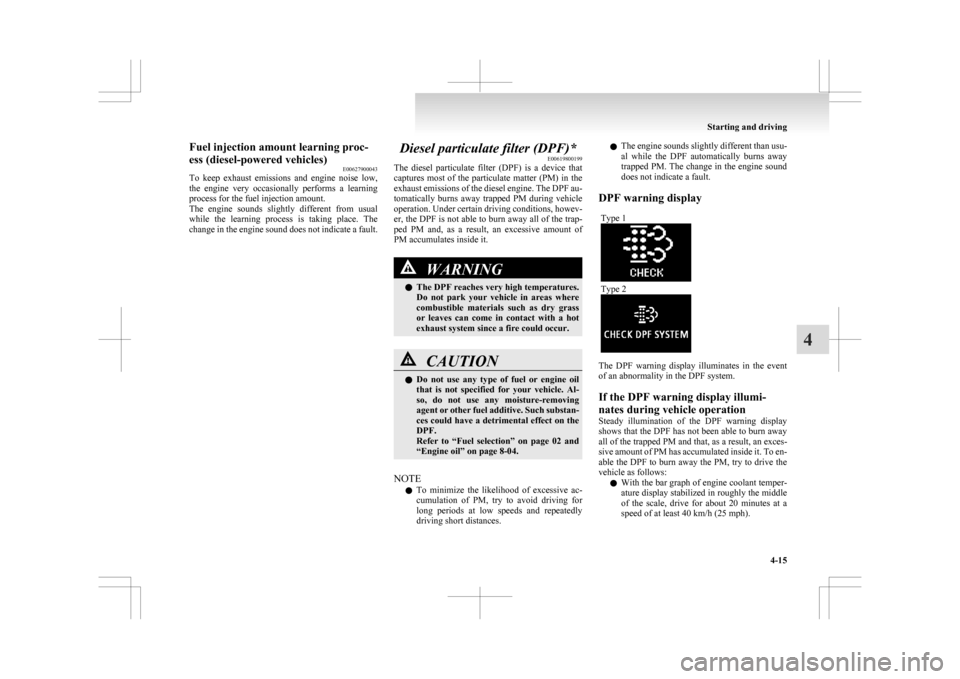
DPF warning display Type 1 Type 2
The DPF warning display illuminates in the event
of an abnormality in the DPF system.
If the DPF warning display illumi-
nates during vehicle operation
Steady
illumination of the DPF warning display
shows that the DPF has not been able to burn away
all of the trapped PM and that, as a result, an exces-
sive amount of PM has accumulated inside it. To en-
able the DPF to burn away the PM, try to drive the
vehicle as follows:
l With the bar graph of engine coolant temper-
ature display stabilized in roughly the middle
of the scale, drive for about 20 minutes at a
speed of at least 40 km/h (25 mph). Starting and driving
4-15 4
Page 168 of 368

If the DPF warning display subsequently stays on,
contact
a MITSUBISHI MOTORS Authorized Serv-
ice Point. CAUTION
l
You
do not have to continuously drive ex-
actly as indicated above. Always strive to
drive safely in accordance with road con-
ditions.
If the DPF warning display and check
engine warning lamp illuminate at the
same time during vehicle operation Warning lamp Warning display type 1
Warning display type 2
If an abnormal condition occurs in the DPF system,
the
DPF warning display and check engine warn-
ing lamp illuminate. Have the system inspected at a MITSUBISHI
MOTORS Authorized Service Point.
CAUTION
l
Continuing
to drive with the DPF warn-
ing display and check engine warning
lamp illuminating could result in engine
trouble and DPF damage. Turbocharger operation*
E00611200083 CAUTION
l
Do not run the engine at high speeds (for
example, by revving it or by accelerating
rapidly) immediately after starting it.
l Do not stop the engine immediately after
high-speed or uphill driving. First allow
the engine to idle to give the turbocharg-
er a chance to cool down. Starting and driving
4-16
4
Page 169 of 368
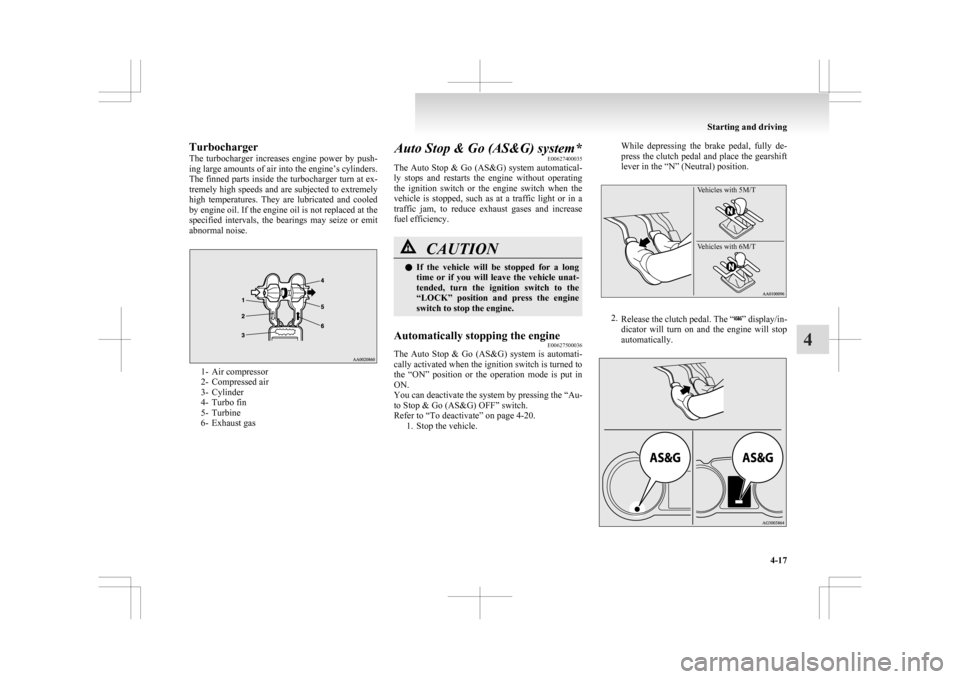
Turbocharger
The
turbocharger increases engine power by push-
ing large amounts of air into the engine’s cylinders.
The finned parts inside the turbocharger turn at ex-
tremely high speeds and are subjected to extremely
high temperatures. They are lubricated and cooled
by engine oil. If the engine oil is not replaced at the
specified intervals, the bearings may seize or emit
abnormal noise. 1- Air compressor
2-
Compressed air
3- Cylinder
4- Turbo fin
5- Turbine
6- Exhaust gas Auto Stop & Go (AS&G) system*
E00627400035
The
Auto Stop & Go (AS&G) system automatical-
ly stops and restarts the engine without operating
the ignition switch or the engine switch when the
vehicle is stopped, such as at a traffic light or in a
traffic jam, to reduce exhaust gases and increase
fuel efficiency. CAUTION
l
If
the vehicle will be stopped for a long
time or if you will leave the vehicle unat-
tended, turn the ignition switch to the
“LOCK” position and press the engine
switch to stop the engine.
Automatically stopping the engine E00627500036
The Auto Stop & Go (AS&G) system is automati-
cally activated when the ignition switch is turned to
the
“ON” position or the operation mode is put in
ON.
You can deactivate the system by pressing the “Au-
to Stop & Go (AS&G) OFF” switch.
Refer to “To deactivate” on page 4-20. 1. Stop the vehicle. While depressing the brake pedal, fully de-
press
the clutch pedal and place the gearshift
lever in the “N” (Neutral) position.
Vehicles with 5M/T
Vehicles with 6M/T 2.
Release
the clutch pedal. The “ ” display/in-
dicator
will turn on and the engine will stop
automatically. Starting and driving
4-17 4
Page 170 of 368
NOTE
l When
the engine is automatically stopped,
changes will occur in the driving operations.
Pay closel attention to the following. • The brake booster becomes inoperativeand the pedal effort will increase.
If the vehicle is moving, press down the
brake pedal harder than usual.
• The electric power steering system (EPS) becomes inoperative and it will become
harder to turn the steering wheel. CAUTION
l
Observe
the following precautions when
the engine is stopped automatically. Oth-
erwise, an unexpected accident might oc-
cur when the engine restarts automatical-
ly. • Do not depress the accelerator pedalto race the engine while the vehicle is
stopped (regardless of whether the en-
gine is running or stopped).
Otherwise, an unexpected accident
might occur when the engine restarts
automatically. CAUTION
• Do
not leave the driver’s seat or open
the bonnet.
If the driver’s seat belt is unfastened
or if the bonnet is opened, the “ ” dis-
play/indicator
will blink to notify the
driver. If this occurs, the engine will
not restart automatically even if the
clutch pedal is depressed, the seat belt
is refastened, and the bonnet is closed.
While depressing the brake pedal,
fully depress the clutch pedal and
turn the ignition switch to the
“START” position or press the engine
switch to start the engine.
For details, refer to “Starting and stop-
ping the engine” on page 1-15 or “Start-
ing” on page 4-13.
• Do not move the gearshift lever to a po- sition other than the “N” (Neutral) po-
sition.
If the gearshift lever is moved to a po-
sition other than the “N” (Neutral) po-
sition, the “ ”
display/indicator
blinks and the buzzer sounds.
If the gearshift lever is returned to the
“N” (Neutral) position, the display/in-
dicator stops blinking and the buzzer
stops sounding. The engine will not re-
start if the gearshift lever is in a posi-
tion other than the “N” (Neutral) posi-
tion.
NOTE l In
the following cases, the Auto Stop & Go
(AS&G) system will not operate and the en- gine will not stop automatically even if the ve-
hicle is stopped.
•
Driver’s seat belt is not fastened
• Bonnet is open
• After the engine restarts automatically, the vehicle speed has not exceeded ap-
proximately 5 km/h (3 mph)
• Brake booster vacuum pressure is low be- cause the brake pedal is depressed repeat-
edly or depressed harder than usual
• After the ignition switch is turned from the “ON” position to the “START” posi-
tion, approximately 30 seconds or more
have not elapsed.
• After the engine restarts automatically and the vehicle stops again within 10 sec-
onds.
• After presing the engine switch to start the engine from the operation mode is in
ON, approximately 30 seconds or more
have not elapsed
• Engine coolant temperature is low
• Ambient temperature is lower than ap- proximately 3 °C
• Air conditioning is operating and passen- ger compartment has not sufficiently
cooled
• Mode selection dial is set to the demister position.
Refer to “Demisting of the windscreen
and door windows: For quick demisting”
on page 5-08.
• When the air conditioning is operated in AUTO mode where the temperature con-
trol dial is set to the max. hot or the max.
cool position (for vehicles with automatic
air conditioning). Starting and driving
4-18
4