2009 MITSUBISHI ASX torque
[x] Cancel search: torquePage 181 of 368

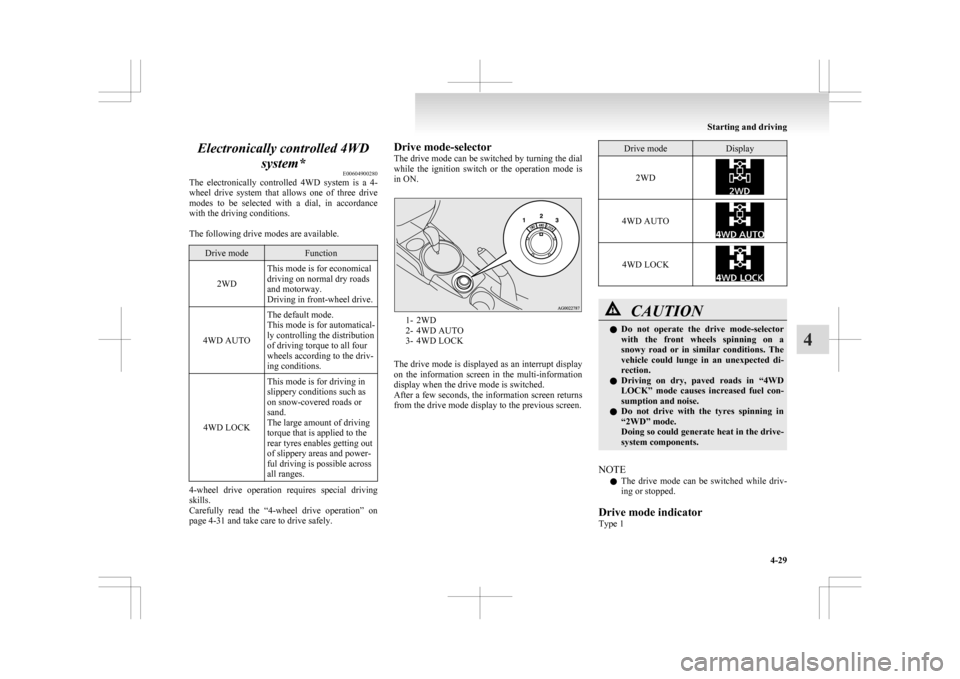
Electronically controlled 4WD
system* E00604900280
The
electronically controlled 4WD system is a 4-
wheel drive system that allows one of three drive
modes to be selected with a dial, in accordance
with the driving conditions.
The following drive modes are available. Drive mode Function
2WD This mode is for economical
driving on normal dry roads
and motorway.
Driving in front-wheel drive.
4WD AUTO The default mode.
This mode is for automatical-
ly controlling the distribution
of driving torque to all four
wheels according to the driv-
ing conditions.
4WD LOCK This mode is for driving in
slippery conditions such as
on snow-covered roads or
sand.
The large amount of driving
torque that is applied to the
rear tyres enables getting out
of slippery areas and power-
ful driving is possible across
all ranges.4-wheel drive operation requires special driving
skills.
Carefully
read the “4-wheel drive operation” on
page 4-31 and take care to drive safely. Drive mode-selector
The
drive mode can be switched by turning the dial
while the ignition switch or the operation mode is
in ON. 1- 2WD
2-
4WD AUTO
3- 4WD LOCK
The drive mode is displayed as an interrupt display
on the information screen in the multi-information
display when the drive mode is switched.
After a few seconds, the information screen returns
from the drive mode display to the previous screen. Drive mode Display
2WD 4WD AUTO
4WD LOCK
CAUTION
l
Do not operate the drive mode-selector
with the front wheels spinning on a
snowy road or in similar conditions. The
vehicle could lunge in an unexpected di-
rection.
l Driving on dry, paved roads in “4WD
LOCK” mode causes increased fuel con-
sumption and noise.
l Do not drive with the tyres spinning in
“2WD” mode.
Doing so could generate heat in the drive-
system components.
NOTE l The
drive mode can be switched while driv-
ing or stopped.
Drive mode indicator
Type 1 Starting and driving
4-29 4
Page 185 of 368

Inspection and maintenance
following rough road operation E00606700338
After
operating the vehicle in rough road condi-
tions, be sure to perform the following inspection
and maintenance procedures:
l Check that the vehicle has not been damaged
by rocks, gravel, etc.
l Carefully wash the vehicle with water.
Drive the vehicle slowly while lightly depress-
ing the brake pedal in order to dry out the
brakes. If the brakes still do not function prop-
erly, we recommend you to have the brakes
checked as soon as possible.
l Remove the insects, dried grass, etc. clog-
ging the radiator core.
l After driving through water, check the en-
gine, transmission and differential oil. If the
oil or grease is milky or cloudy because of
water contamination, it must be replaced
with new oil or grease.
l Check the inside of the vehicle. If water en-
try is found, dry the carpet etc.
l Inspect the headlamps, If the headlamp bulb
is flooded with water, we recommend you to
have it drained. Cautions on handling of 4-wheel
drive vehicles E00606800746
Tyres and wheels
Since
the driving torque can be applied to the 4
wheels, the driving performance of the vehicle
when operating in 4-wheel drive is greatly affected
by the condition of the tyres.
Pay close attention to the tyres.
l Install only the specified tyres on all wheels.
Refer to “Tyres and wheels” on page 9-12.
l Be sure all 4 tyres and wheels are the same
size and type.
When it is necessary to replace any of the
tyres or wheels, replace all 4 tyres.
l All tyres should be rotated before the wear
difference between the front and rear tyres is
recognizable.
Good vehicle performance cannot be expected if
there is a difference in wear between tyres. Refer to
“Tyre rotation” on page 8-13. l Check the tyre inflation pressure regularly. CAUTION
l
Always
use tyres of the same size, same
type, and same brand, and which have no
wear differences. Using tyres of different
size, type, brands or degree of wear, will
increase the differential oil temperature,
resulting in possible damage to the driv-
ing system. Further, the drive train will
be subjected to excessive loading possibly
leading to oil leakage, component seizure,
or other serious faults.
Towing Starting and driving
4-33 4
Page 295 of 368

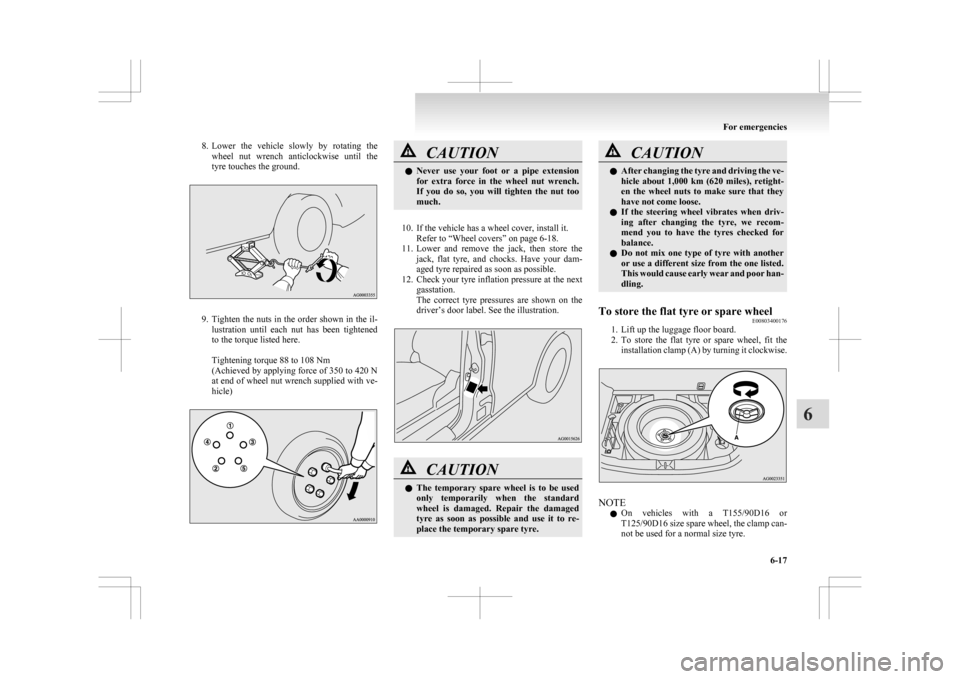
8. Lower the vehicle slowly by rotating the
wheel nut wrench anticlockwise until the
tyre touches the ground. 9. Tighten
the nuts in the order shown in the il-
lustration until each nut has been tightened
to the torque listed here.
Tightening torque 88 to 108 Nm
(Achieved by applying force of 350 to 420 N
at end of wheel nut wrench supplied with ve-
hicle) CAUTION
l
Never
use your foot or a pipe extension
for extra force in the wheel nut wrench.
If you do so, you will tighten the nut too
much.
10. If the vehicle has a wheel cover, install it. Refer to “Wheel covers” on page
6-18.
11. Lower and remove the jack, then store the jack, flat tyre, and chocks. Have your dam-
aged tyre repaired as soon as possible.
12. Check your tyre inflation pressure at the next gasstation.
The correct tyre pressures are shown on the
driver’s door label. See the illustration. CAUTION
l
The
temporary spare wheel is to be used
only temporarily when the standard
wheel is damaged. Repair the damaged
tyre as soon as possible and use it to re-
place the temporary spare tyre. CAUTION
l
After
changing the tyre and driving the ve-
hicle about 1,000 km (620 miles), retight-
en the wheel nuts to make sure that they
have not come loose.
l If the steering wheel vibrates when driv-
ing after changing the tyre, we recom-
mend you to have the tyres checked for
balance.
l Do not mix one type of tyre with another
or use a different size from the one listed.
This would cause early wear and poor han-
dling.
To store the flat tyre or spare wheel E00803400176
1. Lift up the luggage floor board.
2. To
store the flat tyre or spare wheel, fit the
installation clamp (A) by turning it clockwise. NOTE
l On
vehicles with a T155/90D16 or
T125/90D16 size spare wheel, the clamp can-
not be used for a normal size tyre. For emergencies
6-17 6
Page 350 of 368

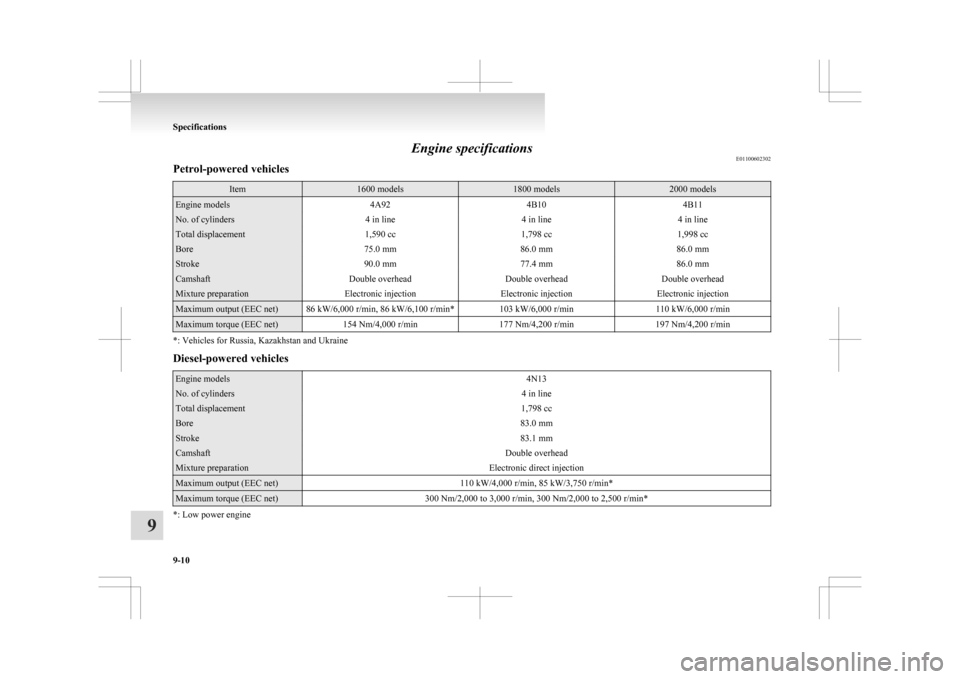
Engine specifications
E01100602302
Petrol-powered vehicles Item 1600 models 1800 models 2000 models
Engine models
4A924B104B11No. of cylinders
4 in line4 in line4 in lineTotal displacement
1,590 cc1,798 cc1,998 ccBore
75.0 mm86.0 mm86.0 mmStroke
90.0 mm77.4 mm86.0 mmCamshaft
Double overheadDouble overheadDouble overheadMixture preparation
Electronic injectionElectronic injectionElectronic injectionMaximum output (EEC net) 86 kW/6,000 r/min, 86 kW/6,100 r/min* 103 kW/6,000 r/min
110 kW/6,000 r/minMaximum torque (EEC net)
154 Nm/4,000 r/min177 Nm/4,200 r/min197 Nm/4,200 r/min*: Vehicles for Russia, Kazakhstan and Ukraine
Diesel-powered vehicles
Engine models
4N13No. of cylinders
4 in lineTotal displacement
1,798 ccBore
83.0 mmStroke
83.1 mmCamshaft
Double overheadMixture preparation
Electronic direct injectionMaximum output (EEC net)
110 kW/4,000 r/min, 85 kW/3,750 r/min*Maximum torque (EEC net)
300 Nm/2,000 to 3,000 r/min, 300 Nm/2,000 to 2,500 r/min**: Low power engineSpecifications
9-10
9