2009 MITSUBISHI ASX tyre pressure
[x] Cancel search: tyre pressurePage 13 of 368

1. Keyless entry system* p. 1-04
Keyless operation system* p. 1-07
Locking and unlocking the doors
p. 1-21
2. Changing tyres p. 6-12 Tyre inflation pressures p. 8-12
Tyre rotation p. 8-13
Tyre chains p. 8-14
Size of tyres and wheels p. 9-12
3. Turn-signal lamps/Hazard warning lamps p. 3-49, 3-50, 8-24, 8-31
4. Stop lamps/Tail lamps p. 3-44, 8-24, 8-31
5. Corner sensors* p. 4-47
6. Reversing lamps p. 3-44, 8-24, 8-32
7. Back sensors* p. 4-47
8. Rear fog lamp p. 3-51, 8-24, 8-31
9. Licence plate lamps p. 3-44, 8-24, 8-33
10. Rear window wiper p. 3-55
11. Rear spoiler p. 7-04
12. High-mounted stop lamp p. 8-24
13. Antenna p. 5-39
14. Tailgate p. 1-26 Overview1
2
3
4
5
7
8
9
10
1
1 12
13
14
Page 18 of 368

CAUTION
l
Since the fuel system may be under pres-
sure, remove the fuel cap slowly. This re-
lieves any pressure or vacuum that might
have built up in the fuel tank. If you hear
a hissing sound from the cap, wait until it
stops before removing the cap. Other-
wise, fuel may spray out, injuring you or
others.
5. Insert
the gun in the tank port as far as it goes. CAUTION
l
Do not tilt the gun.
6. When
the gun stops automatically, do not fill with fuel any more.
7. Close the fuel cap. To close, turn the fuel cap slowly clockwise
until you hear clicking sounds, then gently
push the fuel tank filler door closed. Installation of accessories
E00200300963
We
recommend you to consult a MITSUBISHI
MOTORS Authorized Service Point.
l The installation of accessories, optional
parts, etc., should only be carried out within
the limits prescribed by law in your country,
and in accordance with the guidelines and
warnings contained within the documents ac-
companying this vehicle.
l Installing electric components incorrectly
could lead to a fire. Please refer to Modifica-
tion/alteration to the electrical or fuel sys-
tems section within this owner’s manual.
l Using a cellular phone or radio set inside the
vehicle without an external antenna may
cause electrical system interference, which
could lead to unsafe vehicle operation.
l Tyres and wheels which do not meet specifi-
cations must not be used.
Refer to the “Specifications” section for in-
formation regarding wheel and tyre sizes.
Important points!
Due to large number of accessory and replacement
parts of different manufactures available in the mar-
ket, it is not possible, not only for MITSUBISHI
MOTORS, but also for a MITSUBISHI MOTORS
Authorized Service Point, to check whether the at-
tachment or installation of such parts affects the
overall safety of your MITSUBISHI-vehicle.
Even when such parts are officially authorized, for
example
by a “general operators permit” (an ap-
praisal for the part) or through the execution of the
part in an officially approved manner of construc-
tion, or when a single operation permit following
the attachment or installation of such parts, it can-
not be deduced from that alone, that the driving safe-
ty of your vehicle has not been affected.
Consider also that there basically exists no liability
on the part of the appraiser or the official. Maxi-
mum safety can only be ensured with parts recom-
mended, sold and fitted or installed by a
MITSUBISHI MOTORS Authorized Service Point
(MITSUBISHI MOTORS genuine replacement
parts and MITSUBISHI MOTORS accessories).
The same also pertains to modifications of
MITSUBISHI vehicles with respect to the produc-
tion specifications. For safety reasons, do not at-
tempt any modifications other than those that fol-
low the recommendations of a MITSUBISHI
MOTORS Authorized Service Point. General information
04
Page 154 of 368

Economical driving
E00600101076
For
economical driving, there are some technical re-
quirements that have to be met. The prerequisite
for low fuel consumption is a properly adjusted en-
gine. In order to achieve longer life of the vehicle
and the most economical operation, we recommend
you to have the vehicle checked at regular intervals
in accordance with the service standards.
Fuel economy and generation of exhaust gas and
noise are highly influenced by personal driving hab-
its as well as the particular operating conditions.
The following points should be observed in order
to minimize wear of brakes, tyres and engine as
well as to reduce environmental pollution.
Starting the engine
Avoid sudden acceleration and sudden starts, as
they will increase fuel consumption.
Shifting
Shift only at an appropriate speed and engine
speed. Always use the highest shift position possible.
Selecting the 4WD drive mode (4WD
vehicles)
The drive mode-selector should be set to “2WD”
when driving on normal roads and express ways to
obtain best possible fuel economy.
City traffic
Frequent starting and stopping increases the aver-
age fuel consumption. Use roads with smooth traf-
fic flow whenever possible. When driving on con-
gested roads, avoid use of a low shift position at
high engine speeds. Idling
The
vehicle consumes fuel even during idling.
Avoid extended idling whenever possible.
Speed
At higher vehicle speed, more fuel is consumed.
Avoid driving at full speed. Even a slight release of
the accelerator pedal will save a significant amount
of fuel.
Tyre inflation pressure
Check the tyre inflation pressures at regular inter-
vals. Low tyre inflation pressure increases road re-
sistance and fuel consumption. In addition, low
tyre pressures adversely affect tyre wear and driv-
ing stability.
Cargo loads
Do not drive with unnecessary articles in the lug-
gage compartment. Especially during city driving
where frequent starting and stopping is necessary,
the increased weight of the vehicle will greatly af-
fect fuel consumption. Also avoid driving with un-
necessary luggage or carriers, etc., on the roof; the
increased air resistance will increase fuel consump-
tion.
Cold engine starting
Starting of a cold engine consumes more fuel.
Unnecessary fuel consumption is also caused by
keeping a hot engine running. After the engine is
started, commence driving as soon as possible.
Air conditioning
The use of the air conditioning will increase the
fuel consumption. Driving, alcohol and drugs
E00600200070
Driving
after drinking alcohol is one of the most fre-
quent causes of accidents.
Your driving ability can be seriously impaired even
with blood alcohol levels far below the legal mini-
mum. If you have been drinking, don’t drive. Ride
with a designated non-drinking driver, call a cab or
a friend, or use public transportation.
Drinking coffee or taking a cold shower will not
make you sober.
Similarly, prescription and nonprescription drugs af-
fect your alertness, perception and reaction time.
Consult with your doctor or pharmacist before driv-
ing while under the influence of any of these medi-
cations. WARNING
l NEVER DRINK AND DRIVE.
Your
perceptions are less accurate, your
reflexes are slower and your judgment is
impaired. Starting and driving
4-02
4
Page 183 of 368

4-wheel drive operation
E00606600887
Your
vehicle has been designed primarily for use
on paved roads.
But its unique 4-wheel drive system allows you to
occasionally travel on unpaved roads, to camp-
grounds, picnic sites, and similar locations.
Not only does this ensure better handling on dry,
paved roads but also permits better traction when
driving on slippery, wet or snow-covered roads and
when moving out of mud.
But it is not suitable for heavy off road use or tow-
ing in rough conditions.
It is particularly important to note that 4-wheel
drive may not give sufficient hill climbing ability
and engine braking on steep slopes. You should try
to avoid driving on steep slopes.
Also, you must exercise caution when driving on
sand and mud and when driving through water be-
cause sufficient traction may not be available in cer-
tain circumstances.
Please avoid driving the vehicle through areas
where the tyres may get stuck in deep sand or mud. WARNING
l Do
not over-rely on the 4-wheel drive ve-
hicles. Even 4-wheel drive vehicles have
limits to the system and ability to main-
tain control and traction. Reckless driv-
ing may lead to accidents. Always drive
carefully, taking account of the road con-
ditions.
l Improperly operating this vehicle on or
off-paved roads can cause an accident or
rollover in which you and your passen-
gers could be seriously injured or killed. WARNING
• Follow
all instructions and guidelines in the owner’s manual.
• Keep your speed low and do not drive faster than conditions allow you to.
NOTE l Driving
on rough roads can be hard on a ve-
hicle. Before you leave paved roads, be sure
all scheduled maintenance and service has
been done, and that you have inspected your
vehicle. Pay special attention to the condi-
tion of the tyres, and check the tyre pressures.
l MITSUBISHI MOTORS is not responsible
to the operator for any damage or injury
caused or liability incurred by improper and
negligent operation of a vehicle. All techni-
ques of vehicle operation depend on the skill
and experience of the operator and other par-
ticipating parties. Any deviation from the rec-
ommended operating instructions above is at
their own risk.
l Note that the stopping distance required of a
4-wheel drive vehicle differs very little from
that of a 2-wheel drive vehicle. When driv-
ing on a snow-covered road or a slippery,
muddy surface, make sure that you keep a suf-
ficient distance between your vehicle and the
one ahead of you.
l The driving posture should be more upright;
adjust the seat to a good position for easy
steering and pedal operation. Be sure to wear
the seat belt. l
After
driving on rough roads, check each
part of the vehicle and wash it thoroughly
with water. Refer to the “Inspection and main-
tenance following rough road operation” sec-
tion and “Maintenance” section. CAUTION
l
Setting
the drive mode-selector to “4WD
LOCK” to drive on dry paved road will
increase fuel consumption, with possible
noise generation.
Turning sharp corners
When
turning a sharp corner in “4WD LOCK” po-
sition at low speed, a slight difference in steering
may be experienced similar to as if the brakes were
applied. This is called tight corner braking and re-
sults from each of the 4 tyres being at a different
distance from the corner. The phenomenon is typi-
cal of 4-wheel drive vehicles. If this occurs, either
straighten out the steering wheel, or change to
“2WD” or “4WD AUTO” mode.
On snowy or icy roads
Set the drive mode-selector to “4WD AUTO” or
“4WD LOCK” in accordance with the road condi-
tions, and then gradually depress the accelerator ped-
al for a smooth start.
NOTE
l The use of snow tyres is recommended.
l Maintain a safe distance between vehicles,
avoid sudden braking, and use engine brak-
ing (downshifting). Starting and driving
4-31 4
Page 185 of 368

Inspection and maintenance
following rough road operation E00606700338
After
operating the vehicle in rough road condi-
tions, be sure to perform the following inspection
and maintenance procedures:
l Check that the vehicle has not been damaged
by rocks, gravel, etc.
l Carefully wash the vehicle with water.
Drive the vehicle slowly while lightly depress-
ing the brake pedal in order to dry out the
brakes. If the brakes still do not function prop-
erly, we recommend you to have the brakes
checked as soon as possible.
l Remove the insects, dried grass, etc. clog-
ging the radiator core.
l After driving through water, check the en-
gine, transmission and differential oil. If the
oil or grease is milky or cloudy because of
water contamination, it must be replaced
with new oil or grease.
l Check the inside of the vehicle. If water en-
try is found, dry the carpet etc.
l Inspect the headlamps, If the headlamp bulb
is flooded with water, we recommend you to
have it drained. Cautions on handling of 4-wheel
drive vehicles E00606800746
Tyres and wheels
Since
the driving torque can be applied to the 4
wheels, the driving performance of the vehicle
when operating in 4-wheel drive is greatly affected
by the condition of the tyres.
Pay close attention to the tyres.
l Install only the specified tyres on all wheels.
Refer to “Tyres and wheels” on page 9-12.
l Be sure all 4 tyres and wheels are the same
size and type.
When it is necessary to replace any of the
tyres or wheels, replace all 4 tyres.
l All tyres should be rotated before the wear
difference between the front and rear tyres is
recognizable.
Good vehicle performance cannot be expected if
there is a difference in wear between tyres. Refer to
“Tyre rotation” on page 8-13. l Check the tyre inflation pressure regularly. CAUTION
l
Always
use tyres of the same size, same
type, and same brand, and which have no
wear differences. Using tyres of different
size, type, brands or degree of wear, will
increase the differential oil temperature,
resulting in possible damage to the driv-
ing system. Further, the drive train will
be subjected to excessive loading possibly
leading to oil leakage, component seizure,
or other serious faults.
Towing Starting and driving
4-33 4
Page 288 of 368

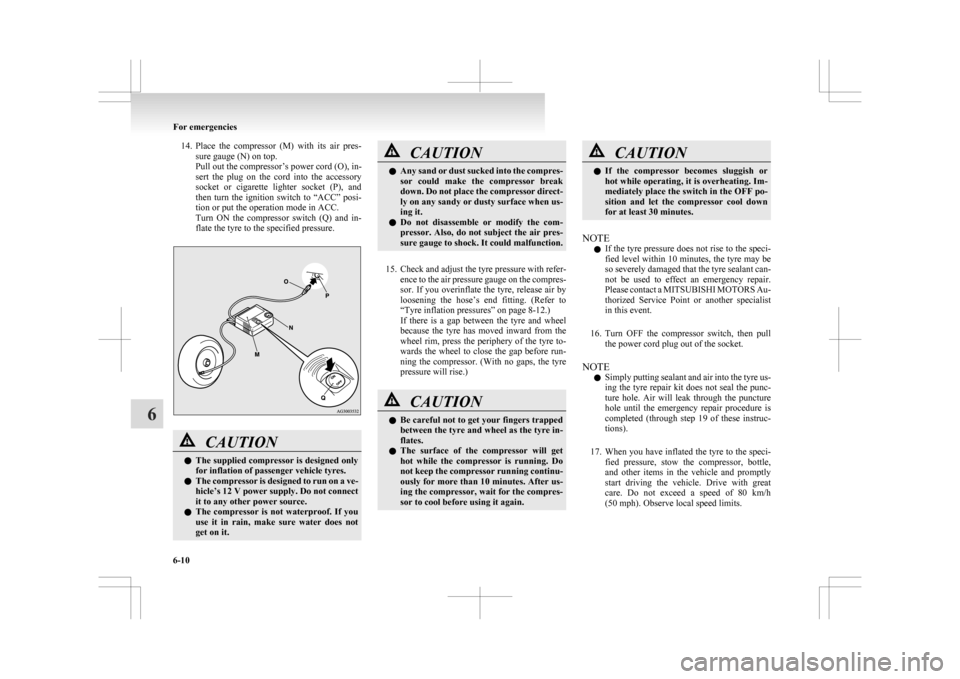
14. Place the compressor (M) with its air pres-
sure gauge (N) on top.
Pull out the compressor’s power cord (O), in-
sert the plug on the cord into the accessory
socket or cigarette lighter socket (P), and
then turn the ignition switch to “ACC” posi-
tion or put the operation mode in ACC.
Turn ON the compressor switch (Q) and in-
flate the tyre to the specified pressure. CAUTION
l
The
supplied compressor is designed only
for inflation of passenger vehicle tyres.
l The compressor is designed to run on a ve-
hicle’s 12 V power supply. Do not connect
it to any other power source.
l The compressor is not waterproof. If you
use it in rain, make sure water does not
get on it. CAUTION
l
Any
sand or dust sucked into the compres-
sor could make the compressor break
down. Do not place the compressor direct-
ly on any sandy or dusty surface when us-
ing it.
l Do not disassemble or modify the com-
pressor. Also, do not subject the air pres-
sure gauge to shock. It could malfunction.
15. Check
and adjust the tyre pressure with refer- ence to the air pressure gauge on the compres-
sor. If you overinflate the tyre, release air by
loosening the hose’s end fitting. (Refer to
“Tyre inflation pressures” on page 8-12.)
If there is a gap between the tyre and wheel
because the tyre has moved inward from the
wheel rim, press the periphery of the tyre to-
wards the wheel to close the gap before run-
ning the compressor. (With no gaps, the tyre
pressure will rise.) CAUTION
l
Be
careful not to get your fingers trapped
between the tyre and wheel as the tyre in-
flates.
l The surface of the compressor will get
hot while the compressor is running. Do
not keep the compressor running continu-
ously for more than 10 minutes. After us-
ing the compressor, wait for the compres-
sor to cool before using it again. CAUTION
l
If
the compressor becomes sluggish or
hot while operating, it is overheating. Im-
mediately place the switch in the OFF po-
sition and let the compressor cool down
for at least 30 minutes.
NOTE l If
the tyre pressure does not rise to the speci-
fied level within 10 minutes, the tyre may be
so severely damaged that the tyre sealant can-
not be used to effect an emergency repair.
Please contact a MITSUBISHI MOTORS Au-
thorized Service Point or another specialist
in this event.
16. Turn OFF the compressor switch, then pull the power cord plug out of the socket.
NOTE l Simply putting sealant and air into the tyre us-
ing the tyre repair kit does not seal the punc-
ture hole. Air will leak through the puncture
hole until the emergency repair procedure is
completed (through step 19 of these instruc-
tions).
17. When you have inflated the tyre to the speci- fied pressure, stow the compressor, bottle,
and other items in the vehicle and promptly
start driving the vehicle. Drive with great
care. Do not exceed a speed of 80 km/h
(50 mph). Observe local speed limits. For emergencies
6-10
6
Page 289 of 368

CAUTION
l
If you sense any abnormality while driv-
ing, stop the vehicle and contact a
MITSUBISHI MOTORS Authorized
Service Point or another specialist. Other-
wise the tyre pressure may drop before
the emergency repair procedure is com-
pleted, rendering the vehicle unsafe.
NOTE l Driving
faster than 80 km/h (50 mph) can
make the vehicle vibrate.
18. After driving for 10 minutes or 5 km (3 miles), check the tyre pressure using the
air pressure gauge on the compressor.
(Refer to “Tyre inflation pressures” on page
8-12.)
If the tyre pressure is not sufficient, inflate
the tyre to the specified pressure again and
drive the vehicle carefully without exceeding
a speed of 80 km/h (50 mph). CAUTION
l
If
the tyre pressure is lower than the min-
imum permitted pressure (1.3 bar
{130 kPa}), the tyre cannot successfully
be repaired with the tyre sealant. Do not
drive the vehicle any further. Contact a
MITSUBISHI MOTORS Authorized
Service Point or another specialist.
19. After
driving for 10 minutes or 5 km (3 miles), check the tyre pressure using the
air pressure gauge on the compressor. (Refer to “Tyre
inflation pressures” on page 8-12.)
If the tyre pressure has apparently not drop-
ped, the emergency repair procedure is com-
plete. You must still not exceed a speed of
80 km/h (50 mph). Observe local speed limits.
NOTE l If the tyre pressure has dropped below the
specified level when you check it at the end
of the repair procedure, do not drive the vehi-
cle any further. Contact a MITSUBISHI
MOTORS Authorized Service Point or anoth-
er specialist.
l In cold conditions (when the ambient temper-
ature is 0 °C or lower), the time and driving
distance necessary until completion of the re-
pair can be longer than in warmer conditions,
meaning that the tyre pressure can drop be-
low the specified level even when you have
inflated the tyre a second time and subsequent-
ly driven the vehicle. If this happens, inflate
the tyre to the specified pressure once more,
drive for about 10 minutes or 5 km (3 miles),
then check the tyre pressure again. If the tyre
pressure has again dropped below the speci-
fied level, stop driving the vehicle and con-
tact a MITSUBISHI MOTORS Authorized
Service Point or another specialist.
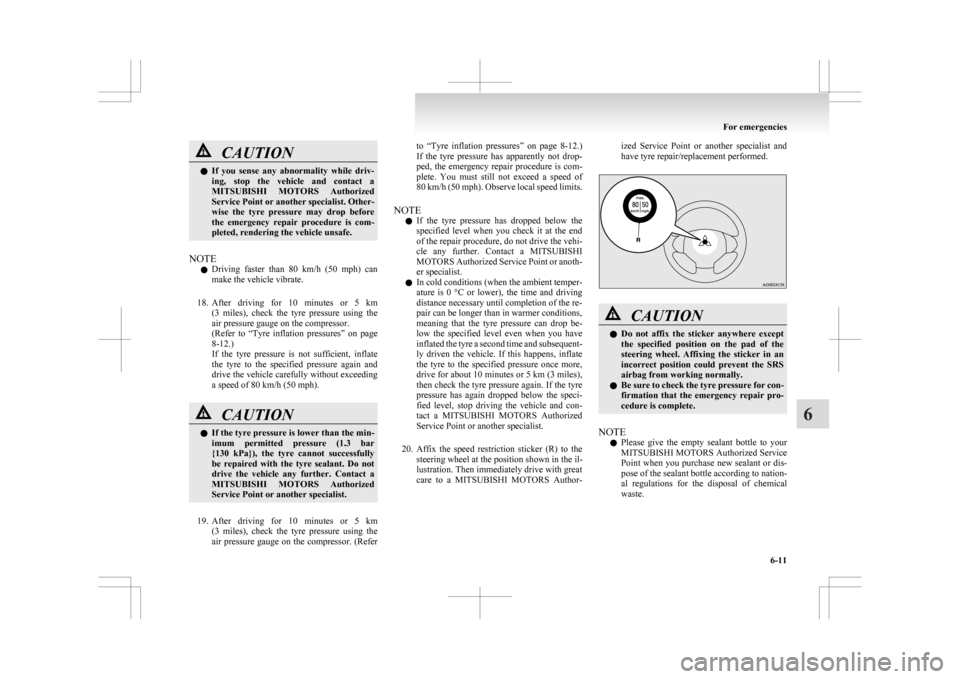
20. Affix the speed restriction sticker (R) to the steering wheel at the position shown in the il-
lustration. Then immediately drive with great
care to a MITSUBISHI MOTORS Author- ized Service Point or another specialist and
have tyre repair/replacement performed.
CAUTION
l
Do
not affix the sticker anywhere except
the specified position on the pad of the
steering wheel. Affixing the sticker in an
incorrect position could prevent the SRS
airbag from working normally.
l Be sure to check the tyre pressure for con-
firmation that the emergency repair pro-
cedure is complete.
NOTE l Please
give the empty sealant bottle to your
MITSUBISHI MOTORS Authorized Service
Point when you purchase new sealant or dis-
pose of the sealant bottle according to nation-
al regulations for the disposal of chemical
waste. For emergencies
6-11 6
Page 291 of 368

Spare wheel information*
E00803600497
Check
the air pressure of the spare tyre frequently
and make sure it is ready for emergency use at any
time.
Maintaining the spare wheel at the highest speci-
fied air pressure will ensure that it can always be
used under any conditions (city/high-speed driving,
varying load weight, etc.).
The spare wheel is stored beneath the luggage floor
board of the luggage compartment. CAUTION
l
The
pressure should be periodically
checked and maintained at the specified
pressure while the tyre is stowed.
Driving with an insufficient tyre pressure
can lead to an accident. If you have no
choice but to drive with an insufficient
tyre pressure, keep your speed down and
inflate the tyre to the correct pressure as
soon as possible. (Refer to “Tyre inflation
pressures” on page 8-12.)
l When the tread wear indicators appear,
the tyre must be replaced.
Refer to “Wheel condition” on page 8-13.
Temporary spare wheel (spare wheel with a speed
limit label)*
The T155/90D16
or T125/90D16 size spare wheel
is stored beneath the luggage floor board of the lug-
gage compartment. It is designed to save space in
the luggage compartment and its light weight
makes it easy to handle in the event of a flat tyre. CAUTION
l
The
temporary spare wheel is for tempo-
rary use only and should be removed as
soon as the original wheel can be re-
paired or replaced.
l The vehicle must not be driven at speeds
in excess of 80 km/h (50 mph) while using
the temporary spare wheel.
l The T155/90D16 or T125/90D16 size
spare wheel is not as good as a standard
wheel in controllability and stability.
When the temporary spare wheel is used,
avoid quick starts, sudden braking and
sharp steering.
Tyre size of the 215/65R16 size tyre is dif-
ferent from that of the standard tyre.
When the temporary spare tyre is used,
avoid quick starts, sudden braking and
sharp steering.
l The temporary spare wheel is specifically
designed for your vehicle and it should
not be used on any other vehicle.
When you purchase a 215/65R16 size
spare wheel, be sure to purchase the type
designed specially for your vehicle from
your MITSUBISHI MOTORS Author-
ized Service Point. CAUTION
l
Do not use tyre chains with your tempora-
ry spare wheel. Because of the smaller
tyre size, a tyre chain will not fit proper-
ly. This could cause damage to the wheel
and result in loss of the chain.
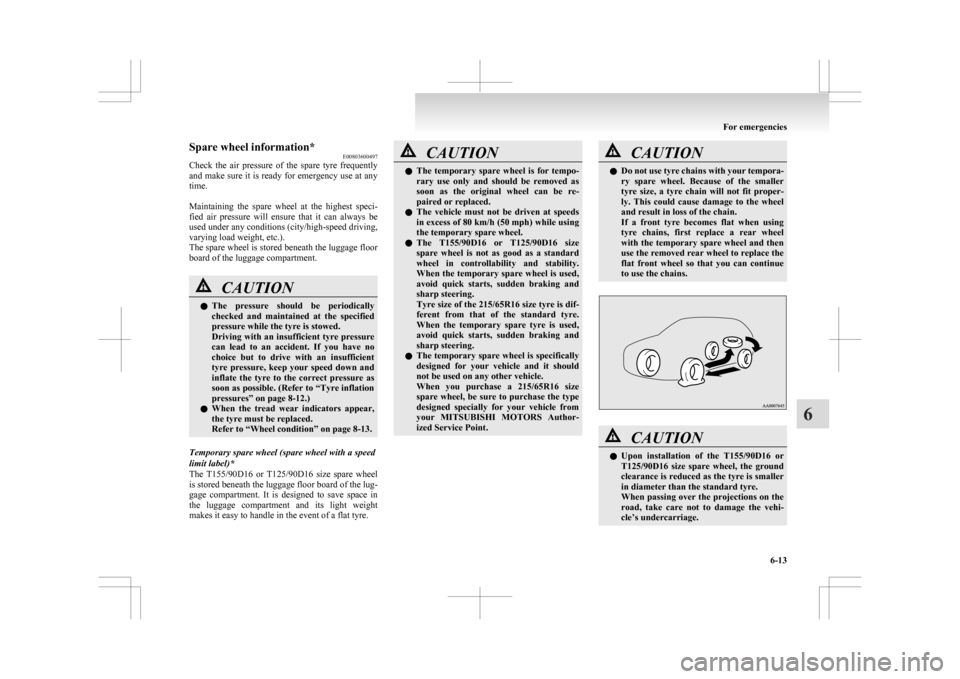
If a front tyre becomes flat when using
tyre chains, first replace a rear wheel
with the temporary spare wheel and then
use the removed rear wheel to replace the
flat front wheel so that you can continue
to use the chains. CAUTION
l
Upon
installation of the T155/90D16 or
T125/90D16 size spare wheel, the ground
clearance is reduced as the tyre is smaller
in diameter than the standard tyre.
When passing over the projections on the
road, take care not to damage the vehi-
cle’s undercarriage. For emergencies
6-13 6