2009 MITSUBISHI ASX ECU
[x] Cancel search: ECUPage 261 of 368

5. The voice guide will say “Home, work, mo-
bile or other?”
Select and say the location where the tele-
phone number you want to change or add is
registered.
When the confirmation function is on, the sys-
tem will check the target name and location
again. Answer “Yes” if you want to continue
with the editing.
Answer “No” to return to Step 3.
6. The voice guide will say “Number please.” Say the telephone number you want to register.
NOTE l If the telephone number is already registered
in the selected location, the voice guide will
say “The current number is
phone number to change the current number.
7. The voice guide will repeat the telephone number.
When the confirmation function is on, the sys-
tem will ask if the number is correct. Answer
“Yes.”
Answer “No” to return to Step 3.
8. Once the telephone number is registered, the voice guide will say “Number saved” and
then the system will return to the main menu.
NOTE l If the location where a telephone number
was already registered has been overwritten
with a new number, the voice guide will say
“Number changed” and then the system will
return to the main menu.
[Editing a name] 1. Press the SPEECH button.
2.
Say “Phone book.”
3. The voice guide will say “Select one of the following: new entry, edit number, edit
name, list names, delete, erase all, or import
contact.” Say “Edit name.”
4. The voice guide will say “Please say the name of the entry you would like to edit, or
say list names.” Say the name you want to edit.
NOTE l Say “List names,” and the names registered
in the phone book will be read out in order.
Refer to “Vehicle phone book: Listening to
the list of registered names” on page 5-50.
5. The voice guide will say “Changing
tem will ask if the name is correct. Answer
“Yes” if you want to continue with the edit-
ing based on this information.
Answer “No” to return to Step 4.
6. The voice guide will say “Name please.” Say the new name you want to register.
7. The registered name will be changed. When the change is complete, the system
will return to the main menu.
[Listening to the list of registered names] 1. Press the SPEECH button.
2. Say “Phone book.”
3. The voice guide will say “Select one of thefollowing: new entry, edit number, edit
name, list names, delete, erase all, or import
contact.” Say “List names.”
4. Bluetooth ®
2.0 interface will read out the en-
tries in the phone book in order. 5. When the voice guide is done reading the
list, it will say “End of list, would you like to
start from the beginning?”
When you want to check the list again from
the beginning, answer “Yes.”
When you are done, answer “No” to return to
the previous or main menu.
NOTE l You can call, edit or delete a name that is be-
ing read out.
Press the SPEECH button and say “Call” to
call the name, “Edit name” to edit it, or “De-
lete” to delete it.
The system will beep and then execute your
command.
l If you press the SPEECH button and say “Con-
tinue” or “Previous” while the list is being
read, the system will advance or rewind the
list. Say “Continue” to proceed to the next en-
try or “Previous” to return to the previous en-
try.
[Deleting a telephone number] 1. Press the SPEECH button.
2. Say “Phone book.”
3. The voice guide will say “Select one of thefollowing: new entry, edit number, edit
name, list names, delete, erase all, or import
contact.” Say “Delete.”
4. The voice guide will say “Please say the name of the entry you would like to delete,
or say list names.” Say the name of the
phone book entry in which the telephone num-
ber you want to delete is registered. For pleasant driving
5-53 5
Page 268 of 368
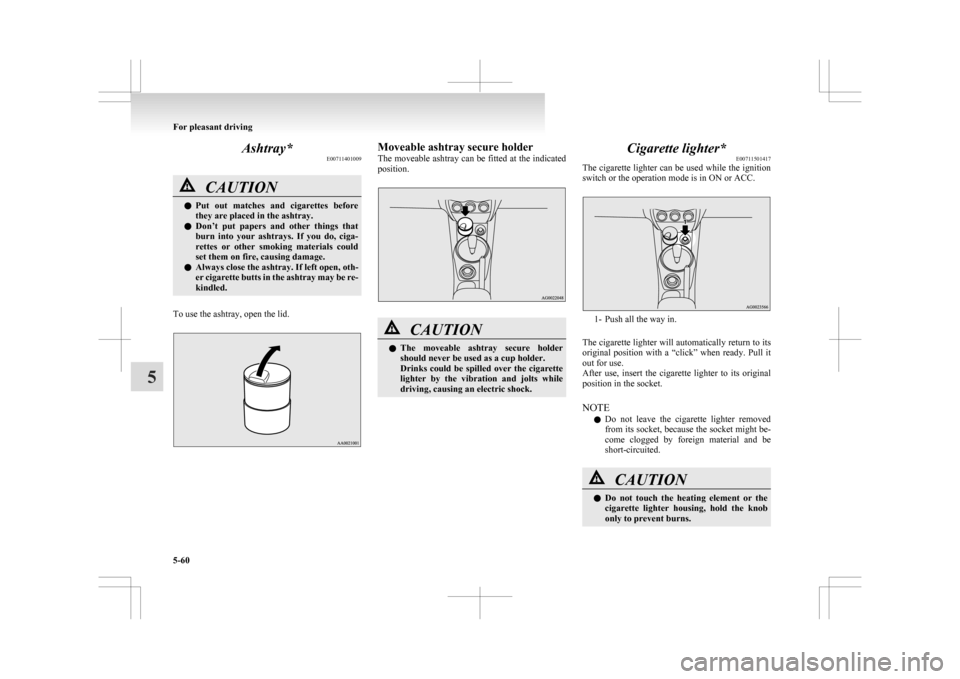
Ashtray*
E00711401009CAUTION
l
Put out matches and cigarettes before
they are placed in the ashtray.
l Don’t put papers and other things that
burn into your ashtrays. If you do, ciga-
rettes or other smoking materials could
set them on fire, causing damage.
l Always close the ashtray. If left open, oth-
er cigarette butts in the ashtray may be re-
kindled.
To use the ashtray, open the lid. Moveable ashtray secure holder
The
moveable ashtray can be fitted at the indicated
position. CAUTION
l
The
moveable ashtray secure holder
should never be used as a cup holder.
Drinks could be spilled over the cigarette
lighter by the vibration and jolts while
driving, causing an electric shock. Cigarette lighter*
E00711501417
The
cigarette lighter can be used while the ignition
switch or the operation mode is in ON or ACC. 1- Push all the way in.
The
cigarette lighter will automatically return to its
original position with a “click” when ready. Pull it
out for use.
After use, insert the cigarette lighter to its original
position in the socket.
NOTE
l Do not leave the cigarette lighter removed
from its socket, because the socket might be-
come clogged by foreign material and be
short-circuited. CAUTION
l
Do
not touch the heating element or the
cigarette lighter housing, hold the knob
only to prevent burns. For pleasant driving
5-60
5
Page 277 of 368
Bottle holder
E00718200328CAUTION
l
Do not drink beverages while driving.
This is distracting and could cause an ac-
cident.
l Drinks could be spilled by the vibration
and jolts while driving. If the spilt drink
is very hot, you could be burnt.
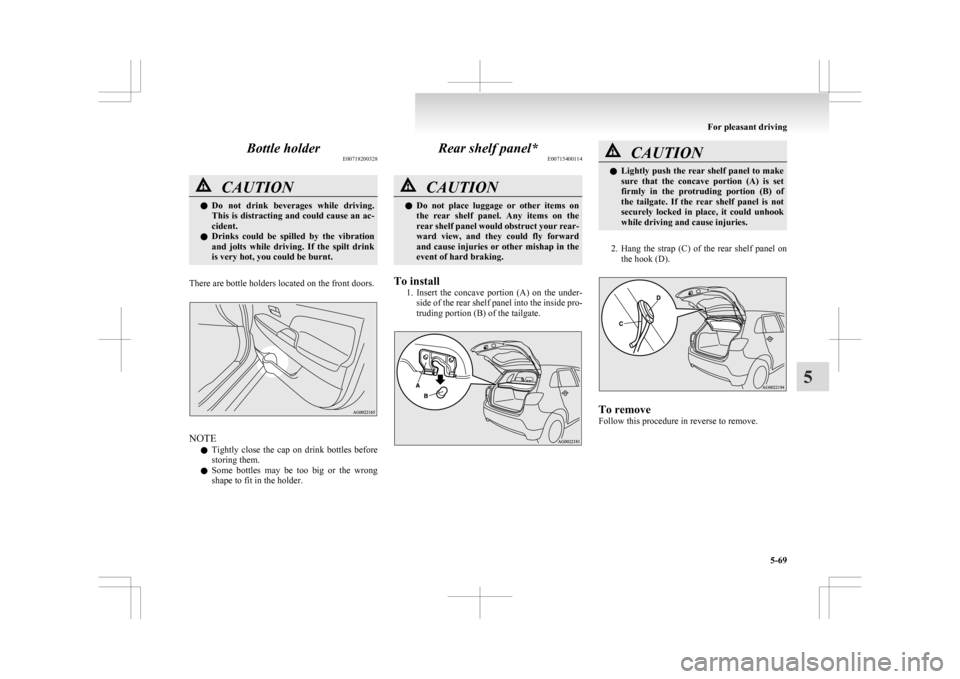
There are bottle holders located on the front doors. NOTE
l Tightly
close the cap on drink bottles before
storing them.
l Some bottles may be too big or the wrong
shape to fit in the holder. Rear shelf panel*
E00715400114 CAUTION
l
Do
not place luggage or other items on
the rear shelf panel. Any items on the
rear shelf panel would obstruct your rear-
ward view, and they could fly forward
and cause injuries or other mishap in the
event of hard braking.
To install 1. Insert
the concave portion (A) on the under-
side of the rear shelf panel into the inside pro-
truding portion (B) of the tailgate. CAUTION
l
Lightly
push the rear shelf panel to make
sure that the concave portion (A) is set
firmly in the protruding portion (B) of
the tailgate. If the rear shelf panel is not
securely locked in place, it could unhook
while driving and cause injuries.
2. Hang
the strap (C) of the rear shelf panel on the hook (D). To remove
Follow this procedure in reverse to remove. For pleasant driving
5-69 5
Page 278 of 368
Assist grips
E00732800256
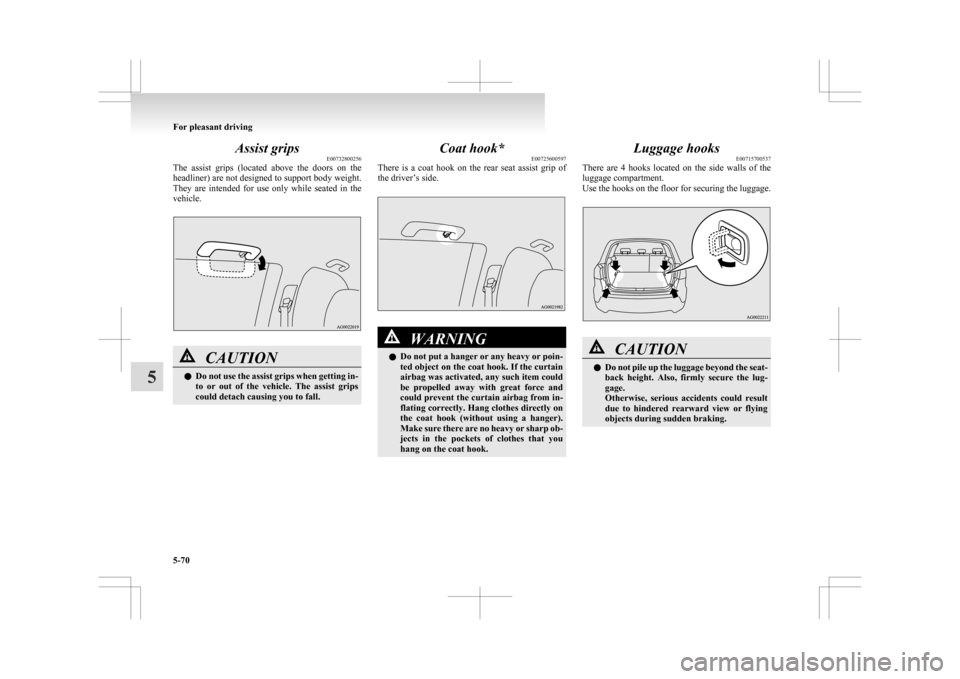
The
assist grips (located above the doors on the
headliner) are not designed to support body weight.
They are intended for use only while seated in the
vehicle. CAUTION
l
Do
not use the assist grips when getting in-
to or out of the vehicle. The assist grips
could detach causing you to fall. Coat hook*
E00725600597
There
is a coat hook on the rear seat assist grip of
the driver’s side. WARNING
l Do
not put a hanger or any heavy or poin-
ted object on the coat hook. If the curtain
airbag was activated, any such item could
be propelled away with great force and
could prevent the curtain airbag from in-
flating correctly. Hang clothes directly on
the coat hook (without using a hanger).
Make sure there are no heavy or sharp ob-
jects in the pockets of clothes that you
hang on the coat hook. Luggage hooks
E00715700537
There
are 4 hooks located on the side walls of the
luggage compartment.
Use the hooks on the floor for securing the luggage. CAUTION
l
Do
not pile up the luggage beyond the seat-
back height. Also, firmly secure the lug-
gage.
Otherwise, serious accidents could result
due to hindered rearward view or flying
objects during sudden braking. For pleasant driving
5-70
5
Page 287 of 368
CAUTION
l
If there is any air left in the tyre when
you remove the valve insert, the valve in-
sert may fly out and injure you. Make
sure the tyre contains no air before remov-
ing the valve insert.
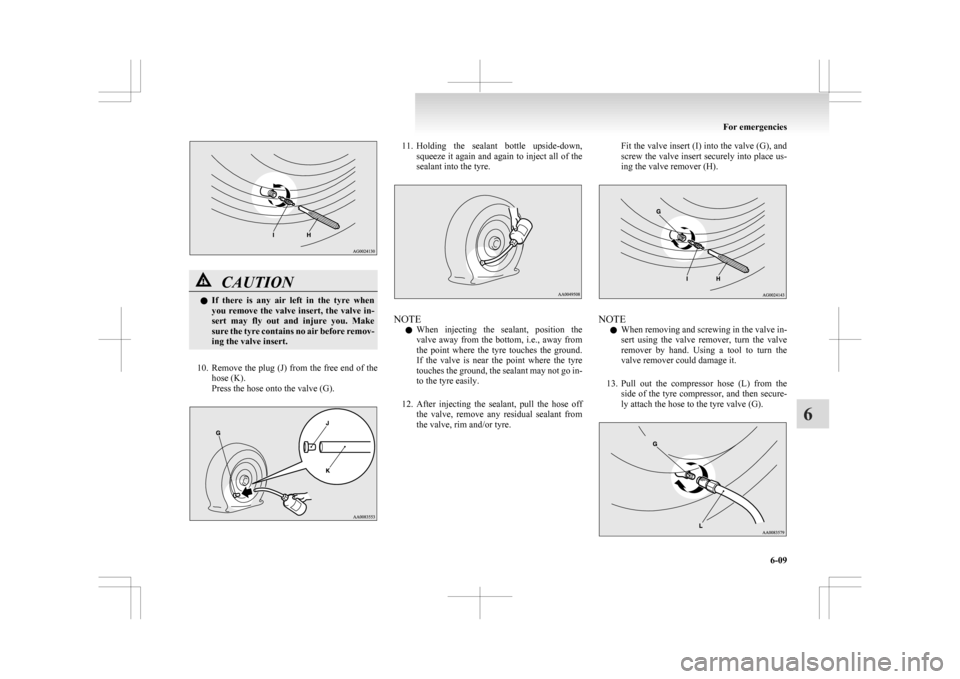
10. Remove
the plug (J) from the free end of the
hose (K).
Press the hose onto the valve (G). 11. Holding
the sealant bottle upside-down,
squeeze it again and again to inject all of the
sealant into the tyre. NOTE
l When
injecting the sealant, position the
valve away from the bottom, i.e., away from
the point where the tyre touches the ground.
If the valve is near the point where the tyre
touches the ground, the sealant may not go in-
to the tyre easily.
12. After injecting the sealant, pull the hose off the valve, remove any residual sealant from
the valve, rim and/or tyre. Fit the valve insert (I) into the valve (G), and
screw
the valve insert securely into place us-
ing the valve remover (H). NOTE
l When
removing and screwing in the valve in-
sert using the valve remover, turn the valve
remover by hand. Using a tool to turn the
valve remover could damage it.
13. Pull out the compressor hose (L) from the side of the tyre compressor, and then secure-
ly attach the hose to the tyre valve (G). For emergencies
6-09 6
Page 298 of 368
![MITSUBISHI ASX 2009 1.G Owners Manual CAUTION
l
[For 2WD vehicles equipped with the Ac-
tive Stability Control (ASC)]
If the vehicle is towed with the ignition
switch in the “ON” position or the opera-
tion mode in ON and MITSUBISHI ASX 2009 1.G Owners Manual CAUTION
l
[For 2WD vehicles equipped with the Ac-
tive Stability Control (ASC)]
If the vehicle is towed with the ignition
switch in the “ON” position or the opera-
tion mode in ON and](/manual-img/19/7566/w960_7566-297.png)
CAUTION
l
[For 2WD vehicles equipped with the Ac-
tive Stability Control (ASC)]
If the vehicle is towed with the ignition
switch in the “ON” position or the opera-
tion mode in ON and only the front
wheels or only the rear wheels raised off
the ground (Type B or C), the ASC may
operate, resulting in an accident.
When towing the vehicle with the rear
wheels raised, turn the ignition switch to
the “ACC” position or put the operation
mode in ACC.
When towing the vehicle with the front
wheels raised, keep the ignition switch or
the operation mode as follows.
[Except for vehicles equipped with key-
less operation system]
The ignition switch is in “LOCK” or
“ACC” position.
[Vehicles with keyless operation system]
The operation mode is in OFF or ACC.
Towing with rear wheels off the ground (Type B)
Place
the gearshift lever in the “N” (Neutral) posi-
tion.
Turn the ignition switch to the “ACC” position or
put the operation mode in ACC and secure the steer-
ing wheel in a straight-ahead position with a rope
or tiedown strap. Never place the ignition switch in
the “LOCK” position or put the operation mode in
OFF when towing.
Towing with front wheels off the ground (Type C)
Release the parking brake. Place the gearshift lever in the “N” (Neutral) posi-
tion
(M/T) or the selector lever in the “N” (NEU-
TRAL) position (CVT).
Emergency towing
If towing service is not available in an emergency,
your vehicle may be temporarily towed by a rope
secured to the towing hook.
If your vehicle is to be towed by another vehicle or
if your vehicle tows another vehicle, pay careful at-
tention to the following points:
If your vehicle is to be towed by another vehicle
1. The front towing hook (A) is located asshown in the illustration. Secure the tow rope
to the front towing hook. NOTE
l Do
not use the tie-down hooks (B) for tow-
ing. These hooks are provided only for the
purpose of transporting the vehicle itself.
Using any part other than the designated tow-
ing hook (A) could result in damage to vehi-
cle body. l
Using
a wire rope or metal chain can result
in damage to the vehicle body. It is best to
use a non-metallic rope. If you use a wire
rope or metal chain, wrap it with cloth at any
point where it touches the vehicle body.
l Take care that the tow rope is kept as horizon-
tal as possible. An angled tow rope can dam-
age the vehicle body.
2. Keep the engine running. If the engine is not running, perform the fol-
lowing operation to unlock the steering wheel.
[Except for vehicles with keyless operation
system]
Turn the ignition switch to the “ACC” or
“ON” position (M/T) or “ON” position
(CVT).
[For vehicles with the keyless operation sys-
tem]
Put the operation mode in ACC or ON (M/T)
or ON (CVT).
NOTE l For vehicles equipped with the Auto Stop &
Go (AS&G) system, press the “Auto Stop &
Go (AS&G) OFF” switch to deactivate the
Auto Stop & Go (AS&G) system before stop-
ping the vehicle.
Refer to “To deactivate” on page 4-20. For emergencies
6-20
6
Page 304 of 368

CAUTION
• When washing around the door glass,
hold the nozzle at a distance of more
than 70 cm and at right angles to the
glass surface.
l After washing the vehicle, drive the vehi-
cle slowly while lightly depressing the
brake pedal several times in order to dry
out the brakes.
Leaving the brakes wet could result in re-
duced braking performance. Also, there
is a possibility that they could freeze up
or become inoperative due to rust, render-
ing the vehicle unable to move.
l When using an automatic car wash, pay
attention to the following items, referring
to the operation manual or consulting a
car wash operator. If the following proce-
dure is not followed, it could result in dam-
age to your vehicle.
• The outside mirrors are retracted.
• The antenna is removed.
• The wiper arms are secured in placewith tape.
• If your vehicle is equipped with a rear spoiler or roof rails, consult a car
wash operator before using the car
wash.
• If your vehicle has rain sensor wipers, place the wiper switch lever in the
“OFF” position to deactivate the rain
sensor. During cold weather
Salt
and other chemicals spread on the roads in
some areas in winter can have a harmful effect on
the vehicle body. You should therefore wash the ve-
hicle as often as possible in accordance with our
care-instructions. It is recommended to have a pres-
ervative applied and the underfloor protection
checked before and after the cold weather season.
After washing your vehicle, wipe off all water-
drops from the rubber parts around the doors to pre-
vent the doors from freezing.
NOTE
l To prevent freezing of the weatherstripping
on the doors, bonnet, etc., they should be trea-
ted with silicone spray.
Waxing E00901000863
Waxing the vehicle will help prevent the adherence
of
dust and road chemicals to the paintwork. Apply
a wax solution after washing the vehicle, or at least
once every three months to assist displacing of water.
Do not wax your vehicle in direct sunlight. You
should wax after the surfaces have cooled. CAUTION
l
Waxes
containing high abrasive com-
pounds should not be used. Such waxes re-
move rust and stains effectively from the
paintwork but they are harmful to the lus-
tre on the painted surface and the plated
surface.
Further, they are harmful to glossy surfa-
ces such as grille, garnish, mouldings, etc. CAUTION
l
Do
not use petrol or paint thinners to re-
move road tar or other contamination to
the painted surface.
l Do not apply wax to sections that have a
black mat paint coating, as doing so
could cause uneven discolouration, spots
or stains. If wax gets on such areas, wipe
it off using lukewarm water and a soft
cloth.
Polishing E00901100066
The vehicle should only be polished if the paint-
work
has become stained or lost its lustre. Do not
polish parts with a mat coating and the plastic bump-
ers. Doing so could cause stains or damage the finish.
Damaged paint E00901200054
Small cracks and scratches in the paint coat should
be
touched up as soon as possible with
MITSUBISHI touch-up paint to prevent corrosion.
Check body areas facing the road or the tyres care-
fully for damage to the paint caused by gravels,
etc. The paint code number for your vehicle can be
found on the vehicle information code plate in the
engine compartment.
Cleaning plastic parts E00901300707
Use a sponge or chamois leather.
If
a car wax adheres on a grey or black rough sur-
face of the bumper, moulding or lamps, the surface
becomes white. In such a case, wipe it off using
lukewarm water and soft cloth or chamois leather. Vehicle care
7-04
7
Page 309 of 368
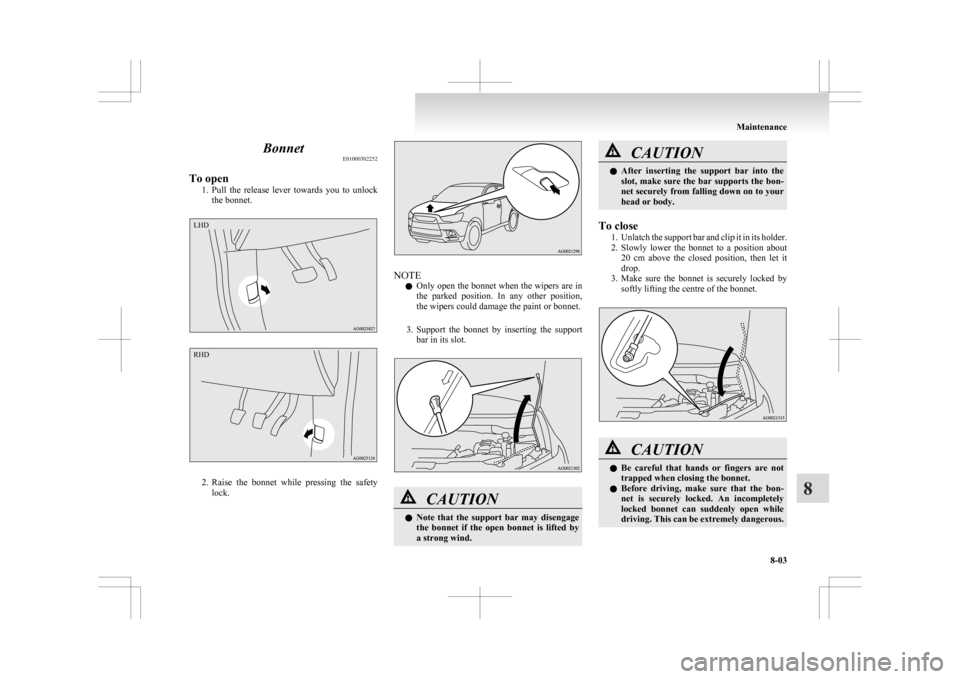
Bonnet
E01000302252
To open 1. Pull
the release lever towards you to unlock
the bonnet. 2. Raise
the bonnet while pressing the safety
lock. NOTE
l Only
open the bonnet when the wipers are in
the parked position. In any other position,
the wipers could damage the paint or bonnet.
3. Support the bonnet by inserting the support bar in its slot. CAUTION
l
Note
that the support bar may disengage
the bonnet if the open bonnet is lifted by
a strong wind. CAUTION
l
After
inserting the support bar into the
slot, make sure the bar supports the bon-
net securely from falling down on to your
head or body.
To close 1. Unlatch
the support bar and clip it in its holder.
2. Slowly lower the bonnet to a position about 20 cm above the closed position, then let it
drop.
3. Make sure the bonnet is securely locked by softly lifting the centre of the bonnet. CAUTION
l
Be
careful that hands or fingers are not
trapped when closing the bonnet.
l Before driving, make sure that the bon-
net is securely locked. An incompletely
locked bonnet can suddenly open while
driving. This can be extremely dangerous. Maintenance
8-03 8LHD RHD