2009 MITSUBISHI ASX ECU
[x] Cancel search: ECUPage 155 of 368
Safe driving techniques
E00600300446
Driving
safety and protection against injury cannot
be fully ensured. However, we recommend that
you pay extra attention to the following:
Seat belts
Before starting the vehicle, make sure that you and
your passengers have fastened your seat belts.
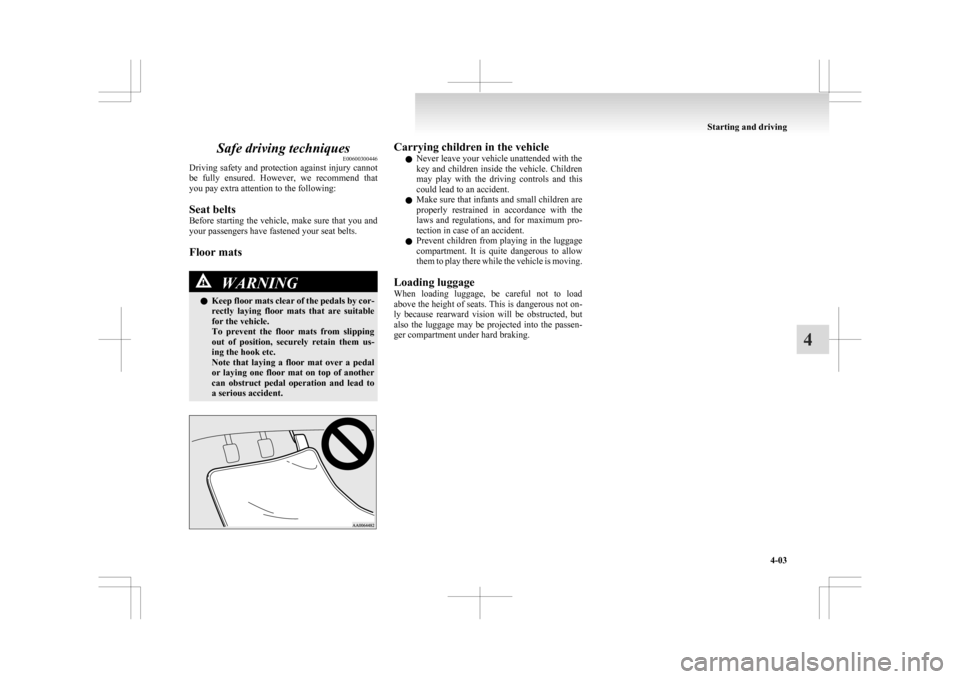
Floor mats WARNING
l Keep
floor mats clear of the pedals by cor-
rectly laying floor mats that are suitable
for the vehicle.
To prevent the floor mats from slipping
out of position, securely retain them us-
ing the hook etc.
Note that laying a floor mat over a pedal
or laying one floor mat on top of another
can obstruct pedal operation and lead to
a serious accident. Carrying children in the vehicle
l Never leave your vehicle unattended with the
key
and children inside the vehicle. Children
may play with the driving controls and this
could lead to an accident.
l Make sure that infants and small children are
properly restrained in accordance with the
laws and regulations, and for maximum pro-
tection in case of an accident.
l Prevent children from playing in the luggage
compartment. It is quite dangerous to allow
them to play there while the vehicle is moving.
Loading luggage
When loading luggage, be careful not to load
above the height of seats. This is dangerous not on-
ly because rearward vision will be obstructed, but
also the luggage may be projected into the passen-
ger compartment under hard braking. Starting and driving
4-03 4
Page 160 of 368

Steering wheel height and reach
adjustment E00600700512
1. Release
the lever while holding the steering
wheel up.
2. Adjust the steering wheel to the desired posi- tion.
3. Securely lock the steering wheel by pulling the lever fully upward. A- Locked
B-
Release WARNING
l Do
not attempt to adjust the steering
wheel while you are driving the vehicle. Inside rear-view mirror
E00600800366
Adjust
the rear-view mirror only after making any
seat adjustments so you have a clear view to the
rear of the vehicle. WARNING
l Do
not attempt to adjust the rear-view
mirror while driving. This can be danger-
ous.
Always adjust the mirror before driving.
Adjust the rear-view mirror to maximize the view
through the rear window.
To adjust the vertical mirror position
It
is possible to move the mirror up and down to ad-
just its position. To reduce the glare
The
lever (A) at the bottom of the mirror can be
used to adjust the mirror to reduce the glare from
the headlamps of vehicles behind you during night
driving. 1- Normal
2-
Anti-glare Starting and driving
4-08
4
Page 178 of 368
Sports mode
E00602500194
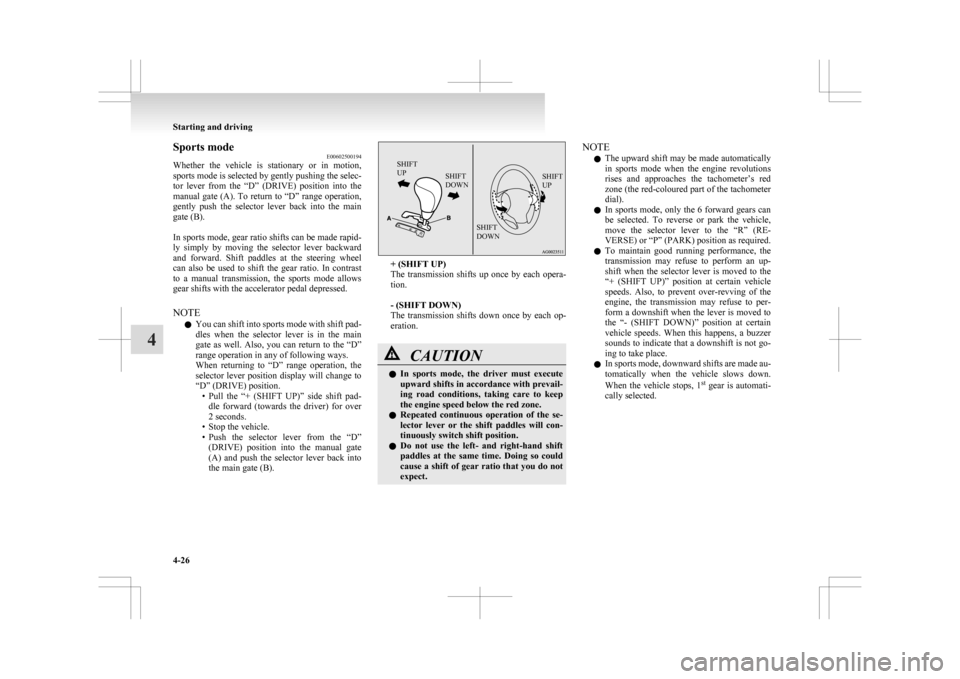
Whether
the vehicle is stationary or in motion,
sports mode is selected by gently pushing the selec-
tor lever from the “D” (DRIVE) position into the
manual gate (A). To return to “D” range operation,
gently push the selector lever back into the main
gate (B).
In sports mode, gear ratio shifts can be made rapid-
ly simply by moving the selector lever backward
and forward. Shift paddles at the steering wheel
can also be used to shift the gear ratio. In contrast
to a manual transmission, the sports mode allows
gear shifts with the accelerator pedal depressed.
NOTE
l You can shift into sports mode with shift pad-
dles when the selector lever is in the main
gate as well. Also, you can return to the “D”
range operation in any of following ways.
When returning to “D” range operation, the
selector lever position display will change to
“D” (DRIVE) position.
• Pull the “+ (SHIFT UP)” side shift pad-dle forward (towards the driver) for over
2 seconds.
• Stop the vehicle.
• Push the selector lever from the “D” (DRIVE) position into the manual gate
(A) and push the selector lever back into
the main gate (B).
SHIFT
UP SHIFT
DOWN SHIFT
UP
SHIFT
DOWN + (SHIFT UP)
The
transmission shifts up once by each opera-
tion.
- (SHIFT DOWN)
The transmission shifts down once by each op-
eration. CAUTION
l
In
sports mode, the driver must execute
upward shifts in accordance with prevail-
ing road conditions, taking care to keep
the engine speed below the red zone.
l Repeated continuous operation of the se-
lector lever or the shift paddles will con-
tinuously switch shift position.
l Do not use the left- and right-hand shift
paddles at the same time. Doing so could
cause a shift of gear ratio that you do not
expect. NOTE
l The
upward shift may be made automatically
in sports mode when the engine revolutions
rises and approaches the tachometer’s red
zone (the red-coloured part of the tachometer
dial).
l In sports mode, only the 6 forward gears can
be selected. To reverse or park the vehicle,
move the selector lever to the “R” (RE-
VERSE) or “P” (PARK) position as required.
l To maintain good running performance, the
transmission may refuse to perform an up-
shift when the selector lever is moved to the
“+ (SHIFT UP)” position at certain vehicle
speeds. Also, to prevent over-revving of the
engine, the transmission may refuse to per-
form a downshift when the lever is moved to
the “- (SHIFT DOWN)” position at certain
vehicle speeds. When this happens, a buzzer
sounds to indicate that a downshift is not go-
ing to take place.
l In sports mode, downward shifts are made au-
tomatically when the vehicle slows down.
When the vehicle stops, 1 st
gear is automati-
cally selected. Starting and driving
4-26
4
Page 187 of 368
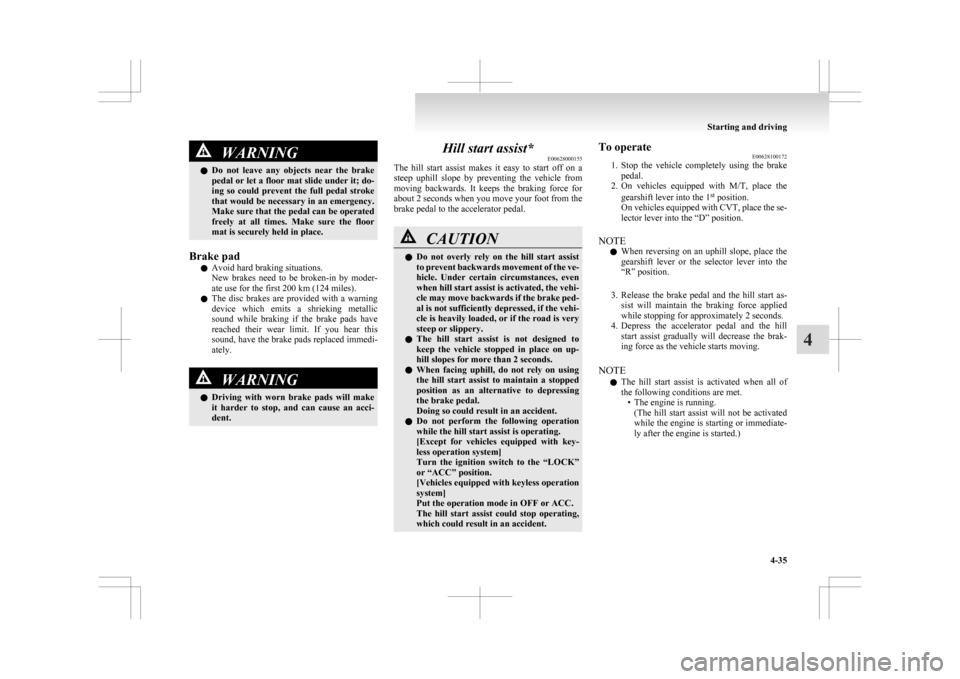
WARNING
l Do not leave any objects near the brake
pedal or let a floor mat slide under it; do-
ing so could prevent the full pedal stroke
that would be necessary in an emergency.
Make sure that the pedal can be operated
freely at all times. Make sure the floor
mat is securely held in place.
Brake pad l Avoid hard braking situations.
New
brakes need to be broken-in by moder-
ate use for the first 200 km (124 miles).
l The disc brakes are provided with a warning
device which emits a shrieking metallic
sound while braking if the brake pads have
reached their wear limit. If you hear this
sound, have the brake pads replaced immedi-
ately. WARNING
l Driving
with worn brake pads will make
it harder to stop, and can cause an acci-
dent. Hill start assist*
E00628000155
The
hill start assist makes it easy to start off on a
steep uphill slope by preventing the vehicle from
moving backwards. It keeps the braking force for
about 2 seconds when you move your foot from the
brake pedal to the accelerator pedal. CAUTION
l
Do
not overly rely on the hill start assist
to prevent backwards movement of the ve-
hicle. Under certain circumstances, even
when hill start assist is activated, the vehi-
cle may move backwards if the brake ped-
al is not sufficiently depressed, if the vehi-
cle is heavily loaded, or if the road is very
steep or slippery.
l The hill start assist is not designed to
keep the vehicle stopped in place on up-
hill slopes for more than 2 seconds.
l When facing uphill, do not rely on using
the hill start assist to maintain a stopped
position as an alternative to depressing
the brake pedal.
Doing so could result in an accident.
l Do not perform the following operation
while the hill start assist is operating.
[Except for vehicles equipped with key-
less operation system]
Turn the ignition switch to the “LOCK”
or “ACC” position.
[Vehicles equipped with keyless operation
system]
Put the operation mode in OFF or ACC.
The hill start assist could stop operating,
which could result in an accident. To operate
E00628100172
1. Stop
the vehicle completely using the brake
pedal.
2. On vehicles equipped with M/T, place the
gearshift lever into the 1 st
position.
On vehicles equipped with CVT, place the se-
lector lever into the “D” position.
NOTE l When reversing on an uphill slope, place the
gearshift lever or the selector lever into the
“R” position.
3. Release the brake pedal and the hill start as- sist will maintain the braking force applied
while stopping for approximately 2 seconds.
4. Depress the accelerator pedal and the hill start assist gradually will decrease the brak-
ing force as the vehicle starts moving.
NOTE l The hill start assist is activated when all of
the following conditions are met.
• The engine is running.(The hill start assist will not be activated
while the engine is starting or immediate-
ly after the engine is started.) Starting and driving
4-35 4
Page 205 of 368
NOTE
l We
recommend you to use a genuine
MITSUBISHI roof carrier, since the brackets
to be used have a special shape.
For details, we recommend you to consult a
MITSUBISHI MOTORS Authorized Service
Point.
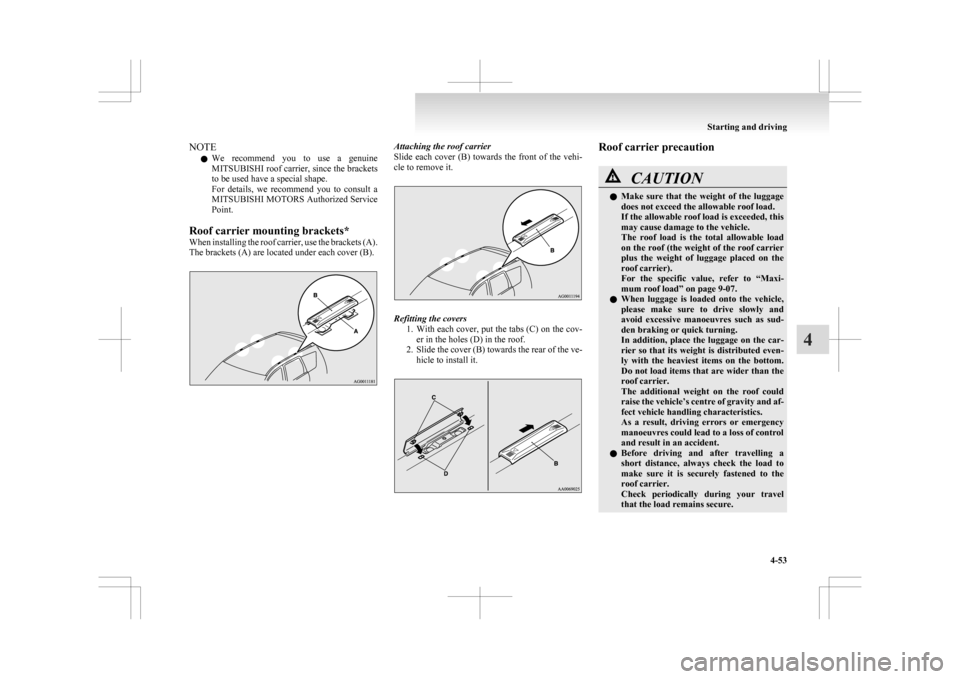
Roof carrier mounting brackets*
When installing the roof carrier, use the brackets (A).
The brackets (A) are located under each cover (B). Attaching the roof carrier
Slide
each cover (B) towards the front of the vehi-
cle to remove it. Refitting the covers
1. With
each cover, put the tabs (C) on the cov-
er in the holes (D) in the roof.
2. Slide the cover (B) towards the rear of the ve- hicle to install it. Roof carrier precaution
CAUTION
l
Make
sure that the weight of the luggage
does not exceed the allowable roof load.
If the allowable roof load is exceeded, this
may cause damage to the vehicle.
The roof load is the total allowable load
on the roof (the weight of the roof carrier
plus the weight of luggage placed on the
roof carrier).
For the specific value, refer to “Maxi-
mum roof load” on page 9-07.
l When luggage is loaded onto the vehicle,
please make sure to drive slowly and
avoid excessive manoeuvres such as sud-
den braking or quick turning.
In addition, place the luggage on the car-
rier so that its weight is distributed even-
ly with the heaviest items on the bottom.
Do not load items that are wider than the
roof carrier.
The additional weight on the roof could
raise the vehicle’s centre of gravity and af-
fect vehicle handling characteristics.
As a result, driving errors or emergency
manoeuvres could lead to a loss of control
and result in an accident.
l Before driving and after travelling a
short distance, always check the load to
make sure it is securely fastened to the
roof carrier.
Check periodically during your travel
that the load remains secure. Starting and driving
4-53 4
Page 226 of 368
1. Press the PWR switch to turn the audio sys-
tem ON and OFF. The audio system turns on
in the last mode used.
2. Press the CD button to enter CD mode. The CD changer will start playback if the
CD is already in the CD changer.
3. To stop the CD, turn off the power by press- ing the PWR switch, or change over to the ra-
dio mode by pressing the AM/FM button, or
eject the disc by pressing the eject button.
NOTE l For information on adjusting the volume and
tone, refer to “To adjust the volume” on page
5-11 and “To adjust the tone” on page 5-11.
l As many as 6 CDs can be inserted into the
CD changer.
l 8 cm CDs cannot be played on this CD chang-
er.
l For information concerning the handling of
compact discs, refer to “Handling of compact
discs” on page 5-38.
To set a single disc 1. Press the LOAD button briefly.
2. The CD changer will show “WAIT” on thedisplay and start making itself ready for disc
loading.
3. When the CD changer is ready for disc load- ing, the LOAD indicator will illuminate and
the display will show “LOAD DISC No.
(1-6)”.
4. When a disc is inserted into the CD slot, the disc will begin to play. NOTE
l If
there are multiple empty slots, you can se-
lect your desired slot by pressing the DISC
buttons.
l If you do not insert a disc for about 15 sec-
onds after the CD changer starts standing by
for loading, the loading standby mode will
be cancelled.
To set all the discs 1. Press the LOAD button for 2 seconds or lon-ger (until you hear a beep).
2. The CD changer will select the lowest-num- bered empty slot and switch to loading stand-
by mode.
3. When the display shows “LOAD DISC No. (1-6)” insert a disc. The CD changer will
then automatically select the next empty slot
and enter loading standby mode.
4. Repeat the above-described steps until every slot contains a disc. Playback will then begin
with the disc that you inserted last.
NOTE l If you press the LOAD button again while
the CD changer is in loading standby mode,
the loading standby mode will be cancelled.
To select a desired disc
You can select your desired disc by using the DISC
button. The active disc will be indicated on the dis-
play.
Press the DISC (Disc up) button repeatedly until
the desired disc number appears on the display.
Press the DISC (Disc down) button repeatedly until
the desired disc number appears on the display. To listen to a music CD
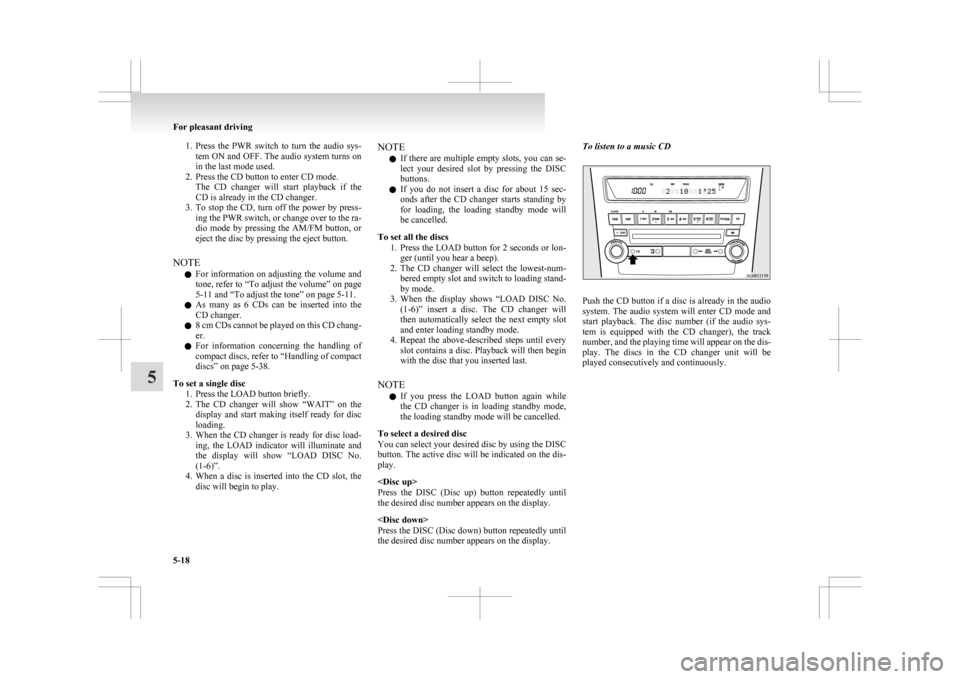
Push the CD button if a disc is already in the audio
system.
The audio system will enter CD mode and
start playback. The disc number (if the audio sys-
tem is equipped with the CD changer), the track
number, and the playing time will appear on the dis-
play. The discs in the CD changer unit will be
played consecutively and continuously. For pleasant driving
5-18
5
Page 247 of 368

Notes on CD-Rs/RWs
E00725100055
l You
may have trouble playing back some
CD-R/RW discs recorded on CD recorders
(CD-R/RW drives), either due to their record-
ing characteristics or dirt, fingerprints,
scratches, etc. on the disc surface.
l CD-R/RW discs are less resistant to high tem-
peratures and high humidity than ordinary mu-
sic CDs and can therefore be damaged and
rendered unplayable if left inside your vehi-
cle for a long time.
l Depending on the combination of the writing
software, the CD recorder (CD-R/RW drive),
and the disc used to create a CD-R/RW, the
disc might not play successfully.
l This player cannot play the CD-R/RW discs
if the session is not closed.
l This player cannot play CD-R/RW discs
which contain other than CD-DA or MP3 da-
ta (Video CD, etc.).
l Be sure to observe the handling instructions
for the CD-R/RW disc. WARNING
l Operating
the CD player in a manner oth-
er than specifically instructed herein may
result in hazardous radiation exposure.
Do not remove the cover and attempt to
repair the CD player by yourself. There
are no user serviceable parts inside. If the
CD player is not working correctly, it is
recommended that you have it inspected. Antenna
E00710500543
To remove
Turn the pole (A) anticlockwise. To install
Screw
the pole (A) clockwise into the base (B) un-
til it is securely retained.
NOTE
l Be sure to remove the roof antenna in the fol-
lowing cases:
• When using an automatic car wash.
• When placing a car cover over the vehicle.
• When driving into a structure that has alow ceiling. Digital clock*
E00711800455
Automatic
mode and manual mode is available for
digital clock adjustment.
Select the automatic mode or the manual mode by
performing the following operations: A- PWR switch
B-
TUNE switch
1. Press the PWR switch (A) to turn ON the au- dio system.
2. Enter the function setup mode by pressing the TUNE switch (B) for 2 seconds or longer.
3. Press the TUNE switch (B) repeatedly to se- lect the CT (Clock Time) mode.
The order is: AF CT REG TP-S
PI-S Language of PTY display
SCV PHONE Function setup mode
OFF For pleasant driving
5-39 5
Page 252 of 368

With the confirmation function activated, you are
given
more opportunities than normal to confirm a
command when making various settings to Blue-
tooth ®
2.0 interface. This allows you to decrease
the possibility that a setting is accidentally changed.
The confirmation function can be turned on or off
by following the steps below. 1. Press the SPEECH button.
2. Say “Setup”.
3. Say “Confirmation prompts”.
4. The voice guide will say “Confirmationprompts are
confirmation prompts
Answer “Yes” to change the setting or an-
swer “No” to keep the current setting.
5. The voice guide will say “Confirmation prompts are
will return to the main menu.
Security function E00760500043
It is possible to use a password as a security func-
tion
by setting a password of your choice for the
Bluetooth ®
2.0 interface.
When the security function is turned on, it is neces-
sary to make a voice input of a 4-digit password in
order to use all functions of the Bluetooth ®
2.0 in-
terface, except for reception.
Setting the password
Use the following procedure to turn on the security
function by setting a password. 1. Press the SPEECH button.
2. Say “Setup”.
3. Say “Password.” 4. The
voice guide will say “Password is disa-
bled. Would you like to enable it?” Answer
“Yes.”
Answer “No” to cancel the setting of the pass-
word and return to the main menu.
5. The voice guide will say “Please say a 4-dig- it password. Remember this password. It will
be required to use this system”.
Say a 4-digit number which you want to set
as a password.
6. For confirmation purposes, the voice guide will say “Password <4-digit password>. Is
this correct?” Answer “Yes.”
Answer “No” to return to the password input
in Step 5.
7. When the registration of the password is com- pleted, the voice guide will say “Password is
enabled” and the system will return to the
main menu.
NOTE l Password will be required to access the sys-
tem after the next ignition cycle.
l It is required for a little time after engine
stop that the entered password is actually re-
corded in the system.
If the ignition switch or the operation mode
is made to ACC or ON or the engine is star-
ted immediately after engine stop, there is a
case when the entered password is not recor-
ded in the system. At this time, please try to
enter the password again. Entering the password
If
a password has been set and the security function
is enabled, the voice guide will say “Hands-free sys-
tem is locked. State the password to continue”
when the SPEECH button is pressed to enter voice
recognition mode. Say the 4-digit password num-
ber to enter the password.
If the entered password is wrong, the voice guide
will say “<4- digit password>, Incorrect password.
Please try again”. Enter the correct password.
NOTE
l You can re-enter the password as many times
as you want.
l If you have forgotten your password, say
“Cancel” to quit the voice input mode and
then check with a MITSUBISHI MOTORS
Authorized Service Point.
Disabling the password
Use the following procedure to turn off the security
function by disabling the password.
NOTE l System must be unlocked to disable the pass-
word.
1. Press the SPEECH button.
2. Say “Setup”.
3. Say “Password.”
4. The voice guide will say “Password is en- abled. Would you like to disable it?” An-
swer “Yes.”
Answer “No” to cancel the disabling of
the password and return to the main menu. For pleasant driving
5-44
5