2009 MITSUBISHI ASX change wheel
[x] Cancel search: change wheelPage 258 of 368
l
If the name you selected has matching data
in the mobile phone book but no telephone
number is registered under the selected loca-
tion, the voice guide will say “{home/work/
mobile/other} not found for
you like to try again?”
Answer “Yes,” and the system will return to
Step 3.
Answer “No,” and the call will be cancelled.
Start over again from Step 1.
6. The voice guide will say “Calling
telephone number.
NOTE l When the confirmation function is on, the sys-
tem will ask if the name and location of the
receiver are correct.
If the name is correct, answer “Yes.”
If you want to change the name or location to
call, answer “No.” The system will return to
Step 3.
Redialing
You can redial the last number called, based on the
history of dialed calls in the paired cellular phone.
Use the following procedure to redial. 1. Press the SPEECH button.
2. Say “Redial.”
SEND function E00761300035
During a call, press the SPEECH button to enter
voice
recognition mode, then say “
SEND” to generate DTMF tones. For example, if during a call you need to simulate
the
press of a phone button as a response to an auto-
mated system, press the SPEECH button and speak
“1 2 3 4 pound SEND” and the 1234# will be sent
on your cellular phone.
Receiving calls E00761600025
If an incoming phone call is received while the ig-
nition
switch or the operation mode is in ON or
ACC, the audio system will be automatically
turned on and switched to the incoming call, even
when the audio system was originally off.
The voice guide announcement for the incoming
call will be output from the front passenger’s seat
speaker.
If the CD player or radio was playing when the in-
coming call was received, the audio system will
mute the sound from the CD player or radio and out-
put only the incoming call.
To receive the call, press the PICK-UP button on
the steering wheel control switch.
When the call is over, the audio system will return
to its previous state.
MUTE function E00760300054
At any time during a call, you can mute the vehicle
microphone.
Pressing
the SPEECH button and then saying
“Mute” during a call will turn ON the MUTE func-
tion and mute the microphone.
Saying “Mute off” in the same way will turn off
the MUTE function and cancel the mute on the mi-
crophone. Switching between hands-free mode and private
mode
E00761400036
The
Bluetooth ®
2.0 interface can switch between
Hands-free mode (Hands-free calls) and private
mode (calls using cellular phone).
If you press the SPEECH button and say “Transfer
call” during a Hands-free call, you can stop the
Hands-free mode and talk in private mode.
To return to Hands-free mode, press the SPEECH
button again and say “Transfer call”.
Phone book function E00763700020
The Bluetooth ®
2.0 interface has 2 types of unique
phone books that are different from the phone book
stored in the cellular phone. They are the vehicle
phone book and the mobile phone book.
These phone books are used to register telephone
numbers and to make calls to desired numbers via
the voice recognition function.
NOTE
l Disconnecting the battery cable will not de-
lete information registered in the phone book.
Vehicle phone book E00763800050
This phone book is used when making calls with
the voice recognition function.
Up
to 32 names can be registered in the vehicle
phone book per language.
Also, each entry has 4 locations associated with:
home, work, mobile and other. You can register
one telephone number for each location.
You can register a desired name as a name for any
phone book entry registered in the vehicle phone
book. For pleasant driving
5-50
5
Page 290 of 368
l
A tyre in which puncture sealant has been
used should ideally be replaced with a new
one. If you wish to have such a tyre properly
repaired for reuse, please contact a
MITSUBISHI MOTORS Authorized Service
Point or another specialist. Note that a proper
repair is impossible following an emergency
repair if the puncture hole cannot be located.
l Wipe away any sealant that gets on the
wheel. Provided the valve is replaced with a
new one, the wheel can be reused.
l The manufacturer is unable to guarantee that
all tyre punctures can be repaired with the
tyre repair kit, in particular cuts or perfora-
tions with a diameter of more than 4 mm or
away from the tyre’s tread. The manufacturer
is not liable for damage sustained through im-
proper use of the tyre repair kit.
l The manufacturer is not liable for damage sus-
tained through re-use of any tyre in which
tyre sealant has been used. How to change a tyre
E00801202637
Before
changing a tyre, first stop your vehicle in a
safe, flat location. 1. Park the vehicle on level and stable ground,free of loose pebbles, etc.
2. Set the parking brake firmly.
3. On vehicles with M/T, stop the engine and move the gearshift lever to the “R” (Reverse)
position.
On vehicles with CVT, move the selector lev-
er to the “P” (PARK) position and stop the en-
gine.
4. Turn on the hazard warning flashers and set up a warning triangle, flashing signal lamp,
etc., at an adequate distance from the vehi-
cle, and have all your passengers leave the ve-
hicle.
NOTE l The warning triangle and flashing signal
lamp do not come with your vehicle. It is rec-
ommended that you keep one in the vehicle
for use if needed.
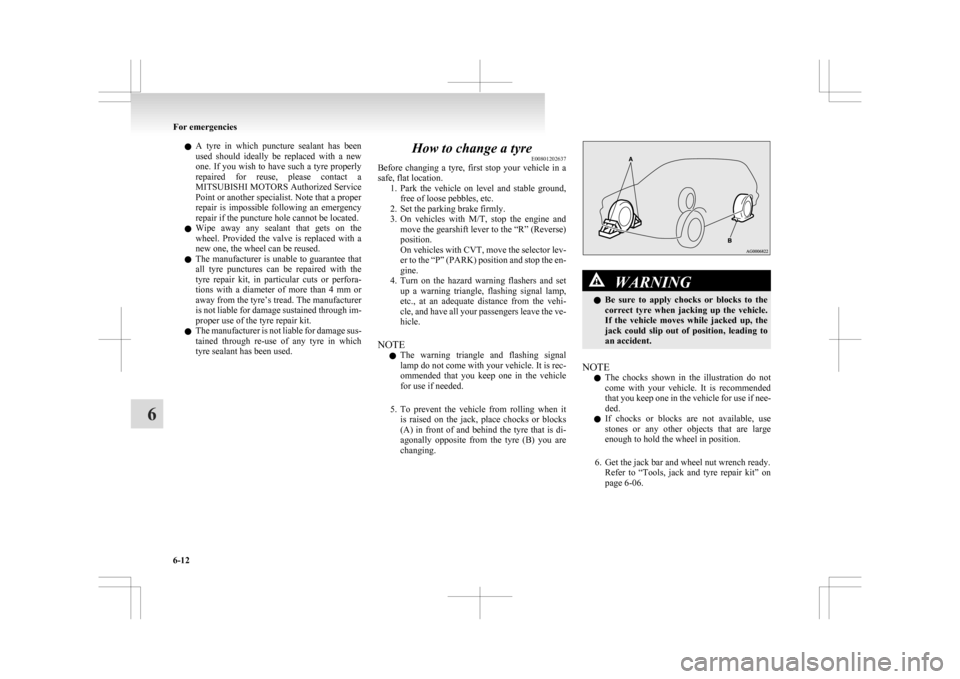
5. To prevent the vehicle from rolling when it is raised on the jack, place chocks or blocks
(A) in front of and behind the tyre that is di-
agonally opposite from the tyre (B) you are
changing. WARNING
l Be
sure to apply chocks or blocks to the
correct tyre when jacking up the vehicle.
If the vehicle moves while jacked up, the
jack could slip out of position, leading to
an accident.
NOTE l The
chocks shown in the illustration do not
come with your vehicle. It is recommended
that you keep one in the vehicle for use if nee-
ded.
l If chocks or blocks are not available, use
stones or any other objects that are large
enough to hold the wheel in position.
6. Get the jack bar and wheel nut wrench ready. Refer to “Tools, jack and tyre repair kit” on
page 6-06. For emergencies
6-12
6
Page 292 of 368
CAUTION
l
Do not install more than one temporary
spare wheel at the same time.
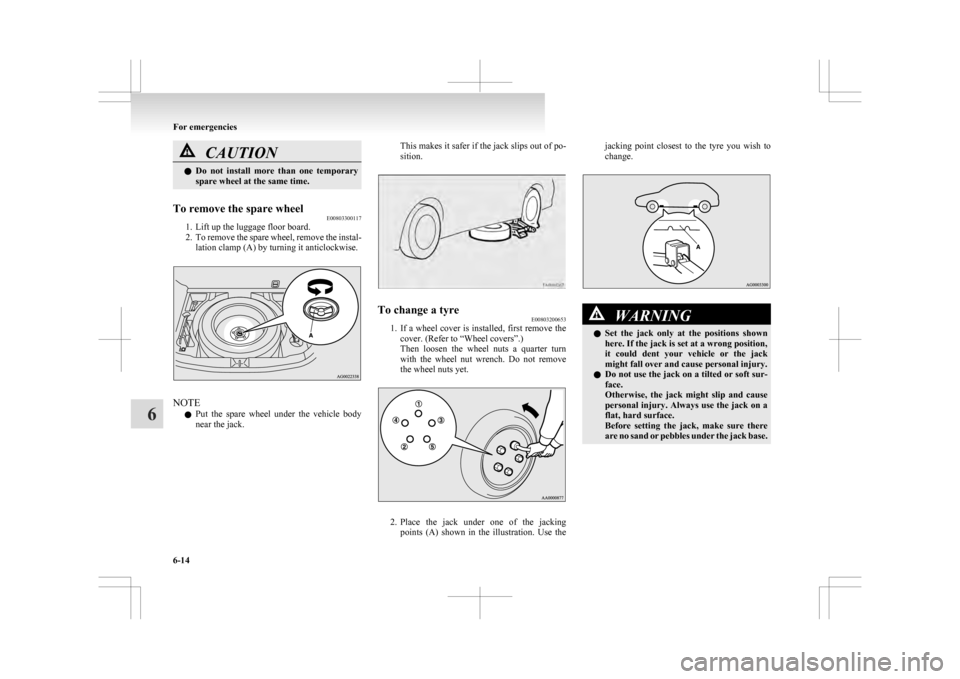
To remove the spare wheel E00803300117
1. Lift up the luggage floor board.
2. To
remove the spare wheel, remove the instal-
lation clamp (A) by turning it anticlockwise. NOTE
l Put
the spare wheel under the vehicle body
near the jack. This makes it safer if the jack slips out of po-
sition.
To change a tyre
E00803200653
1. If
a wheel cover is installed, first remove the
cover. (Refer to “Wheel covers”.)
Then loosen the wheel nuts a quarter turn
with the wheel nut wrench. Do not remove
the wheel nuts yet. 2. Place
the jack under one of the jacking
points (A) shown in the illustration. Use the jacking point closest to the tyre you wish to
change.
WARNING
l Set
the jack only at the positions shown
here. If the jack is set at a wrong position,
it could dent your vehicle or the jack
might fall over and cause personal injury.
l Do not use the jack on a tilted or soft sur-
face.
Otherwise, the jack might slip and cause
personal injury. Always use the jack on a
flat, hard surface.
Before setting the jack, make sure there
are no sand or pebbles under the jack base. For emergencies
6-14
6
Page 293 of 368
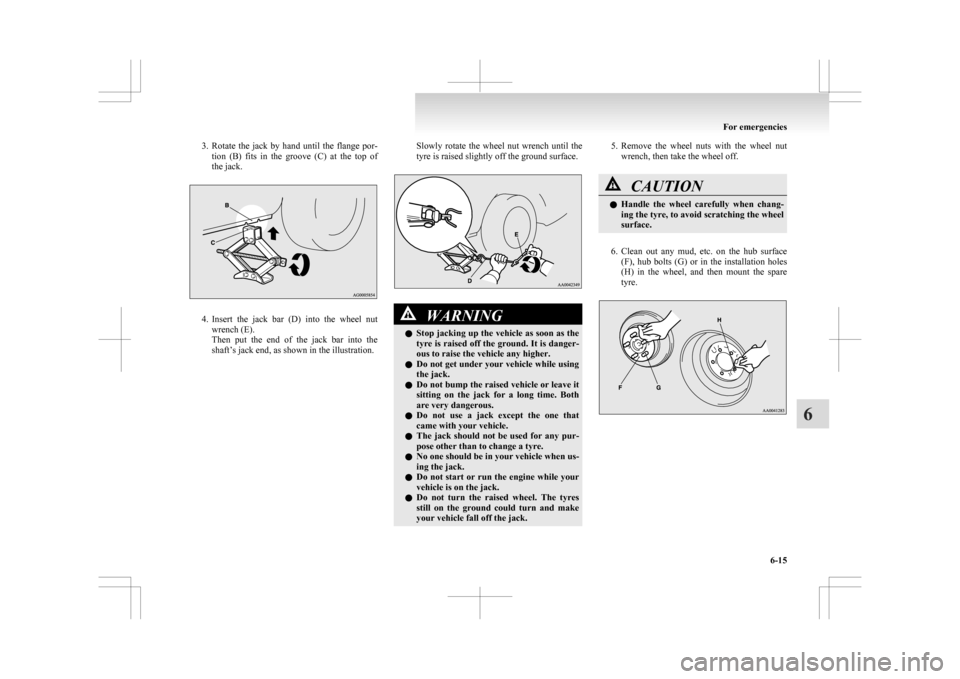
3. Rotate the jack by hand until the flange por-
tion (B) fits in the groove (C) at the top of
the jack. 4. Insert
the jack bar (D) into the wheel nut
wrench (E).
Then put the end of the jack bar into the
shaft’s jack end, as shown in the illustration. Slowly rotate the wheel nut wrench until the
tyre is raised slightly off the ground surface. WARNING
l Stop
jacking up the vehicle as soon as the
tyre is raised off the ground. It is danger-
ous to raise the vehicle any higher.
l Do not get under your vehicle while using
the jack.
l Do not bump the raised vehicle or leave it
sitting on the jack for a long time. Both
are very dangerous.
l Do not use a jack except the one that
came with your vehicle.
l The jack should not be used for any pur-
pose other than to change a tyre.
l No one should be in your vehicle when us-
ing the jack.
l Do not start or run the engine while your
vehicle is on the jack.
l Do not turn the raised wheel. The tyres
still on the ground could turn and make
your vehicle fall off the jack. 5. Remove
the wheel nuts with the wheel nut
wrench, then take the wheel off. CAUTION
l
Handle
the wheel carefully when chang-
ing the tyre, to avoid scratching the wheel
surface.
6. Clean
out any mud, etc. on the hub surface (F), hub bolts (G) or in the installation holes
(H) in the wheel, and then mount the spare
tyre. For emergencies
6-15 6
Page 294 of 368
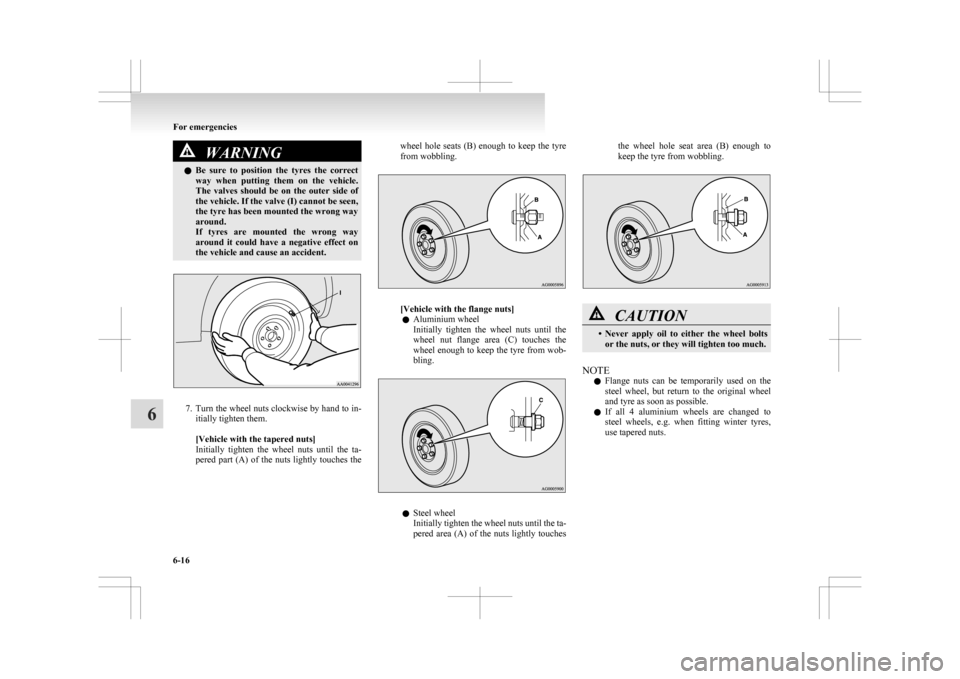
WARNING
l Be sure to position the tyres the correct
way when putting them on the vehicle.
The valves should be on the outer side of
the vehicle. If the valve (I) cannot be seen,
the tyre has been mounted the wrong way
around.
If tyres are mounted the wrong way
around it could have a negative effect on
the vehicle and cause an accident. 7. Turn
the wheel nuts clockwise by hand to in-
itially tighten them.
[Vehicle with the tapered nuts]
Initially tighten the wheel nuts until the ta-
pered part (A) of the nuts lightly touches the wheel hole seats (B) enough to keep the tyre
from wobbling.
[Vehicle with the flange nuts]
l Aluminium wheel
Initially
tighten the wheel nuts until the
wheel nut flange area (C) touches the
wheel enough to keep the tyre from wob-
bling. l
Steel wheel
Initially
tighten the wheel nuts until the ta-
pered area (A) of the nuts lightly touches the wheel hole seat area (B) enough to
keep the tyre from wobbling.
l
CAUTION
• Never
apply oil to either the wheel bolts
or the nuts, or they will tighten too much.
NOTE l Flange
nuts can be temporarily used on the
steel wheel, but return to the original wheel
and tyre as soon as possible.
l If all 4 aluminium wheels are changed to
steel wheels, e.g. when fitting winter tyres,
use tapered nuts. For emergencies
6-16
6
Page 320 of 368
*- If the spare tyre wheel differs from the standard
tyre
wheel, do not perform tyre rotation using a
spare wheel. CAUTION
l
A
temporary spare tyre can be fitted tem-
porarily in place of a tyre that has been re-
moved during the tyre rotation. However,
it must not be included in the regular tyre
rotation sequence.
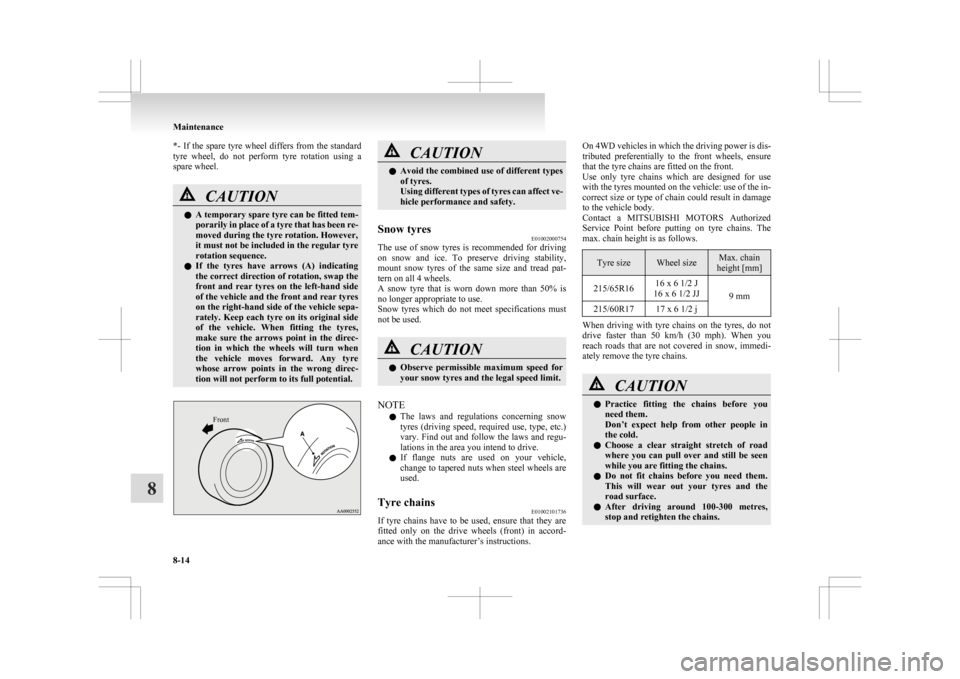
l If the tyres have arrows (A) indicating
the correct direction of rotation, swap the
front and rear tyres on the left-hand side
of the vehicle and the front and rear tyres
on the right-hand side of the vehicle sepa-
rately. Keep each tyre on its original side
of the vehicle. When fitting the tyres,
make sure the arrows point in the direc-
tion in which the wheels will turn when
the vehicle moves forward. Any tyre
whose arrow points in the wrong direc-
tion will not perform to its full potential.
Front CAUTION
l
Avoid
the combined use of different types
of tyres.
Using different types of tyres can affect ve-
hicle performance and safety.
Snow tyres E01002000754
The use of snow tyres is recommended for driving
on
snow and ice. To preserve driving stability,
mount snow tyres of the same size and tread pat-
tern on all 4 wheels.
A snow tyre that is worn down more than 50% is
no longer appropriate to use.
Snow tyres which do not meet specifications must
not be used. CAUTION
l
Observe
permissible maximum speed for
your snow tyres and the legal speed limit.
NOTE l The
laws and regulations concerning snow
tyres (driving speed, required use, type, etc.)
vary. Find out and follow the laws and regu-
lations in the area you intend to drive.
l If flange nuts are used on your vehicle,
change to tapered nuts when steel wheels are
used.
Tyre chains E01002101736
If tyre chains have to be used, ensure that they are
fitted
only on the drive wheels (front) in accord-
ance with the manufacturer’s instructions. On 4WD vehicles in which the driving power is dis-
tributed
preferentially to the front wheels, ensure
that the tyre chains are fitted on the front.
Use only tyre chains which are designed for use
with the tyres mounted on the vehicle: use of the in-
correct size or type of chain could result in damage
to the vehicle body.
Contact a MITSUBISHI MOTORS Authorized
Service Point before putting on tyre chains. The
max. chain height is as follows. Tyre size Wheel size Max. chain
height [mm]
215/65R16 16 x 6 1/2 J
16 x 6 1/2 JJ 9 mm
215/60R17 17 x 6 1/2 j When driving with tyre chains on the tyres, do not
drive
faster than 50 km/h (30 mph). When you
reach roads that are not covered in snow, immedi-
ately remove the tyre chains. CAUTION
l
Practice
fitting the chains before you
need them.
Don’t expect help from other people in
the cold.
l Choose a clear straight stretch of road
where you can pull over and still be seen
while you are fitting the chains.
l Do not fit chains before you need them.
This will wear out your tyres and the
road surface.
l After driving around 100-300 metres,
stop and retighten the chains. Maintenance
8-14
8
Page 357 of 368

4
4-wheel drive operation 4-31
AAccessory (Installation) 04
Accessory socket 5-61
Active stability control (ASC)
4-40
Additional equipment 8-17
Air conditioning 5-03 Important operation tips for the air condition-
ing 5-09
Air purifier 5-10
Airbag 2-24
Antenna 5-39
Anti-lock brake system (ABS) 4-38 Display 4-38
Warning lamp 4-38
Ashtray 5-60
Assist grips 5-70
Audio 5-10 Error codes 5-35
External audio input function 5-32
Handling of compact discs 5-38
Steering wheel audio remote control
switches 5-33
Auto Stop & Go (AS&G) system 4-17
Automatic transmission Fluid 9-14
Selector lever operation 4-24
Selector lever position 4-25
Sports mode 4-26
BBattery 8-08
Charge warning lamp 3-42 Discharged battery (Emergency starting) 6-02
Disposal information for used batteries
06
Specification 9-11
Bluetooth® 2.0 interface 5-41
Bonnet 8-03
Bottle holder 5-69
Brake assist system 4-36
Brake Anti-lock brake 4-38
Braking 4-34
Fluid 8-07,9-14
Parking brake 4-06
Bulb capacity 8-23
C Capacities 9-14
Card holder 5-59,5-66
Cargo loads 4-52
Catalytic converter
8-02
Cautions on handling of 4-wheel drive vehi-
cles 4-33
Central door locks 1-22
Charge warning lamp 3-42
Chassis number 9-02
Check engine warning lamp 3-41
Child restraint 2-15
Child-protection rear doors 1-25
Cigarette lighter 5-60
Cleaning Exterior of your vehicle 7-03
Interior of your vehicle 7-02
Clock 5-39
Clutch Fluid 8-07
Coat hook 5-70
Combination headlamps and dipper switch 3-44
Coolant (engine) 8-06,9-14
Cruise control 4-43 Cup holder 5-68
D Daytime running lamps
Bulb capacity
8-24
Replacement 8-30
Demister (rear window) 3-57
Diesel particulate filter (DPF) 4-15
Dimensions 9-04
Dipper (High/Low beam change) 3-47
Doors Central door locks 1-22
Child-protection 1-25
Dead Lock System 1-23
Lock and unlock 1-21
Driving, alcohol and drugs 4-02
E Economical driving 4-02
Electric power steering system (EPS)
4-40
Electric window control 1-34
Electrical system 9-11
Electronic immobilizer (Anti-theft starting sys-
tem) 1-03
Electronically controlled 4WD system 4-29
Emergency starting 6-02
Emergency stop signal system 4-37
Engine specifications 9-10
Engine switch 1-11
Engine Coolant 8-06,9-14
Number 9-02
Oil 8-04
Oil and filter 9-14
Overheating 6-04
Specifications 9-10 Alphabetical index
1
Page 360 of 368

T
Tachometer 3-02
Tail lamps
Bulb capacity
8-24
Replacement 8-31
Tailgate 1-26
Tank capacity 03
Tissue holder 5-67
Tools 6-06 Storage 6-06
Towing 6-19
Trailer towing 4-54
Transfer oil 9-14
Transmission Automatic transmission 4-24
Manual transmission 4-21
Turbocharger operation 4-16
Turn-signal indication lamps 3-40
Turn/Lane-change signals 3-49
Twin Clutch SST (Sport Shift Transmission) Fluid 9-14
Tyres 8-11 How to change a tyre 6-12
Inflation pressures 8-12
Rotation 8-13
Size (tyre and wheel) 9-12
Snow tyres 8-14
Tread wear indicators 8-13
Tyre chains 8-14
Tyre repair kit 6-07
UUSB input terminal 5-57
USB input terminal device
How to connect a USB memory device
5-57
How to connect an iPod 5-57 Used engine oils safety instructions and disposal in-
formation 05
V Vanity mirror lamp
Bulb capacity
8-24
Vehicle care precautions 7-02
Vehicle dimensions 9-04
Vehicle identification number plate 9-02
Vehicle information code plate 9-02
Vehicle labeling 9-02
Vehicle performance 9-06
Vehicle weight 9-07
Ventilators 5-02
W Warning lamps 3-41
Washer
Fluid 8-07,9-14
Switch 3-55,3-56
Washing 7-03
Waxing 7-04
Weatherstripping
8-17
Weight 9-07
Wheel Covers 6-18
Specification 9-12
Wiper Rear window 3-55
Windscreen 3-51
Wiper blades 8-15 Alphabetical index
4