Page 89 of 172

REFERENCEAT A GLANCE CONTROLS DRIVING TIPS MOBILITY
87
Clothes hooks
There are clothes hooks on the grab handles in
the rear passenger compartment.
Items of clothing hung from the hooks
must not obstruct the driver's view. Do not
hang heavy objects from the hooks, otherwise
they could endanger the car's occupants, e.g. in
case of heavy braking or sudden swerving.<
Cup holders and
ashtray*
Cup holders
Two cup holders are located in the front of the
center console, another is in the rear at the back
of the center console.
Do not place glass containers in the cup
holders, as this increases the risk of injury
in the event of an accident.<
Ashtray*
The ashtray is located in one of the cup holders
in the center console.
Emptying
Remove the entire ashtray.
Lighter
With the engine running or the ignition switched
on, press in the cigarette lighter.
The lighter can be pulled out as soon as it pops
back out.
Hold or touch the hot cigarette lighter by
the knob only. Holding or touching it in
other areas could result in burns. When leaving the car, always remove the key so
that children cannot operate the cigarette
lighter and burn themselves.<
Connecting electrical
appliances
In your MINI, you can use electrical devices such
as a flashlight, car vacuum cleaner, etc., up to
approx. 200 watts at 12 volts, as long as one of
the following sockets is available. Avoid damag-
ing the sockets by attempting to insert plugs of
unsuitable shape or size.
Cigarette lighter socket
Remove the lighter* or cover from the socket.
Power socket in cargo bay
MINI
Pull out the cover.
MINI Convertible
Pull out the cover.
Page 90 of 172
Page 91 of 172
AT A GLANCE
CONTROLS
DRIVING TIPS
MOBILITY
REFERENCE DRIVING TIPS
Page 92 of 172

Things to remember when driving
90
Things to remember when driving
Break-in period
Moving parts need breaking-in time to adjust to
each other. Please follow the instructions below
in order to achieve the optimal service life and
economy of operation for your vehicle.
Engine and differential
Always obey all official speed limits.
Up to 1,200 miles/2,000 km
Drive at varying engine and road speeds, but do
not exceed the following:
>Gasoline engine
4,500 rpm or 100 mph/160 km/h
Avoid full-throttle operation and use of the
transmission's kick-down mode.
After driving 1,200 miles/2,000 km
Engine and vehicle speeds can be gradually
increased.
Tires
Due to technical factors associated with their
manufacture, tires do not achieve their full trac-
tion potential until after an initial break-in
period. Therefore, drive cautiously during the
first 200 miles/300 km.
Brake system
Brakes require an initial break-in period of
approx. 300 miles/500 km to achieve optimized
contact and wear patterns between brake pads
and rotors. Drive cautiously during this break-in
period.
Clutch
The function of the clutch reaches its optimal
level only after a distance driven of approx.
300 miles/500 km. During this break-in period,
engage the clutch gently.
Following part replacement
The same break-in procedures should be
observed if any of the components mentioned
above have to be renewed in the course of the
vehicle's operating life.
General driving notes
Close the tailgate
Drive the vehicle only when the tailgate is
closed. Otherwise, exhaust fumes could
penetrate the interior of the vehicle.<
If special circumstances make it absolutely nec-
essary to drive with the tailgate open:
1.Close all windows and the glass sunroof.
2.Switch off the recirculated-air mode and sig-
nificantly increase the air flow rate of the air
conditioner or automatic climate control,
page79 or81.
Hot exhaust system
In all vehicles, extremely high tempera-
tures are generated in the exhaust system.
Do not remove the heat shields installed adjacent
to various sections of the exhaust system, and
never apply undercoating to them. When driving,
standing at idle and while parking, take care to
avoid possible contact between the hot exhaust
system and any highly flammable materials such
as hay, leaves, grass, etc. Such contact could lead
to a fire, with the risk of serious personal injuries
and property damage. Do not touch hot exhaust
tail pipes. Otherwise there is a risk of burns.<
Hydroplaning
When driving on wet or slushy roads,
reduce road speed. If you do not, a wedge
of water can form between tires and road sur-
face. This situation, known as hydroplaning, can
cause partial or complete loss of tire contact
with the road surface, so that the car cannot be
steered or braked properly.<
Page 93 of 172

REFERENCEAT A GLANCE CONTROLS DRIVING TIPS MOBILITY
91
The risk of hydroplaning increases with declining
tread depth on the tires, refer also to Tread
depth on page110.
Driving through water
Drive through water on the road only if it is
not deeper than 1 ft/30 cm, and then only
at walking speed at the most. Otherwise, the
vehicle's engine, the electrical systems and the
transmission may be damaged.<
Parking brake on inclines
On inclines, do not hold the vehicle with
the clutch; use the parking brake. Other-
wise greater clutch wear will result.<
For information on driving off using Hill Start
Assist
*, refer to page64.
Braking safely
Your MINI is equipped with ABS. If you are in a
situation which requires full braking, it is best to
brake using maximum brake pressure. Since the
vehicle maintains steering responsiveness, you
can still avoid possible obstacles with a mini-
mum of steering effort.
The pulsation of the brake pedal, together with
the sound of hydraulic regulation, indicates that
ABS is actively taking effect.
Driving in wet conditions
When roads are wet or there is heavy rain, briefly
exert gentle pressure on the brake pedal every
few miles. Monitor traffic conditions to ensure
that this maneuver does not endanger other
road users. The heat generated in this process
helps dry the pads and rotors to ensure that
Then full braking force will be immediately avail-
able when it is needed.
Hills
To prevent overheating and the resulting
reduced efficiency of the brake system,
drive long or steep downhill gradients in the
gear in which the least braking is required. Even
light but consistent brake pressure can lead to
high temperatures, brake wear and possibly
even brake failure.
shifting down, all the way to first gear if necessary.
This strategy helps you avoid placing excessive
loads on the brake system. Downshifting in man-
ual mode of the automatic transmission, page46.
Never drive with the clutch held down, with
the transmission in neutral or with the
engine switched off; otherwise, engine braking
action will not be present or there will be no
power assistance to the brakes or steering.
Never allow floor mats, carpets or any other
objects to protrude into the area around the ped-
als, otherwise pedal function could be impaired.<
Corrosion on brake rotors
When the vehicle is driven only occasionally,
during extended periods when the vehicle is not
used at all, and in operating conditions where
brake applications are less frequent, there is an
increased tendency for corrosion to form on
rotors, while contaminants accumulate on the
brake pads. This occurs because the minimum
pressure which must be exerted by the pads
during brake applications to clean the rotors is
not reached.
Should corrosion form on the brake rotors, the
brakes will tend to respond with a pulsating
effect that even extended application will fail to
cure.
When the vehicle is parked
Condensation forms while the automatic climate
control is in operation, and then exits under the
vehicle. Traces of condensed water under the
vehicle are therefore normal.
In the MINI Cooper S, the coolant pump may
continue to run for some time after the engine is
switched off. This will generate noise in the
engine compartment.
Before driving into a car wash
Avoid car washes with tracks higher than
4 in/10 cm, otherwise the chassis could be
damaged.<
Additional information about the wash/wipe
system as well as general care instructions for
your MINI start on page119.
Page 94 of 172

Things to remember when driving
92
With convenient access and automatic
transmission
Insert the key into the ignition lock.
The engine can be switched off when the selec-
tor lever is in position N. Refer also to page27.
Cargo loading
To avoid loading the tires beyond their
approved carrying capacity, never over-
load the vehicle. Overloading can lead to over-
heating and increases the rate at which damage
develops inside the tires. The ultimate result can
assume the form of a sudden blow-out.<
Avoid fluid spills in the cargo bay as they
could damage the vehicle.<
MINI: Cargo bay
Cargo bay cover
Do not place any objects on the cover,
otherwise they could endanger the car's
occupants, e.g. in the case of braking or sudden
swerving, or they may damage the cover.<
When you open the tailgate, the cargo bay cover
is raised.
To load bulky luggage, the cover can be
removed.
1.Unhook the lift straps from the tailgate.
2.Pull the cover out of the holders toward the
rear.
Expanding the cargo bay
The rear set backrest is split. Both sides can be
folded separately to expand the cargo bay.
1.Pull the lever.
2.Fold rear seat backrests forward.
When folding the backrest back up, make
sure that the seat's locking mechanisms
engage properly. Otherwise, cargo could be
thrown around in the event of sharp braking or
swerving and endanger the occupants.<
Adjusting rear seat backrest*
Expand the cargo bay by raising the split rear
seat backrests to a steeper angle.
1.Pull the lever, arrow1, and fold the rear seat
backrest forward.
2.Fold up the lever of the backrest lock until it
audibly engages, arrow2.
3.Fold back the backrest until it engages.
If the rear seat backrests are positioned at
a steeper angle, do not install child-
restraint systems in the rear of the vehicle as
their protective features may be ineffective.<
Page 95 of 172

REFERENCEAT A GLANCE CONTROLS DRIVING TIPS MOBILITY
93
MINI Convertible: Luggage
compartment
Do not place any objects on the luggage
compartment roll-up cover, as it may
damage the cover or the convertible top.<
Loading aid
When the convertible top is closed, you can load
the vehicle more easily by releasing the convert-
ible top and folding it up.
1.Release the convertible top using the han-
dles, see arrows 1.
2.Lift the convertible top, see arrow 2.
3.Fold back the handles and place them on
holders3.
Expanding the luggage compartment
volume
You can enlarge the luggage compartment vol-
ume when the convertible top is closed.
1.Fold the convertible top upwards, refer to
Loading aid
2.Pull the luggage compartment's roll-up
cover from its lower storage area and
towards the rear, then swing upward, see
arrows 1.3.Push cover into the upper storage areas, see
arrows 2 and place down horizontally.
To operate the convertible top, move the
luggage compartment cover back to its
lower position.<
Through-loading system
To be able to transport larger objects, the rear
backrest can be folded down.
1.If necessary, use the integrated key and
open the backrest lock 1.
2.Press button2 and fold down backrest
together with the belt strap.
3.Fold the backrest forward.
When folding the backrest back into its
original position, always ensure that the
catch engages securely. A loose backrest might
fail to prevent cargo from entering the passen-
ger compartment during sudden braking or eva-
sive maneuvers, posing a potential hazard to
occupants.
The belt guide loop, see page37, must be
closed.<
Page 96 of 172

Things to remember when driving
94
Determining cargo limit
1.Locate the following statement on your
vehicle's placard
*:
The combined weight of occupants
and cargo should never exceed
XXX kg or YYY lbs. Otherwise, overloading
can result in damage to the vehicle and un-
stable driving conditions.<
2.Determine the combined weight of the
driver and passengers that will be riding in
your vehicle.
3.Subtract the combined weight of the driver
and passengers from XXX kilograms or YYY
pounds.
4.The resulting figure equals the available
amount of cargo and luggage load capacity.
For example, if the XXX amount equals
1,400 lbs. and there will be four 150 lbs. pas-
sengers in your vehicle, the amount of avail-
able cargo and luggage load capacity is
650 lbs:
1,400 lbs. minus 750 lbs. = 650 lbs.
5.Determine the combined weight of luggage
and cargo being loaded on the vehicle. That
weight may not safely exceed the available
cargo and luggage load capacity calculated
in step 4.
6.If your vehicle will be towing a trailer, part of
the load from your trailer will be transferred
to your vehicle. Consult the manual for
transporting a trailer to determine how this
may reduce the available cargo and luggage
load capacity of your vehicle.
Load
The permissible load is the sum of the occu-
pants' weights and the weight of the cargo. The
greater the weight of the occupants, the less
cargo/luggage can be transported.
Stowing cargo
>Position heavy objects as low and as far for-
ward as possible, ideally directly behind the
rear seat backrests.
>Cover sharp edges and corners.
>For very heavy cargo when the rear seat is
not occupied, secure each safety belt in the
respective opposite buckle.
>Do not stack higher than the top edge of the
backrests.
MINI
 1
1 2
2 3
3 4
4 5
5 6
6 7
7 8
8 9
9 10
10 11
11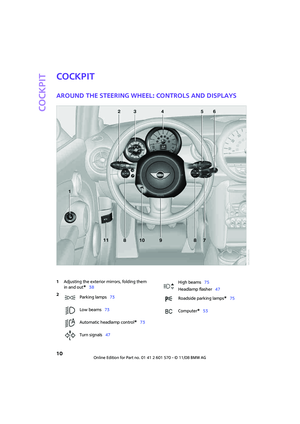 12
12 13
13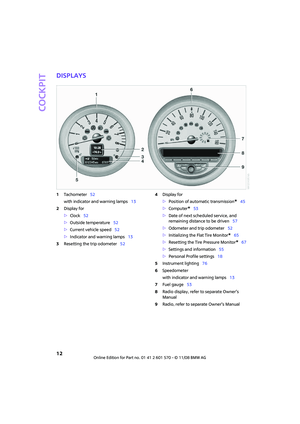 14
14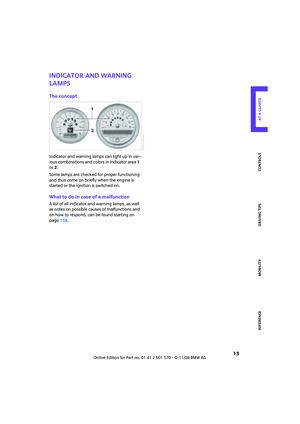 15
15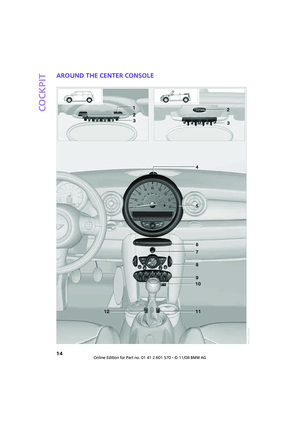 16
16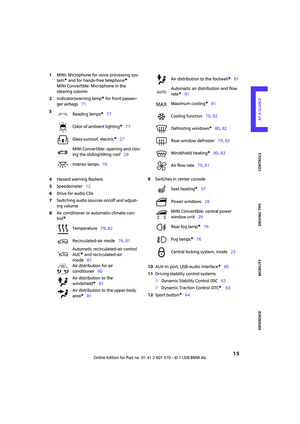 17
17 18
18 19
19 20
20 21
21 22
22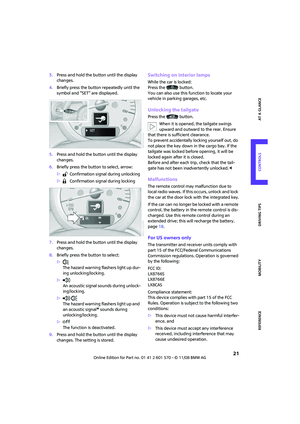 23
23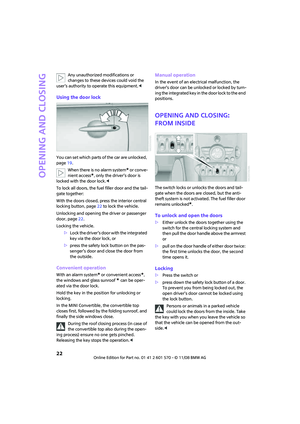 24
24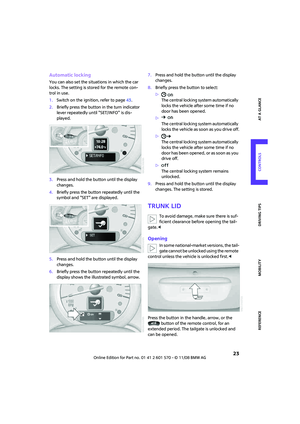 25
25 26
26 27
27 28
28 29
29 30
30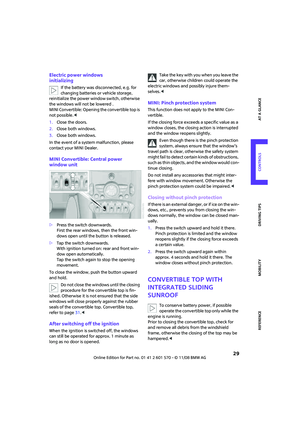 31
31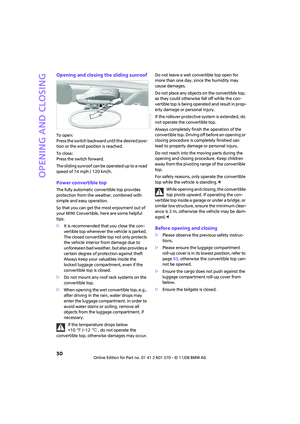 32
32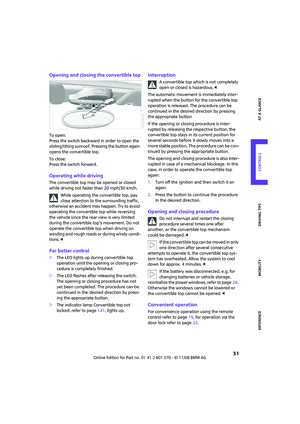 33
33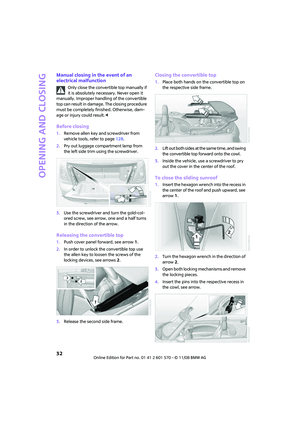 34
34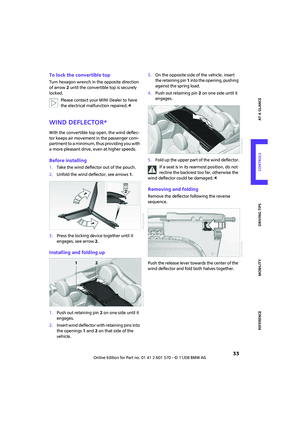 35
35 36
36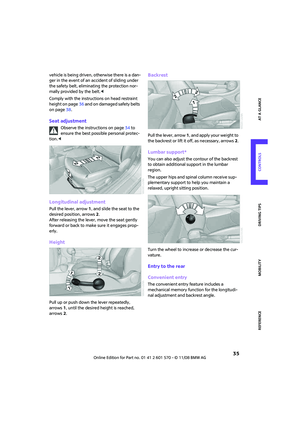 37
37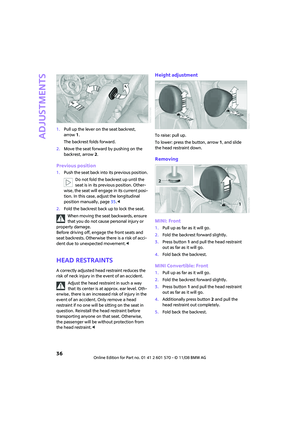 38
38 39
39 40
40 41
41 42
42 43
43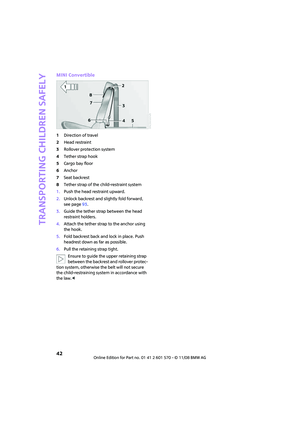 44
44 45
45 46
46 47
47 48
48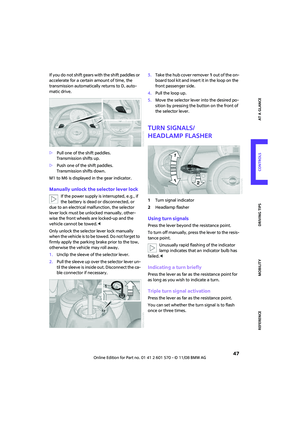 49
49 50
50 51
51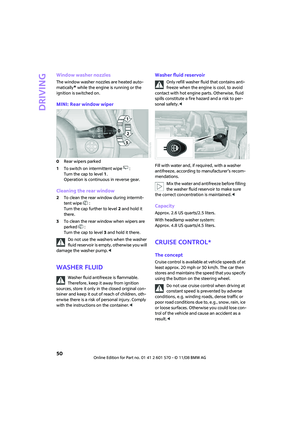 52
52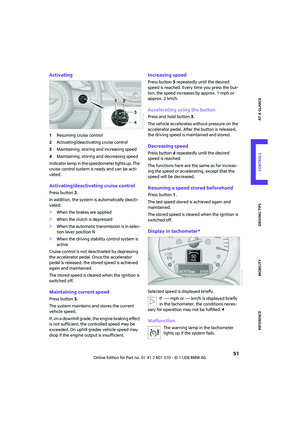 53
53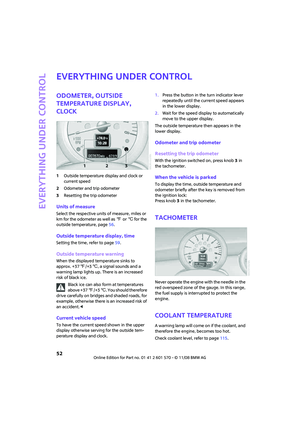 54
54 55
55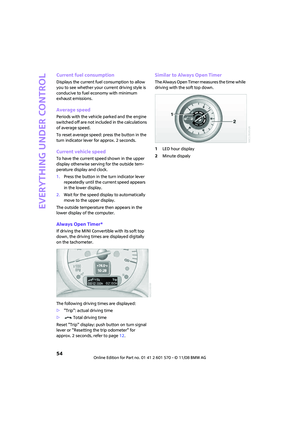 56
56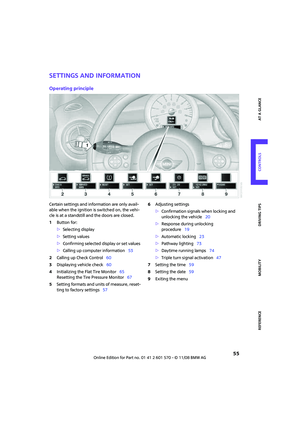 57
57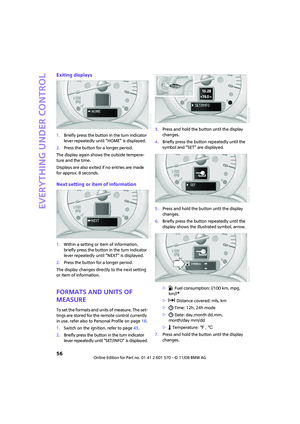 58
58 59
59 60
60 61
61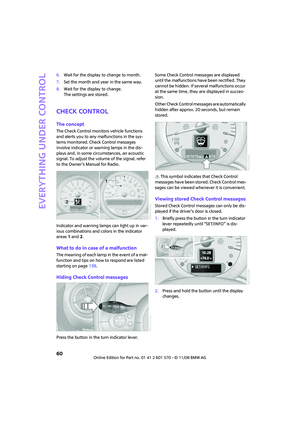 62
62 63
63 64
64 65
65 66
66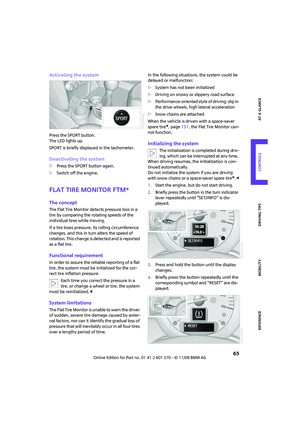 67
67 68
68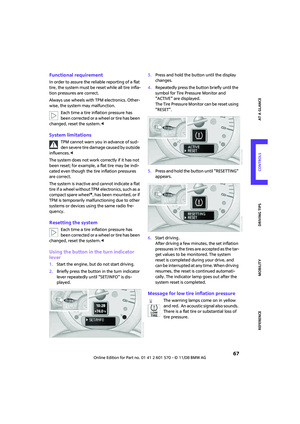 69
69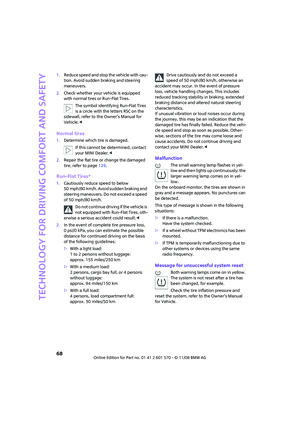 70
70 71
71 72
72 73
73 74
74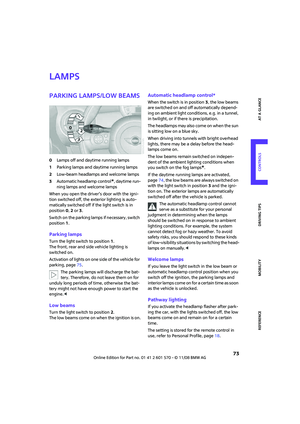 75
75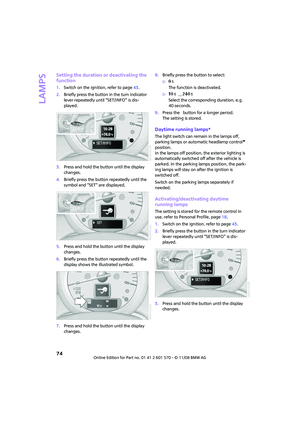 76
76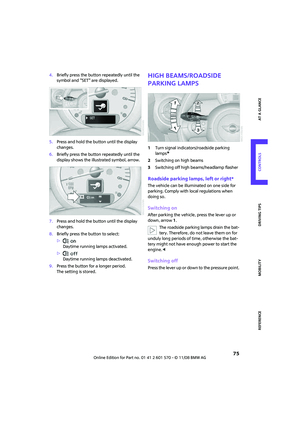 77
77 78
78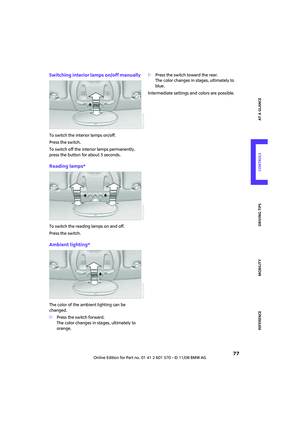 79
79 80
80 81
81 82
82 83
83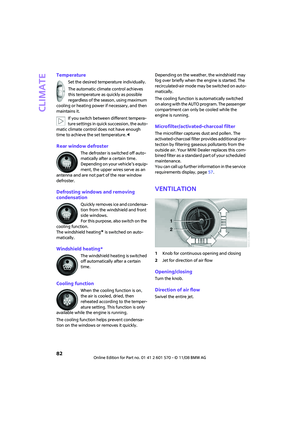 84
84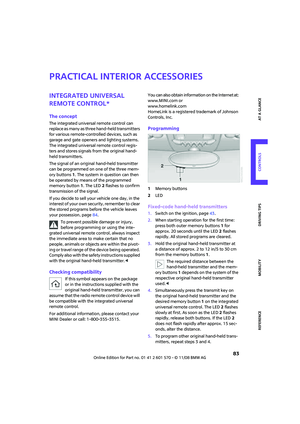 85
85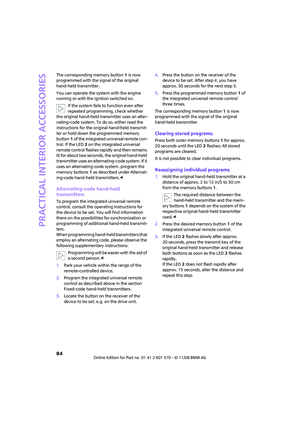 86
86 87
87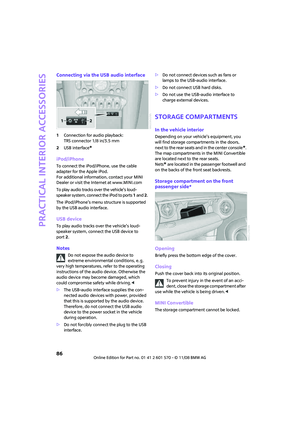 88
88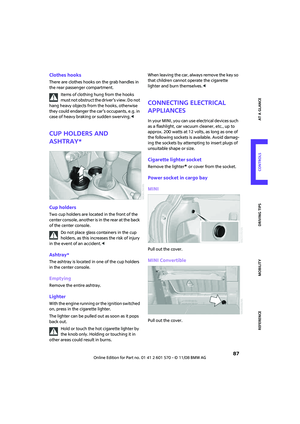 89
89 90
90 91
91 92
92 93
93 94
94 95
95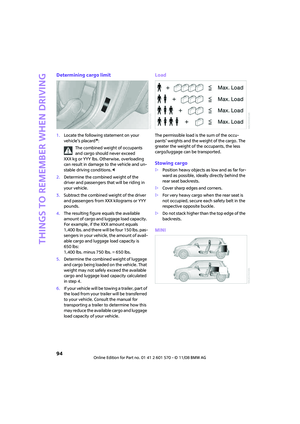 96
96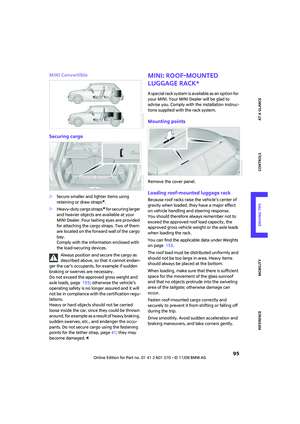 97
97 98
98 99
99 100
100 101
101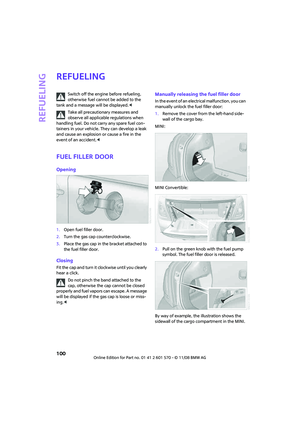 102
102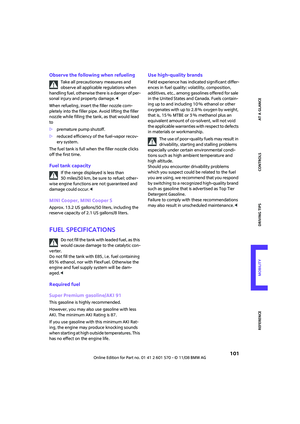 103
103 104
104 105
105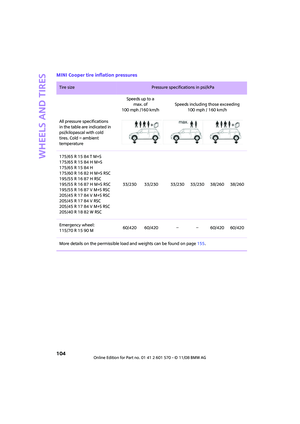 106
106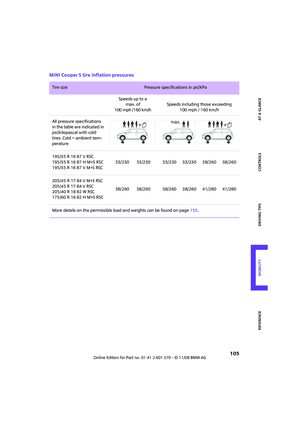 107
107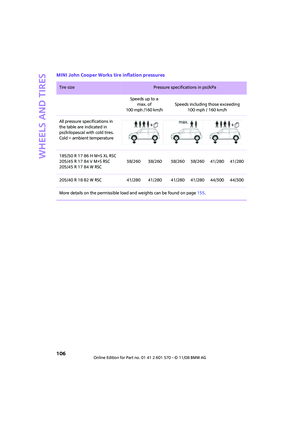 108
108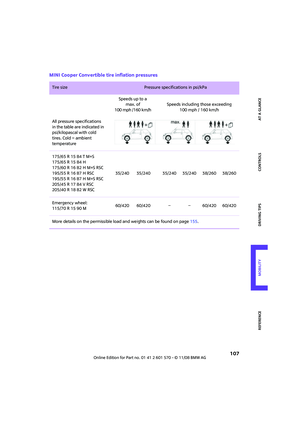 109
109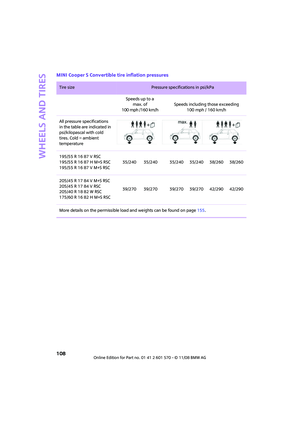 110
110 111
111 112
112 113
113 114
114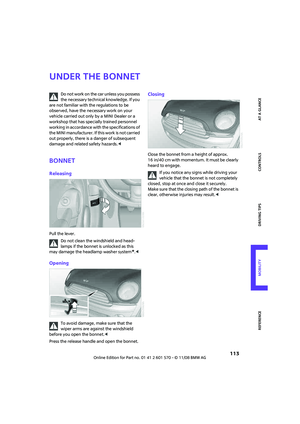 115
115 116
116 117
117 118
118 119
119 120
120 121
121 122
122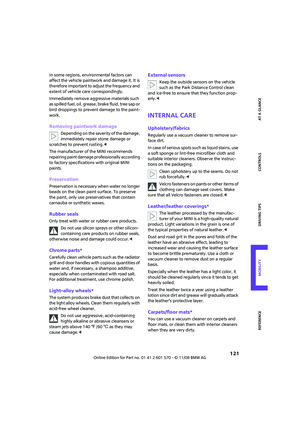 123
123 124
124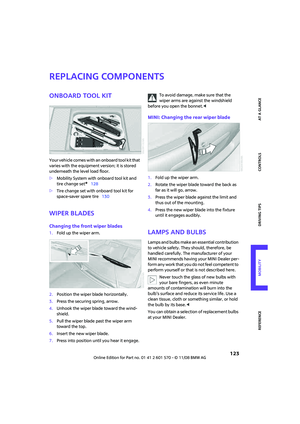 125
125 126
126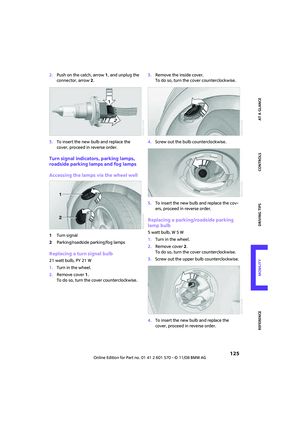 127
127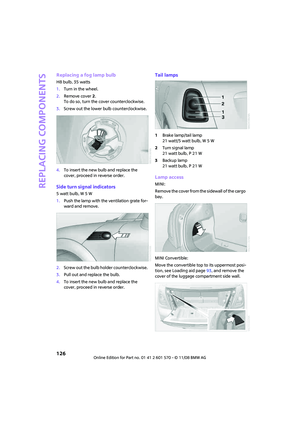 128
128 129
129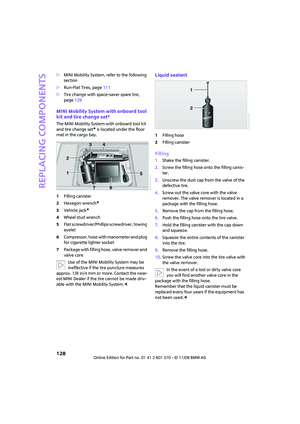 130
130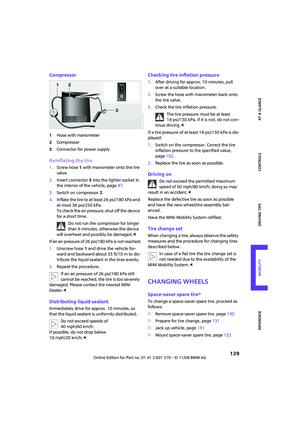 131
131 132
132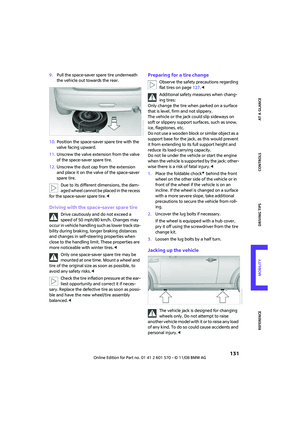 133
133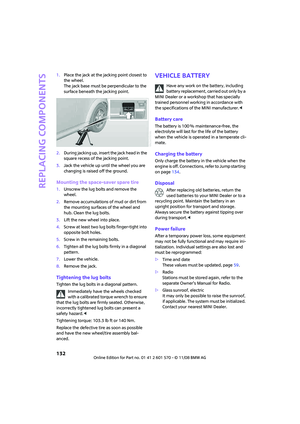 134
134 135
135 136
136 137
137 138
138 139
139 140
140 141
141 142
142 143
143 144
144 145
145 146
146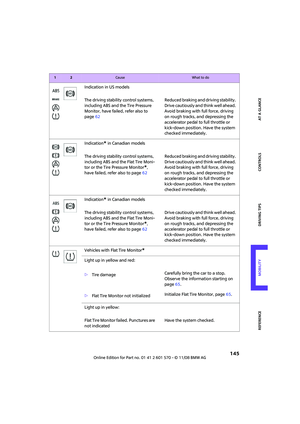 147
147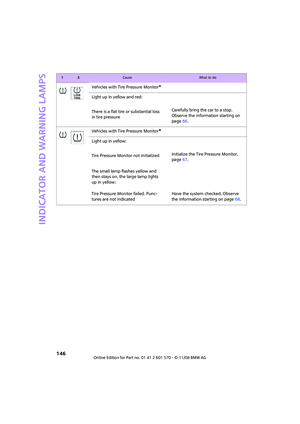 148
148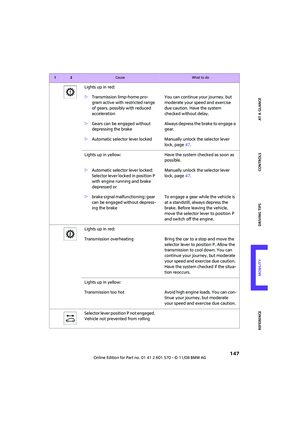 149
149 150
150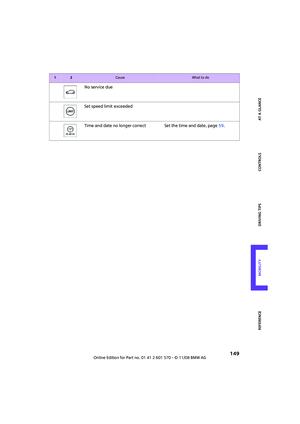 151
151 152
152 153
153 154
154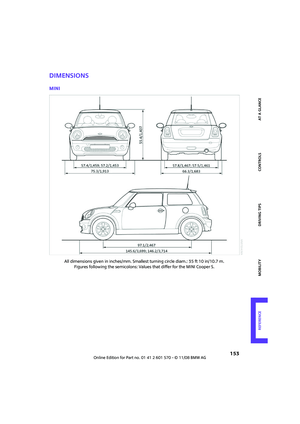 155
155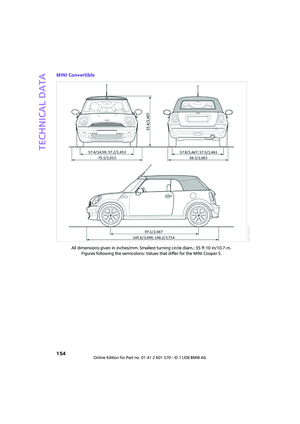 156
156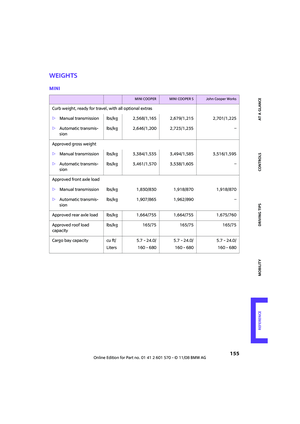 157
157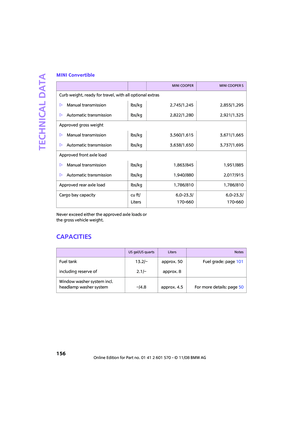 158
158 159
159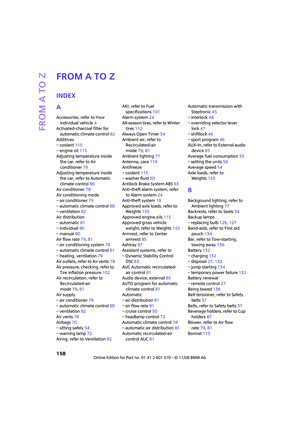 160
160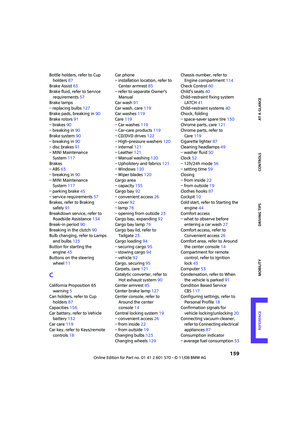 161
161 162
162 163
163 164
164 165
165 166
166 167
167 168
168 169
169 170
170 171
171
