Page 197 of 426

197 Controls in detail
Open air
Opening the door windows�
Press switch1 or2 to the resistance
point.
The corresponding window will move
downwards until you release the
switch.
Closing the door windows
�
Pull switch1 or2 to the resistance
point.
The corresponding window will move
upwards until you release the switch.Fully opening the door windows
(Express-open)
�
Press switch1 or2 past the
resistance point and release.
The corresponding window opens
completely.
Fully closing the door windows
(Express-close)
�
Pull switch1 or2 past the
resistance point and release.
The corresponding window closes
completely.Stopping the door windows
�
Press or pull respective switch again.
Warning!
G
If you pull and hold the switch up when
closing the window, and upward movement
of the window is blocked by some obstruc-
tion including but not limited to arms, hands,
fingers, etc., the automatic reversal will not
operate.
Warning!
G
Driver’s door only:
If within 5 seconds you again pull the switch
past the resistance point and release, the
automatic reversal will not function.
!
If the upward movement of the window is
blocked during the closing procedure, the
window will stop and open slightly.
Remove the obstruction, pull the switch again
past the resistance point and release.
If the window still does not close when there is
no obstruction, then pull and hold the switch
again. The window will then close without the
obstruction sensor function.
Page 198 of 426

198 Controls in detailOpen airSynchronizing power windows
The power windows must be synchronized
each time�
after the battery has been
disconnected
�
if the power windows cannot be fully
opened (Express-open) or closed
(Express-close)
�
Switch on the ignition (
�page 40).
�
Pull the power window switches until
the windows are closed.
Hold the switches for approximately
1 second.
The power windows are synchronized.
Opening and closing the soft top
For safety reasons, the soft top can only be
opened and closed when the vehicle is
stationary.
Also for safety reasons, the door windows
open automatically if the soft top is not
opened or closed completely and a door is
open.
Warning!
G
To prevent possible accidents, only drive the
vehicle with the soft top either completely
closed and locked, or fully lowered into its
storage compartment.
If the soft top does not open or close com-
pletely, the soft top hydraulic system is de-
pressurized and the soft top is lowered:�
after approximately seven minutes
when the ignition is switched on
�
after approximately 15 seconds when
the ignition is switched off
Shortly before the soft top is lowered, a
warning will sound and the K symbol and
the message
Top Lowering
appear in the
multifunction display.
Lock the soft top again before driving any
further. Otherwise, the unlocked soft top
could open while the vehicle is in motion and
cause you to lose control of the vehicle. You
or others could be injured as a result.
Page 199 of 426

199 Controls in detail
Open air
Your vehicle is equipped with a semi-auto-
matic soft top. This means that you will
have to release or lock the soft top manu-
ally by means of a handle. The soft top can
be opened or closed electrically using the
buttons on the soft top switch.
1Handle
Handle1 serves to release or lock the
soft top.
Warning!
G
When opening or closing the soft top, make
sure that nobody is trapped or injured by the
moving parts such as the soft top linkage.
If potential danger exists, release the soft
top switch. The soft top folding mechanism
stops immediately.Warning!
G
When leaving the vehicle, always remove the
SmartKey from the starter switch, take it
with you, and lock the vehicle. Do not leave
children unattended in the vehicle, or with
access to an unlocked vehicle. A child’s
unsupervised access to a vehicle could
result in an accident and/or serious
personal injury.
!
The opened soft top is stored behind the
roll-over bars. Never sit on the stored soft top
and never store objects on it. You will otherwise
damage the soft top.
Never use the space that emerges between the
roll-over bars and the rear window when the soft
top is closed as a storing space.
!
When you open or close the soft top, make
sure
�
there is sufficient clearance, as the soft top
swings upwards
�
that the soft top fabric is not frozen
�
that the soft top is not dirty or wet
�
that no items are placed on the soft top
Otherwise the soft top or other vehicle compo-
nents could be damaged.
!
Please keep in mind that weather conditions
can sometimes change rapidly. Make sure to
close the soft top when leaving the vehicle. If
water enters the vehicle interior, vehicle elec-
tronics could be damaged which is not covered
by the Mercedes-Benz Limited Warranty.
Page 200 of 426

200 Controls in detailOpen airThe soft top switch is located on the lower
part of the center console.Soft top switch cover2Cover
3To open the soft top
4To close the soft topOpening the soft top
�
Switch on the ignition.
�
Fold down handle1.
�
Turn the handle clockwise as far as it
will go and leave it in this position (re-
lease position).
�
Push the soft top up by means of the
handle as far as it will go.
The soft top is released. An acoustic
signal indicates that you can now open
the soft top electrically.
�
Open soft top switch cover2.
�
Press and hold button3, until the soft
top has opened completely and until it
has locked.
While the soft top is opening, the K
symbol and the message
Top In
Operation
appear in the multifunction
display.
The windows open.
The opening process is completed.
i
Make sure that the soft top is dry before
opening it. Otherwise, water may enter the inte-
rior.
!
Leave the handle in the release position. Do
not turn it back. Otherwise, the locking mecha-
nism could be damaged when closing the soft
top.
Page 201 of 426

201 Controls in detail
Open air
Closing the soft top�
Switch on the ignition.
�
Press and hold button4, until the
electrical closing process has been
completed.
While the soft top is closing, the K
symbol and the message
Top In
Operation
appear in the multifunction
display.
An acoustic signal indicates that you
can now lock the soft top.
�
Pull the soft top by means of the handle
down on the windscreen frame.
�
Turn the handle counter-clockwise as
far as it will go.
The soft top is locked.
�
Fold up the handle.
Wind screen
The wind screen is a wind protection
device for driving with the soft top open.
The wind screen is stored on the inside of
the trunk lid.
1Wind screen
2Release
!
Always remove the soft top linkage covers
(
�page 202) before closing the soft top.
You could otherwise damage the covers or the
linkages.
!
Before pulling the soft top down, make sure
that the handle is in the release position. Other-
wise, the locking mechanism could be damaged
when closing the soft top.
!
Do not pull on the wind screen to close the
trunk lid. Otherwise, the wind screen or the trim
panel could be damaged.
Page 203 of 426
203 Controls in detail
Open air
Installing
The following describes the installation of
the driver’s side cover. The installation of
the passenger-side cover is identical but
mirror-inverted.
1Cover
2Tab
3Bodywork
4Sealing
�
Open the trunk lid.
�
Fit tabs2 of cover1 between
sealing4 and bodywork3.5Lock
6Holder
7Slot
�
Press down on lock5 and turn it
clockwise by 90°.
�
Hold the lock in this position and insert
holder6 into slot7.
�
Press down on the cover and turn the
lock counter-clockwise by 90°.
Warning!
G
Do not use damaged covers. Damaged
covers could come loose while driving and
hit other road users.!
Do not use damaged covers. Damaged
covers could come loose while driving and
damage the vehicle.
��
Page 204 of 426
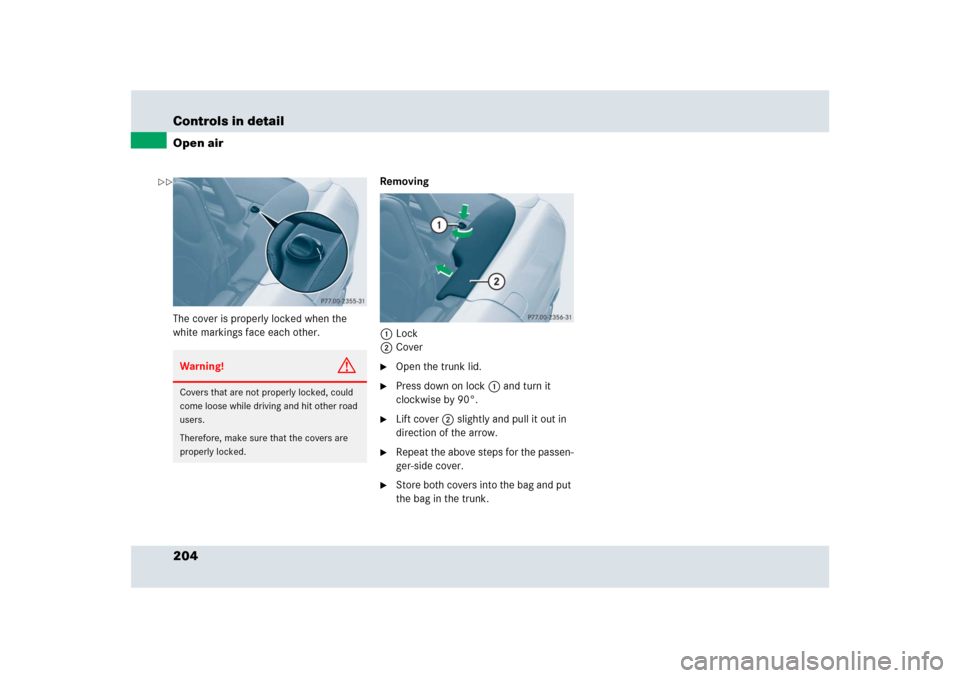
204 Controls in detailOpen airThe cover is properly locked when the
white markings face each other.Removing
1Lock
2Cover
�
Open the trunk lid.
�
Press down on lock1 and turn it
clockwise by 90°.
�
Lift cover2 slightly and pull it out in
direction of the arrow.
�
Repeat the above steps for the passen-
ger-side cover.
�
Store both covers into the bag and put
the bag in the trunk.
Warning!
G
Covers that are not properly locked, could
come loose while driving and hit other road
users.
Therefore, make sure that the covers are
properly locked.
��
Page 211 of 426

211 Controls in detail
Useful features
Ashtray
Removing ashtray insert�
Pull ashtray insert2 upwards.
Replacing ashtray insert
�
Press the ashtray insert into the holder
until you hear it click into place.Cigarette lighter
�
Switch on the ignition (
�page 40).
�
Push in cigarette lighter 1.
The cigarette lighter pops out automat-
ically when hot.
Warning!
G
Remove ashtray insert only with vehicle
standing still.
Warning!
G
Never touch the heating element or sides of
the lighter; they are extremely hot. Hold the
knob only.
Make sure that any children traveling with
you do not injure themselves or start a fire
with the hot cigarette lighter.
When leaving the vehicle, always remove the
SmartKey from the starter switch, take it
with you, and lock the vehicle. Do not leave
children unattended in the vehicle, or with
access to an unlocked vehicle. A child’s
unsupervised access to a vehicle could
result in an accident and/or serious
personal injury.
!
The lighter socket can accommodate
12V DC electrical accessories (up to a maximum
of 85 W) designed for use with the standard
“cigarette lighter” plug type. Keep in mind, how-
ever, that connecting accessories to the lighter
socket (for example extensive connecting and
disconnecting, or using plugs that do not fit prop-
erly) can damage the lighter socket. With the
socket damaged, the lighter may no longer be
able to be placed in the heating (pushed-in) posi-
tion, or the lighter may pop out too early with the
lighter not hot enough.
To help avoid damaging the cigarette lighter
socket, we recommend connecting 12V DC elec-
trical accessories designed for use with a stan-
dard “cigarette lighter” plug type to the
12-volt power outlets in your vehicle whenever
possible.