2009 MERCEDES-BENZ GL SUV mirror
[x] Cancel search: mirrorPage 164 of 309
Roof rack system*
G
Risk of accident and injury
An incorrectly secured roof rack, ski rack or
load could become detached from the vehi-
cle. These objects may be thrown around and
can injure you or others, or cause an accident.
Follow the roof rack/ski rack manufacturer's
installation instructions and special instruc-
tions for use.
The roof load raises the vehicle's centre of
gravity, thereby affecting vehicle handling.
You must always observe the maximum roof
load of 100 kg. Always adapt your driving style
to the prevailing road, traffic and weather
conditions and drive with particular care if the
roof is laden.
! Mercedes-Benz recommends that you
only use roof rack systems which have
been tested and approved for Mercedes-
Benz vehicles. This helps to prevent dam-
age to the vehicle.
Position the load on the roof rack in such a
way that the vehicle will not sustain dam-
age even when it is in motion.
Depending on the vehicle's equipment,
make sure that you can:
R raise the sliding/tilting sunroof* fully
R open the tailgate fully X
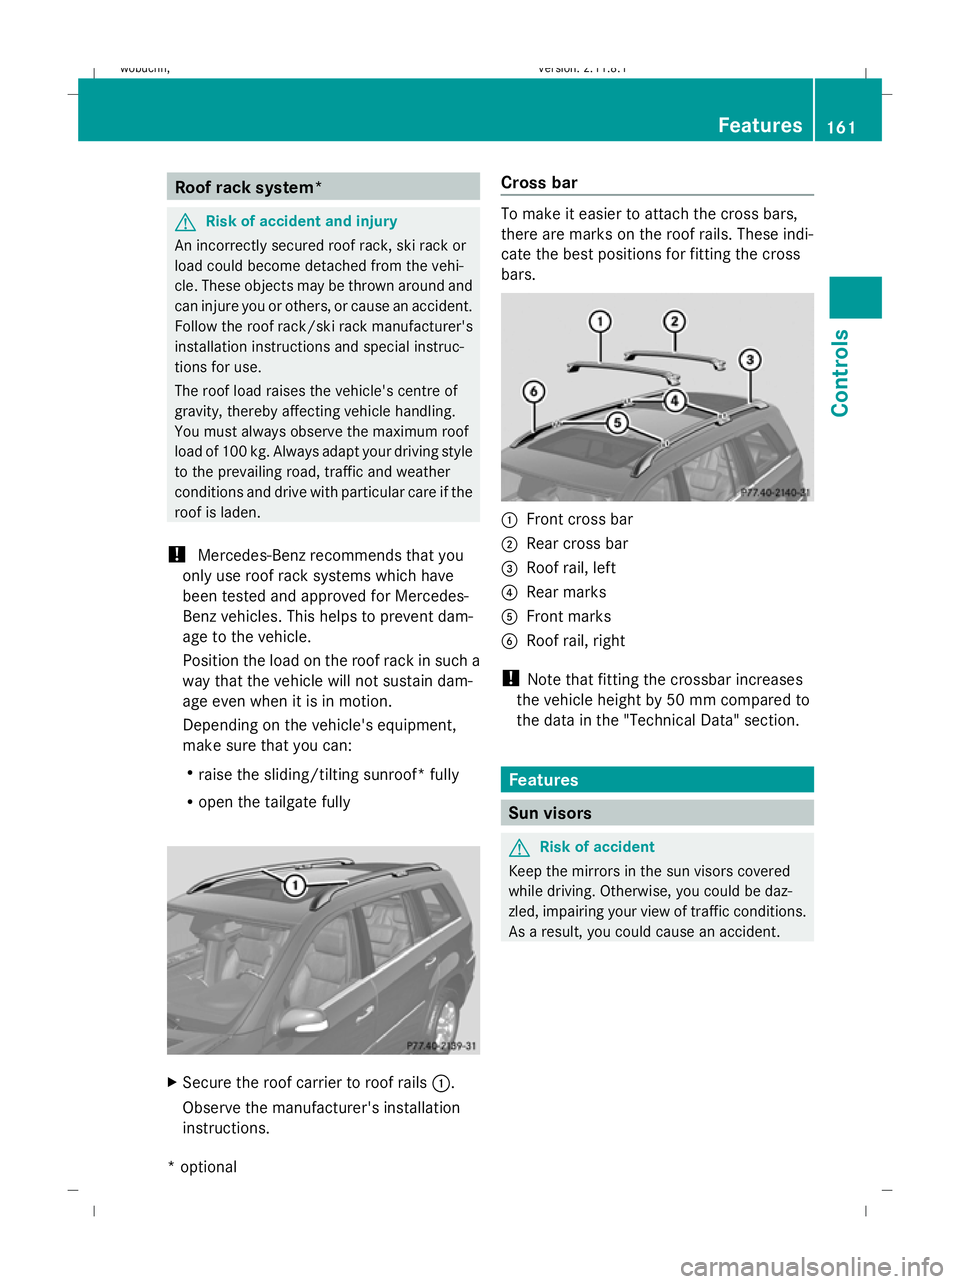
Secure the roof carrier to roof rails :.
Observe the manufacturer's installation
instructions. Cross bar To make it easier to attach the cross bars,
there are marks on the roof rails. These indi-
cate the best positions for fitting the cross
bars. :
Front cross bar
; Rear cross bar
= Roof rail, left
? Rear marks
A Front marks
B Roof rail, right
! Note that fitting the crossbar increases
the vehicle height by 50 mm compared to
the data in the "Technical Data" section. Features
Sun visors
G
Risk of accident
Keep the mirrors in the sun visors covered
while driving. Otherwise, you could be daz-
zled, impairing your view of traffic conditions.
As a result, you could cause an accident. Features
161Controls
* optional
X164_AKB; 2; 3, en-GB
wobuchh,
Version: 2.11.8.1 2009-03-31T14:14:58+02:00 - Seite 161 Z
Dateiname: 6515431202_buchblock.pdf; erzeugt am 01. Apr 2009 00:17:40; WK
Page 165 of 309
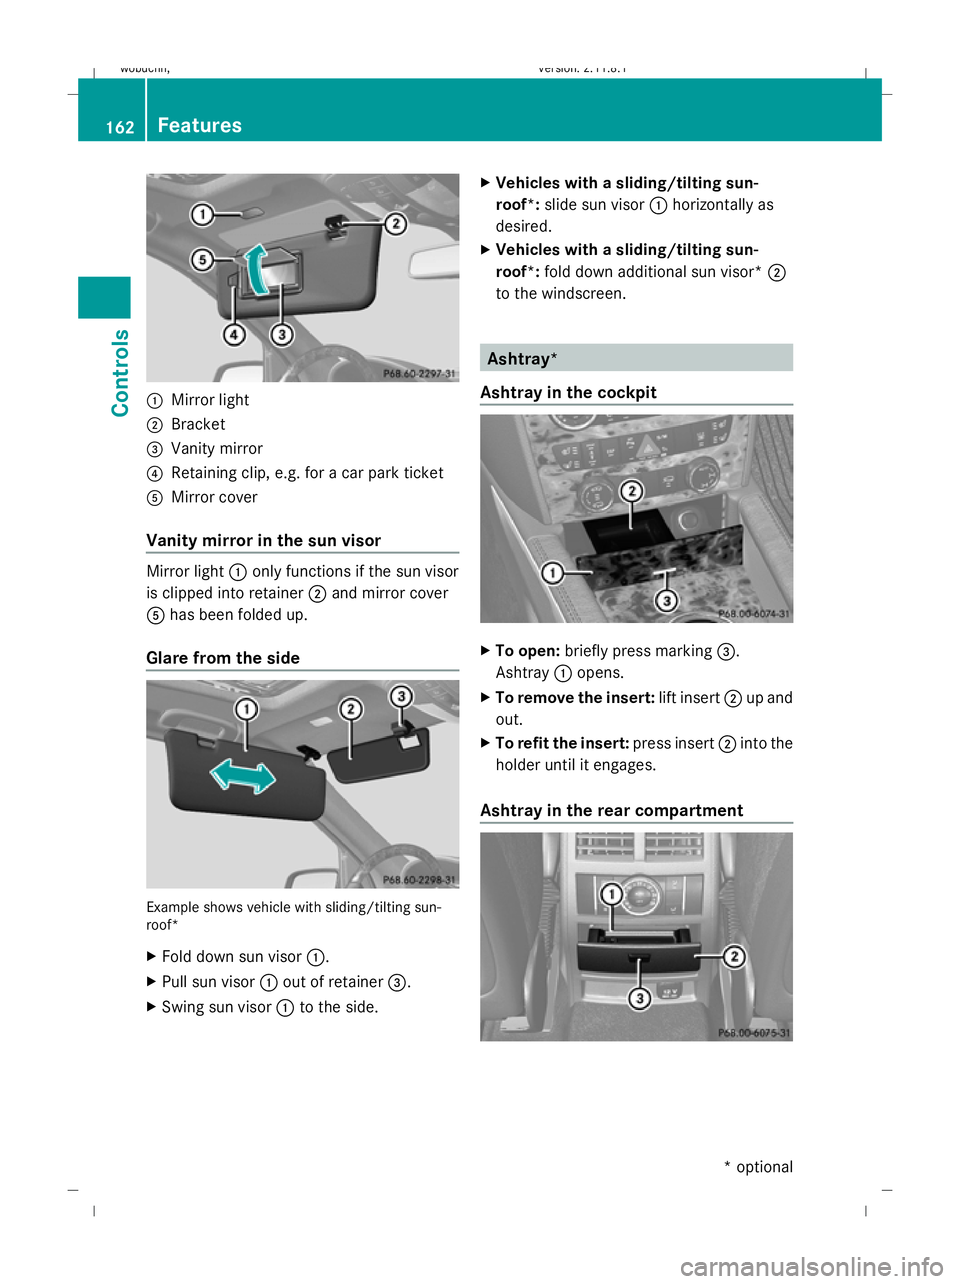
:
Mirror light
; Bracket
= Vanity mirror
? Retaining clip, e.g. for a car park ticket
A Mirror cover
Vanity mirror in the sun visor Mirror light
:only functions if the sun visor
is clipped into retainer ;and mirror cover
A has been folded up.
Glare from the side Example shows vehicle with sliding/tilting sun-
roof*
X Fold down sun visor :.
X Pull sun visor :out of retainer =.
X Swing sun visor :to the side. X
Vehicles with a sliding/tilting sun-
roof*: slide sun visor :horizontally as
desired.
X Vehicles with a sliding/tilting sun-
roof*: fold down additional sun visor* ;
to the windscreen. Ashtray*
Ashtray in the cockpit X
To open: briefly press marking =.
Ashtray :opens.
X To remove the insert: lift insert;up and
out.
X To refit the insert: press insert;into the
holder until it engages.
Ashtray in the rear compartment 162
FeaturesControls
* optional
X164_AKB; 2; 3, en-GB
wobuchh,
Version: 2.11.8.1 2009-03-31T14:14:58+02:00 - Seite 162
Dateiname: 6515431202_buchblock.pdf; erzeugt am 01. Apr 2009 00:17:41; WK
Page 168 of 309
cases, these are country-specific. You can
obtain these mobile phone brackets from a
qualified specialist workshop, e.g. a
Mercedes-Benz Service Centre.
The functions and services available when
you use the phone depend on your mobile
phone model and service provider.
Inserting the mobile phone
X Open the telephone compartment
(Y page 153).
X Place the mobile phone bracket into the
pre-installed fitting; see the separate
mobile phone bracket fitting instructions.
X Insert the mobile phone into the mobile
phone bracket; see the separate mobile
phone bracket fitting instructions.
If the mobile phone is inserted in the mobile
phone bracket, you can speak to the person
you are calling using the hands-free system.
You can operate the telephone using the
6 and~ buttons on the multi-function
steering wheel. You can operate other mobile
phone functions via the on-board computer
(Y page 111).
When you take the key out of the ignition lock,
the mobile phone stays on but you can no
longer use the hands-free system.
If you are making a call and you would like to
take the key out of the ignition lock, first
remove the mobile phone from the bracket.
Otherwise, the call will be ended. Garage door opener*
The remote control integrated in the rear-view
mirror allows you to operate up to three dif-
ferent door and gate systems.
i The garage door opener is only available
for certain countries. Observe the legal
requirements in all countries concerned.
The HomeLink ®
garage door opener is
compatible with most European garage and
gate opener drives. More information on HomeLink
®
and/or compatible products is
available from:
R any Mercedes-Benz Service Centre
R the HomeLink ®
hotline
(0) 08000 466 354 65 (free of charge) or
+49 (0) 6838 907-277 (charges apply)
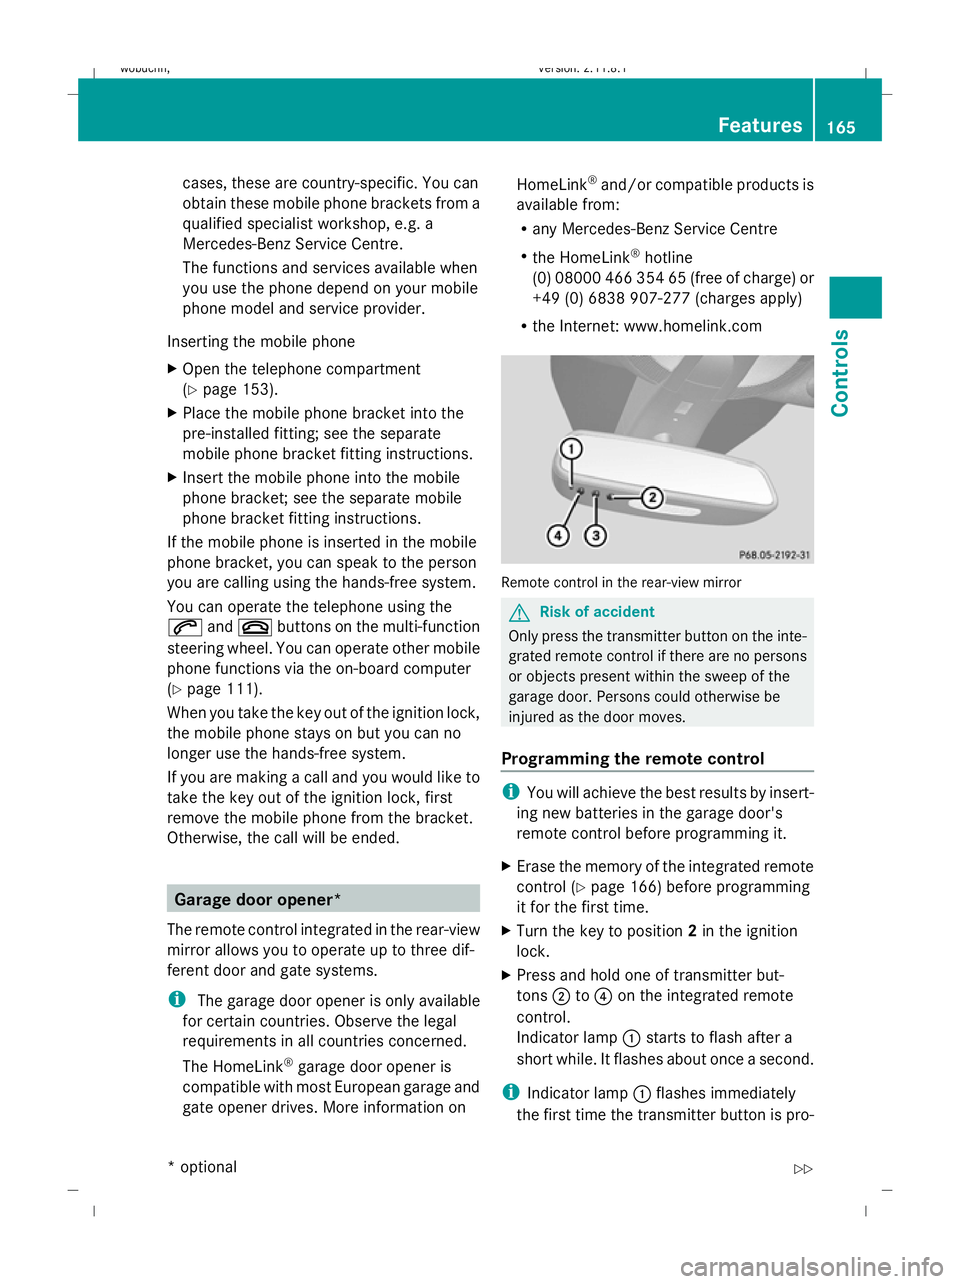
R the Internet: www.homelink.com Remote control in the rear-view mirror
G
Risk of accident
Only press the transmitter button on the inte-
grated remote control if there are no persons
or objects present within the sweep of the
garage door. Persons could otherwise be
injured as the door moves.
Programming the remote control i
You will achieve the best results by insert-
ing new batteries in the garage door's
remote control before programming it.
X Erase the memory of the integrated remote
control ( Ypage 166) before programming
it for the first time.
X Turn the key to position 2in the ignition
lock.
X Press and hold one of transmitter but-
tons ;to? on the integrated remote
control.
Indicator lamp :starts to flash after a
short while. It flashes about once a second.
i Indicator lamp :flashes immediately
the first time the transmitter button is pro- Features
165Controls
* optional
X164_AKB; 2; 3, en-GB
wobuchh,
Version: 2.11.8.1 2009-03-31T14:14:58+02:00 - Seite 165 Z
Dateiname: 6515431202_buchblock.pdf; erzeugt am 01. Apr 2009 00:17:43; WK
Page 169 of 309
grammed. If this transmitter button has
already been programmed, indicator
lamp
:will only start flashing at a rate of
once a second after 20 seconds have
elapsed.
X Keep the transmitter buttons depressed.
X Point the garage door's remote control with
the transmitter towards the left-hand side
of the rear-view mirror from a distance of 5
to 20 cm.
i The distance between the garage door's
remote control and the integrated garage
door opener depends on the system of the
garage door drive. You might require sev-
eral attempts. You should test every posi-
tion for at least 20 seconds before trying
another position.
X Keep the transmitter button on the garage
door's remote control depressed until indi-
cator lamp :starts to flash rapidly.
The programming was successful if indica-
tor lamp :flashes rapidly.
X Release the transmitter buttons on the
garage door's remote control and the inte-
grated remote control.
If indicator lamp :goes out after approx-
imately 20 seconds and did not flash rapidly
before this:
X Release the transmitter buttons on the
integrated and portable remote controls.
X Repeat the programming procedure. When
doing so, change the distance between the
garage door's remote control and the trans-
mitter buttons in the rear-view mirror.
i If the garage door system works with a
rolling code, after programming you must
synchronise the remote control integrated
in the rear-view mirror with the garage door
system receiver.
You will find further information in the
garage door opening system's operating
instructions, e.g. the sections on "Synchro-
nising the transmitter" or "Registering a new transmitter". You can also call the hot-
line mentioned above.
Opening or closing the garage door Once programmed, the integrated remote
control will assume the function of the garage
door system's remote control. Please read
the operating instructions for the garage door
system.
X
Turn the key to position 2in the ignition
lock.
X Press the transmitter button on the rear-
view mirror that you have programmed to
operate the garage door.
Garage door system with fixed code: indi-
cator lamp :lights up continuously.
Garage door system with rolling code: indi-
cator lamp :flashes briefly and then lights
up for approximately two seconds. This is
repeated for up to 20 seconds.
i The transmitter will transmit a signal for
as long as the transmitter button is being
pressed. The transmission will be halted
after a maximum of 20 seconds and indi-
cator lamp :will flash. Press the trans-
mitter button again, if necessary.
Clearing the remote control memory X
Turn the key to position 2in the ignition
lock.
X Press and hold transmitter buttons ;
and ?for approximately 20 seconds until
indicator lamp :flashes rapidly.
The memory is cleared.
i You should clear the remote control mem-
ory before selling the vehicle. Compass*
In the Off-road menu* (Y page 102), the
compass displays the compass bearing of
your direction of travel. You will see N,NE, E,
SE, S,SW, Wor NW in the multi-function display. 166
FeaturesControls
* optional
X164_AKB; 2; 3, en-GB
wobuchh,
Version: 2.11.8.1 2009-03-31T14:14:58+02:00 - Seite 166
Dateiname: 6515431202_buchblock.pdf; erzeugt am 01. Apr 2009 00:17:43; WK
Page 204 of 309
Care
Care and cleaning products
Regular care of your vehicle is a condition for
retaining the quality in the long term.
Use only care products and cleaning agents
recommended and approved by Mercedes-
Benz.
! For cleaning your vehicle, do not use any
of the following:
R dry, rough or hard cloths
R abrasive cleaning agents
R solvents
R cleaning agents containing solvents
and do not scrub.
Do not touch the surfaces and protective
films with hard objects, e.g. rings or ice
scrapers. You could otherwise scratch or
damage the surfaces and protective film. H
Environmental note
Dispose of empty packaging, cleaning cloths
and polishing wads in an environmentally
responsible manner.
! Do not park the vehicle for a long period
of time directly after cleaning, especially if
the wheels have just been cleaned with a
wheel cleaner. Wheel cleaners could cause
rapid corrosion of the brake discs and
brake pads/linings. After cleaning, park
the vehicle when it is at normal operating
temperature. Exterior care
Automatic car wash G
Risk of accident
The efficiency of the brakes is reduced after
using an automatic car wash. This could cause
an accident. For this reason, following a car
wash, drive with particular care until the
brakes are dry. You can wash the vehicle in an automatic car
wash from the beginning.
!
Do not wash vehicles with an exterior
spare wheel bracket* in an automatic car
wash.
If the vehicle is very dirty, pre-wash it before
cleaning it in an automatic car wash.
! Make sure that the automatic car wash is
suitable for the size of the vehicle. Fold in
the exterior mirrors before the vehicle is
washed. There is otherwise a risk of dam-
age to the exterior mirrors.
! When washing your vehicle in a tow-
through car wash, make sure that the auto-
matic transmission is in position N, other-
wise the vehicle could be damaged.
R Vehicles with a key:
Do not remove the key from the ignition
lock. Do not open the driver's or front-
passenger door when the engine is
switched off, as this automatically shifts
the automatic transmission to park posi-
tion Pand locks the wheels, unless you
have previously shifted the automatic
transmission to N.
R Vehicles with KEYLESS GO*:
Do not open the driver's or front-
passenger door when the engine is
switched off, as this shifts the automatic
transmission to park position Pand locks
the wheels.
! Make sure that the side windows are com-
pletely closed, that the ventilation/heater
blower is fully turned off and that the wind-
screen wiper switch is set to 0. Otherwise,
the rain/light sensor may be activated, trig-
gering unintended wiper movements. This
could cause damage to the vehicle.
After using an automatic car wash, wipe off
wax and drying agents from the windscreen
and the wiper blades. This will prevent smears
and reduce wiping noises caused by residue
on the windscreen. Care
201Operation
* optional
X164_AKB; 2; 3, en-GB
wobuchh,
Version: 2.11.8.1 2009-03-31T14:14:58+02:00 - Seite 201 Z
Dateiname: 6515431202_buchblock.pdf; erzeugt am 01. Apr 2009 00:17:53; WK
Page 229 of 309

Display messages
Possible causes/consequences and
X
X Solutions b Trailer
Left-hand
tail lamp
or
Trailer
Right-
hand tail
lamp The left-hand or right-hand trailer tail lamp is faulty.
X
Change the bulb. b Turn sig‐
nal, rear
left
or
Turn sig‐
nal, rear
right The rear left-hand or right-hand turn signal is faulty.
X
Change the bulb ( Ypage 254). b Turn sig‐
nal in
mirror,
left
or
Turn sig‐
nal in
mirror,
right The turn signal in the left-hand or right-hand exterior mirror
is faulty. The display message will only appear if all LEDs have
failed.
X
Visit a qualified specialist workshop. b Turn sig‐
nal,
front left
or
Turn sig‐
nal,
front
right The front left-hand or right-hand turn signal is faulty.
X
Change the bulb ( Ypage 254). b Left-hand
brake lamp
or
Right-
hand
brake lamp The left-hand or right-hand brake lamp is faulty.
X
Change the bulb ( Ypage 254). b 3rd brake
lamp The third brake lamp is faulty. The display message will only
appear if all LEDs have failed.
X
Visit a qualified specialist workshop. 226
Display
messagesPractical advice
X164_AKB; 2; 3, en-GB
wobuchh,V ersion: 2.11.8.1
2009-03-31T14:14:58+02:00 - Seite 226
Dateiname: 6515431202_buchblock.pdf; erzeugt am 01. Apr 2009 00:18:00; WK
Page 249 of 309
Side windows
Problem
Possible causes/consequences and
X XSolutions A side window will not
close. Objects are trapped between the window and the door frame.
X
Remove the objects.
X Close the side window. There are objects in the window guide rail which are preventing
the side window from closing.
X
Remove the objects.
X Close the side window. You cannot see the cause.
X
Close the side window with increased force or without the anti-
entrapment feature (Y page 86).Mirrors
Problem
Possible causes/consequences and
X XSolutions An exterior mirror has
been pushed out of
position.
Vehicles with exterior mirrors that cannot be folded in/out elec-
trically:
X
Move the exterior mirror into the correct position manually.
Vehicles with electrically folding exterior mirrors*:
X Press the mirror-folding button* (Y page 72) repeatedly until
you hear a distinct click.
The mirror housing is engaged again and you can adjust the
mirror as usual (Y page 72).246
TroubleshootingPractical advice
* optional
X164_AKB; 2; 3, en-GB
wobuchh,
Version: 2.11.8.1 2009-03-31T14:14:58+02:00 - Seite 246
Dateiname: 6515431202_buchblock.pdf; erzeugt am 01. Apr 2009 00:18:02; WK
Page 279 of 309
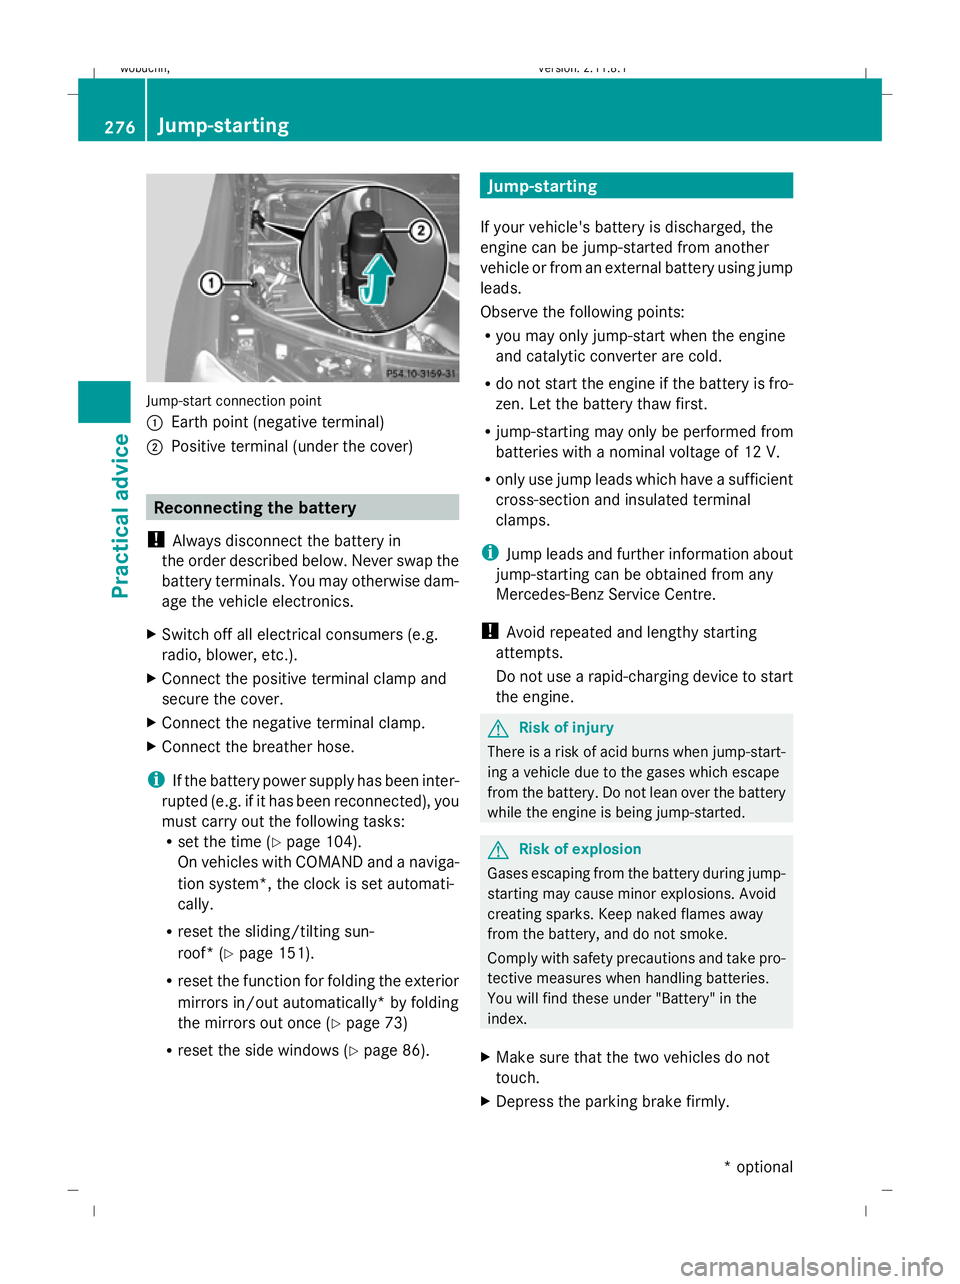
Jump-start connection point
:
Earth point (negative terminal)
; Positive terminal (under the cover) Reconnecting the battery
! Always disconnect the battery in
the order described below. Never swap the
battery terminals. You may otherwise dam-
age the vehicle electronics.
X Switch off all electrical consumers (e.g.
radio, blower, etc.).
X Connect the positive terminal clamp and
secure the cover.
X Connect the negative terminal clamp.
X Connect the breather hose.
i If the battery power supply has been inter-
rupted (e.g. if it has been reconnected), you
must carry out the following tasks:
R set the time (Y page 104).
On vehicles with COMAND and a naviga-
tion system*, the clock is set automati-
cally.
R reset the sliding/tilting sun-
roof* (Y page 151).
R reset the function for folding the exterior
mirrors in/out automatically* by folding
the mirrors out once (Y page 73)
R reset the side windows ( Ypage 86). Jump-starting
If your vehicle's battery is discharged, the
engine can be jump-started from another
vehicle or from an external battery using jump
leads.
Observe the following points:
R you may only jump-start when the engine
and catalytic converter are cold.
R do not start the engine if the battery is fro-
zen. Let the battery thaw first.
R jump-starting may only be performed from
batteries with a nominal voltage of 12 V.
R only use jump leads which have a sufficient
cross-section and insulated terminal
clamps.
i Jump leads and further information about
jump-starting can be obtained from any
Mercedes-Benz Service Centre.
! Avoid repeated and lengthy starting
attempts.
Do not use a rapid-charging device to start
the engine. G
Risk of injury
There is a risk of acid burns when jump-start-
ing a vehicle due to the gases which escape
from the battery. Do not lean over the battery
while the engine is being jump-started. G
Risk of explosion
Gases escaping from the battery during jump-
starting may cause minor explosions. Avoid
creating sparks. Keep naked flames away
from the battery, and do not smoke.
Comply with safety precautions and take pro-
tective measures when handling batteries.
You will find these under "Battery" in the
index.
X Make sure that the two vehicles do not
touch.
X Depress the parking brake firmly. 276
Jump-startingPractical advice
* optional
X164_AKB; 2; 3, en-GB
wobuchh,
Version: 2.11.8.1 2009-03-31T14:14:58+02:00 - Seite 276
Dateiname: 6515431202_buchblock.pdf; erzeugt am 01. Apr 2009 00:18:17; WK