2009 MERCEDES-BENZ GL SUV interior lights
[x] Cancel search: interior lightsPage 9 of 309

C
Calling up a fault see Display message .....................211
Care
Automatic car wash .......................201
Care products ................................ 201
Cleaning agents ............................. 201
Dashboard ..................................... 204
Display ........................................... 204
Exterior .......................................... 201
Headlamps ..................................... 203
High-pressure cleaners ..................202
Interior ........................................... 204
Paintwork ...................................... 202
Plastic trim .................................... 205
Reversing camera ..........................203
Seat covers .................................... 204
Sensors ......................................... 203
Steering wheel boss ......................204
Tail pipes ....................................... 203
Trailer tow hitch ............................. 203
Trim strips ..................................... 205
Wheels ........................................... 202
Windows ........................................ 202
Wiper blades .................................. 202
Wooden trim .................................. 205
Care products .................................... 201
CD player/CD changer Operating (on-board computer) .....101
Central locking
Automatic locking (on-board com-
puter) ............................................. 107
Key .................................................. 58
Central locking/unlocking button .....59
Central unlocking Key .................................................. 58
Centre console
Overview .......................................... 29
Changing a wheel
see Flat tyre
Checklist (off-road driving) ..............189
Child-proof locks Rear doors ....................................... 49
Children
in the vehicle ................................... 41
Restraint systems ............................ 41Child seat
Automatic recognition .....................43
Automatic recognition (malfunc-
tion) ............................................... 234
Child seat lock ................................ 47
Display message ............................ 216
ISOFIX .............................................. 47
On the front-passenger sea t............ 42
Recommendations ...........................46
Suitable positions ............................ 44
TopTether ........................................ 48
Child seat lock ..................................... 47
Cigarette lighter ................................ 163
Cleaning agents ................................. 201
Cleaning the sensors ........................203
Climate control Cooling with air dehumidification ..141
Misted up windows ........................146
Cockpit
Overview .......................................... 23
Collapsible wheel
Technical data ............................... 297
COMAND display
Cleaning ......................................... 204
Compass ............................................ 166
Display message ............................ 216
Constant headlamp mode
see Daytime driving lights ..............105
Consumption statistics (on-board
computer) .......................................... 110
Convenience closing ...........................87
Convenience opening ..........................87
Coolant Checking the level .........................177
Display mes-
sage ...................................... .219, 224
Mixture ratio .................................. 291
Temperature gauge ........................ 100
Cornering lights
Display message ............................ 225
Cruise control .................................... 117
Display message .................... 218, 219
Cup holder ......................................... 1536
Index X164_AKB; 2; 3, en-GB
wobuchh,
Version: 2.11.8.1 2009-03-31T14:14:58+02:00 - Seite 6Dateiname: 6515431202_buchblock.pdf; erzeugt am 01. Apr 2009 00:16:29; WK
Page 10 of 309

D
Dashboard Cleaning ........................................ .204
see Instrument cluster .....................96
see Cockpit
Dashboard lighting
see Instrument lighting ....................25
Date
Setting (on-board computer) .......... 104
Daytime driving lights ......................... 80
Setting (on-board computer) .......... 105
Delayed switch-off
Exterior lighting (on-board com-
puter) ............................................. 105
Interior lighting (on-board com-
puter) ............................................. 106
Diesel
Low outside temperatures .............174
Diesel engine
Winter driving ................................ 174
Differential locks ............................... 116
Display message .................... 222, 223
Digital speedometer .........................100
Setting the unit (on-board com-
puter) ............................................. 104
Dipped-beam headlamps
Display message ............................ 225
Symmetrical ................................... 193
DIRECT SELECT lever
see Automatic transmission
Display messages ............................. 211
ASSYST PLUS service interval dis-
pla y................................................ 199
Symbol messages ..................219, 249
Text messages ............................... 212
Distance warning function (vehi-
cles with Distronic) .............................53
Activating/deactivating (on-
board computer) ............................ 109
Distance warning system
see Distance warning function ....... 109
Distronic ............................................ 119
Display mes-
sage ...................................... .214, 218
Driving tips .................................... 125Door
Automatic locking ............................ 60
Display message ............................ 219
Emergency locking ........................251
Emergency unlocking ..................... 250
Opening (from the inside) ................59
Door control panel
Overview .......................................... 31
Downhill Speed Regulation
See DSR ........................................ 113
Drinks holder
see Cup holder
Driver's airbag ..................................... 38
Driver's door Unlocking (KEYLESS GO) .................58
Driver's seat position ..........................78
Driving abroad ................................... 193
Driving information Off-road ......................................... 189
Tyre ruts ........................................ 193
Driving safety systems .......................49
4ETS ................................................ 53
ABS .................................................. 50
Adaptive brake lamps ......................51
BAS .................................................. 50
Distance warning system (vehi-
cles with Distronic) ..........................53
EBV .................................................. 52
ESP ®
............................................... 51
Driving systems ................................ 117
Cruise control ................................ 117
Distronic ........................................ 119
Level control .................................. 129
Parktroni c...................................... 133
Reversing camera ..........................135
Speedtronic ................................... 126
Driving tips .......................................... 94
Braking .......................................... 187
Distronic ........................................ 125
Driving abroad .............................. 193
Driving on wet roads .....................188
Fording ................................. 188, 192
Trailer towing ................................. 196
Winter ............................................ 186
DSR (Downhill Speed Regulation) ....113
Display message ............................ 223
On-board computer .......................109 Index
7 X164_AKB; 2; 3, en-GB
wobuchh,
Version: 2.11.8.1
2009-03-31T14:14:58+02:00 - Seite 7Dateiname: 6515431202_buchblock.pdf; erzeugt am 01. Apr 2009 00:16:29; WK
Page 13 of 309

Overview
.......................................... 25
Selecting the language (on-board
computer) ...................................... 104
Instrument lighting .............................25
Intelligent Light System Menu (on-board computer) ............106
Interior lighting
Ambient lighting (on-board com-
puter) ............................................. 106
Automatic control system ................84
Delayed switch-off (on-board
computer) ...................................... 106
Emergency lighting ..........................84
Manual control ................................ .83
Reading lamp ................................... 83
Interior motion sensor ........................55
Activating/deactivating (on-
board computer) ............................ 110
ISOFIX child seat securing system ....47 J
Jack .................................................... .209
Operation ....................................... 268
Jump-starting ..................................... 276
Jump leads ..................................... 276K
Key ........................................................ 58
Checking the battery .....................253
Convenience closing ........................87
Convenience opening ......................87
Display mes-
sage .............................................. 230, 231
Loss ............................................... 247
Malfunction ................................... .247
Modifying the programming .............59
KEYLESS GO
Button .............................................. 63
Changing the battery .....................254
Checking the battery .....................253
Convenience closing ........................88
Locking ............................................ 58
Malfunction ................................... .247
Starting the engine ..........................89
Unlocking ......................................... 58 Key positions
Key .................................................. 63
KEYLESS GO .................................... 63
Kickdown ....................................... 94, 96 L
Lamp see Indicator and warning lamp .....235
Lashing eyelets ................................. 156
Level control ...................................... 129
Licence plate lighting Display message ............................ 227
Lighting
see Lights
Lights
Active light function .........................82
Automatic headlamp mode ..............80
Combination switch .........................78
Daytime driving lights ......................80
Dipped-beam headlamps .................80
Display messages ..........................225
Foglamps ................................... 80, 83
Hazard warning lamps .....................81
Headlamp flasher ............................. 80
Light switch ..................................... 78
Main-beam headlamps ..................... 81
Motorway mode ............................... 82
Rear foglamp ................................... 81
Switching off (display message) ..... 227
Turn signals ..................................... 81
LIM indicator lamp
Cruise control ................................ 118
Distronic ........................................ 121
Variable Speedtronic .....................126
Loading guidelines ............................151
Locking Automatic ........................................ 60
Emergency locking ........................251
From the inside (central locking
button) ............................................. 59
LOW RANGE
Display mes-
sage ............................................... 223
Off-road gear ................................ 114
LOW RANGE off-road gear ................114
Luggage compartment enlarge-
ment ................................................... 15410
Index X164_AKB; 2; 3, en-GB
wobuchh,
Version: 2.11.8.1 2009-03-31T14:14:58+02:00 - Seite 10Dateiname: 6515431202_buchblock.pdf; erzeugt am 01. Apr 2009 00:16:29; WK
Page 38 of 309

Never tamper with electronic components
and their software.
SRS (Supplemental Restraint System)
The SRS reduces the risk of occupants com-
ing into contact with the vehicle's interior in
the event of an accident. It can also reduce
the forces to which occupants are subjected
during an accident.
The SRS consists of:
R The + warning lamp
R belt tensioners
R belt force limiters
R airbags
The + + warning lamp The SRS functions are checked regularly
when you turn on the ignition and when the
engine is running. Therefore, malfunctions
can be detected in good time.
The
+ warning lamp in the instrument
cluster lights up when the ignition is switched
on. It goes out no later than a few seconds
after the engine is started. G
Risk of injury
If SRS is malfunctioning, individual systems
may be activated unintentionally or not be
deployed in the event of an accident with
heavy braking.
A malfunction has occurred if the +warn-
ing lamp:
R does not light up when you switch on the
ignition
R does not go out after the engine has been
running for a few seconds
R lights up again once the engine is running
In this case, have SRS checked immediately
at a qualified specialist workshop. Triggering of belt tensioners, belt force
limiters and airbags In the event of a collision, the airbag control
unit evaluates important physical data such
as duration, direction and force of the vehicle
deceleration or acceleration. Based on the
evaluation of this data and in the event of lon-
gitudinal deceleration in a collision, the airbag
control unit pre-emptively triggers the belt
tensioners, depending on the rate of deceler-
ation, in the first stage.
i
The front belt tensioners can only be trig-
gered if the belt tongue is correctly
engaged in the seat belt buckle.
The front airbags are only deployed if there is
an even higher rate of vehicle deceleration in
a longitudinal direction.
Your vehicle has adaptive, dual stage front
airbags. When the first activation threshold is
reached, the front airbag is filled with enough
propellant gas to reduce the risk of injuries.
The front airbag is only fully inflated if a sec-
ond threshold is reached within a few milli-
seconds, due to the control unit having detec-
ted further deceleration.
Criteria for triggering belt tensioners and
airbags
In the first stage of a collision, the airbag con-
trol unit evaluates the duration and direction
of vehicle acceleration or deceleration in
order to determine whether it is necessary to
trigger the belt tensioner and/or airbag.
The belt tensioner and airbag triggering
thresholds are variable and are adapted to the
rate of deceleration of the vehicle. This proc-
ess is pre-emptive in nature as the airbag
must be deployed during – and not at the end
of – the collision.
i Airbags are not deployed in all types of
accidents. They are controlled by complex
sensor technology and evaluation logic.
This process is pre-emptive in nature as
airbag deployment must take place during
the impact and must be adapted to provide Occupant safety
35Safety
X164_AKB; 2; 3, en-GB
wobuchh,V ersion: 2.11.8.1
2009-03-31T14:14:58+02:00 - Seite 35 Z
Dateiname: 6515431202_buchblock.pdf; erzeugt am 01. Apr 2009 00:16:43; WK
Page 76 of 309

Adjusting the exterior mirrors
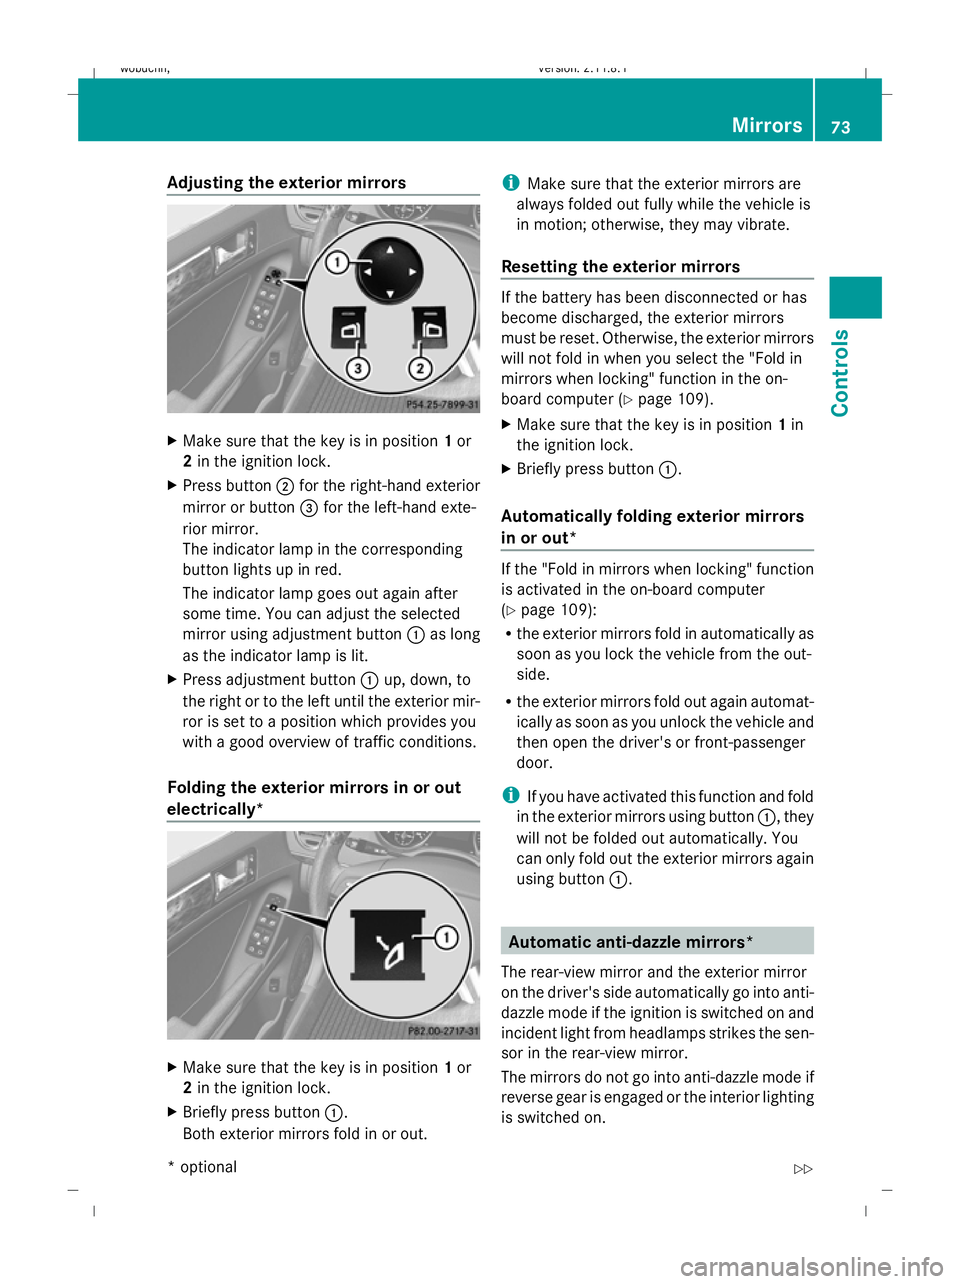
X
Make sure that the key is in position 1or
2 in the ignition lock.
X Press button ;for the right-hand exterior
mirror or button =for the left-hand exte-
rior mirror.
The indicator lamp in the corresponding
button lights up in red.
The indicator lamp goes out again after
some time. You can adjust the selected
mirror using adjustment button :as long
as the indicator lamp is lit.
X Press adjustment button :up, down, to
the right or to the left until the exterior mir-
ror is set to a position which provides you
with a good overview of traffic conditions.
Folding the exterior mirrors in or out
electrically* X
Make sure that the key is in position 1or
2 in the ignition lock.
X Briefly press button :.
Both exterior mirrors fold in or out. i
Make sure that the exterior mirrors are
always folded out fully while the vehicle is
in motion; otherwise, they may vibrate.
Resetting the exterior mirrors If the battery has been disconnected or has
become discharged, the exterior mirrors
must be reset. Otherwise, the exterior mirrors
will not fold in when you select the "Fold in
mirrors when locking" function in the on-
board computer (Y
page 109).
X Make sure that the key is in position 1in
the ignition lock.
X Briefly press button :.
Automatically folding exterior mirrors
in or out* If the "Fold in mirrors when locking" function
is activated in the on-board computer
(Y
page 109):
R the exterior mirrors fold in automatically as
soon as you lock the vehicle from the out-
side.
R the exterior mirrors fold out again automat-
ically as soon as you unlock the vehicle and
then open the driver's or front-passenger
door.
i If you have activated this function and fold
in the exterior mirrors using button :, they
will not be folded out automatically. You
can only fold out the exterior mirrors again
using button :. Automatic anti-dazzle mirrors*
The rear-view mirror and the exterior mirror
on the driver's side automatically go into anti-
dazzle mode if the ignition is switched on and
incident light from headlamps strikes the sen-
sor in the rear-view mirror.
The mirrors do not go into anti-dazzle mode if
reverse gear is engaged or the interior lighting
is switched on. Mirrors
73Controls
* optional
X164_AKB; 2; 3, en-GB
wobuchh,
Version: 2.11.8.1 2009-03-31T14:14:58+02:00 - Seite 73 Z
Dateiname: 6515431202_buchblock.pdf; erzeugt am 01. Apr 2009 00:17:03; WK
Page 86 of 309

Extended range foglamps
The extended range foglamps reduce the
glare experienced by the driver and improve
the illumination of the edge of the carriage-
way.
Active:
if you are driving more slowly than
70 km/h and switch on the rear foglamp.
If your speed does not exceed 100 km/h, the
extended foglamp function remains active.
Not active: if you are driving at speeds above
100 km/h or you switch off the rear foglamp. Headlamp cleaning system*
The headlamps are cleaned automatically if
the "Wipe with washer fluid" function is oper-
ated five times while the lights are on and the
engine is running. When you switch off the
ignition, the automatic headlamp cleaning
system is reset and counting is resumed
from 0. Interior lighting
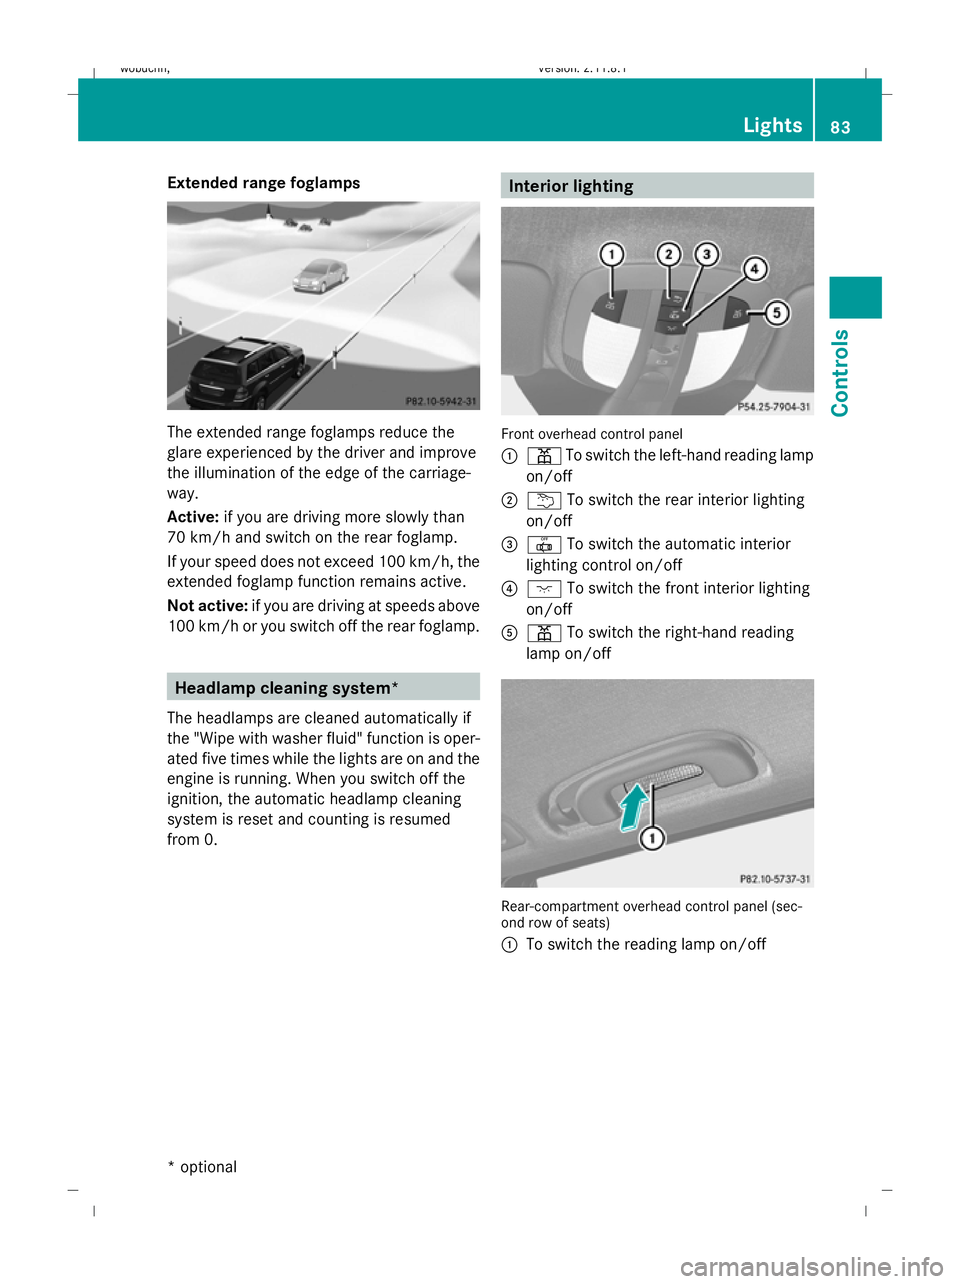
Front overhead control panel
:
p To switch the left-hand reading lamp
on/off
; u To switch the rear interior lighting
on/off
= | To switch the automatic interior
lighting control on/off
? c To switch the front interior lighting
on/off
A p To switch the right-hand reading
lamp on/off Rear-compartment overhead control panel (sec-
ond row of seats)
:
To switch the reading lamp on/off Lights
83Controls
* optional
X164_AKB; 2; 3, en-GB
wobuchh,
Version: 2.11.8.1 2009-03-31T14:14:58+02:00 - Seite 83 Z
Dateiname: 6515431202_buchblock.pdf; erzeugt am 01. Apr 2009 00:17:08; WK
Page 151 of 309

switch off the auxiliary heating at filling sta-
tions.
i Switch the auxiliary heating on regularly
once a month for about ten minutes.
The auxiliary heating heats the air in the vehi-
cle interior to the set temperature without
using the heat of the running engine. The aux-
iliary heating is operated using the vehicle's
fuel. For this reason, the tank content must
be at least at reserve fuel level to ensure that
the auxiliary heating functions.
The auxiliary heating/ventilation automati-
cally adjusts to changes in temperature and
weather conditions. For this reason, the aux-
iliary heating could switch from ventilation
mode to heating mode or from heating mode
to ventilation mode.
You cannot use the auxiliary ventilation to
cool the vehicle interior to a temperature
lower than the outside temperature.
Before activating X
Turn the key to position 2in the ignition
lock.
X Set the temperature.
The auxiliary heating/ventilation can be acti-
vated even when the air conditioning is being
controlled manually. Optimum comfort can
be attained when the system is set to auto-
matic mode. Set the temperature to 22 †.
The auxiliary heating/ventilation can be acti-
vated or deactivated using the remote control
or the button on the centre console.
The on-board computer can be used to spec-
ify up to three departure times, one of which
may be preselected (Y page 107). Switching the auxiliary heating/venti-
lation on/off using the button on the
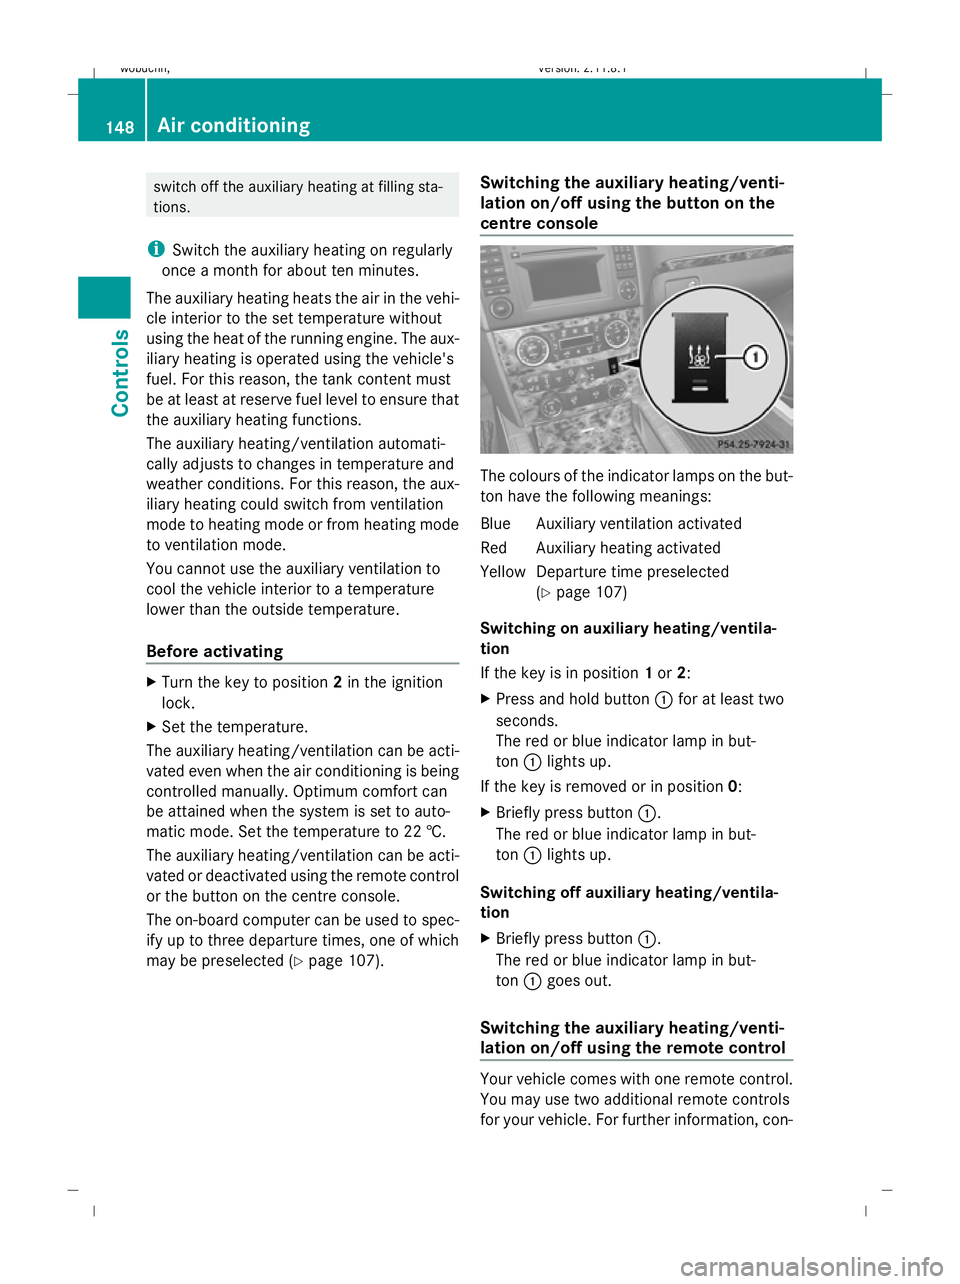
centre console The colours of the indicator lamps on the but-
ton have the following meanings:
Blue Auxiliary ventilation activated
Red Auxiliary heating activated
YellowD eparture time preselected
(Y page 107)
Switching on auxiliary heating/ventila-
tion
If the key is in position 1or 2:
X Press and hold button :for at least two
seconds.
The red or blue indicator lamp in but-
ton :lights up.
If the key is removed or in position 0:
X Briefly press button :.
The red or blue indicator lamp in but-
ton :lights up.
Switching off auxiliary heating/ventila-
tion
X Briefly press button :.
The red or blue indicator lamp in but-
ton :goes out.
Switching the auxiliary heating/venti-
lation on/off using the remote control Your vehicle comes with one remote control.
You may use two additional remote controls
for your vehicle. For further information, con-148
Air conditioningControls
X164_AKB; 2; 3, en-GB
wobuchh,
Version: 2.11.8.1 2009-03-31T14:14:58+02:00 - Seite 148
Dateiname: 6515431202_buchblock.pdf; erzeugt am 01. Apr 2009 00:17:32; WK
Page 171 of 309

X
Start the engine.
X Use W orX on the multi-function
steering wheel to select the Vehiclesub-
menu.
X Keep pressing &or* until the Com‐
pass calibration message appears.
The selection marker highlights switched
off . X
Use W orX to select Start.
In the multi-function display, you will see
the Compass calibration active
Please drive a full circle message.
X Drive the vehicle a full circle at approx-
imately 5 – 10 km/h.
When calibration is completed, you will see
the following message in the multi-function
display: Compass calibration Comple‐
ted successfully
If you do not see the Compass calibration
Completed successfully message in the
multi-function display, drive another full cir-
cle. If calibration is not successful within
three minutes of it starting, the Compass
calibration message will appear in the
multi-function display again. This means that
compass calibration is impossible because of
external interference. Repeat calibration at
another location. Floormat* on the driver's side
G
Risk of accident
Make sure that there is sufficient clearance
around the pedals when floormats are used,
and that the floormats are properly secured.
The floormats must be correctly secured at all
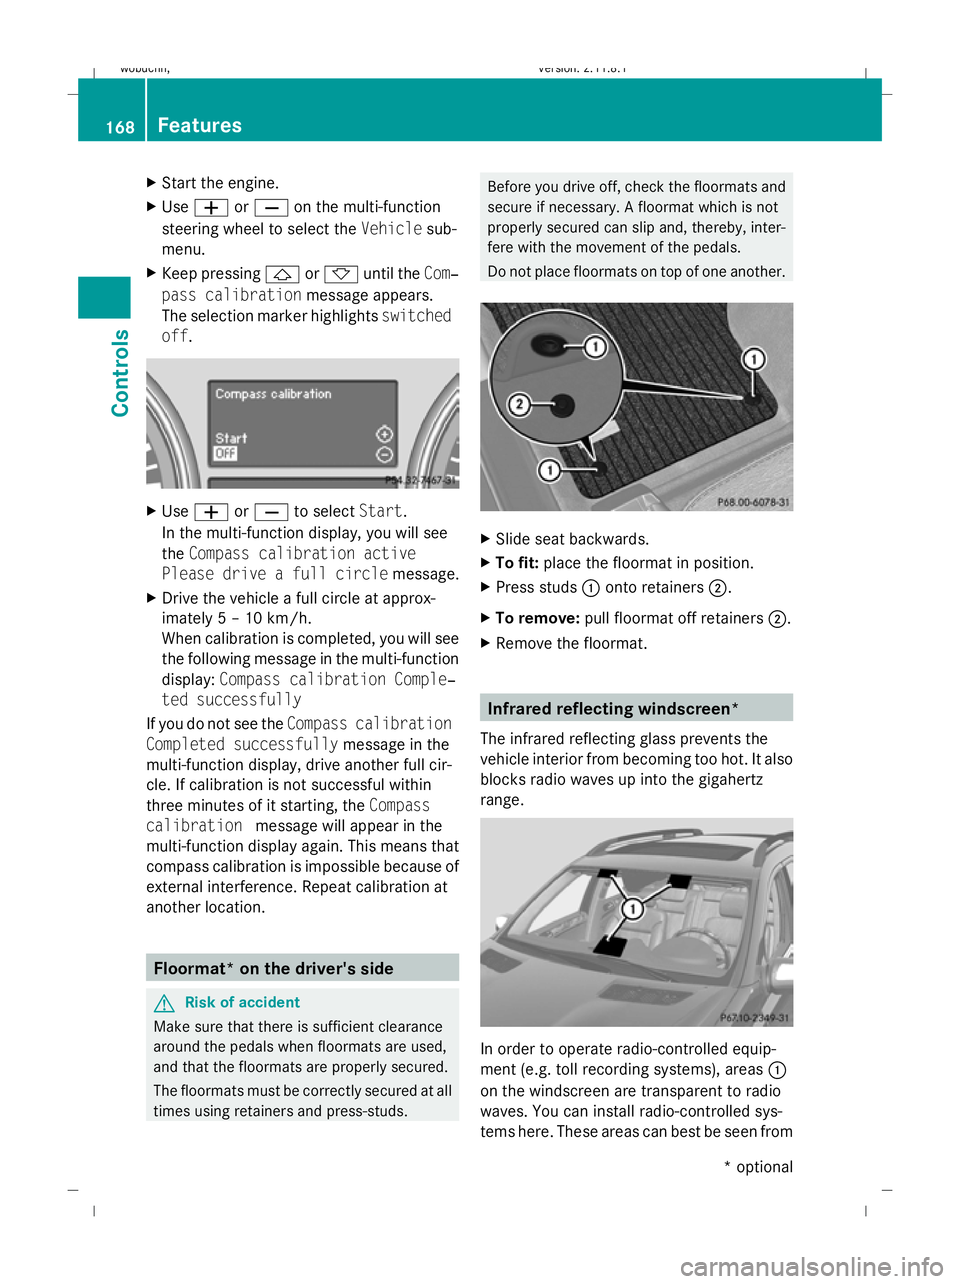
times using retainers and press-studs. Before you drive off, check the floormats and
secure if necessary. A floormat which is not
properly secured can slip and, thereby, inter-
fere with the movement of the pedals.
Do not place floormats on top of one another.
X
Slide seat backwards.
X To fit: place the floormat in position.
X Press studs :onto retainers ;.
X To remove: pull floormat off retainers ;.
X Remove the floormat. Infrared reflecting windscreen*
The infrared reflecting glass prevents the
vehicle interior from becoming too hot. It also
blocks radio waves up into the gigahertz
range. In order to operate radio-controlled equip-
ment (e.g. toll recording systems), areas :
on the windscreen are transparent to radio
waves. You can install radio-controlled sys-
tems here. These areas can best be seen from 168
FeaturesControls
* optional
X164_AKB; 2; 3, en-GB
wobuchh,
Version: 2.11.8.1 2009-03-31T14:14:58+02:00 - Seite 168
Dateiname: 6515431202_buchblock.pdf; erzeugt am 01. Apr 2009 00:17:44; WK