2009 MERCEDES-BENZ GL SUV air condition
[x] Cancel search: air conditionPage 145 of 309
X
To deactivate: press theKorI
button.
The indicator lamp in the Ãbutton goes
out. Automatic airflow is deactivated and
the airflow is controlled according to the
level set. Automatic air distribution
remains activated.
or
X Press the Z,M,¯,\,P,
c orO button.
The indicator lamp in the Ãbutton goes
out. Automatic air distribution is deactiva-
ted. Air distribution is controlled according
to the position set. Automatic airflow
remains activated.
Controlling the rear-compartment air
conditioning automatically via the rear
control unit* X
Turn the key to position 2in the ignition
lock.
X Activate Thermotronic luxury multi-zone
automatic climate control*.
X Set the desired temperature.
X To switch on: press theÃbutton.
The indicator lamp in the Ãbutton lights
up. Automatic air distribution and airflow
are activated.
X To deactivate: press theKorI
button.
Automatic airflow is deactivated and the
airflow is controlled according to the level
set. Automatic air distribution remains acti-
vated.
or
X Press one of the MorO buttons.
Automatic air distribution is deactivated.
Air distribution is controlled according to
the position set. Automatic airflow remains
activated. Setting the temperature
Thermatic 2-zone automatic climate
control Different temperatures can be set for the
driver's and front-passenger sides.
X
Turn the key to position 2in the ignition
lock.
X To increase/reduce: turn controls:and
C clockwise or anti-clockwise
(Y page 138). Only change the temperature
setting in small increments. Start at 22 †.
Thermotronic multi-zone luxury auto-
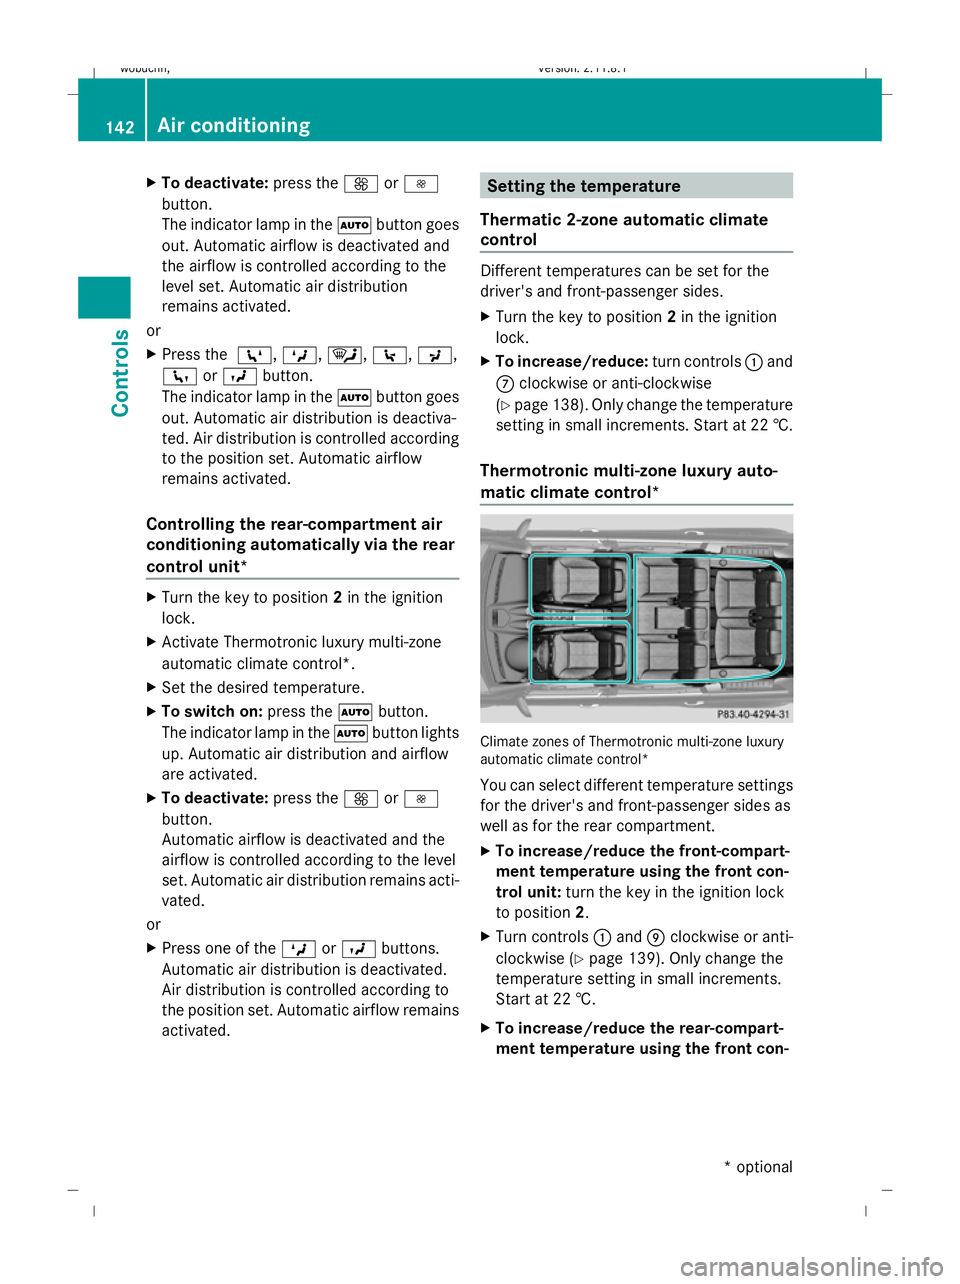
matic climate control* Climate zones of Thermotronic multi-zone luxury
automatic climate control*
You can select different temperature settings
for the driver's and front-passenger sides as
well as for the rear compartment.
X To increase/reduce the front-compart-
ment temperature using the front con-
trol unit: turn the key in the ignition lock
to position 2.
X Turn controls :and Eclockwise or anti-
clockwise (Y page 139). Only change the
temperature setting in small increments.
Start at 22 †.
X To increase/reduce the rear-compart-
ment temperature using the front con- 142
Air conditioningControls
* optional
X164_AKB; 2; 3, en-GB
wobuchh
,V ersion: 2.11.8.1
2009-03-31T14:14:58+02:00 - Seite 142
Dateiname: 6515431202_buchblock.pdf; erzeugt am 01. Apr 2009 00:17:29; WK
Page 146 of 309
trol unit:
turn the key in the ignition lock
to position 2.
X Press the Ybutton.
The display message shown in the display
changes to rear-compartment air condi-
tioning.
X Turn control Eclockwise or anti-clockwise
(Y page 139). Only change the temperature
setting in small increments. Start at 22 †.
i Press the Ybutton to return to the
standard display.
i The rear-compartment display returns to
the standard display automatically after
three seconds.
X To increase/reduce the rear-compart-
ment temperature using the rear con-
trol unit*: turn the key in the ignition lock
to position 2.
X Turn control Rclockwise or anti-clockwise
(Y page 139). Only change the temperature
setting in small increments. Start at 22 †. Adjusting the air vents
G
Risk of injury
Very hot or very cold air can flow from the air
vents. This could cause burns or frostbite to
bare skin in the immediate vicinity of the
vents. Keep bare skin away from these air
outlets. If necessary, direct the airflow away
to a different area of the vehicle interior.
In order to ensure the direct flow of fresh air
through the air vents into the vehicle interior,
please observe the following notes:
R keep the air inlet grille on the bonnet free
of blockage, such as ice, snow or leaves.
R never cover the vents or air inlet and outlet
grilles in the vehicle interior. i
For virtually draught-free ventilation,
adjust the sliders of the air vents to the
centre position.
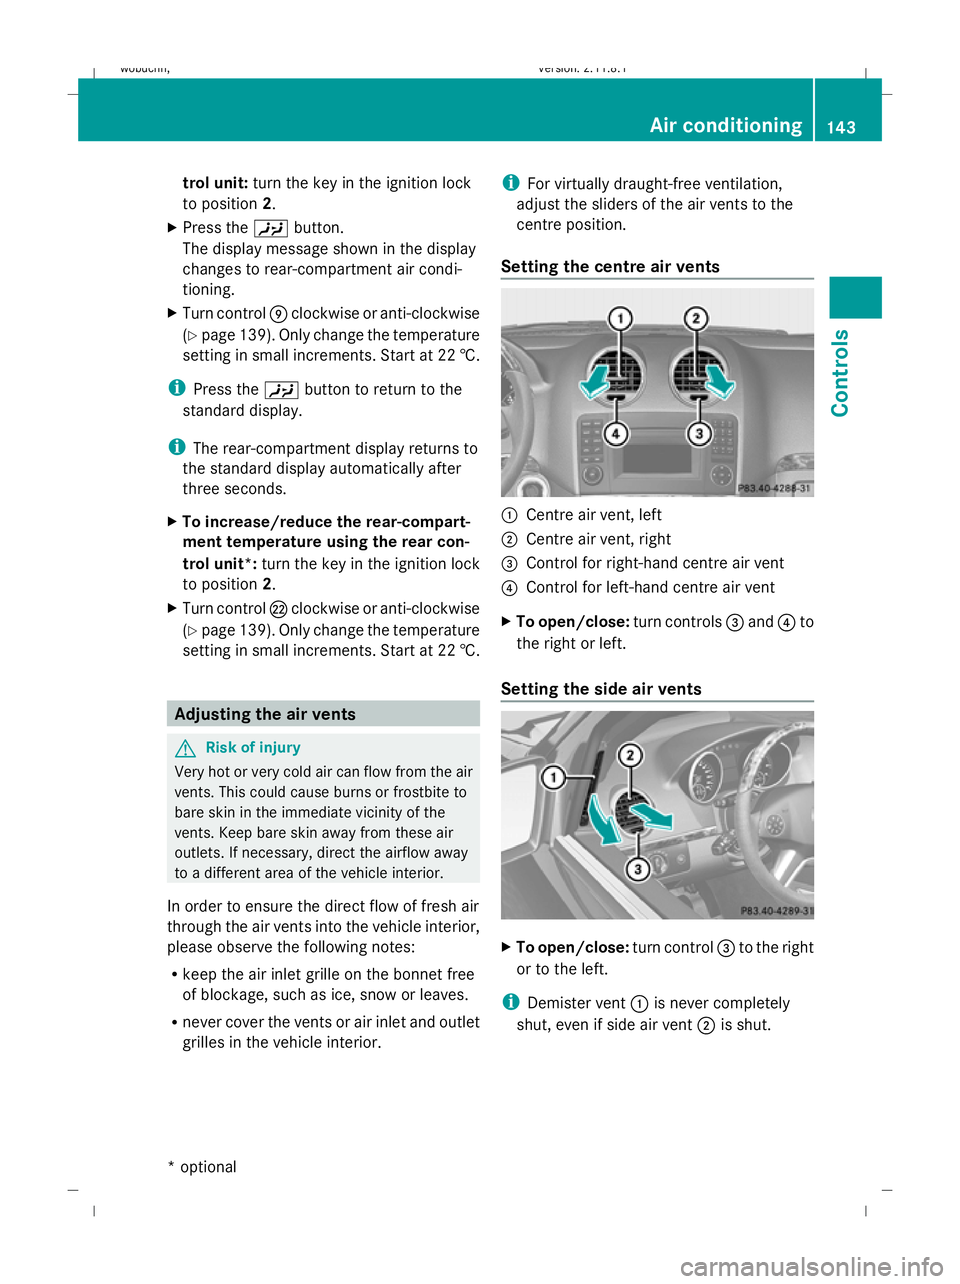
Setting the centre air vents :
Centre air vent, left
; Centre air vent, right
= Control for right-hand centre air vent
? Control for left-hand centre air vent
X To open/close: turn controls=and ?to
the right or left.
Setting the side air vents X
To open/close: turn control=to the right
or to the left.
i Demister vent :is never completely
shut, even if side air vent ;is shut. Air conditioning
143Controls
* optional
X164_AKB; 2; 3, en-GB
wobuchh
,V ersion: 2.11.8.1
2009-03-31T14:14:58+02:00 - Seite 143 Z
Dateiname: 6515431202_buchblock.pdf; erzeugt am 01. Apr 2009 00:17:30; WK
Page 147 of 309
Setting the rear-compartment air vents
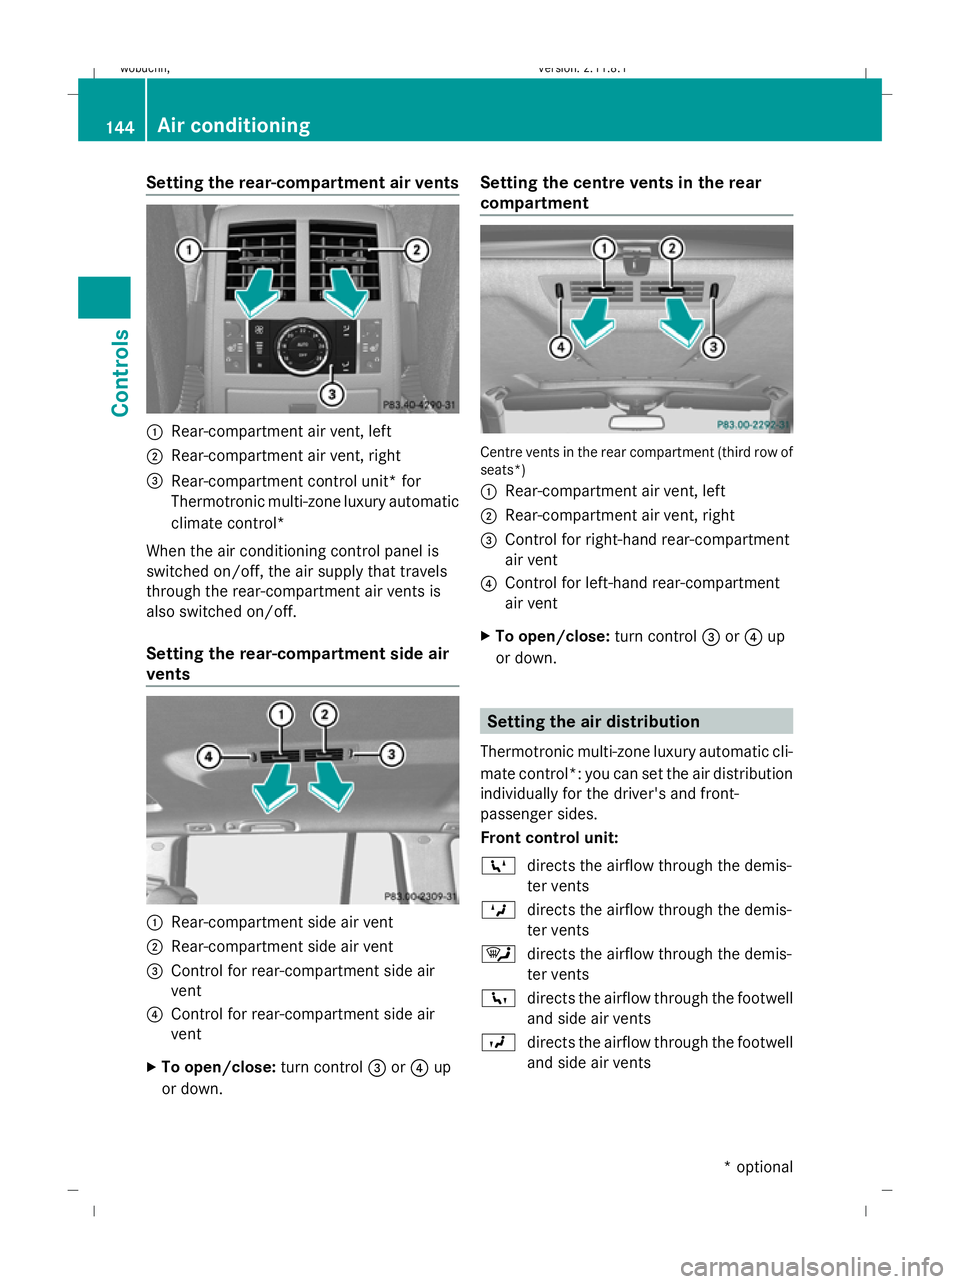
:
Rear-compartment air vent, left
; Rear-compartment air vent, right
= Rear-compartment control unit* for
Thermotronic multi-zone luxury automatic
climate control*
When the air conditioning control panel is
switched on/off, the air supply that travels
through the rear-compartment air vents is
also switched on/off.
Setting the rear-compartment side air
vents :
Rear-compartment side air vent
; Rear-compartment side air vent
= Control for rear-compartment side air
vent
? Control for rear-compartment side air
vent
X To open/close: turn control=or? up
or down. Setting the centre vents in the rear
compartment
Centre vents in the rear compartment (third row of
seats*)
:
Rear-compartment air vent, left
; Rear-compartment air vent, right
= Control for right-hand rear-compartment
air vent
? Control for left-hand rear-compartment
air vent
X To open/close: turn control=or? up
or down. Setting the air distribution
Thermotronic multi-zone luxury automatic cli-
mate control*: you can set the air distribution
individually for the driver's and front-
passenger sides.
Front control unit:
Z directs the airflow through the demis-
ter vents
M directs the airflow through the demis-
ter vents
¯ directs the airflow through the demis-
ter vents
c directs the airflow through the footwell
and side air vents
O directs the airflow through the footwell
and side air vents 144
Air conditioningControls
* optional
X164_AKB; 2; 3, en-GB
wobuchh,
Version: 2.11.8.1 2009-03-31T14:14:58+02:00 - Seite 144
Dateiname: 6515431202_buchblock.pdf; erzeugt am 01. Apr 2009 00:17:31; WK
Page 148 of 309
\
directs the airflow through the centre
and side air vents
P directs the airflow through the centre
and side air vents
Rear control unit*:
M directs the airflow through the rear-
compartment air vents
O directs the airflow through the footwell
air vents
X Turn the key to position 2in the ignition
lock.
X Press the Z,M,¯,c,O,
\ orP button. Setting the airflow
X Turn the key to position 2in the ignition
lock.
X To increase/reduce: press theKor
I button.
Vehicles with Linguatronic*: when voice con-
trol is started the airflow is restricted to 50%.
After voice control is finished, the airflow is
adjusted back to the previous setting. Switching the Mono function on/off
Only Thermotronic luxury automatic climate
control* features the "mono" function.
You can use the "mono" function to adopt the
settings configured for temperature, air dis-
tribution and airflow on the driver's side for
the front-passenger side and the rear com-
partment.
X Press the ºbutton.
The indicator lamp in the ºbutton lights
up or goes out. Demisting the windscreen
i You should only select the "demisting"
function until the windscreen is clear again.
X Turn the key to position 2in the ignition
lock.
X To activate: press the¦button.
The indicator lamp in the ¦button lights
up.
The system automatically switches to the
following functions:
R cooling with air dehumidification on
R high airflow 26
R high temperature 26
R air distribution to the windscreen and
front side windows
R air-recirculation mode off
X To switch off: press the¦button.
The indicator lamp in the ¦button goes
out. The previously selected settings come
into effect again. The cooling with air dehu-
midification function remains on. Air-recir-
culation mode remains deactivated.
or
X Press the ^button.
or
X Press the Ãbutton.
or
X Turn the temperature control clockwise or
anti-clockwise.
or
X Press the KorI button.
26 Depending on the outside temperature. Air conditioning
145Controls
* optional
X164_AKB; 2; 3, en-GB
wobuchh,
Version: 2.11.8.1 2009-03-31T14:14:58+02:00 - Seite 145 Z
Dateiname: 6515431202_buchblock.pdf; erzeugt am 01. Apr 2009 00:17:31; WK
Page 149 of 309
Demisting the windows
Windows misted up on the inside X
Activate the "cooling function with air dehu-
midification" function.
X Activate automatic mode.
X If the windows continue to mist up, activate
the demisting function.
i You should only select this setting until
the windscreen is clear again.
Windows misted up on the outside X
Activate the windscreen wipers.
X Press the P/\ orO/c air
distribution button.
i You should only select this setting until
the windscreen is clear again. Switching the rear window heating
on/off G
Risk of accident
Make sure that all windows are clear of ice
and snow before starting a journey. This may
otherwise obstruct your view of the traffic
conditions, thereby causing an accident.
i The rear window heating has a high cur-
rent draw. You should therefore switch it
off as soon as the window is clear, as it only
switches off automatically after several
minutes.
i If the battery voltage is too low, the rear
window heating may switch off.
X Turn the key to position 2in the ignition
lock.
X Press the ªbutton.
The indicator lamp in the ªbutton lights
up or goes out. Activating/deactivating air-recircula-
tion mode
You can deactivate the flow of fresh air if
unpleasant odours are entering the vehicle
from outside. The air already inside the vehi-
cle will then be recirculated. G
Risk of accident
Only switch over to air-recirculation mode
briefly at low outside temperatures. Other-
wise, the windows could mist up, thus impair-
ing visibility and endangering yourself and
others. This may prevent you from observing
the traffic conditions, thereby causing an
accident.
X Turn the key to position 2in the ignition
lock.
X To activate: press thedbutton.
The indicator lamp in the dbutton lights
up.
i Air-recirculation mode is activated auto-
matically at high outside temperatures.
When air-recirculation mode is activated
automatically, the indicator lamp in the
d button is not lit.
Outside air is added after about 30
minutes.
X To switch off: press thedbutton.
The indicator lamp in the dbutton goes
out.
i Air-recirculation mode switches off auto-
matically:
R after approximately five minutes at out-
side temperatures below approximately
5 †
R after approximately five minutes if cool-
ing with air dehumidification is deactiva-
ted
R after approximately 30 minutes at out-
side temperatures above approximately
5 † 146
Air conditioningCont
rols
X164_AKB; 2; 3, en-GB
wobuchh, Version: 2.11.8.1 2009-03-31T14:14:58+02:00 - Seite 146
Dateiname: 6515431202_buchblock.pdf; erzeugt am 01. Apr 2009 00:17:31; WK
Page 150 of 309
Convenience opening/closing
G
Risk of injury
Make sure that nobody can become trapped
between the side window and the door frame
as the side windows are opened and closed.
Do not place objects or lean against the side
windows when they are being opened or
closed. You or the objects could be drawn in
or become trapped between the side window
and the door frame as the window moves. If
there is a risk of entrapment, press the
d button again. Press the button for stop-
ping, opening or closing the side windows in
the opposite direction as appropriate.
Make sure that nobody can become trapped
when you are opening or closing the sliding/
tilting sunroof*. If there is a risk of entrap-
ment, press the dbutton again. Press the
button to stop, open or close the panorama
sliding/tilting sunroof* in the opposite direc-
tion as appropriate.
X Convenience closing: press and hold
the d button until the side windows and
the sliding/tilting sunroof* are closed.
The indicator lamp in the dbutton lights
up. Air-recirculation mode is activated.
X Convenience opening: press and hold the
d button until the side windows and the
sliding/tilting sunroof* have reached their
original position.
The indicator lamp in the dbutton goes
out. Air-recirculation mode is deactivated.
i If you open the side windows or the slid-
ing/tilting sunroof* manually after closing
with the convenience closing feature, they
will remain in this position when opened
using the convenience opening feature. Switching the residual heat on/off
It is possible to make use of the residual heat
of the engine to continue heating the station-
ary vehicle for up to 30 minutes after the engine has been switched off. The heating
time depends on the temperature that has
been set.
i
The blower will run at a low speed regard-
less of the airflow setting.
i If you activate the "residual heat" function
at high temperatures, only the ventilation
will be activated. The blower runs at
medium speed.
X Turn the key to position 0in the ignition
lock or remove it.
X To activate: press theÁbutton.
The indicator lamp in the Ábutton
comes on.
X To switch off: press theÁbutton.
The indicator lamp in the Ábutton goes
out.
i The residual heat automatically switches
off after around 30 minutes or if:
R the ignition is switched on
R the battery voltage drops Auxiliary heating/ventilation*
Notes on the auxiliary heating/ventila-
tion system G
Risk of poisoning
Exhaust fumes are produced when the auxili-
ary heating is in operation. Inhaling these
exhaust fumes can be poisonous. You should
therefore switch off the auxiliary heating in
confined spaces without an extraction sys-
tem, e.g. a garage. G
Risk of fire
When operating the auxiliary heating, parts of
the vehicle may become very hot, and highly
inflammable material such as fuels could be
ignited. Operating the auxiliary heating is thus
prohibited at filling stations or when your vehi-
cle is being refuelled. You must therefore Air conditioning
147Controls
* optional
X164_AKB; 2; 3, en-GB
wobuchh,
Version: 2.11.8.1 2009-03-31T14:14:58+02:00 - Seite 147 Z
Dateiname: 6515431202_buchblock.pdf; erzeugt am 01. Apr 2009 00:17:31; WK
Page 151 of 309
switch off the auxiliary heating at filling sta-
tions.
i Switch the auxiliary heating on regularly
once a month for about ten minutes.
The auxiliary heating heats the air in the vehi-
cle interior to the set temperature without
using the heat of the running engine. The aux-
iliary heating is operated using the vehicle's
fuel. For this reason, the tank content must
be at least at reserve fuel level to ensure that
the auxiliary heating functions.
The auxiliary heating/ventilation automati-
cally adjusts to changes in temperature and
weather conditions. For this reason, the aux-
iliary heating could switch from ventilation
mode to heating mode or from heating mode
to ventilation mode.
You cannot use the auxiliary ventilation to
cool the vehicle interior to a temperature
lower than the outside temperature.
Before activating X
Turn the key to position 2in the ignition
lock.
X Set the temperature.
The auxiliary heating/ventilation can be acti-
vated even when the air conditioning is being
controlled manually. Optimum comfort can
be attained when the system is set to auto-
matic mode. Set the temperature to 22 †.
The auxiliary heating/ventilation can be acti-
vated or deactivated using the remote control
or the button on the centre console.
The on-board computer can be used to spec-
ify up to three departure times, one of which
may be preselected (Y page 107). Switching the auxiliary heating/venti-
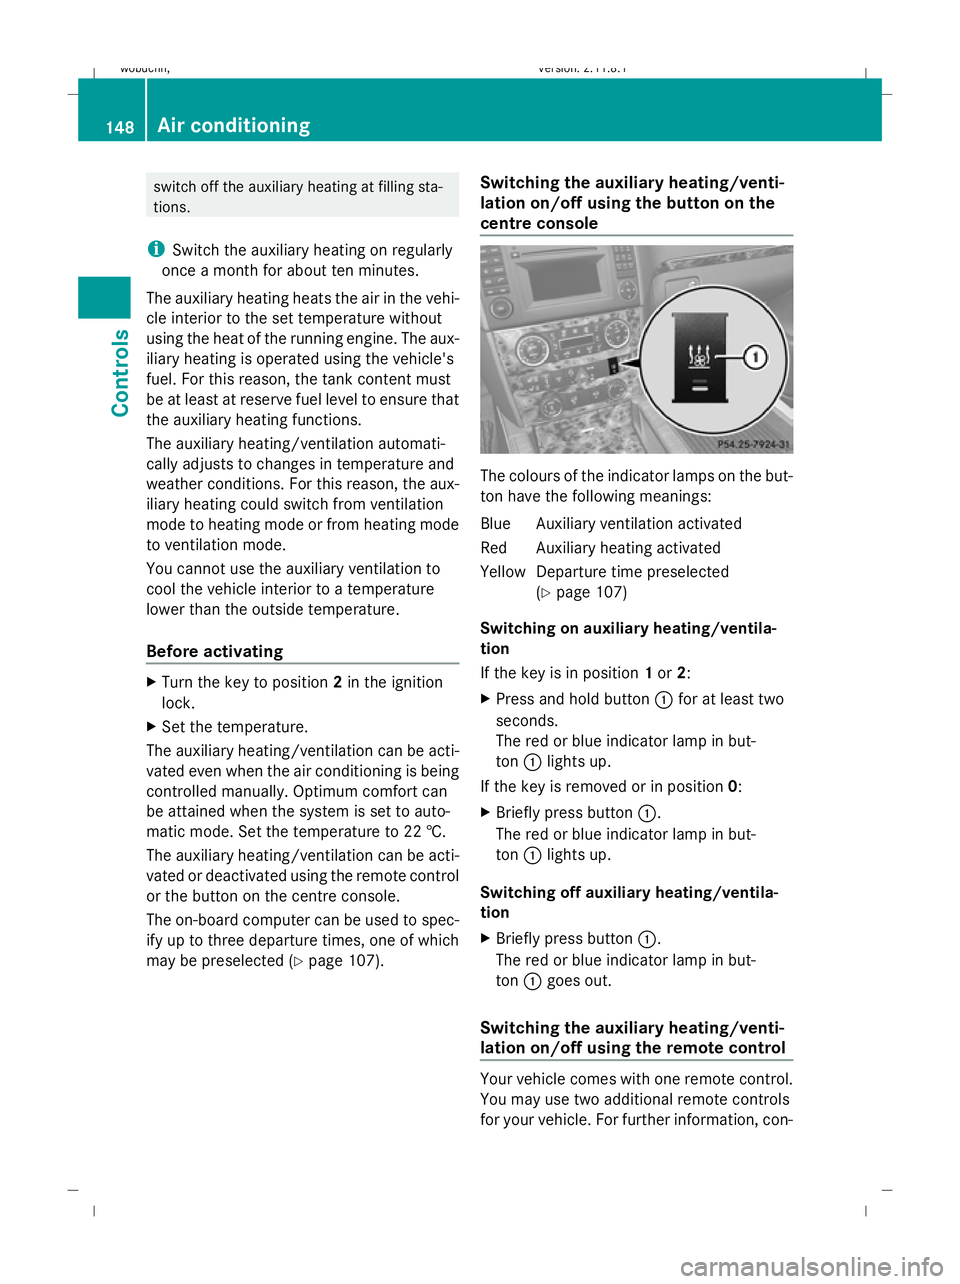
lation on/off using the button on the
centre console The colours of the indicator lamps on the but-
ton have the following meanings:
Blue Auxiliary ventilation activated
Red Auxiliary heating activated
YellowD eparture time preselected
(Y page 107)
Switching on auxiliary heating/ventila-
tion
If the key is in position 1or 2:
X Press and hold button :for at least two
seconds.
The red or blue indicator lamp in but-
ton :lights up.
If the key is removed or in position 0:
X Briefly press button :.
The red or blue indicator lamp in but-
ton :lights up.
Switching off auxiliary heating/ventila-
tion
X Briefly press button :.
The red or blue indicator lamp in but-
ton :goes out.
Switching the auxiliary heating/venti-
lation on/off using the remote control Your vehicle comes with one remote control.
You may use two additional remote controls
for your vehicle. For further information, con-148
Air conditioningControls
X164_AKB; 2; 3, en-GB
wobuchh,
Version: 2.11.8.1 2009-03-31T14:14:58+02:00 - Seite 148
Dateiname: 6515431202_buchblock.pdf; erzeugt am 01. Apr 2009 00:17:32; WK
Page 164 of 309
Roof rack system*
G
Risk of accident and injury
An incorrectly secured roof rack, ski rack or
load could become detached from the vehi-
cle. These objects may be thrown around and
can injure you or others, or cause an accident.
Follow the roof rack/ski rack manufacturer's
installation instructions and special instruc-
tions for use.
The roof load raises the vehicle's centre of
gravity, thereby affecting vehicle handling.
You must always observe the maximum roof
load of 100 kg. Always adapt your driving style
to the prevailing road, traffic and weather
conditions and drive with particular care if the
roof is laden.
! Mercedes-Benz recommends that you
only use roof rack systems which have
been tested and approved for Mercedes-
Benz vehicles. This helps to prevent dam-
age to the vehicle.
Position the load on the roof rack in such a
way that the vehicle will not sustain dam-
age even when it is in motion.
Depending on the vehicle's equipment,
make sure that you can:
R raise the sliding/tilting sunroof* fully
R open the tailgate fully X
Secure the roof carrier to roof rails :.
Observe the manufacturer's installation
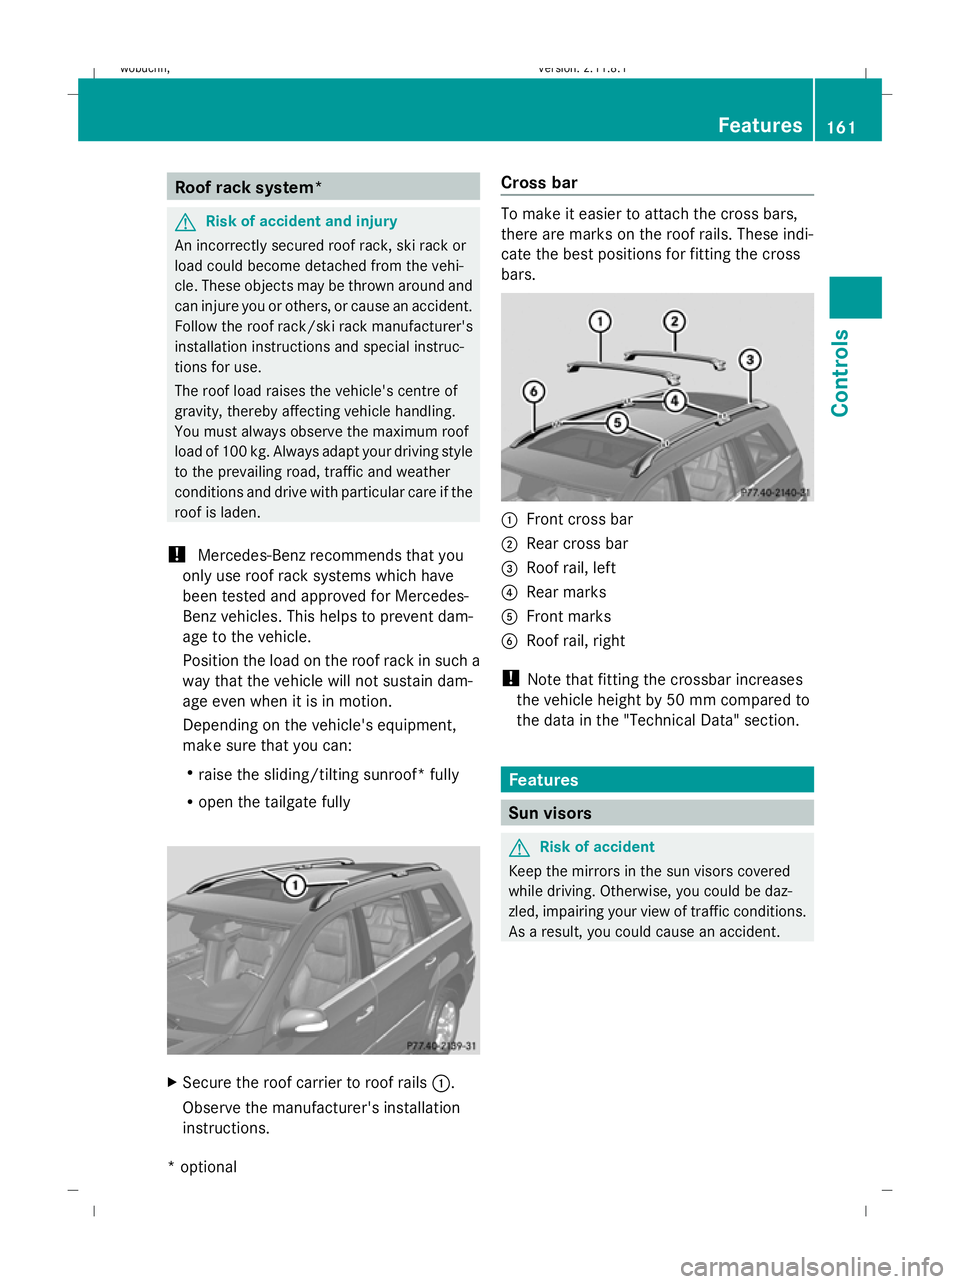
instructions. Cross bar To make it easier to attach the cross bars,
there are marks on the roof rails. These indi-
cate the best positions for fitting the cross
bars. :
Front cross bar
; Rear cross bar
= Roof rail, left
? Rear marks
A Front marks
B Roof rail, right
! Note that fitting the crossbar increases
the vehicle height by 50 mm compared to
the data in the "Technical Data" section. Features
Sun visors
G
Risk of accident
Keep the mirrors in the sun visors covered
while driving. Otherwise, you could be daz-
zled, impairing your view of traffic conditions.
As a result, you could cause an accident. Features
161Controls
* optional
X164_AKB; 2; 3, en-GB
wobuchh,
Version: 2.11.8.1 2009-03-31T14:14:58+02:00 - Seite 161 Z
Dateiname: 6515431202_buchblock.pdf; erzeugt am 01. Apr 2009 00:17:40; WK