2009 MERCEDES-BENZ E-CLASS SALOON towing
[x] Cancel search: towingPage 206 of 373
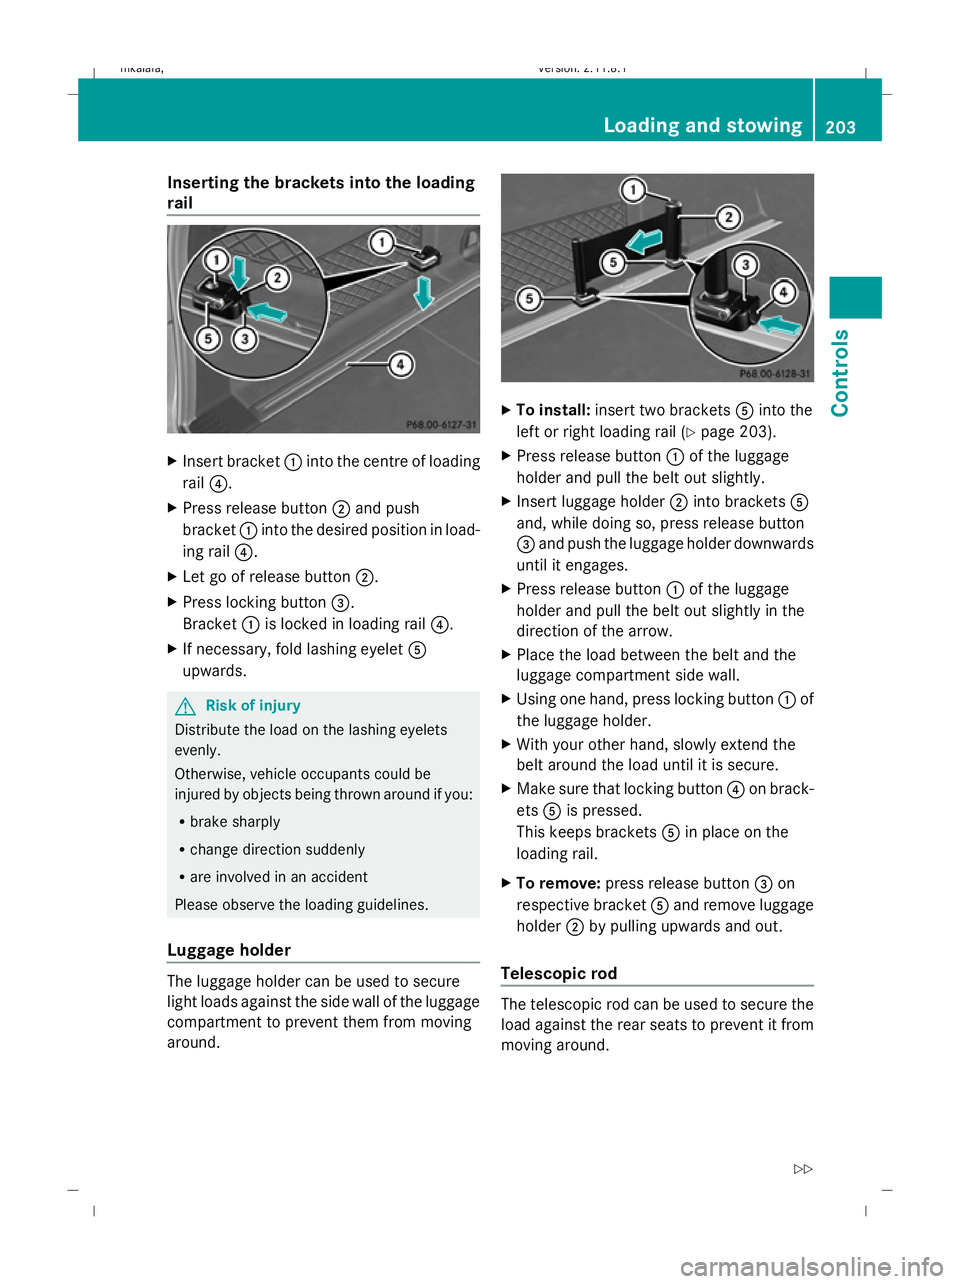
Inserting the brackets into the loading
rail X
Insert bracket :into the centre of loading
rail ?.
X Press release button ;and push
bracket :into the desired position in load-
ing rail ?.
X Let go of release button ;.
X Press locking button =.
Bracket :is locked in loading rail ?.
X If necessary, fold lashing eyelet A
upwards. G
Risk of injury
Distribute the load on the lashing eyelets
evenly.
Otherwise, vehicle occupants could be
injured by objects being thrown around if you:
R brake sharply
R change direction suddenly
R are involved in an accident
Please observe the loading guidelines.
Luggage holder The luggage holder can be used to secure
light loads against the side wall of the luggage
compartment to prevent them from moving
around. X
To install: insert two brackets Ainto the
left or right loading rail (Y page 203).
X Press release button :of the luggage
holder and pull the belt out slightly.
X Insert luggage holder ;into brackets A
and, while doing so, press release button
= and push the luggage holder downwards
until it engages.
X Press release button :of the luggage
holder and pull the belt out slightly in the
direction of the arrow.
X Place the load between the belt and the
luggage compartment side wall.
X Using one hand, press locking button :of
the luggage holder.
X With your other hand, slowly extend the
belt around the load until it is secure.
X Make sure that locking button ?on brack-
ets Ais pressed.
This keeps brackets Ain place on the
loading rail.
X To remove: press release button =on
respective bracket Aand remove luggage
holder ;by pulling upwards and out.
Telescopic rod The telescopic rod can be used to secure the
load against the rear seats to prevent it from
moving around. Loading and stowing
203Controls
212_AKB; 2; 4, en-GB
mkalafa,V ersion: 2.11.8.1
2009-05-05T14:17:16+02:00 - Seite 203 Z
Dateiname: 6515346702_buchblock.pdf; erzeugt am 07. May 2009 14:16:46; WK
Page 207 of 373
X
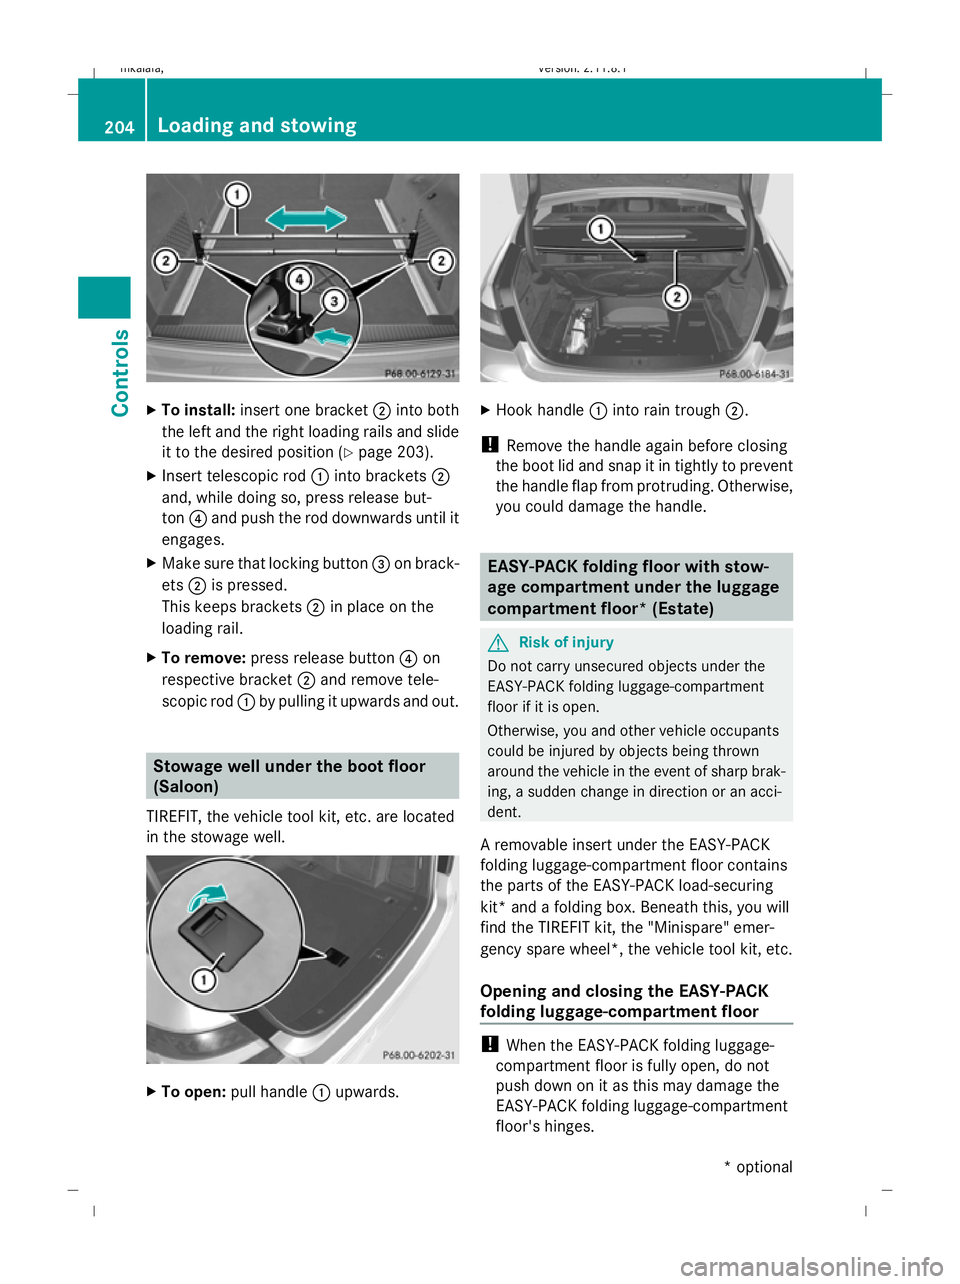
To install: insert one bracket ;into both
the left and the right loading rails and slide
it to the desired position (Y page 203).
X Insert telescopic rod :into brackets ;
and, while doing so, press release but-
ton ?and push the rod downwards until it
engages.
X Make sure that locking button =on brack-
ets ;is pressed.
This keeps brackets ;in place on the
loading rail.
X To remove: press release button ?on
respective bracket ;and remove tele-
scopic rod :by pulling it upwards and out. Stowage well under the boot floor
(Saloon)
TIREFIT, the vehicle tool kit, etc. are located
in the stowage well. X
To open: pull handle :upwards. X
Hook handle :into rain trough ;.
! Remove the handle again before closing
the boot lid and snap it in tightly to prevent
the handle flap from protruding. Otherwise,
you could damage the handle. EASY-PACK folding floor with stow-
age compartment under the luggage
compartment floor* (Estate)
G
Risk of injury
Do not carry unsecured objects under the
EASY-PACK folding luggage-compartment
floor if it is open.
Otherwise, you and other vehicle occupants
could be injured by objects being thrown
around the vehicle in the event of sharp brak-
ing, a sudden change in direction or an acci-
dent.
A removable insert under the EASY-PACK
folding luggage-compartment floor contains
the parts of the EASY-PACK load-securing
kit* and a folding box. Beneath this, you will
find the TIREFIT kit, the "Minispare" emer-
gency spare wheel*, the vehicle tool kit, etc.
Opening and closing the EASY-PACK
folding luggage-compartment floor !
When the EASY-PACK folding luggage-
compartment floor is fully open, do not
push down on it as this may damage the
EASY-PACK folding luggage-compartment
floor's hinges. 204
Loading and stowingControls
* optional
212_AKB; 2; 4, en-GB
mkalafa,
Version: 2.11.8.1 2009-05-05T14:17:16+02:00 - Seite 204
Dateiname: 6515346702_buchblock.pdf; erzeugt am 07. May 2009 14:16:47; WK
Page 208 of 373
X
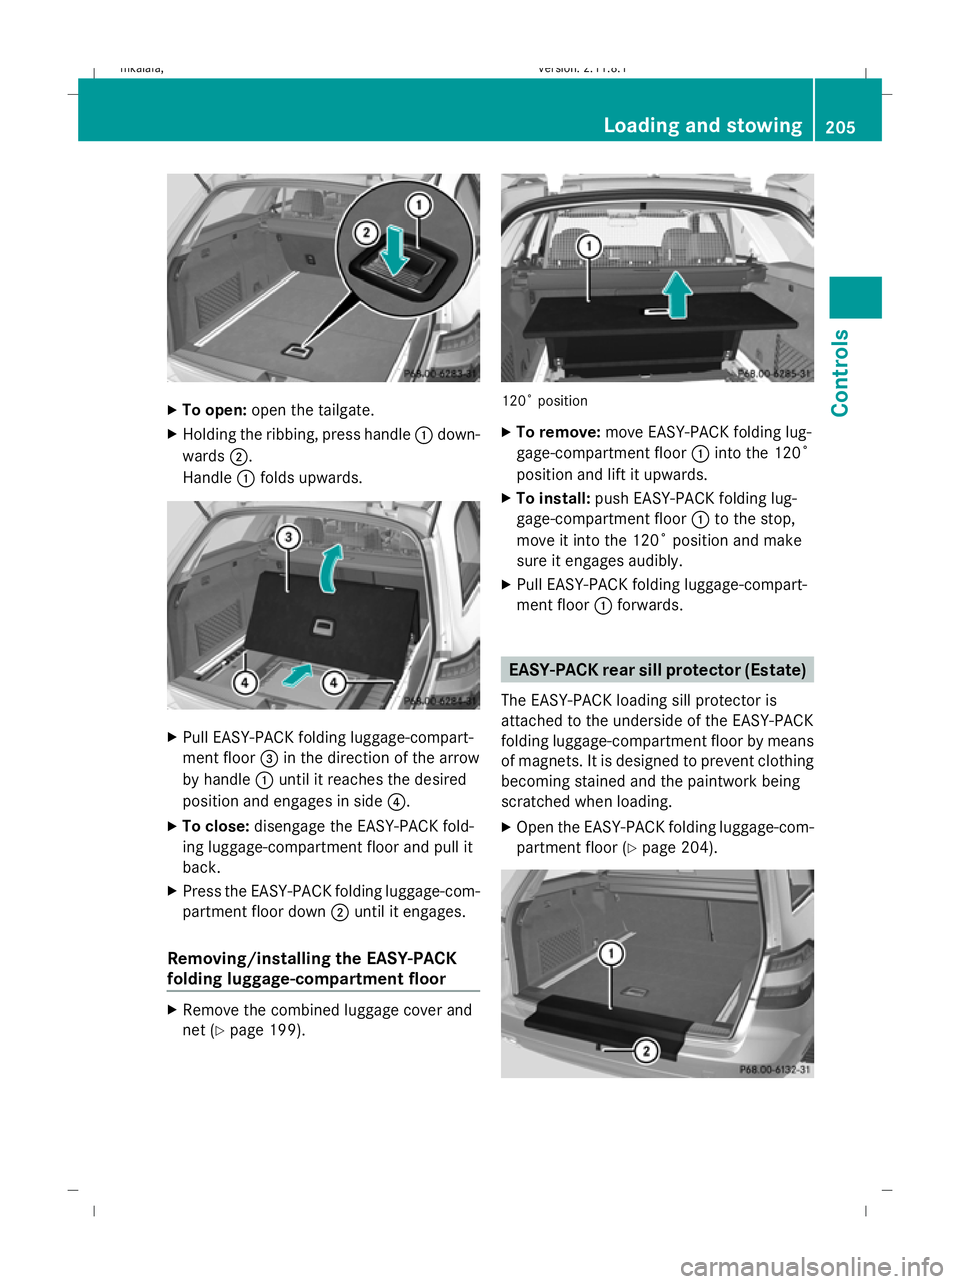
To open: open the tailgate.
X Holding the ribbing, press handle :down-
wards ;.
Handle :folds upwards. X
Pull EASY-PACK folding luggage-compart-
ment floor =in the direction of the arrow
by handle :until it reaches the desired
position and engages in side ?.
X To close: disengage the EASY-PACK fold-
ing luggage-compartment floor and pull it
back.
X Press the EASY-PACK folding luggage-com-
partment floor down ;until it engages.
Removing/installing the EASY-PACK
folding luggage-compartment floor X
Remove the combined luggage cover and
net ( Ypage 199). 120˚ position
X
To remove: move EASY-PACK folding lug-
gage-compartment floor :into the 120˚
position and lift it upwards.
X To install: push EASY-PACK folding lug-
gage-compartment floor :to the stop,
move it into the 120˚ position and make
sure it engages audibly.
X Pull EASY-PACK folding luggage-compart-
ment floor :forwards. EASY-PACK rear sill protector (Estate)
The EASY-PACK loading sill protector is
attached to the underside of the EASY-PACK
folding luggage-compartment floor by means
of magnets. It is designed to prevent clothing
becoming stained and the paintwork being
scratched when loading.
X Open the EASY-PACK folding luggage-com-
partment floor ( Ypage 204). Loading and stowing
205Controls
212_AKB; 2; 4, en-GB
mkalafa, Version: 2.11.8.1 2009-05-05T14:17:16+02:00 - Seite 205 Z
Dateiname: 6515346702_buchblock.pdf; erzeugt am 07. May 2009 14:16:48; WK
Page 209 of 373
X
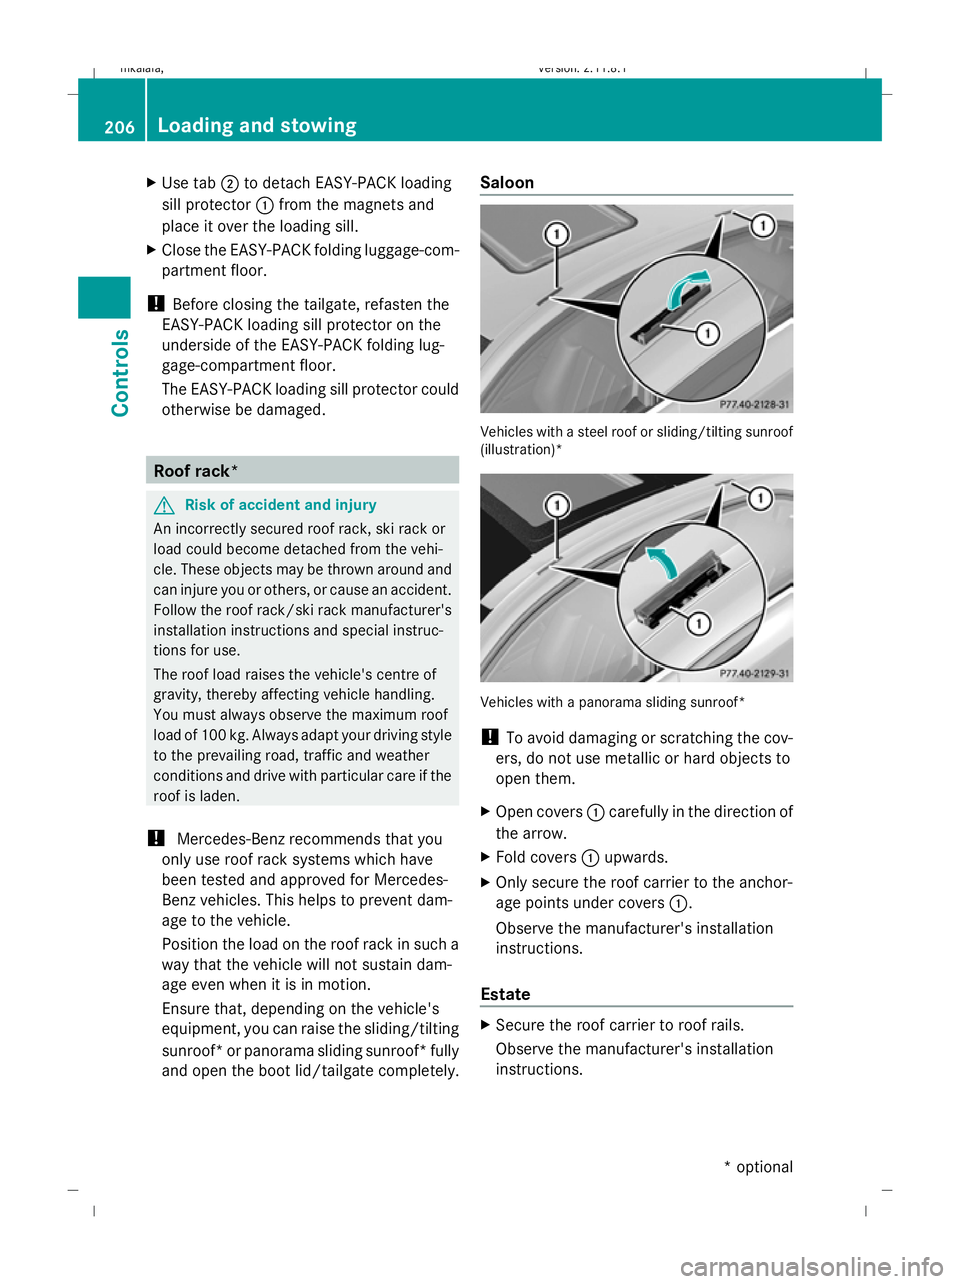
Use tab ;to detach EASY-PACK loading
sill protector :from the magnets and
place it over the loading sill.
X Close the EASY-PACK folding luggage-com-
partment floor.
! Before closing the tailgate, refasten the
EASY-PACK loading sill protector on the
underside of the EASY-PACK folding lug-
gage-compartment floor.
The EASY-PACK loading sill protector could
otherwise be damaged. Roof rack*
G
Risk of accident and injury
An incorrectly secured roof rack, ski rack or
load could become detached from the vehi-
cle. These objects may be thrown around and
can injure you or others, or cause an accident.
Follow the roof rack/ski rack manufacturer's
installation instructions and special instruc-
tions for use.
The roof load raises the vehicle's centre of
gravity, thereby affecting vehicle handling.
You must always observe the maximum roof
load of 100 kg. Always adapt your driving style
to the prevailing road, traffic and weather
conditions and drive with particular care if the
roof is laden.
! Mercedes-Benz recommends that you
only use roof rack systems which have
been tested and approved for Mercedes-
Benz vehicles. This helps to prevent dam-
age to the vehicle.
Position the load on the roof rack in such a
way that the vehicle will not sustain dam-
age even when it is in motion.
Ensure that, depending on the vehicle's
equipment, you can raise the sliding/tilting
sunroof* or panorama sliding sunroof* fully
and open the boot lid/tailgate completely. Saloon
Vehicles with a steel roof or sliding/tilting sunroof
(illustration)*
Vehicles with a panorama sliding sunroof*
! To avoid damaging or scratching the cov-
ers, do not use metallic or hard objects to
open them.
X Open covers :carefully in the direction of
the arrow.
X Fold covers :upwards.
X Only secure the roof carrier to the anchor-
age points under covers :.
Observe the manufacturer's installation
instructions.
Estate X
Secure the roof carrier to roof rails.
Observe the manufacturer's installation
instructions. 206
Loading and stowingControls
* optional
212_AKB; 2; 4, en-GB
mkalafa,
Version: 2.11.8.1 2009-05-05T14:17:16+02:00 - Seite 206
Dateiname: 6515346702_buchblock.pdf; erzeugt am 07. May 2009 14:16:48; WK
Page 218 of 373

Running-in notes
............................... 216
Refuelling ........................................... 216
Engine compartment ........................219
Tyres and wheels .............................. 223
Winter driving ................................... 230
Driving tips ........................................ 231
Driving abroad ................................... 233
Trailer towing .................................... 234
Service ............................................... 239
Care .................................................... 240 215Operation
212_AKB; 2; 4, en-GB
mkalafa,
Version: 2.11.8.1 2009-05-05T14:17:16+02:00 - Seite 215
Dateiname: 6515346702_buchblock.pdf; erzeugt am 07. May 2009 14:16:53; WK
Page 228 of 373

Thus, you should replace tyres that have
insufficient tread.
R winter tyres should be replaced when the
tread depth is 4 mm or less as they will no
longer provide adequate grip.
R the tread on a tyre may not wear evenly.
Thus, you should regularly check the tread
depth and the condition of the tread across
the entire width of all tyres. If necessary,
turn the front wheels to full lock in order to
inspect the tyre tread more easily.
Otherwise, you could lose control of the vehi-
cle and cause an accident due to the reduced
grip of the tyres on the road. Tyre pressures
i You will find a table of tyre pressures for
various operating conditions on the inside
of your vehicle's fuel filler flap.
The applicable value for the "Minispare"
emergency spare wheel* is stated on the
spare wheel and in the technical data sec-
tion.
The applicable value for the maximum load
during trailer towing is stated on the tyre
pressure information label on the inside of
your vehicle's fuel filler flap.
The load condition "partially laden" or "fully
laden" is defined in the table by the differing
number of passengers and amount of lug-
gage. The actual number of seats may vary
from this – more information can be found on
the vehicle's registration document.
If no other data is stated, the tyre pressures
specified on the fuel filler flap apply for all
tyres approved for this vehicle. If the tyre pressures are preceded by a tyre
size, the tyre pressure specified only applies
to this tyre size.
Instead of the complete tyre size, it may be
that only the rim diameter is stated, e.g.
R 16
or16". Rim diameter
:is part of the tyre size and
can be found on the sidewall of the tyre. G
Risk of accident
Tyre pressure that is either too high or too low
has a negative effect on the vehicle’s driving
safety, which could lead you to cause an acci- Tyres and wheels
225Operation
* optional
212_AKB; 2; 4, en-GB
mkalafa,
Version: 2.11.8.1 2009-05-05T14:17:16+02:00 - Seite 225 Z
Dateiname: 6515346702_buchblock.pdf; erzeugt am 07. May 2009 14:16:57; WK
Page 229 of 373
dent. Therefore, you should regularly check
the pressure of all the tyres, particularly prior
to long trips, and correct the pressure as nec-
essary.
To test tyre pressure, use a suitable pressure
gauge. The outer appearance of a tyre does
not permit any reliable conclusion about the
tyre pressure. On vehicles fitted with the elec-
tronic tyre pressure monitor*, the tyre pres-
sure can be checked in the on-board com-
puter. G
Risk of accident
Do not fit anything else to the tyre valve other
than the standard valve cap. In particular, ret-
rofitted tyre pressure monitors which are
screwed on to the valve may overload it and
cause it to fail. Due to their design, the valve
is kept open continuously, which may lead to
air loss. G
Risk of accident
Should the tyre pressure drop repeatedly:
R check the tyre for foreign bodies.
R check whether the wheel is losing air or the
valve is leaking.
R make sure that only a valve cap approved
by Mercedes-Benz is fitted on the tyre
valve.
Tyre pressures that are too low have a nega-
tive effect on vehicle safety, which could lead
to your causing an accident.
If possible, you should only correct tyre pres-
sures when the tyres are cold. Depending on
the ambient temperature, the speed you are
driving at and the load on the tyres, the tyre
temperature and thus the tyre pressure may
change by approximately 0.1 bar per 10 †.
Take this into account when checking the
pressure of warm tyres and only correct it if
it is too low for the current operating condi-
tions. Driving with tyre pressure that is too high or
too low can:
R
shorten the service life of the tyres
R increase the likelihood of tyre damage
R have a negative effect on handling charac-
teristics (e.g. by causing aquaplaning)
Also check the pressure of the "Minispare"
emergency spare wheel*. H
Environmental note
Check the tyre pressure regularly, at least
every 14 days.
Speeds up to 210 km/h:
Despite the values stated on the tyre pressure
information label (fuel filler flap), for speeds
up to 210 km/h andwith 16" or 17" tyres,
the values stated can be reduced as follows,
without a reduction in safety:
Saloon: -0.3 bar / (-4 psi)
Estate: -0.2 bar (-3 psi)
This does not apply to vehicles towing a
trailer.
This improves the ride comfort of your vehi-
cle; however, the fuel consumption may
increase slightly. Tyre pressure loss warning
While the vehicle is in motion, the tyre pres-
sure loss warning system monitors the set
tyre pressure using the rotational speed of
the wheels. This enables the system to detect
significant pressure loss in a tyre. If the speed
of rotation of a wheel changes as a result of
a loss of pressure, a corresponding warning
message will appear in the multi-function dis-
play. G
Risk of accident
The tyre pressure loss warning system does
not warn you of an incorrectly set tyre pres-
sure. The table on the inside of the fuel filler
flap will help you decide whether the tyre
pressures should be corrected. 226
Tyres and wheelsOperation
* optional
212_AKB; 2; 4, en-GB
mkalafa,
Version: 2.11.8.1 2009-05-05T14:17:16+02:00 - Seite 226
Dateiname: 6515346702_buchblock.pdf; erzeugt am 07. May 2009 14:16:57; WK
Page 230 of 373

The tyre pressure loss warning system does
not replace the need to regularly check your
vehicle's tyre pressures, since an even loss of
pressure on several tyres at the same time
cannot be detected by the tyre pressure loss
warning system.
The tyre pressure monitor is not able to warn
you of a sudden loss of pressure, e.g. if the
tyre is penetrated by a foreign object.
In the event of a sudden loss of pressure, bring
the vehicle to a halt by braking carefully. Do
not make any sudden steering movements
when doing so.
The function of the tyre pressure loss warning
system is limited or delayed if:
R snow chains are fitted to your vehicle's
tyres.
R road conditions are wintry.
R you are driving on sand or gravel.
R you adopt a very sporty driving style (cor-
nering at high speeds or driving with high
rates of acceleration).
R you are towing a very heavy or large trailer.
R you are driving with a heavy load (in the
vehicle or on the roof).
Restarting the tyre pressure loss warn-
ing system Restart the tyre pressure loss warning system
if you have:
R
changed the tyre pressure
R changed the wheels or tyres
R fitted new wheels or tyres
X Before restarting, consult the table of tyre
pressures on the inside of the fuel filler flap
to ensure that the tyre pressure in all four
tyres is set correctly for the respective
operating conditions.
X Observe the notes in the section on tyre
pressures (Y page 225). G
Risk of accident
The tyre pressure loss warning system can
only give reliable warnings if you have set the
correct tyre pressure.
If an incorrect tyre pressure is set, these
incorrect values will be monitored.
A tyre with insufficient pressure results in
vehicle instability when driving, thus increas-
ing the risk of an accident.
X Make sure that the key is in position 2in
the ignition lock.
In the multi-function display you will see the
standard display (Y page 119).
X Press the =or; button to select the
Service menu.
X Press the 9or: button to select
Tyre pressure.
X Press the abutton.
The multi-function display shows the mes-
sage:
Run Flat Indicator active Restart
with OK
If you wish to confirm the restart:
X Press the abutton.
The multi-function display shows the mes-
sage:
Tyre press. now OK?
X Press the 9or: button to select
Yes.
X Press the abutton.
You will see the following message in the
multi-function display:
Run Flat Indicator restarted
After a teach-in period, the tyre pressure
loss warning system will monitor the set
tyre pressures of all four tyres.
If you wish to cancel the restart:
X Press the %button.
or
X When the Tyre press. now OK? message
appears, press 9or: to select
Cancel. Tyres and wheels
227Operation
212_AKB; 2; 4, en-GB
mkalafa, Version: 2.11.8.1 2009-05-05T14:17:16+02:00 - Seite 227 Z
Dateiname: 6515346702_buchblock.pdf; erzeugt am 07. May 2009 14:16:57; WK