2009 MERCEDES-BENZ E-CLASS SALOON remote control
[x] Cancel search: remote controlPage 8 of 373

ASSYST PLUS service interval dis-
play ..................................................... 239
Calling up the date (on-board
computer) ...................................... 239
Display message ............................ 239
ATA (anti-theft alarm system) ............65
Switching off the alarm ....................66
ATTENTION ASSIST ...........................163
Activating/deactivating (on-
board computer) ............................ 130
Display message ............................ 265
AUTO lights
Display message ............................ 271
Automatic car wash ..........................240
Automatic engine start With ECO Start/Stop function .......109
Automatic engine switch-off
Using the ECO Start/Stop func-
tion ................................................ 108
Automatic lane recognition system
see Lane Keeping Assist ................130
Automatic transmission
Changing gear yoursel f.................. 112
Display message ............................ 253
Driving tips .................................... 114
Emergency running mode ..............293
Kickdown ....................................... 114
Malfunction ................................... .293
One-touch gearshifting ..................112
Program selector button ................113
Releasing the parking lock man-
ually ............................................... 301
Selector lever positions .................111
Shift ranges ................................... 113
Trailer towing ................................. 114
Auxiliary heating ............................... 181
Display message ............................ 276
Notes ............................................. 181
Remote control .............................. 182
Setting (on-board computer) .......... 135
Auxiliary ventilation ..........................181 B
Backrest Display message ............................ 277
Bag hook ............................................ 200Ball coupling
Folding in ....................................... 237
Folding out ..................................... 234
BAS (Brake Assist) ............................... 59
BAS PLUS (Brake Assist System
Plus*) .................................................... 59
Battery Changing (auxiliary heating
remote control) .............................. 304
Changing (key )............................... 304
Charging ........................................ 322
Checking (key) ............................... 304
Check lamp (key )........................... 304
Disconnecting ................................ 321
Display message ...........253, 265, 274
Fitting the battery ..........................323
Jump-starting ................................. 323
Maintenance (vehicle) .................... 319
Reconnecting ................................. 323
Removing/fitting ........................... 322
Vehicle battery .............................. 319
Belt force limiters
Activation ......................................... 37
Belt height adjustment .......................91
Belt tensioners Activation ......................................... 37
Belt warning ......................................... 91
Blind Spot Assist ............................... 167
Activating/deactivating (on-
board computer) ............................ 130
Display message ............................ 261
Indicator lamp ................................ 280
Trailer towing ................................. 169
Warning lamp ................................. 280
BlueTEC
AdBlue ®
......................................... 335
Bonnet
Active bonnet (pedestrian protec-
tion) ............................................... 219
Bonnet catch ................................. 220
Display message ............................ 263
Opening/closing ........................... 219
Resetting the active bonnet
(pedestrian protection) after
being triggered .............................. 302
Bonnet release lever
Release leve r................................. 220 Index
5 212_AKB; 2; 4, en-GB
mkalafa,
Version: 2.11.8.1 2009-05-05T14:17:16+02:00 - Seite 5Dateiname: 6515346702_buchblock.pdf; erzeugt am 07. May 2009 14:15:26; WK
Page 13 of 373

G
Garage door Opening/closing (with the remote
control) .......................................... 213
Garage door opener ..........................211
Clearing the memory .....................213
Frequencies ................................... 359
Programming the remote control ...212
Gear indicator ............................ 111, 112
Gear indicator (on-board com-
puter) ................................................. .122
Gearshift program SETUP (on-board computer) ..........123
Genuine Mercedes-Benz parts .........330
Glove compartment ..........................188 H
Headlamp cleaning system ..............222
Headlamps Cleaning ......................................... 242
Cleaning system .............................. 98
Misting up ...................................... 294
Head restraints
Adjusting (front) ......................... 77, 78
Adjusting (rear) ................................ 79
Luxury .............................................. 81
NECK-PRO ....................................... 43
Removing (rear) ............................... 79
Resetting triggered NECK-PRO
head restraints .............................. 303
Heating
see Air conditioning
High-pressure cleaners ....................241
Hill start assist .................................. 106
HOLD function ................................... 151
Display message ...........253, 257, 267
HomeLink ®
see Garage door opener
Hook ................................................... 200I
Immobiliser .......................................... 65
Indicator and warning lamp Automatic child seat recognition
(malfunction) ................................. 280
Brakes (red) ................................... 284PASSENGER AIRBAG OFF
........45, 280
Reserve fuel ................................... 287
SRS .......................................... 37, 283
Thermotronic (malfunction) ...........279
Indicator and warning lamps ...........281
Coolant .......................................... 284
Engine diagnostics .........................285
Seat belt ........................................ 286
Indicator lamps
see Warning and indicator lamps
Instrument cluster ............................117
On-board computer .......................131
Overview .......................................... 27
Instrument lighting .............................27
see Instrument cluster lighting
Integrated child seat ...........................53
Intelligent Light System Display message .................... 257, 272
On-board computer .......................133
Tourist mode .................................. 133
Interior lighting
Automatic control system ................99
Delayed switch-off (on-board
computer) ...................................... 134
Emergency lighting ..........................99
Manual control ................................ .99
Reading lamp ................................... 99
Setting ambient lighting (on-board
computer) ...................................... 133
Interior motion sensor ........................67
ISOFIX child seat securing system ....51 J
Jack Operation ....................................... 315
Storage location ............................ 249
Jump-starting ..................................... 323
Jump leads ..................................... 323 K
Key ........................................................ 70
Changing the battery .....................304
Checking the battery .....................304
Convenience closing ......................102
Convenience opening ....................102
Display message ............................ 27410
Index 212_AKB; 2; 4, en-GB
mkalafa,
Version: 2.11.8.1 2009-05-05T14:17:16+02:00 - Seite 10Dateiname: 6515346702_buchblock.pdf; erzeugt am 07. May 2009 14:15:27; WK
Page 17 of 373

Rear window heating
........................179
Rear window wiper ...........................100
Replacing the wiper blade .............. 309
Refuelling ........................................... 216
Remote control Auxiliary heating ............................ 182
Changing the batteries (auxiliary
heating) ......................................... 304
Garage door opene r....................... 211
Programming (garage door
opener) .......................................... 212
Reserve fuel ....................................... 334
Display message ............................ 278
Fuel tank ........................................ 334
Warning lamp ................................. 287
Restraint system
See SRS .......................................... 37
Restraint systems
For children ..................................... 44
Rev counter ........................................ 117
Reverse gear Engaging (manual transmission) ....110
Reversing camera ............................. 162
Cleaning ......................................... 243
Reversing lamps
Display message ............................ 273
Roller blind
see Roller sunblind
Roller sunblind
Panorama sliding sunroo f.............. 187
Rear side windows .........................207
Rear window .................................. 208
Roof carrier ....................................... 206
Roof load (maximum) ........................339
Route see Route guidance .......................125
Route guidance
On-board computer .......................125 S
Safety net .......................................... .200
Seat Adjusting ................................... 76, 77
Correct driver's seat position ........... 92
Storing settings ............................... 87
Seat backrest (rear)
Folding forwards/back ..................196Seat belt
Adjusting the driver's and front-
passenger seat belt .........................90
Adjusting the height ......................... 91
Centre rear-compartment sea t........ 90
Display message ......................91, 263
Fastening ......................................... 89
Switching belt adjustment on/off
(on-board computer) ......................136
Warning lamp ........................... 91, 286
Seat covers
Cleaning ......................................... 244
Seat heating ........................................ .81
Seat ventilation ................................... 81
Malfunction indicator lamp ............279
Securing a load .................................. 197
Selector lever Display message ............................ 253
Selector lever positions ....................112
Sensors Cleaning ......................................... 243
Service indicator
see ASSYST PLUS service interval
displa y........................................... 239
Service products ............................... 333
AdBlue ®
additives .......................... 335
Brake fluid ..................................... 338
Coolant .......................................... 338
Engine oil ....................................... 336
Fuel ................................................ 334
Windscreen washer fluid ................339
Settings
Calling up a stored setting ...............88
Factory (on-board computer) .........137
On-board computer .......................131
SETUP (on-board computer) .............123
Shift ranges ....................................... 113
Sidebag ................................................ 41
Side marker lamp Display message ............................ 273
Side windows
Convenience closing ......................102
Convenience opening ....................102
Fault .............................................. 295
Opening/closing ............................ 100
Skibag ................................................ 193
Ski rack .............................................. 20614
Index 212_AKB; 2; 4, en-GB
mkalafa,
Version: 2.11.8.1 2009-05-05T14:17:16+02:00 - Seite 14Dateiname: 6515346702_buchblock.pdf; erzeugt am 07. May 2009 14:15:27; WK
Page 76 of 373

X
To close: pull down the boot lid/tailgate
using recess :or;.
X Lock the vehicle, if necessary, with
the & button on the key.
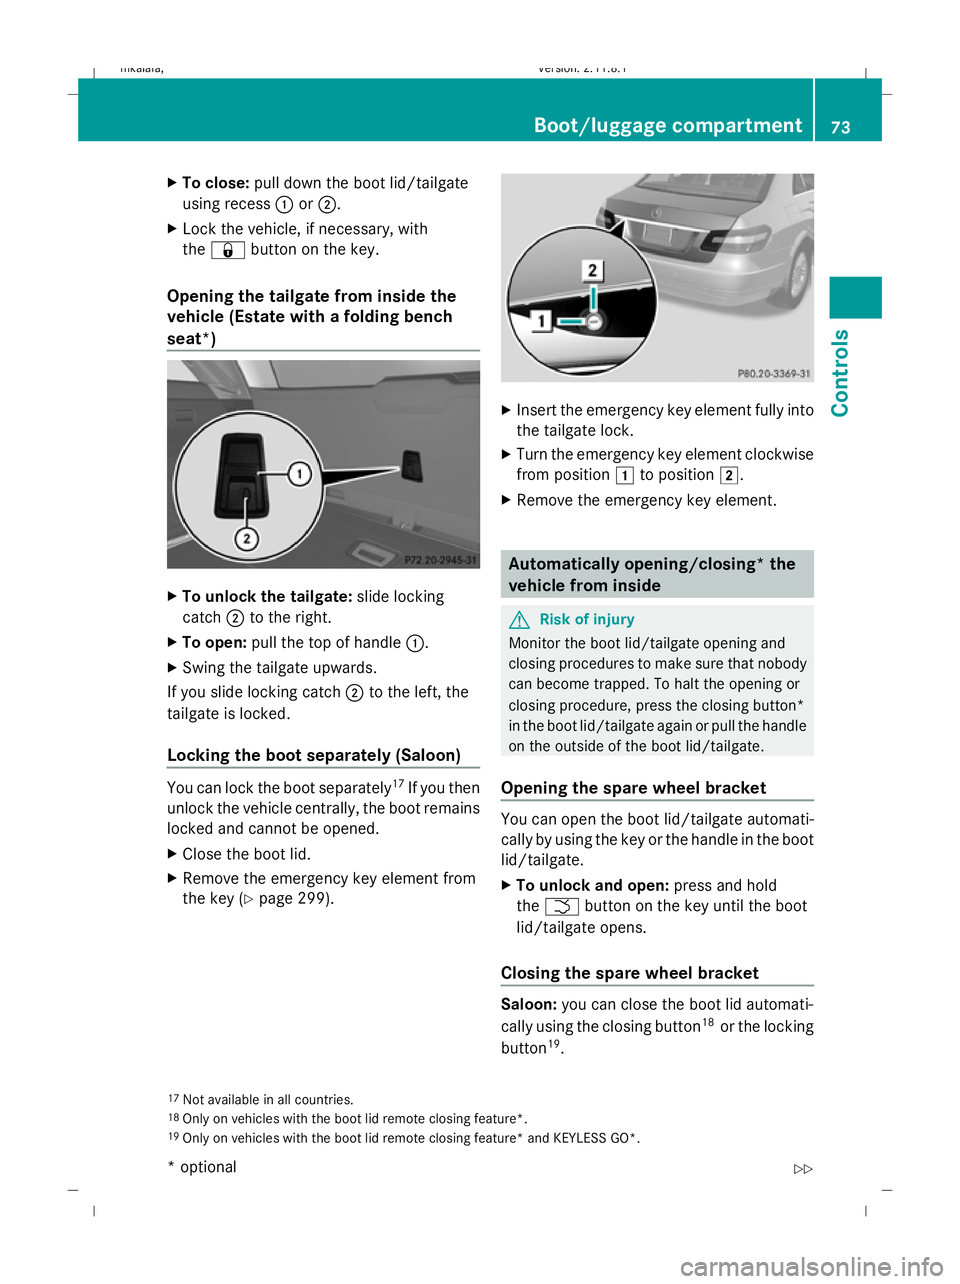
Opening the tailgate from inside the
vehicle (Estate with a folding bench
seat*) X
To unlock the tailgate: slide locking
catch ;to the right.
X To open: pull the top of handle :.
X Swing the tailgate upwards.
If you slide locking catch ;to the left, the
tailgate is locked.
Locking the boot separately (Saloon) You can lock the boot separately
17
If you then
unlock the vehicle centrally, the boot remains
locked and cannot be opened.
X Close the boot lid.
X Remove the emergency key element from
the key (Y page 299). X
Insert the emergency key element fully into
the tailgate lock.
X Turn the emergency key element clockwise
from position 1to position 2.
X Remove the emergency key element. Automatically opening/closing* the
vehicle from inside
G
Risk of injury
Monitor the boot lid/tailgate opening and
closing procedures to make sure that nobody
can become trapped. To halt the opening or
closing procedure, press the closing button*
in the boot lid/tailgate again or pull the handle
on the outside of the boot lid/tailgate.
Opening the spare wheel bracket You can open the boot lid/tailgate automati-
cally by using the key or the handle in the boot
lid/tailgate.
X
To unlock and open: press and hold
the F button on the key until the boot
lid/tailgate opens.
Closing the spare wheel bracket Saloon:
you can close the boot lid automati-
cally using the closing button 18
or the locking
button 19
.
17 Not available in all countries.
18 Only on vehicles with the boot lid remote closing feature*.
19 Only on vehicles with the boot lid remote closing feature* and KEYLESS GO*. Boot/luggage compartment
73Controls
* optional
212_AKB; 2; 4, en-GB
mkalafa,
Version: 2.11.8.1 2009-05-05T14:17:16+02:00 - Seite 73 Z
Dateiname: 6515346702_buchblock.pdf; erzeugt am 07. May 2009 14:15:47; WK
Page 77 of 373

Estate:
you can close the tailgate automati-
cally using either the closing button or the
locking button 20
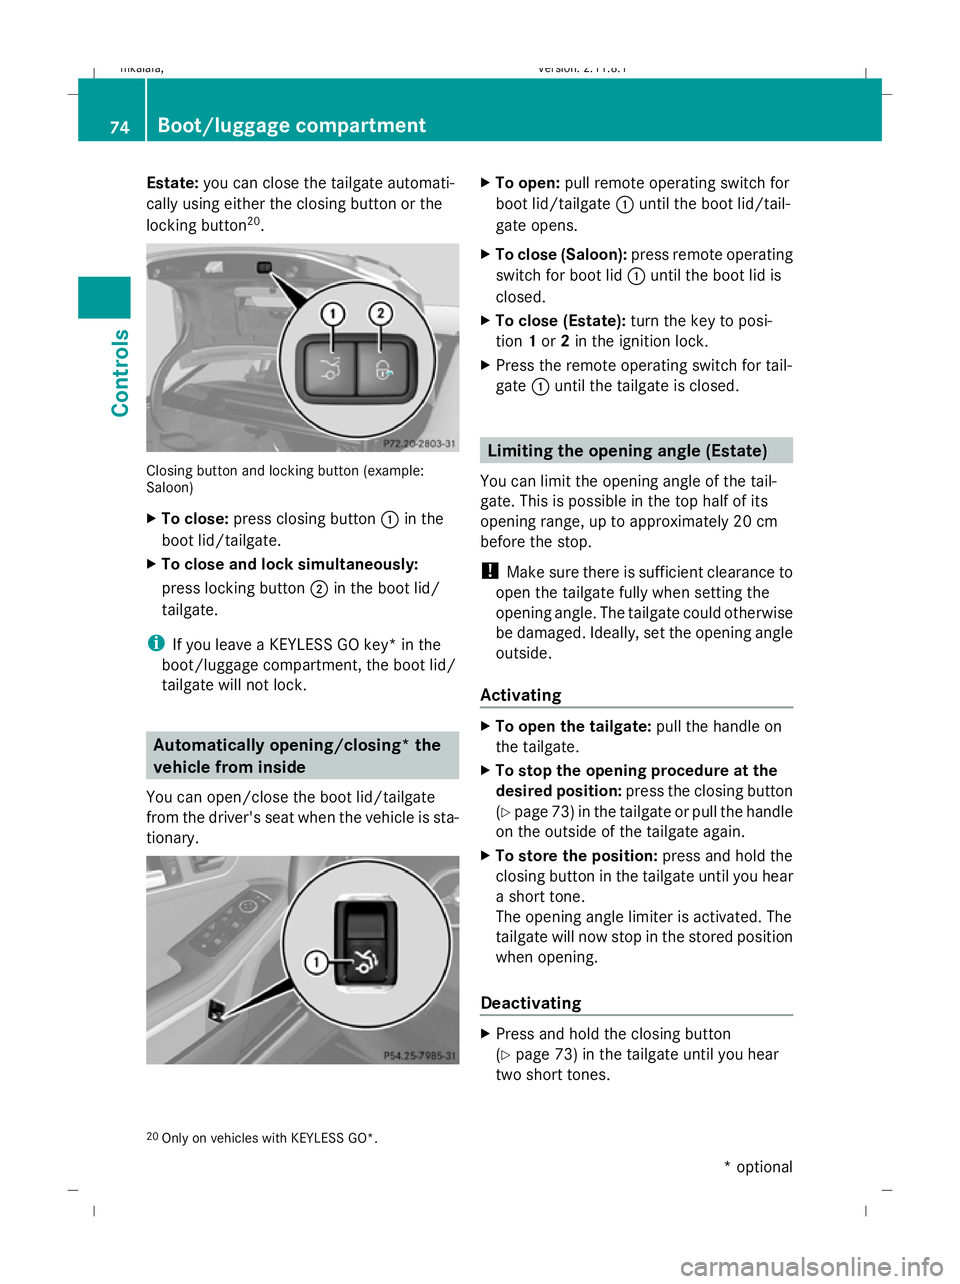
. Closing button and locking button (example:
Saloon)
X To close: press closing button :in the
boot lid/tailgate.
X To close and lock simultaneously:
press locking button ;in the boot lid/
tailgate.
i If you leave a KEYLESS GO key* in the
boot/luggage compartment, the boot lid/
tailgate will not lock. Automatically opening/closing* the
vehicle from inside
You can open/close the boot lid/tailgate
from the driver's seat when the vehicle is sta-
tionary. X
To open: pull remote operating switch for
boot lid/tailgate :until the boot lid/tail-
gate opens.
X To close (Saloon): press remote operating
switch for boot lid :until the boot lid is
closed.
X To close (Estate): turn the key to posi-
tion 1or 2in the ignition lock.
X Press the remote operating switch for tail-
gate :until the tailgate is closed. Limiting the opening angle (Estate)
You can limit the opening angle of the tail-
gate. This is possible in the top half of its
opening range, up to approximately 20 cm
before the stop.
! Make sure there is sufficient clearance to
open the tailgate fully when setting the
opening angle. The tailgate could otherwise
be damaged. Ideally, set the opening angle
outside.
Activating X
To open the tailgate: pull the handle on
the tailgate.
X To stop the opening procedure at the
desired position: press the closing button
(Y page 73 )in the tailgate or pull the handle
on the outside of the tailgate again.
X To store the position: press and hold the
closing button in the tailgate until you hear
a short tone.
The opening angle limiter is activated. The
tailgate will now stop in the stored position
when opening.
Deactivating X
Press and hold the closing button
(Y page 73) in the tailgate until you hear
two short tones.
20 Only on vehicles with KEYLESS GO*. 74
Boot/luggage compartmentControls
* optional
212_AKB; 2; 4, en-GB
mkalafa,
Version: 2.11.8.1 2009-05-05T14:17:16+02:00 - Seite 74
Dateiname: 6515346702_buchblock.pdf; erzeugt am 07. May 2009 14:15:48; WK
Page 138 of 373

X
Press the abutton to confirm.
X Press the :or9 button to select the
Automatic door locks: function.
You will see the selected setting: onor
off.
X Press the abutton to save the setting.
Activating/deactivating the radar sensor
system*
i You must deactivate the radar sensor sys-
tem in certain countries and near radio
telescope facilities. You will find further
information under "Radar sensor system"
in the index.
Vehicles with a navigation system*: the radar
sensor system is deactivated automatically if
you are close to radio telescope facilities.
The following systems are switched off when
the radar sensor system is deactivated:
R Distronic Plus* (Y page 140)
R BAS PLUS* (Y page 59)
R PRE-SAFE ®
Brake* (Y page 63)
R Blind Spot Assist* (Y page 167)
X Press the =or; button on the steer-
ing wheel to select the Settingsmenu.
X Press the :or9 button to select the
Vehicle submenu.
X Press the abutton to confirm.
X Press the 9or: button to select the
Radar sensor (See Owner's Man.):
You will see the selected setting: onor
off.
X Press the abutton to save the setting.
Heating* Auxiliary heating* departure time
Only vehicles with auxiliary heating have this
submenu.
In the
Heating submenu, you can select a
stored departure time or change a departure time, at which the vehicle is preheated by the
auxiliary heating.
The auxiliary heating timer function calcu-
lates the switch-on time according to the out-
side temperature so that the vehicle is pre-
heated by the departure time. When the
departure time is reached, the auxiliary heat-
ing continues to heat for a further five
minutes and then switches off. The auxiliary
heating adopts the 2-zone Thermatic or the
3-zone Thermotronic *temperature settings.
You can switch off the auxiliary heating by
using the remote control or the auxiliary heat-
ing button on the centre console. G
Risk of poisoning
Exhaust fumes are produced when the auxili-
ary heating is in operation. Inhaling these
exhaust fumes can be poisonous. You should
therefore switch off the auxiliary heating in
confined spaces without an extraction sys-
tem, e.g. a garage. G
Risk of fire
When the auxiliary heating is in operation,
parts of the vehicle can become very hot.
Make sure that the exhaust system does
not under any circumstances come into con-
tact with highly flammable materials such as
dry grass or fuels. The highly flammable mate-
rial could otherwise ignite and set the vehicle
alight. Select your parking space accordingly.
Operating the auxiliary heating is therefore
prohibited at filling stations or when your vehi-
cle is being refuelled. Always switch off the
auxiliary heating at filling stations.
Selecting the departure time or deactivat-
ing a selected departure time
X Press the =or; button on the steer-
ing wheel to select the Settingsmenu.
X Press the :or9 button to select the
Heating submenu.
X Press the abutton to confirm.
You will see the selected setting.
X Press the abutton to confirm. On-board computer
135Controls
* optional
212_AKB; 2; 4, en-GB
mkalafa
,V ersion: 2.11.8.1
2009-05-05T14:17:16+02:00 - Seite 135 Z
Dateiname: 6515346702_buchblock.pdf; erzeugt am 07. May 2009 14:16:16; WK
Page 185 of 373

mode to heating mode or from heating mode
to ventilation mode.
You cannot use the auxiliary ventilation to
cool the vehicle interior to a temperature
lower than the outside temperature.
Before activating X
Turn the key to position 2in the ignition
lock.
X Set the temperature.
The auxiliary heating/ventilation can be acti-
vated even when the air conditioning is being
controlled manually. Optimum comfort can
be attained when the system is set to auto-
matic mode. Set the temperature to 22 †.
The auxiliary heating/ventilation can be acti-
vated or deactivated using the remote control
or the button on the centre console.
The on-board computer can be used to spec-
ify up to three departure times, one of which
may be preselected (Y page 135).
Switching the auxiliary heating/venti-
lation on/off using the button on the
centre console The colours of the indicator lamps on the but-
ton have the following meanings:
Blue Auxiliary ventilation activated
Red Auxiliary heating activated
Yellow Departure time preselected (Ypage 135) X
Press button :.
The red or blue indicator lamp in but-
ton :comes on or goes out.
Switching the auxiliary heating/venti-
lation on/off using the remote control Your vehicle comes with one remote control.
You may use two additional remote controls
for your vehicle. For further information, con-
sult a qualified specialist workshop, e.g. a
Mercedes-Benz Service Centre.
The remote control has a maximum range of
approximately 300 metres. This range is
reduced by:
R
sources of radio interference
R solid objects between the remote control
and the vehicle
R the remote control being in an unfavoura-
ble position in relation to the vehicle
R transmitting from an enclosed space
i The optimum range can be achieved if you
hold the remote control vertically, pointing
upwards when you press one of the but-
tons.
i A battery symbol appears in the display
when the batteries in the remote control
are low. Replace the remote control bat-
teries (Y page 304). 182
Air conditioningControls
212_AKB; 2; 4, en-GB
mkalafa,
Version: 2.11.8.1 2009-05-05T14:17:16+02:00 - Seite 182
Dateiname: 6515346702_buchblock.pdf; erzeugt am 07. May 2009 14:16:31; WK
Page 186 of 373

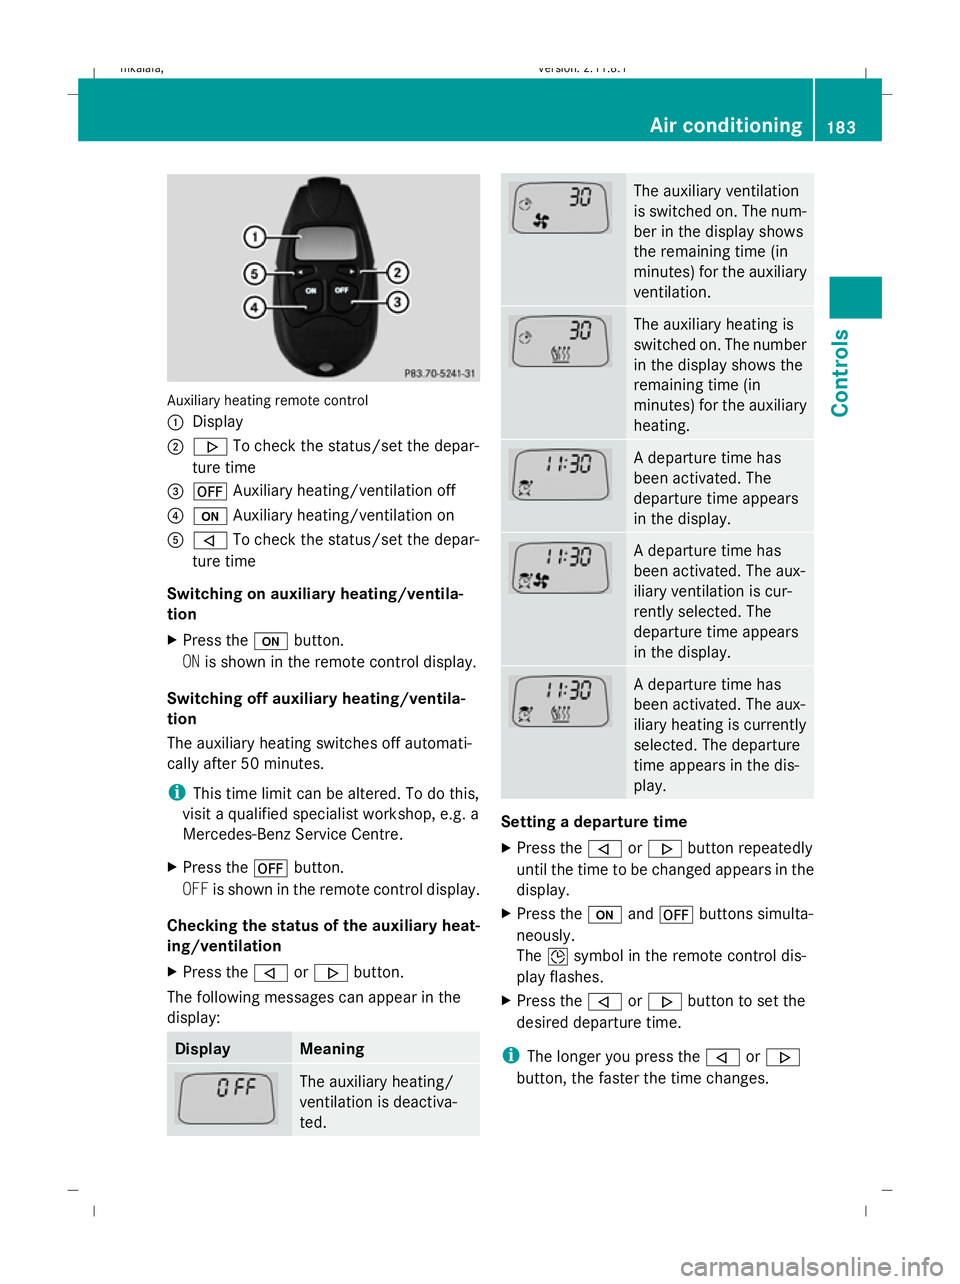
Auxiliary heating remote control
:
Display
; . To check the status/set the depar-
ture time
= ^ Auxiliary heating/ventilation off
? u Auxiliary heating/ventilation on
A , To check the status/set the depar-
ture time
Switching on auxiliary heating/ventila-
tion
X Press the ubutton.
ON is shown in the remote control display.
Switching off auxiliary heating/ventila-
tion
The auxiliary heating switches off automati-
cally after 50 minutes.
i This time limit can be altered. To do this,
visit a qualified specialist workshop, e.g. a
Mercedes-Benz Service Centre.
X Press the ^button.
OFF is shown in the remote control display.
Checking the status of the auxiliary heat-
ing/ventilation
X Press the ,or. button.
The following messages can appear in the
display: Display Meaning
The auxiliary heating/
ventilation is deactiva-
ted. The auxiliary ventilation
is switched on. The num-
ber in the display shows
the remaining time (in
minutes) for the auxiliary
ventilation.
The auxiliary heating is
switched on. The number
in the display shows the
remaining time (in
minutes) for the auxiliary
heating.
A departure time has
been activated. The
departure time appears
in the display.
A departure time has
been activated. The aux-
iliary ventilation is cur-
rently selected. The
departure time appears
in the display.
A departure time has
been activated. The aux-
iliary heating is currently
selected. The departure
time appears in the dis-
play.
Setting a departure time
X
Press the ,or. button repeatedly
until the time to be changed appears in the
display.
X Press the uand^ buttons simulta-
neously.
The Îsymbol in the remote control dis-
play flashes.
X Press the ,or. button to set the
desired departure time.
i The longer you press the ,or.
button, the faster the time changes. Air conditioning
183Controls
212_AKB; 2; 4, en-GB
mkalafa,V ersion: 2.11.8.1
2009-05-05T14:17:16+02:00 - Seite 183 Z
Dateiname: 6515346702_buchblock.pdf; erzeugt am 07. May 2009 14:16:32; WK