2009 MERCEDES-BENZ E-CLASS SALOON mirror controls
[x] Cancel search: mirror controlsPage 72 of 373
Opening and closing
...........................70
Boot/luggage compartment ..............72
Key positions ....................................... 75
Seats .................................................... 76
Steering wheel .................................... 84
Mirrors ................................................. 86
Memory functions* .............................87
Seat belts ............................................. 89
Lights ................................................... 93
Windscreen wipers .............................99
Side windows .................................... 100
Driving and parking ..........................103
Transmission ..................................... 110
Instrument cluster ............................117
On-board computer ..........................118
Driving systems ................................ 137
Air conditioning ................................. 171
Sliding sunroof .................................. 184
Loading and stowing ........................187
Features ............................................. 207 69Controls
212_AKB; 2; 4, en-GB
mkalafa,
Version: 2.11.8.1 2009-05-05T14:17:16+02:00 - Seite 69
Dateiname: 6515346702_buchblock.pdf; erzeugt am 07. May 2009 14:15:46; WK
Page 89 of 373
position of the key in the ignition lock. This
makes it easier to exit the vehicle and res-
cue the occupants. Mirrors
Rear-view mirror
X Adjust the rear-view mirror by hand so you
have a good overview of the traffic condi-
tions.
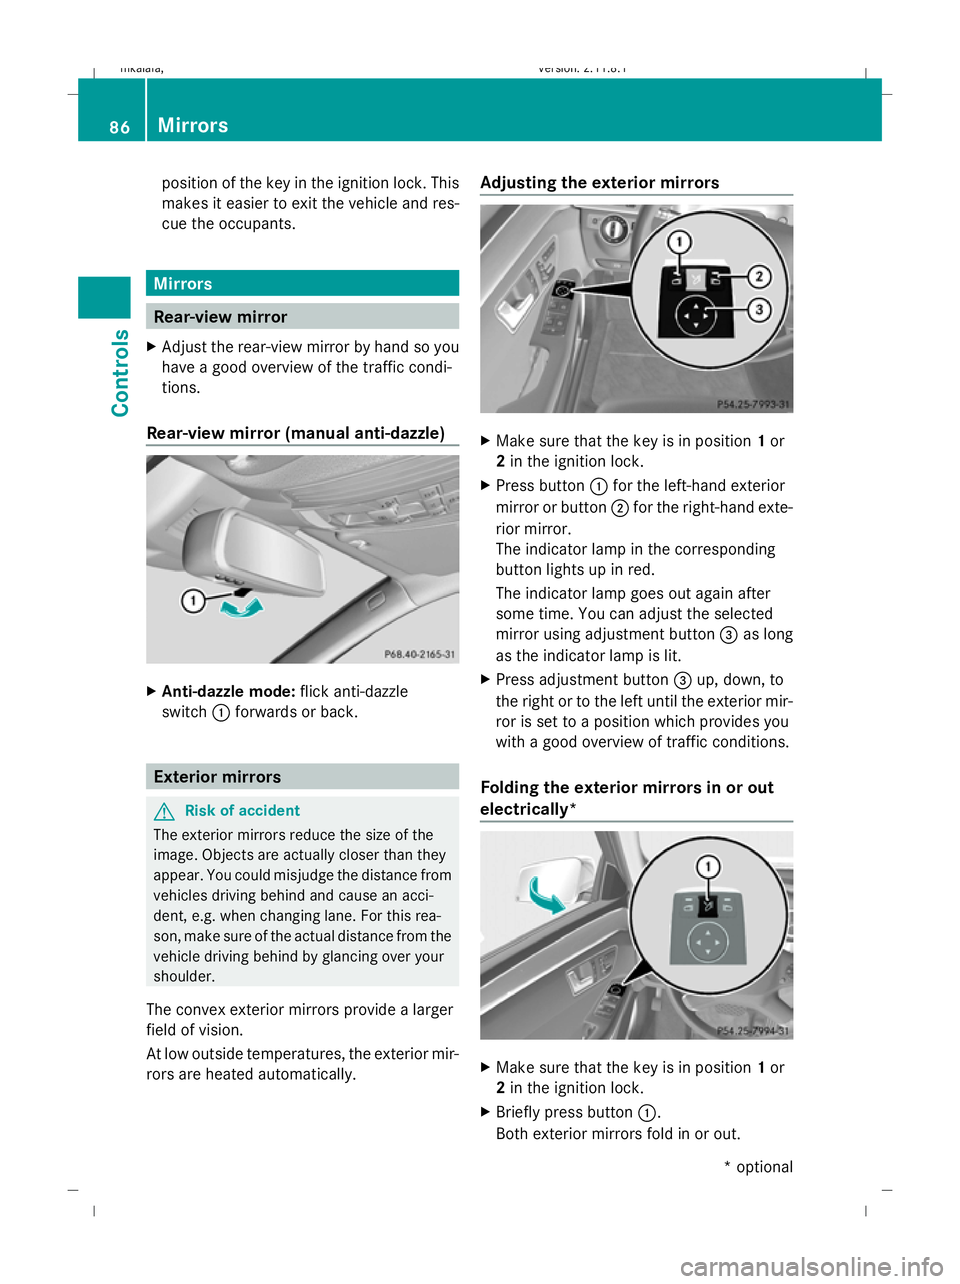
Rear-view mirror (manual anti-dazzle) X
Anti-dazzle mode: flick anti-dazzle
switch :forwards or back. Exterior mirrors
G
Risk of accident
The exterior mirrors reduce the size of the
image. Objects are actually closer than they
appear. You could misjudge the distance from
vehicles driving behind and cause an acci-
dent, e.g. when changing lane. For this rea-
son, make sure of the actual distance from the
vehicle driving behind by glancing over your
shoulder.
The convex exterior mirrors provide a larger
field of vision.
At low outside temperatures, the exterior mir-
rors are heated automatically. Adjusting the exterior mirrors
X
Make sure that the key is in position 1or
2 in the ignition lock.
X Press button :for the left-hand exterior
mirror or button ;for the right-hand exte-
rior mirror.
The indicator lamp in the corresponding
button lights up in red.
The indicator lamp goes out again after
some time. You can adjust the selected
mirror using adjustment button =as long
as the indicator lamp is lit.
X Press adjustment button =up, down, to
the right or to the left until the exterior mir-
ror is set to a position which provides you
with a good overview of traffic conditions.
Folding the exterior mirrors in or out
electrically* X
Make sure that the key is in position 1or
2 in the ignition lock.
X Briefly press button :.
Both exterior mirrors fold in or out. 86
MirrorsControls
* optional
212_AKB; 2; 4, en-GB
mkalafa,
Version: 2.11.8.1 2009-05-05T14:17:16+02:00 - Seite 86
Dateiname: 6515346702_buchblock.pdf; erzeugt am 07. May 2009 14:15:56; WK
Page 90 of 373

i
Make sure that the exterior mirrors are
always folded out fully while the vehicle is
in motion; otherwise, they may vibrate.
Resetting the exterior mirrors If the battery has been disconnected or has
become discharged, the exterior mirrors
must be reset. Otherwise, the exterior mirrors
will not fold in when you select the "Fold in
mirrors when locking" function in the on-
board computer (Y page 136).
X Make sure that the key is in position 1in
the ignition lock.
X Briefly press button :.
Automatically folding exterior mirrors
in or out* If the "Fold in mirrors when locking" function
is activated in the on-board computer
(Y
page 136):
R the exterior mirrors fold in automatically as
soon as you lock the vehicle from the out-
side.
R the exterior mirrors fold out again automat-
ically as soon as you unlock the vehicle and
then open the driver's or front-passenger
door.
i If you have activated this function and fold
in the exterior mirrors using button :, they
will not be folded out automatically. You
can only fold out the exterior mirrors again
using button :. Automatic anti-dazzle mirrors*
The rear-view mirror and the exterior mirror
on the driver's side automatically go into anti-
dazzle mode if the ignition is switched on and
incident light from headlamps strikes the sen-
sor in the rear-view mirror.
The mirrors do not go into anti-dazzle mode if
reverse gear is engaged or the interior lighting
is switched on. G
Risk of accident
If the incident light from headlamps cannot
strike the sensor in the rear-view mirror, for
instance, when the rear window blind* is
extended, the mirror's automatic anti-dazzle
function will not operate.
Incident light could then dazzle you. This may
distract you from the traffic conditions, and
you may, thereby, cause an accident. In this
case, adjust the rear-view mirror manually. Memory functions*
Storing settings
Using the memory button you can store up to
three different settings, e. g. for three differ-
ent people.
The following settings are stored as a single
memory preset:
R position of the seat, backrest and head
restraint
R active multicontour seat*: dynamic func-
tion level
R driver's side: steering wheel position
R driver's side: position of the exterior mir-
rors on the driver's and front-passenger
sides G
Risk of injury
The memory function can still be used when
the key has been removed. For this reason,
children should never be left unsupervised in
the vehicle. Otherwise, they could become
trapped when moving the seat or the steering
wheel. G
Risk of accident
Only use the memory function on the driver’s
side when the vehicle is stationary. Other-
wise, you could be distracted from the traffic
conditions by the steering wheel and seat
moving of their own accord, and as a result
cause an accident. Memory functions*
87Controls
* optional
212_AKB; 2; 4, en-GB
mkalafa,
Version: 2.11.8.1 2009-05-05T14:17:16+02:00 - Seite 87 Z
Dateiname: 6515346702_buchblock.pdf; erzeugt am 07. May 2009 14:15:56; WK
Page 91 of 373
X
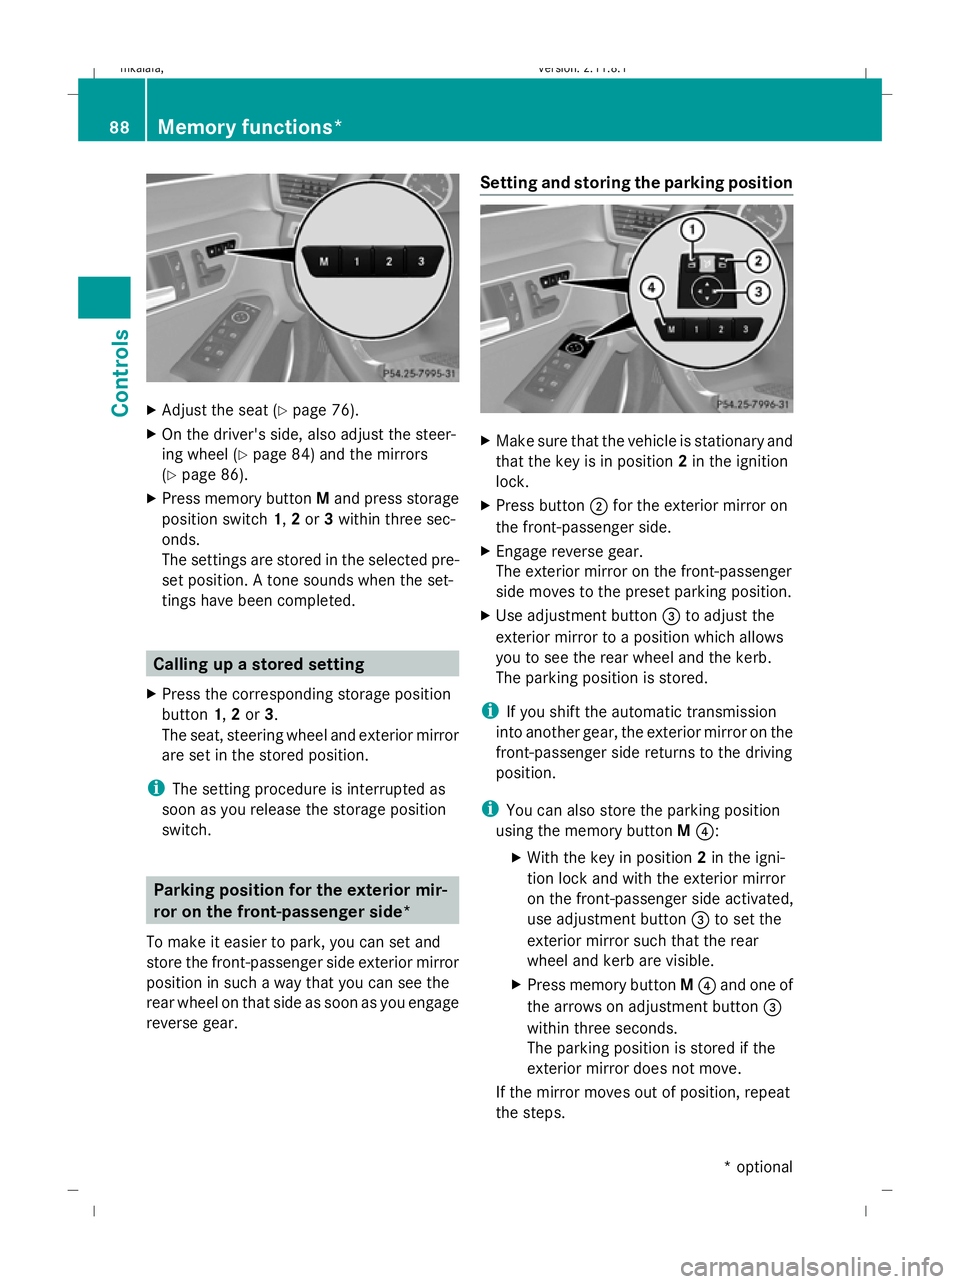
Adjust the seat ( Ypage 76).
X On the driver's side, also adjust the steer-
ing wheel (Y page 84) and the mirrors
(Y page 86).
X Press memory button Mand press storage
position switch 1,2or 3within three sec-
onds.
The settings are stored in the selected pre-
set position. A tone sounds when the set-
tings have been completed. Calling up a stored setting
X Press the corresponding storage position
button 1,2or 3.
The seat, steering wheel and exterior mirror
are set in the stored position.
i The setting procedure is interrupted as
soon as you release the storage position
switch. Parking position for the exterior mir-
ror on the front-passenger side*
To make it easier to park, you can set and
store the front-passenger side exterior mirror
position in such a way that you can see the
rear wheel on that side as soon as you engage
reverse gear. Setting and storing the parking position
X
Make sure that the vehicle is stationary and
that the key is in position 2in the ignition
lock.
X Press button ;for the exterior mirror on
the front-passenger side.
X Engage reverse gear.
The exterior mirror on the front-passenger
side moves to the preset parking position.
X Use adjustment button =to adjust the
exterior mirror to a position which allows
you to see the rear wheel and the kerb.
The parking position is stored.
i If you shift the automatic transmission
into another gear, the exterior mirror on the
front-passenger side returns to the driving
position.
i You can also store the parking position
using the memory button M?:
X With the key in position 2in the igni-
tion lock and with the exterior mirror
on the front-passenger side activated,
use adjustment button =to set the
exterior mirror such that the rear
wheel and kerb are visible.
X Press memory button M? and one of
the arrows on adjustment button =
within three seconds.
The parking position is stored if the
exterior mirror does not move.
If the mirror moves out of position, repeat
the steps. 88
Memory functions*Controls
* optional
212_AKB; 2; 4, en-GB
mkalafa,
Version: 2.11.8.1 2009-05-05T14:17:16+02:00 - Seite 88
Dateiname: 6515346702_buchblock.pdf; erzeugt am 07. May 2009 14:15:57; WK
Page 92 of 373
Calling up the parking position
X
When the key is in position 2in the ignition
lock and the exterior mirror on the front-
passenger side is activated, engage
reverse gear.
The exterior mirror on the front-passenger
side moves to the stored parking position.
The exterior mirror on the front-passenger
side moves back to its original position:
R as soon as you exceed a speed of
10 km/h
R about ten seconds after you have disen-
gaged reverse gear
R if you press button :for the exterior mir-
ror on the driver's side Seat belts
Wearing seat belts
Seat belts are the most effective means of
restraining the movement of vehicle occu-
pants in the event of an accident. This
reduces the risk of vehicle occupants coming
into contact with the vehicle interior. G
Risk of injury
A seat belt which is not worn correctly, or
which has not been engaged in the seat belt
buckle correctly, cannot perform its intended
protective function. Under certain circum-
stances, this could result in severe or even
fatal injuries.
Make sure that all occupants – in particular,
pregnant women – wear their seat belt cor-
rectly at all times.
R The seat belt must pass closely over your
body and must not be twisted. Therefore,
you should avoid wearing bulky clothing
(e.g. a winter coat). The shoulder belt sec-
tion must be routed across the middle of
your shoulder – on no account across your
neck or under your arm – and pulled tight
against your upper body. The lap belt must
always pass across your lap as low down as possible, i.e. over your hip joints – not
across your abdomen. If necessary, push
down the belt strap slightly and then
retighten it in the roll-up direction.
R Do not route the belt strap across sharp or
fragile objects, especially if these are loca-
ted on or in your clothing, e.g. spectacles,
pens, keys, etc. The seat belt strap could
be damaged and tear in an accident, and
you or other vehicle occupants could be
injured.
R Only one person should use each seat belt
at any one time. Children must never travel
sitting on the lap of other occupants. It
would not be possible to restrain the child
in the event of a sudden change in direc-
tion, braking or an accident. This could
result in severe or even fatal injuries to the
child and other occupants.
R Persons less than 1.50 m tall cannot wear
the seat belts correctly. For this reason,
secure persons less than 1.50 m tall in spe-
cially designed, suitable restraint systems.
R Children less than 1.50 m tall or under
12 years of age cannot wear the seat belts
properly. Therefore, they always should be
secured in a suitable child restraint system
on a suitable vehicle seat. You can find
more information under "Children in the
vehicle" in the "Safety" section of the Own-
er's Manual. Follow the manufacturer's
installation instructions when fitting the
child restraint system.
R Do not secure any objects with a seat belt
if the seat belt is also being used by one of
the vehicle's occupants. G
Risk of injury
If the backrest is not almost vertical, the seat
belt does not offer the intended level of pro-
tection. Under certain circumstances, this
could cause severe or even fatal injuries.
Before starting a journey, make sure that the
seat is properly adjusted and that the back-
rest is almost vertical. Seat belts
89Controls
212_AKB; 2; 4, en-GB
mkalafa,V ersion: 2.11.8.1
2009-05-05T14:17:16+02:00 - Seite 89 Z
Dateiname: 6515346702_buchblock.pdf; erzeugt am 07. May 2009 14:15:57; WK
Page 139 of 373
X
Press the :or9 button to select
one of the three departure times or Timer
off (no timer active).
X Press the abutton to confirm.
When a departure time is selected, the yel-
low indicator lamp lights up on the auxiliary
heating button.
Changing the departure time
X Press the =or; button to select the
Settings menu.
X Press the :or9 button to select the
Heating submenu.
X Press the abutton to confirm.
You will see the selected setting.
X Press the abutton to confirm.
X Press the :or9 button to select
Change A, Bor C.
X Press the abutton to confirm.
You can now change the departure time.
X Press the =or; button to select the
display to be changed: hours, minutes.
X Press the :or9 button to set the
selected display.
X Press the abutton to store the entry.
The yellow indicator lamp on the auxiliary
heating button lights up.
Convenience Activating/deactivating the EASY-
ENTRY/EXIT feature*
You can use the
Easy Entry/Exit: function
to activate or deactivate the easy-entry/exit
feature (Y page 85). G
Risk of injury
The steering wheel moves when the EASY-
ENTRY/EXIT feature is active. There is a risk
of occupants becoming trapped. Before acti-
vating the EASY-ENTRY/EXIT feature, make
sure that nobody can become trapped.
Do not leave children unsupervised in the
vehicle, even if they are secured in a child restraint system. The children could open the
driver's door and thereby unintentionally acti-
vate the EASY-ENTRY/EXIT feature and
become trapped.
X Press the =or; button on the steer-
ing wheel to select the Settingsmenu.
X Press the :or9 button to select the
Convenience submenu.
X Press the abutton to confirm.
X Press the :or9 button to select the
Easy Entry/Exit: function.
You will see the selected setting: onor
off.
X Press the abutton to save the setting.
Switching the belt adjustment on/off
X Press the =or; button on the steer-
ing wheel to select the Settingsmenu.
X Press the :or9 button to select the
Convenience submenu.
X Press the abutton to confirm.
X Press the :or9 button to select the
Belt adjustment: function.
You will see the selected setting: onor
off.
X Press the abutton to save the setting.
Switching the fold in mirrors when lock-
ing* function on/off
If you switch on the Fold mirrors in when
locking: function, the exterior mirrors fold
in when you lock the vehicle. When you
unlock the vehicle and then open the driver's
or front-passenger door, the exterior mirrors
fold out again.
If you have switched the function on and you
fold the exterior mirrors in using the button
on the door (Y page 86), they will not fold out
automatically. The exterior mirrors can then
only be folded out using the button on the
door. 136
On-board computerControls
* optional
212_AKB; 2; 4, en-GB
mkalafa,
Version: 2.11.8.1 2009-05-05T14:17:16+02:00 - Seite 136
Dateiname: 6515346702_buchblock.pdf; erzeugt am 07. May 2009 14:16:16; WK
Page 140 of 373
X
Press the =or; button on the steer-
ing wheel to select the Settingsmenu.
X Press the :or9 button to select the
Convenience submenu.
X Press the abutton to confirm.
X Press the :or9 button to select the
Fold in mirrors when locking: func-
tion.
You will see the selected setting: onor
off.
X Press the abutton to save the setting.
Restoring the factory settings For safety reasons, not all functions are reset:
the Limit Speed (winter tyres): func-
tion in permanent Speedtronic can only be set
in the Vehicle submenu. If you want to reset
the Daytime driving lamps: in theLight
submenu, you must turn the key in the igni-
tion lock to position 1.
X Press the =or; button on the steer-
ing wheel to select the Settingsmenu.
X Press the :or9 button to select the
Factory setting submenu.
X Press the abutton to confirm.
The Reset all settings? message
appears.
X Press the :or9 button to select
Yes orNo.
X Press the abutton to confirm the selec-
tion.
If you have selected Yes, the multi-function
display shows a confirmation message. Driving systems
Overview of driving systems
The vehicle's driving systems are described
on the following pages:
R cruise control, Distronic Plus* and Speed-
tronic, which are used to control the speed
of the vehicle
R HOLD function, which makes pulling away
easier, particularly on steep uphill gradi-
ents
R RACE START (E 63 AMG), which makes pull-
ing away on race tracks easier
R AIRMATIC* (except E 63 AMG), which is
used to adjust the vehicle's suspension
system
R AMG RIDE CONTROL sports suspension
(E 63 AMG), which is used to adjust the
vehicle's suspension system
R 4MATIC* (permanent four-wheel drive), for
optimum traction
R PARKTRONIC* and Parking Guidance*,
which assist you in finding a parking space,
as well as when manoeuvring and parking
R reversing camera*, which assists you when
parking and manoeuvring
R ATTENTION ASSIST, which helps you
detect tiredness or increasing lapses in
concentration
R Speed Limit Assist*, which shows you
speed limits that are detected in the multi-
function display
R Night View Assist Plus*, which assists you
when driving in the dark
R lane package*, which assists you with Blind
Spot Assist when changing lanes and warns
you against leaving your lane unintention-
ally with Lane Keeping Assist
The ABS, BAS, BAS PLUS*, adaptive brake
lights, ESP ®
, EBV and ADAPTIVE BRAKE driv-
ing safety systems and the PRE-SAFE ® Driving systems
137Controls
* optional
212_AKB; 2; 4, en-GB
mkalafa,
Version: 2.11.8.1 2009-05-05T14:17:16+02:00 - Seite 137 Z
Dateiname: 6515346702_buchblock.pdf; erzeugt am 07. May 2009 14:16:16; WK
Page 165 of 373
steer in a different direction and then
change gear. In this case, further displays
in the multi-function display will direct you
to the final position.
X Manoeuvre, if necessary.
X Always observe the warning messages dis-
played by PARKTRONIC (Y page 157).
Cancelling Parking Guidance X
Press the PARKTRONIC button on the
centre console (Y page 157).
Parking Guidance is cancelled immediately
and PARKTRONIC is deactivated.
Parking Guidance is cancelled automatically
if it is no longer possible to guide you into the
parking space, or if a malfunction occurs.
The parking space symbol disappears and the
Parking Guidance cancelled message
appears in the multi-function display.
Trailer towing* For vehicles with a trailer coupling, the mini-
mum length for parking spaces is slightly
increased.
If you have attached a trailer to your vehicle,
you should not use Parking Guidance. When
the electrical connection is established
between your vehicle and the trailer, Parking
Guidance ceases to be available. PARK-
TRONIC is deactivated for the rear area. Reversing camera*
The reversing camera is an optical aid. It
shows the area behind your vehicle in the
COMAND APS display. G
Risk of injury
Make sure that no persons or animals are in
the manoeuvring range. Otherwise, they
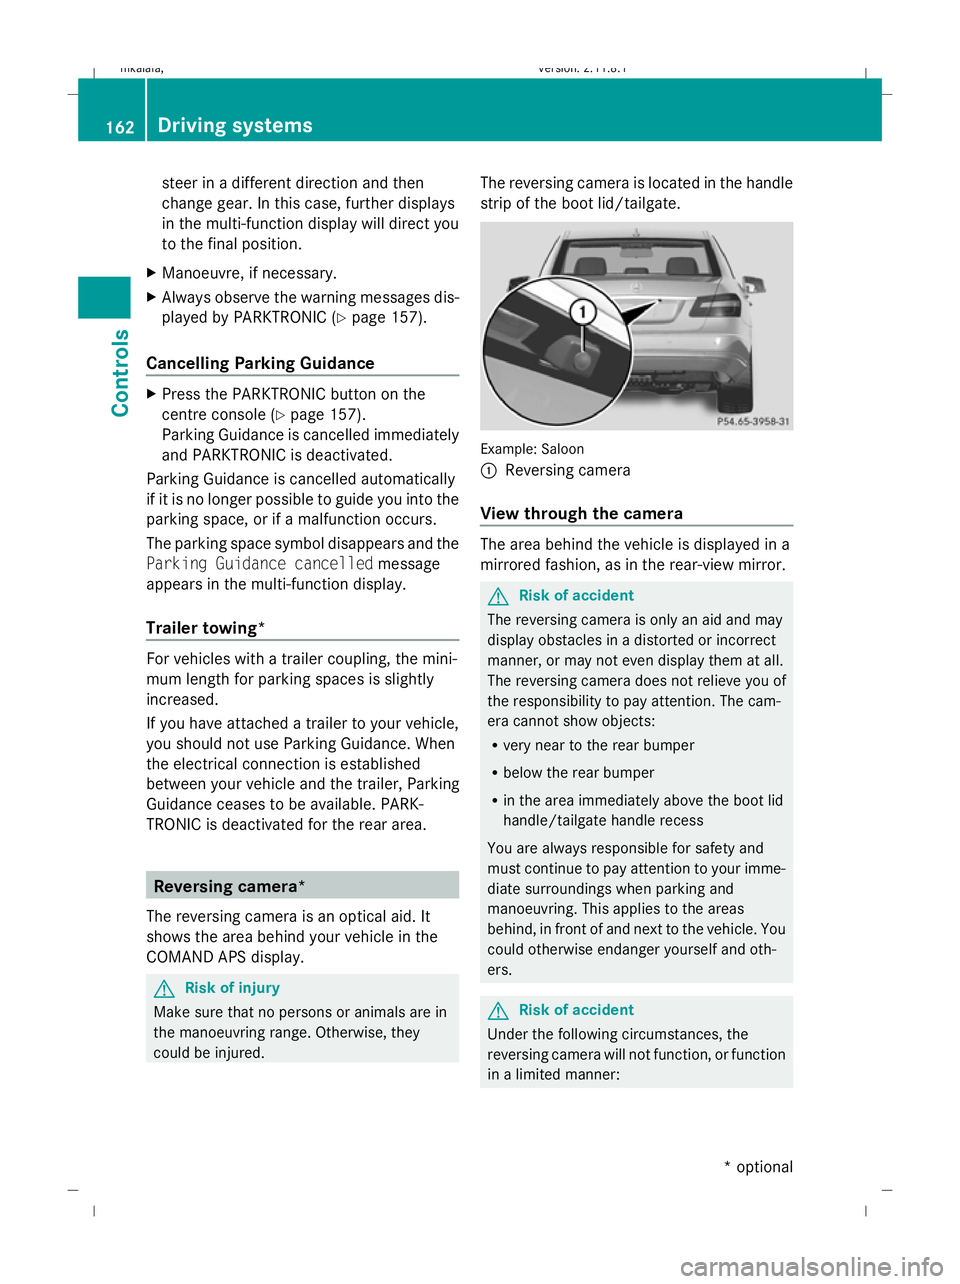
could be injured. The reversing camera is located in the handle
strip of the boot lid/tailgate.
Example: Saloon
:
Reversing camera
View through the camera The area behind the vehicle is displayed in a
mirrored fashion, as in the rear-view mirror.
G
Risk of accident
The reversing camera is only an aid and may
display obstacles in a distorted or incorrect
manner, or may not even display them at all.
The reversing camera does not relieve you of
the responsibility to pay attention. The cam-
era cannot show objects:
R very near to the rear bumper
R below the rear bumper
R in the area immediately above the boot lid
handle/tailgate handle recess
You are always responsible for safety and
must continue to pay attention to your imme-
diate surroundings when parking and
manoeuvring. This applies to the areas
behind, in front of and next to the vehicle. You
could otherwise endanger yourself and oth-
ers. G
Risk of accident
Under the following circumstances, the
reversing camera will not function, or function
in a limited manner: 162
Driving systemsControls
* optional
212_AKB; 2; 4, en-GB
mkalafa,
Version: 2.11.8.1 2009-05-05T14:17:16+02:00 - Seite 162
Dateiname: 6515346702_buchblock.pdf; erzeugt am 07. May 2009 14:16:24; WK