2009 MERCEDES-BENZ E-CLASS SALOON towing
[x] Cancel search: towingPage 234 of 373

and wheels" section in the "Technical data"
chapter.
R snow chains must not be fitted to emer-
gency spare wheels, e.g. a "Minispare"
emergency spare wheel.
R Only fit snow chains in pairs and to the rear
wheels, even on vehicles with 4MATIC*.
Comply with the manufacturer's installa-
tion instructions.
On vehicles with AIRMATIC*, if snow chains
have been fitted, you may only drive at raised
vehicle level (Y page 154).
Do not exceed the maximum permissible
speed of 50 km/h.
i You may wish to deactivate ESP ®
when
pulling away with snow chains fitted
(Y page 60). This way, you can allow the
wheels to spin in a controlled manner, ach-
ieving an increased driving force (cutting
action). Winter driving
G
Risk of accident
Do not shift down for additional engine brak-
ing on a slippery road surface. This could
cause the drive wheels to lose their grip and
the vehicle could skid.
You should drive particularly carefully on slip-
pery road surfaces. Avoid sudden accelera-
tion, steering and braking manoeuvres.
If the vehicle threatens to skid or cannot be
stopped when moving at low speed:
X Vehicles with manual transmission: engage
neutral.
X Vehicles with automatic transmission*:
shift the selector lever to N.
X Try to bring the vehicle under control by
using corrective steering. Driving tips
Rolling with the engine switched off
G
Risk of accident
Never switch the engine off while the vehicle
is in motion.
There is no power assistance for the steering
and the service brake when the engine is not
running.
You will require considerably more effort to
steer and brake and you could therefore lose
control of the vehicle and cause an accident. Brakes
G
Risk of accident
Do not change down for additional engine
braking on a slippery road surface. This could
cause the drive wheels to lose their grip and
the vehicle could skid. G
Risk of accident
Make sure that other road users are not
endangered by your braking.
Downhill gradients On long and steep downhill stretches, espe-
cially if the vehicle is laden or towing a trailer,
you must shift to a lower gear in good time or,
on vehicles with automatic transmission*,
select shift range 1,2or 3.
i This also applies if you have activated
cruise control, Speedtronic or Distronic
Plus*.
This will use the braking effect of the engine,
so less braking will be required to maintain
the speed. This relieves the load on the brake
system and prevents the brakes from over-
heating and wearing too quickly. If you need
additional braking, depress the brake pedal
repeatedly rather than continuously. Driving tips
231Operation
* optional
212_AKB; 2; 4, en-GB
mkalafa
,V ersion: 2.11.8.1
2009-05-05T14:17:16+02:00 - Seite 231 Z
Dateiname: 6515346702_buchblock.pdf; erzeugt am 07. May 2009 14:16:58; WK
Page 237 of 373

Converting dipped-beam headlamps on
vehicles with halogen headlamps :
Protective cap
; Switchover lever
X Turn protective cap :anti-clockwise and
remove it.
X Push switchover lever ;down.
X Insert protective cap :and turn it clock-
wise.
When you are driving back on the same side
of the road as the country where the vehicle
is registered, have the headlamps changed
back to asymmetrical dipped beam as soon
as possible after crossing the border. Trailer towing
Folding out the ball coupling
Before you can tow a trailer with your vehicle,
you must fold out the ball coupling.
The release wheel is located behind the left-
hand side trim panel in the boot/luggage
compartment. G
Risk of accident
Make sure that the ball coupling is engaged,
either in its folded-out or folded-in position,
and that the indicator lamp is off.
Do not turn the release wheel when a trailer
is coupled up. Otherwise, the trailer might
detach. Saloon
Estate
X
To open the cover (saloon): turn han-
dle :anti-clockwise and fold down
cover ;.
X To open the cover (estate): pull han-
dle :in the direction of the arrow and fold
down cover ;. 234
Trailer towingOperation
212_AKB; 2; 4, en-GB
mkalafa
,V ersion: 2.11.8.1
2009-05-05T14:17:16+02:00 - Seite 234
Dateiname: 6515346702_buchblock.pdf; erzeugt am 07. May 2009 14:16:59; WK
Page 238 of 373

X
Grasp release wheel ;with your hand
such that the thumb is in the thumb rest
and turn it anti-clockwise.
The ball coupling disengages and folds out
from under the rear bumper. Indicator
lamp :flashes. X
Pull the ball coupling in the direction of the
arrow until it engages in a vertical position.
Indicator lamp :goes out.
The multi-function display shows the
Trailer hitch Check lock mech. mes-
sage until the ball coupling is engaged.
X Remove the protective cap from the ball
coupling and store it in a safe place.
X Make sure that the ball of the ball coupling
is clean and that, depending on the trailer
specification, it is greased or dry (without
grease) when used.
The power socket is integrated in the ball
coupling. Notes on towing a trailer
G
Risk of accident
When reversing the vehicle towards the
trailer, make sure there is nobody between
the trailer and the vehicle.
Couple and uncouple the trailer carefully. If
you do not couple the trailer to the towing
vehicle correctly, the trailer could become
detached. Make sure that the following values are not
exceeded:
R
the permissible trailer drawbar noseweight
R the permissible trailer load
R the permissible rear axle load of the towing
vehicle
R the maximum permissible gross vehicle
weight of both the towing vehicle and the
trailer
You will find the applicable permissible val-
ues, which must not be exceeded, in the vehi-
cle documents.
You will find the values approved by the man-
ufacturer on the vehicle identification plates
and those for the towing vehicle in the "Tech-
nical data" section.
i When towing a trailer, set the tyre pres-
sure on the rear axle of the towing vehicle
for a maximum load; see the tyre pressure
table in the fuel filler flap.
You will find installation dimensions and loads
in the "Technical data" section
(Y page 356).
The maximum drawbar load of the trailer
drawbar on the ball coupling is 84 kg. How-
ever, the actual noseweight must not exceed
the value given on the trailer coupling or
trailer identification plates. The lowest weight
applies.
! Use a noseweight as close as possible to
the maximum permissible noseweight. Do
not use a noseweight of less than 50 kg,
otherwise the trailer may come loose.
Bear in mind that the payload and the rear
axle load are reduced by the actual nose-
weight.
Please note that when towing a trailer, PARK-
TRONIC* ( Ypage 159), parking guid-
ance* (Y page 162) and Blind Spot
Assist* (Y page 261) are only available with
limitations, or not at all. Trailer towing
235Operation
* optional
212_AKB; 2; 4, en-GB
mkalafa
,V ersion: 2.11.8.1
2009-05-05T14:17:16+02:00 - Seite 235 Z
Dateiname: 6515346702_buchblock.pdf; erzeugt am 07. May 2009 14:16:59; WK
Page 239 of 373

i
On vehicles without level control, the
height of the ball coupling will alter accord-
ing to the load placed on the vehicle. If nec-
essary, use a trailer with a height-adjusta-
ble drawbar.
Coupling up a trailer G
Risk of injury
Do not disconnect a trailer with an engaged
overrun brake. Otherwise, your hand could
become trapped between the bumper and
trailer drawbar.
! Do not disconnect a trailer with an
engaged overrun brake. Otherwise, your
vehicle could be damaged by the rebound-
ing of the overrun brake.
X Position the trailer level behind the vehicle.
X Couple up the trailer.
X Establish the electrical connection
between the vehicle and the trailer.
Driving tips G
Risk of accident
If the Check trailer hitch locking
mechanism message appears in the multi-
function display while the vehicle is in motion,
pull over immediately and check whether the
ball coupling is correctly engaged.
i Observe the notes on ESP ®
trailer stabi-
lisation (Y page 60).
In Germany, the maximum permissible speed
for vehicle/trailer combinations depends on
the type of trailer and is either 80 km/h or
100 km/h. Before beginning the journey,
check the trailer's documents to see what the
maximum permitted speed is. G
Risk of accident
Always observe the maximum speed permit-
ted in Germany for vehicle/trailer combina-
tions, even in countries where higher speeds are permitted. This lowers the risk of an acci-
dent.
When towing a trailer, your vehicle's handling
characteristics will be different in comparison
to when driving without a trailer.
The vehicle/trailer combination:
R is heavier
R is restricted in its acceleration and gradi-
ent-climbing capability
R has an increased braking distance
R is affected more by strong crosswinds
R demands more sensitive steering
R consumes more fuel
On long and steep downhill gradients you
must select a lower gear in good time, or on
vehicles with automatic transmission*, select
shift range 1,2or 3.
i This also applies if you have activated
cruise control, Speedtronic or Distronic
Plus*.
This will use the braking effect of the engine,
so less braking will be required to maintain
the speed. This relieves the load on the brake
system and prevents the brakes from over-
heating and wearing too quickly. If you need
additional braking, depress the brake pedal
repeatedly rather than continuously. G
Risk of accident
Never depress the brake pedal continuously
while the vehicle is in motion, e.g. never cause
the brakes to rub by applying constant slight
pedal pressure. This causes the brake system
to overheat, increases the braking distance
and can lead to the brakes failing completely. 236
Trailer towingOperation
* optional
212_AKB; 2; 4, en-GB
mkalafa,
Version: 2.11.8.1 2009-05-05T14:17:16+02:00 - Seite 236
Dateiname: 6515346702_buchblock.pdf; erzeugt am 07. May 2009 14:16:59; WK
Page 240 of 373

Driving tips
R
Maintain a greater distance from the vehi-
cle in front than when driving without a
trailer.
R Avoid braking abruptly. If possible, brake
gently at first to allow the trailer to run on.
Then, increase the braking force rapidly.
R The values given for gradient-climbing
capabilities from a standstill refer to sea
level. When driving in mountainous areas,
note that the power output of the engine,
and consequently the vehicle's gradient-
climbing capability, decrease with increas-
ing altitude.
If the trailer swings from side to side:
X Do not accelerate.
X Do not counter-steer.
X Brake if necessary. G
Risk of accident
On no account should you attempt to draw the
vehicle/trailer combination out by increasing
speed. Folding in the ball coupling
i Fold the ball coupling back in if you are
not using the trailer tow hitch. G
Risk of injury
Make sure that no persons or animals are in
the pivoting range of the ball coupling. Other-
wise, they could be injured.
X Place the protective cap on the ball cou-
pling.
The release wheel is located behind the left-
hand side trim panel in the boot/luggage
compartment. Saloon
Estate
X
To open the cover (saloon): turn han-
dle :anti-clockwise and fold down
cover ;.
X To open the cover (estate): pull han-
dle :in the direction of the arrow and fold
down cover ;. Trailer towing
237Operation
212_AKB; 2; 4, en-GB
mkalafa, Version: 2.11.8.1 2009-05-05T14:17:16+02:00 - Seite 237 Z
Dateiname: 6515346702_buchblock.pdf; erzeugt am 07. May 2009 14:17:00; WK
Page 241 of 373

X
Grasp release wheel ;with your hand
such that the thumb is in the thumb rest
and turn it anti-clockwise.
The ball coupling unlocks and lowers. Indi-
cator lamp :flashes. X
Press the ball coupling in the direction of
the arrow until it engages behind the
bumper.
Indicator lamp :goes out and the mes-
sage in the multi-function display disap-
pears. Trailer power supply
When it leaves the factory, your vehicle's
trailer socket outlet is equipped with a per-
manent power supply and a power supply that
is switched on via the ignition lock.
The permanent power supply is supplied via
trailer socket pin 9.
The power supply that is switched on via the
ignition lock is supplied via trailer socket
pin 10.
! You can connect consumers with a power
rating of up to 240 W to the permanent
power supply and up to 180 W to the power
supply that is switched on via the ignition
lock.
You must not charge a trailer battery using
the power supply.
The trailer's permanent power supply is
switched off in the event of low vehicle supply
voltage and after six hours at the latest. You can obtain further information about
installing the trailer electrics from a qualified
specialist workshop, e.g. a Mercedes-Benz
Service Centre.
X
To switch the connected power supply
on or off: turn the key in the ignition lock
to position 2or 0, respectively. Bulb failure indicator for LEDs
i If LED lamps are fitted in the trailer, an
error message may appear in the multi-
function display – even if there is no fault –
if the corresponding LED chain's current
draw drops below 50 milliamperes (mA).
To ensure reliable operation of the bulb failure
indicator, a minimum current of 50 mA must
be guaranteed by the manufacturer of each
LED chain in the trailer lighting. Trailer with 7-pin connector
If your trailer has a 7-pin connector, you can
connect it to the 13-pin socket on the ball
coupling using an adapter or, if necessary, an
adapter cable. Both of these can be obtained
at a qualified specialist workshop, e.g. at a
Mercedes-Benz Service Centre.
Fitting the adapter 238
Trailer towingOperation
212_AKB; 2; 4, en-GB
mkalafa
,V ersion: 2.11.8.1
2009-05-05T14:17:16+02:00 - Seite 238
Dateiname: 6515346702_buchblock.pdf; erzeugt am 07. May 2009 14:17:01; WK
Page 250 of 373

Where will I find...?
...........................248
Display messages ............................. 251
Troubleshooting ................................ 278
Locking/unlocking in an emer-
gency ................................................. 299
Resetting the active bonnet
(pedestrian protection) after trig-
gering ................................................. 302
Resetting triggered NECK-PRO
head restraints .................................. 303
Replacing batteries (key and
remote control) ................................. 303
Changing bulbs ................................. 304
Replacing the wiper blades ..............308
Flat tyre ............................................. 309
Battery ............................................... 319
Jump-starting .................................... 323
Towing and tow-starting ..................324
Fuses .................................................. 327 247Practical advice
212_AKB; 2; 4, en-GB
mkalafa,
Version: 2.11.8.1 2009-05-05T14:17:16+02:00 - Seite 247
Dateiname: 6515346702_buchblock.pdf; erzeugt am 07. May 2009 14:17:04; WK
Page 253 of 373
(e.g. if the engine is started or if a door or the
boot lid/tailgate is opened or closed) and you
could be seriously injured.
i When using the jack, you should also
observe the safety notes in the "Flat tyre"
section (Y page 316).
Vehicles with a TIREFIT kit X
Saloon: open the boot floor (Y page 204).
X Estate: open the EASY-PACK folding lug-
gage compartment floor (Y page 204).:
TIREFIT kit
; Folding wheel chock
= Electric air pump
? Towing eye
A Jack
B Centring pin
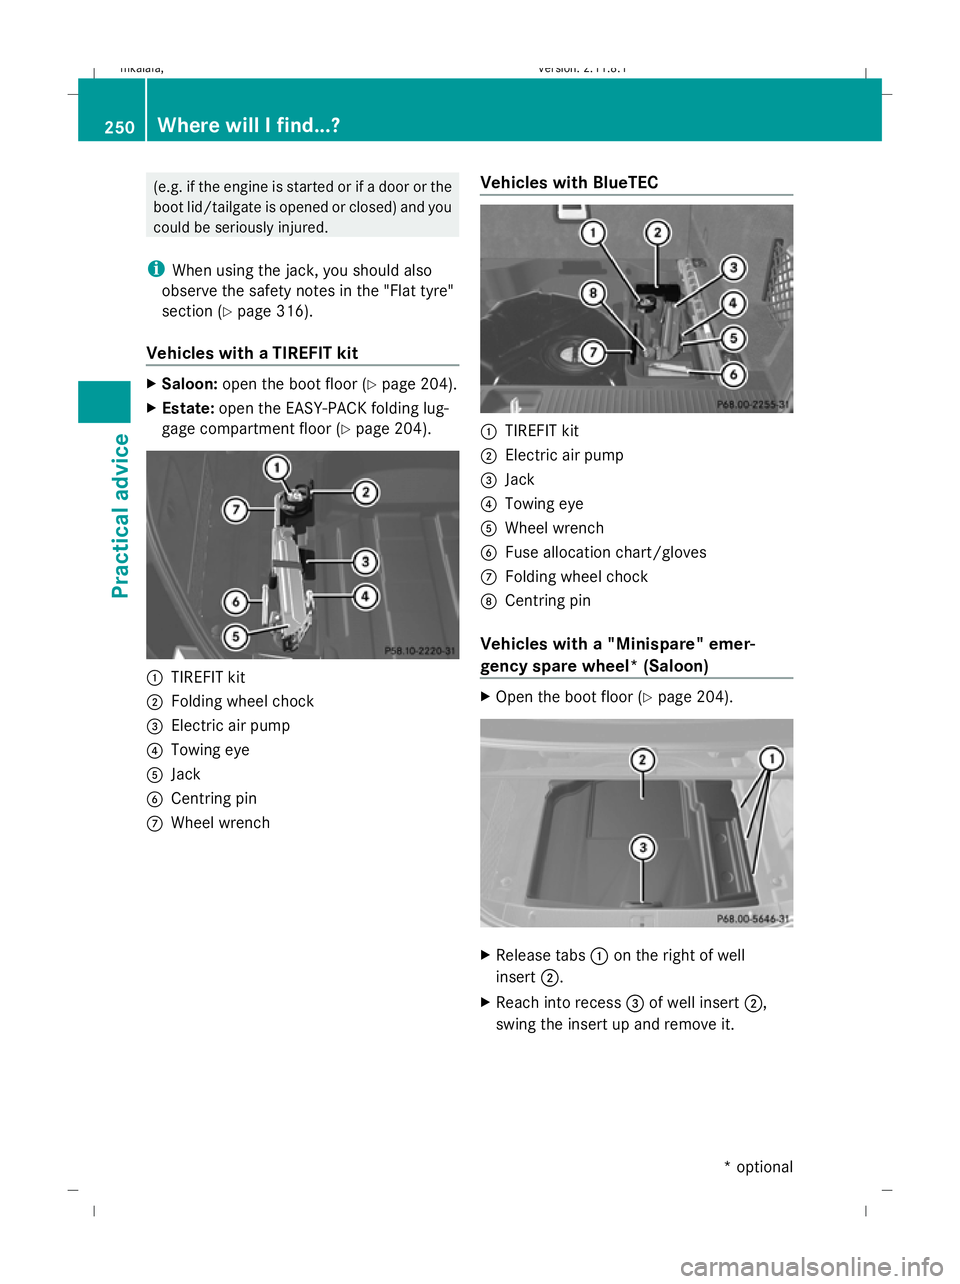
C Wheel wrench Vehicles with BlueTEC :
TIREFIT kit
; Electric air pump
= Jack
? Towing eye
A Wheel wrench
B Fuse allocation chart/gloves
C Folding wheel chock
D Centring pin
Vehicles with a "Minispare" emer-
gency spare wheel* (Saloon) X
Open the boot floor (Y page 204). X
Release tabs :on the right of well
insert ;.
X Reach into recess =of well insert ;,
swing the insert up and remove it. 250
Where will I find...?Practical advice
* optional
212_AKB; 2; 4, en-GB
mkalafa,
Version: 2.11.8.1
2009-05-05T14:17:16+02:00 - Seite 250
Dateiname: 6515346702_buchblock.pdf; erzeugt am 07. May 2009 14:17:06; WK