2009 MERCEDES-BENZ E-CLASS SALOON towing
[x] Cancel search: towingPage 172 of 373

Information and warning display
:
Yellow indicator lamp/red warning lamp
When you turn the key to position 2in the
ignition lock, warning lamps :in the exterior
mirrors light up red.
If Blind Spot Assist is switched on and the
engine is running, indicator lamps :in the
exterior mirrors light up yellow up to a speed
of 30 km/h. At speeds above 30 km/h, the
indicator lamp goes out and Blind Spot Assist
is operational.
If a vehicle is detected within the monitoring
range of Blind Spot Assist at speeds above
30 km/h, warning lamp :on the corre-
sponding side lights up red. This warning is
always issued when a vehicle enters the blind
spot monitoring range from behind or from
the side. When you overtake a vehicle, the
warning only occurs if the difference in speed
is less than 12 km/h.
The yellow indicator lamp goes out after
reverse gear is engaged. In this event, Blind
Spot Assist is no longer active.
The brightness of the indicator/warning
lamps is adjusted automatically according to
the ambient light. G
Risk of accident
Blind Spot Assist is not active at speeds below
30 km/h, and the indicator lamps in the exte-
rior mirrors are yellow. Vehicles in the moni-
toring range are then not indicated.
Always pay attention to traffic conditions and
your surroundings. Otherwise, you may fail to recognise dangers in time, cause an accident
and injure yourself and others.
Collision warning
If a vehicle is detected in the monitoring range
of Blind Spot Assist and you switch on the turn
signal, a double warning tone sounds. Red
warning lamp :flashes. If the turn signal
remains on, detected vehicles are indicated
by the flashing of red warning lamp :. There
are no further warning tones.
Switching on Blind Spot Assist
X Make sure that the radar sensor system
(Y page 134) and Blind Spot Assist
(Y page 130) are activated in the on-board
computer.
X Turn the key to position 2in the ignition
lock.
Red warning lamps :in the exterior mir-
rors are lit.
X Start the engine.
Warning lamps :in the exterior mirrors
now light up yellow.
Trailer towing*
Blind Spot Assist is deactivated when you
connect the trailer to your vehicle electrically.
The Blind Spot Assist currently
unavailable See Owner's Manual mes-
sage appears in the multi-function display.
Lane Keeping Assist If you select
kmon the on-board computer in
the Speed-/odometer: function
(Y page 131), Lane Keeping Assist is activa-
ted starting at a speed of 60 km/h. If the
miles display unit is selected, the assistance
range begins at between 35 and 40 mph.
Lane Keeping Assist is designed to detect
lane markings on the road and warn you
before you leave your lane unintentionally.
Usually the warning is given when a front
wheel passes over a lane marking. It will warn
you by means of intermittent vibration in the
steering wheel for up to 1.5 seconds. Driving systems
169Controls
* optional
212_AKB; 2; 4, en-GB
mkalafa
,V ersion: 2.11.8.1
2009-05-05T14:17:16+02:00 - Seite 169 Z
Dateiname: 6515346702_buchblock.pdf; erzeugt am 07. May 2009 14:16:27; WK
Page 190 of 373

feature, it opens again slightly. The rain
closing feature is then deactivated.
The panorama sliding sunroof does not close
if:
R it is raised at the rear.
R it is blocked.
R no rain is falling on the area of the wind-
screen being monitored by the rain sensor
(e.g. because the vehicle is under a bridge
or in a carport). Roller sunblinds for the panorama
sliding sunroof*
The roller sunblinds provide protection from
the sun. The two roller sunblinds can only be
opened and closed together when the pano-
rama sliding sunroof is closed. G
Risk of injury
Make sure that nobody can become trapped
as you open or close the roller sunblinds. Overhead control panel
: To open
; To close
= To open
X Turn the key to position 1or 2in the ignition
lock.
X Pull or push the switch in the corresponding
direction. i
If you press the switch beyond the point
of resistance, an automatic opening/clos-
ing process is started in the corresponding
direction. You can stop automatic opera-
tion by pressing again.
Resetting the panorama sliding sunroof
and the roller sunblinds Reset the panorama sliding sunroof and the
roller sunblinds if the panorama sliding sun-
roof or the roller sunblinds do not close
smoothly.
X Turn the key to position 1or 2in the ignition
lock.
X Pull the switch repeatedly to the point of
resistance in the direction of arrow ;until
the panorama sliding sunroof is fully
closed.
X Keep the switch pulled for an additional
second.
X Pull the switch repeatedly to the point of
resistance in the direction of arrow ;until
the roller sunblinds are fully closed.
X Keep the switch pulled for an additional
second.
X Check that the panorama sliding sunroof
and the roller sunblinds can be fully opened
again.
X If this is not the case, consult a qualified
specialist workshop. Loading and stowing
Loading guidelines
G
Risk of injury
Secure and position the load as described in
the loading guidelines.
Otherwise, vehicle occupants could
be injured by the load being thrown around in
the event of sharp braking, a sudden change
in direction or an accident.
You will find further information in the "Secur-
ing a load" section. Loading and stowing
187Controls
* optional
212_AKB; 2; 4, en-GB
mkalafa,
Version: 2.11.8.1 2009-05-05T14:17:16+02:00 - Seite 187 Z
Dateiname: 6515346702_buchblock.pdf; erzeugt am 07. May 2009 14:16:33; WK
Page 192 of 373
X
To lock: insert the emergency key element
(Y page 299) into the lock and turn it 90°
clockwise to position 2.
X To unlock: insert the emergency key ele-
ment ( Ypage 299) into the lock and turn
it 90° anti-clockwise to position 1.
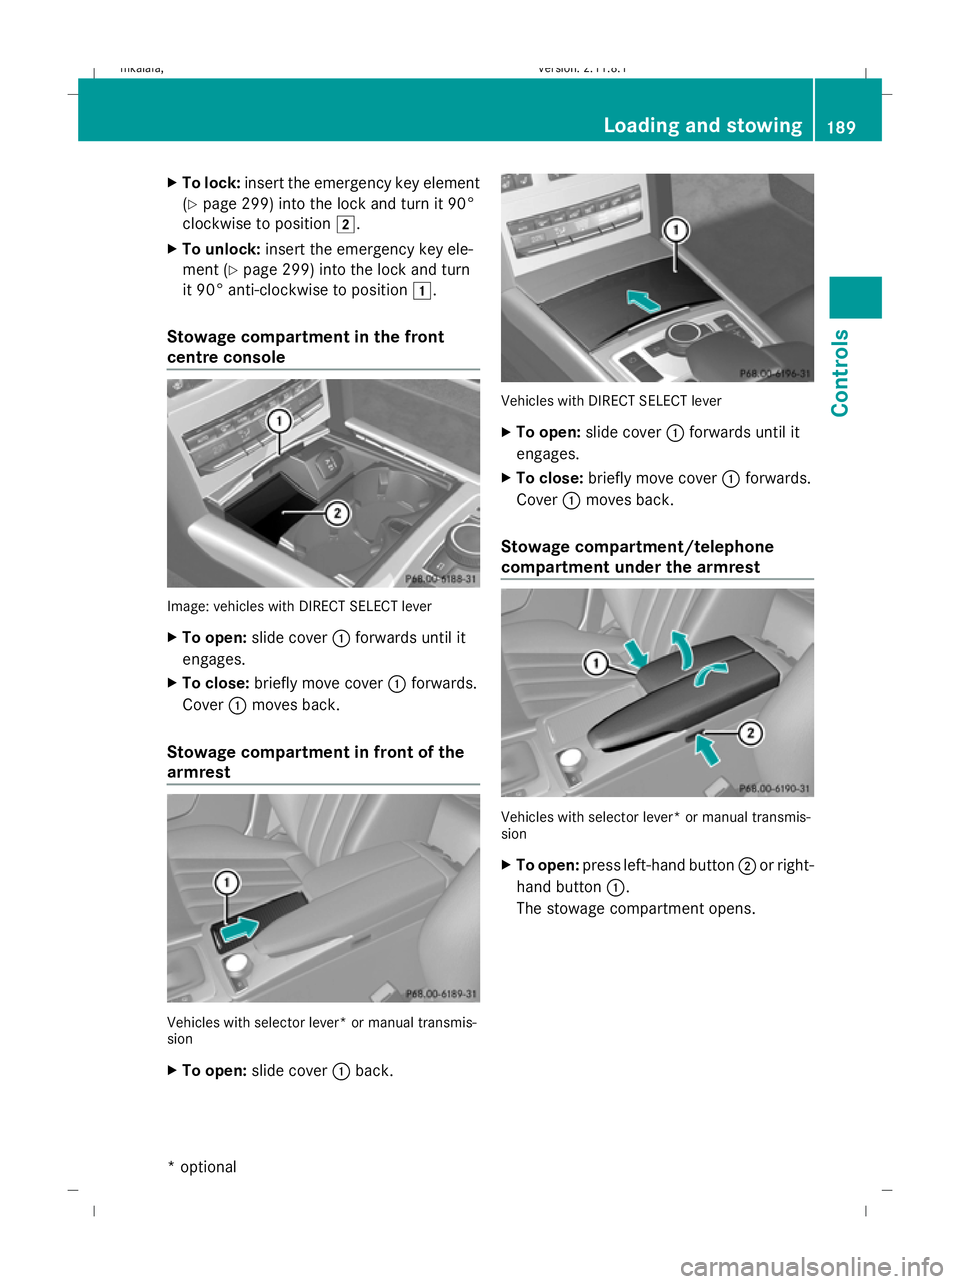
Stowage compartment in the front
centre console Image: vehicles with DIRECT SELECT lever
X
To open: slide cover :forwards until it
engages.
X To close: briefly move cover :forwards.
Cover :moves back.
Stowage compartment in front of the
armrest Vehicles with selector lever* or manual transmis-
sion
X
To open: slide cover :back. Vehicles with DIRECT SELECT lever
X
To open: slide cover :forwards until it
engages.
X To close: briefly move cover :forwards.
Cover :moves back.
Stowage compartment/telephone
compartment under the armrest Vehicles with selector lever* or manual transmis-
sion
X To open: press left-hand button ;or right-
hand button :.
The stowage compartment opens. Loading and stowing
189Controls
* optional
212_AKB; 2; 4, en-GB
mkalafa,
Version: 2.11.8.1 2009-05-05T14:17:16+02:00 - Seite 189 Z
Dateiname: 6515346702_buchblock.pdf; erzeugt am 07. May 2009 14:16:35; WK
Page 193 of 373
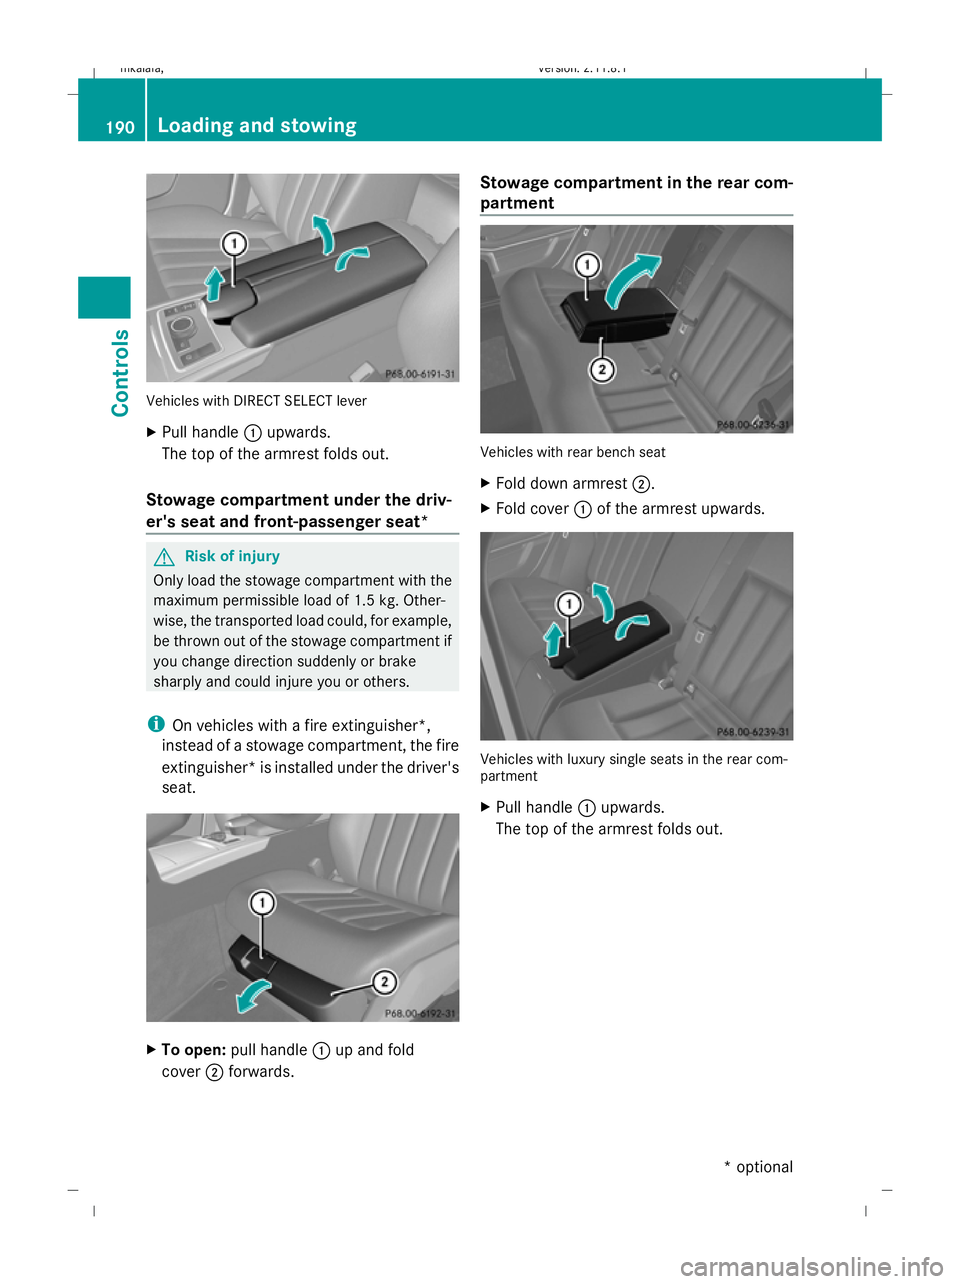
Vehicles with DIRECT SELECT lever
X
Pull handle :upwards.
The top of the armrest folds out.
Stowage compartment under the driv-
er's seat and front-passenger seat* G
Risk of injury
Only load the stowage compartment with the
maximum permissible load of 1.5 kg. Other-
wise, the transported load could, for example,
be thrown out of the stowage compartment if
you change direction suddenly or brake
sharply and could injure you or others.
i On vehicles with a fire extinguisher*,
instead of a stowage compartment, the fire
extinguisher* is installed under the driver's
seat. X
To open: pull handle :up and fold
cover ;forwards. Stowage compartment in the rear com-
partment
Vehicles with rear bench seat
X
Fold down armrest ;.
X Fold cover :of the armrest upwards. Vehicles with luxury single seats in the rear com-
partment
X
Pull handle :upwards.
The top of the armrest folds out. 190
Loading and stowingControls
* optional
212_AKB; 2; 4, en-GB
mkalafa,
Version: 2.11.8.1 2009-05-05T14:17:16+02:00 - Seite 190
Dateiname: 6515346702_buchblock.pdf; erzeugt am 07. May 2009 14:16:36; WK
Page 194 of 373
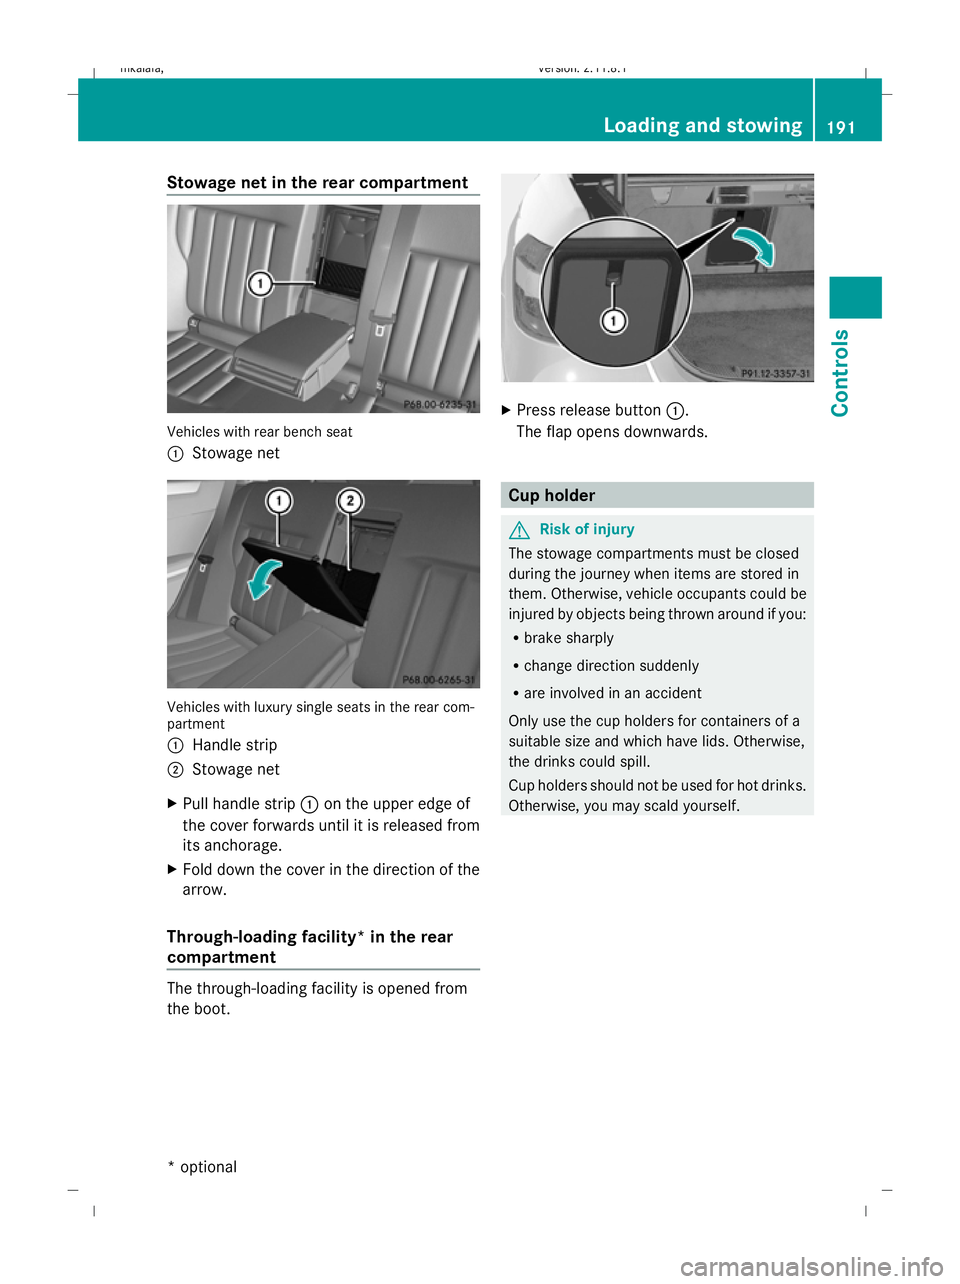
Stowage net in the rear compartment
Vehicles with rear bench seat
:
Stowage net Vehicles with luxury single seats in the rear com-
partment
:
Handle strip
; Stowage net
X Pull handle strip :on the upper edge of
the cover forwards until it is released from
its anchorage.
X Fold down the cover in the direction of the
arrow.
Through-loading facility* in the rear
compartment The through-loading facility is opened from
the boot. X
Press release button :.
The flap opens downwards. Cup holder
G
Risk of injury
The stowage compartments must be closed
during the journey when items are stored in
them. Otherwise, vehicle occupants could be
injured by objects being thrown around if you:
R brake sharply
R change direction suddenly
R are involved in an accident
Only use the cup holders for containers of a
suitable size and which have lids. Otherwise,
the drinks could spill.
Cup holders should not be used for hot drinks.
Otherwise, you may scald yourself. Loading and stowing
191Controls
* optional
212_AKB; 2; 4, en-GB
mkalafa,
Version: 2.11.8.1 2009-05-05T14:17:16+02:00 - Seite 191 Z
Dateiname: 6515346702_buchblock.pdf; erzeugt am 07. May 2009 14:16:36; WK
Page 195 of 373
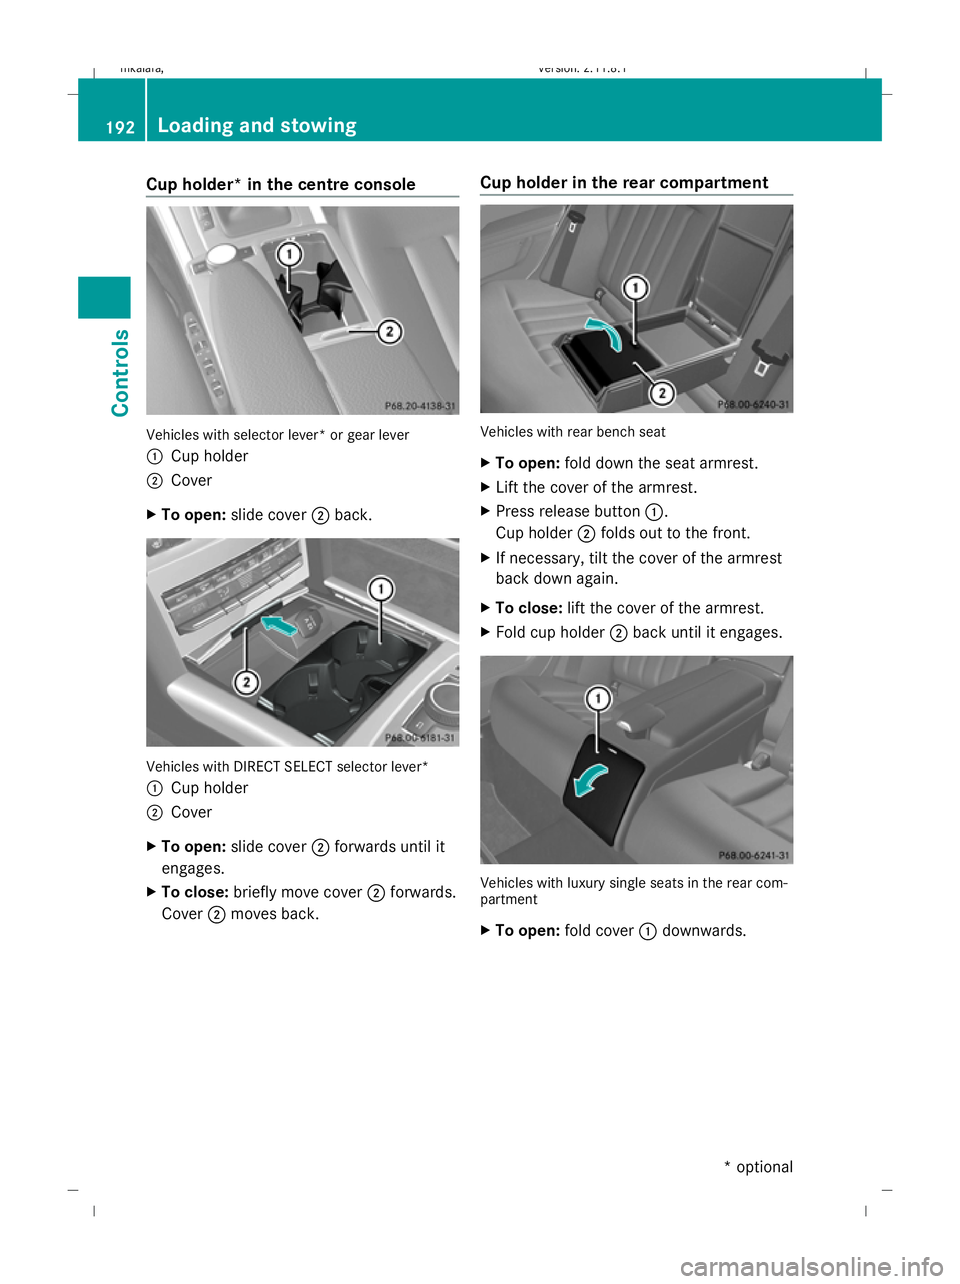
Cup holder* in the centre console
Vehicles with selector lever* or gear lever
: Cup holder
; Cover
X To open: slide cover ;back. Vehicles with DIRECT SELECT selector lever*
: Cup holder
; Cover
X To open: slide cover ;forwards until it
engages.
X To close: briefly move cover ;forwards.
Cover ;moves back. Cup holder in the rear compartment Vehicles with rear bench seat
X
To open: fold down the seat armrest.
X Lift the cover of the armrest.
X Press release button :.
Cup holder ;folds out to the front.
X If necessary, tilt the cover of the armrest
back down again.
X To close: lift the cover of the armrest.
X Fold cup holder ;back until it engages. Vehicles with luxury single seats in the rear com-
partment
X
To open: fold cover :downwards. 192
Loading and stowingControls
* optional
212_AKB; 2; 4, en-GB
mkalafa
,V ersion: 2.11.8.1
2009-05-05T14:17:16+02:00 - Seite 192
Dateiname: 6515346702_buchblock.pdf; erzeugt am 07. May 2009 14:16:37; WK
Page 196 of 373
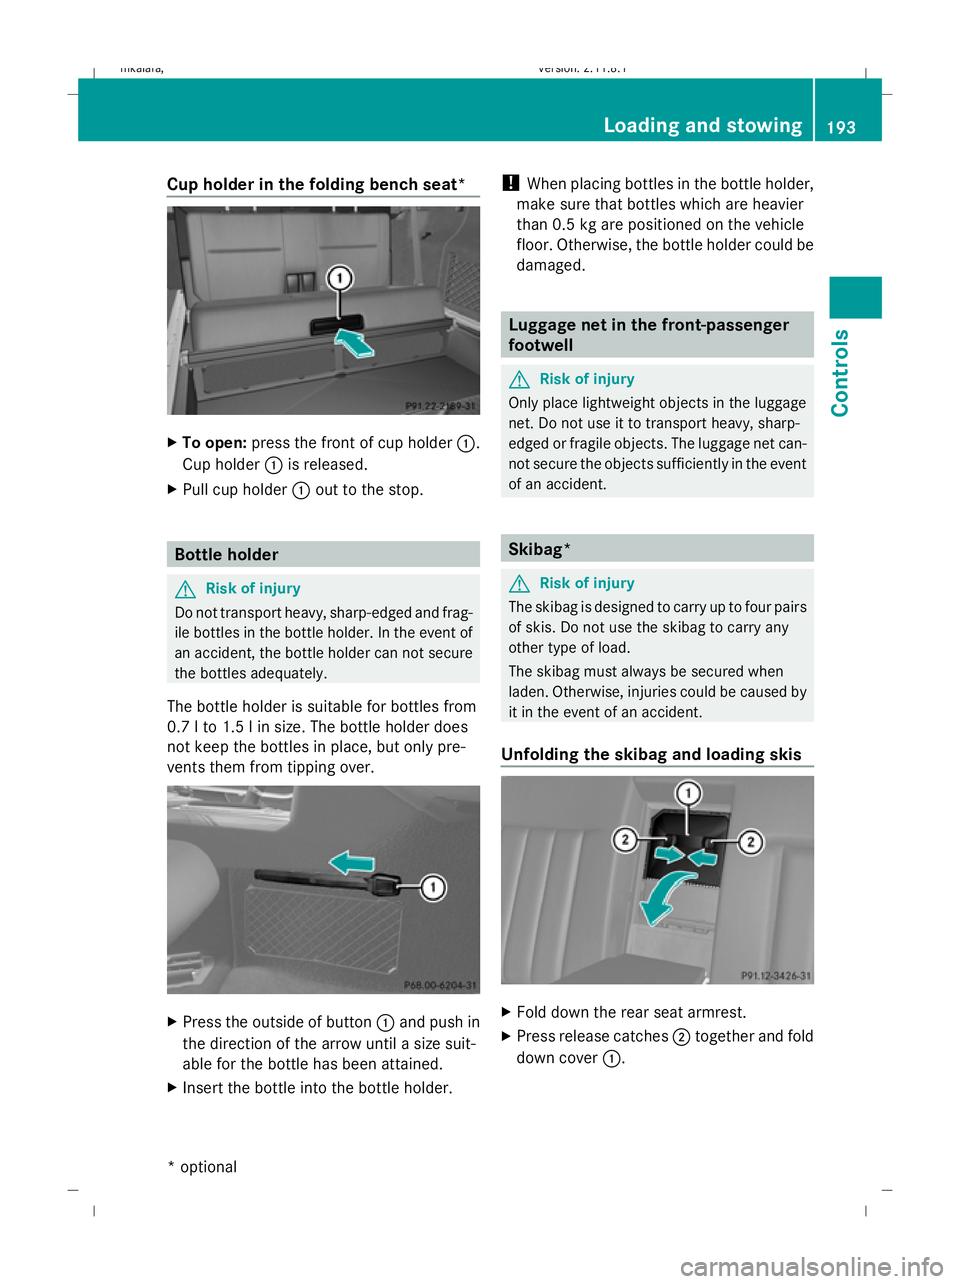
Cup holder in the folding bench seat*
X
To open: press the front of cup holder :.
Cup holder :is released.
X Pull cup holder :out to the stop. Bottle holder
G
Risk of injury
Do not transport heavy, sharp-edged and frag-
ile bottles in the bottle holder. In the event of
an accident, the bottle holder can not secure
the bottles adequately.
The bottle holder is suitable for bottles from
0.7 l to 1.5 l in size. The bottle holder does
not keep the bottles in place, but only pre-
vents them from tipping over. X
Press the outside of button :and push in
the direction of the arrow until a size suit-
able for the bottle has been attained.
X Insert the bottle into the bottle holder. !
When placing bottles in the bottle holder,
make sure that bottles which are heavier
than 0.5 kg are positioned on the vehicle
floor. Otherwise, the bottle holder could be
damaged. Luggage net in the front-passenger
footwell
G
Risk of injury
Only place lightweight objects in the luggage
net. Do not use it to transport heavy, sharp-
edged or fragile objects. The luggage net can-
not secure the objects sufficiently in the event
of an accident. Skibag*
G
Risk of injury
The skibag is designed to carry up to four pairs
of skis. Do not use the skibag to carry any
other type of load.
The skibag must always be secured when
laden. Otherwise, injuries could be caused by
it in the event of an accident.
Unfolding the skibag and loading skis X
Fold down the rear seat armrest.
X Press release catches ;together and fold
down cover :. Loading and stowing
193Controls
* optional
212_AKB; 2; 4, en-GB
mkalafa
,V ersion: 2.11.8.1
2009-05-05T14:17:16+02:00 - Seite 193 Z
Dateiname: 6515346702_buchblock.pdf; erzeugt am 07. May 2009 14:16:38; WK
Page 197 of 373
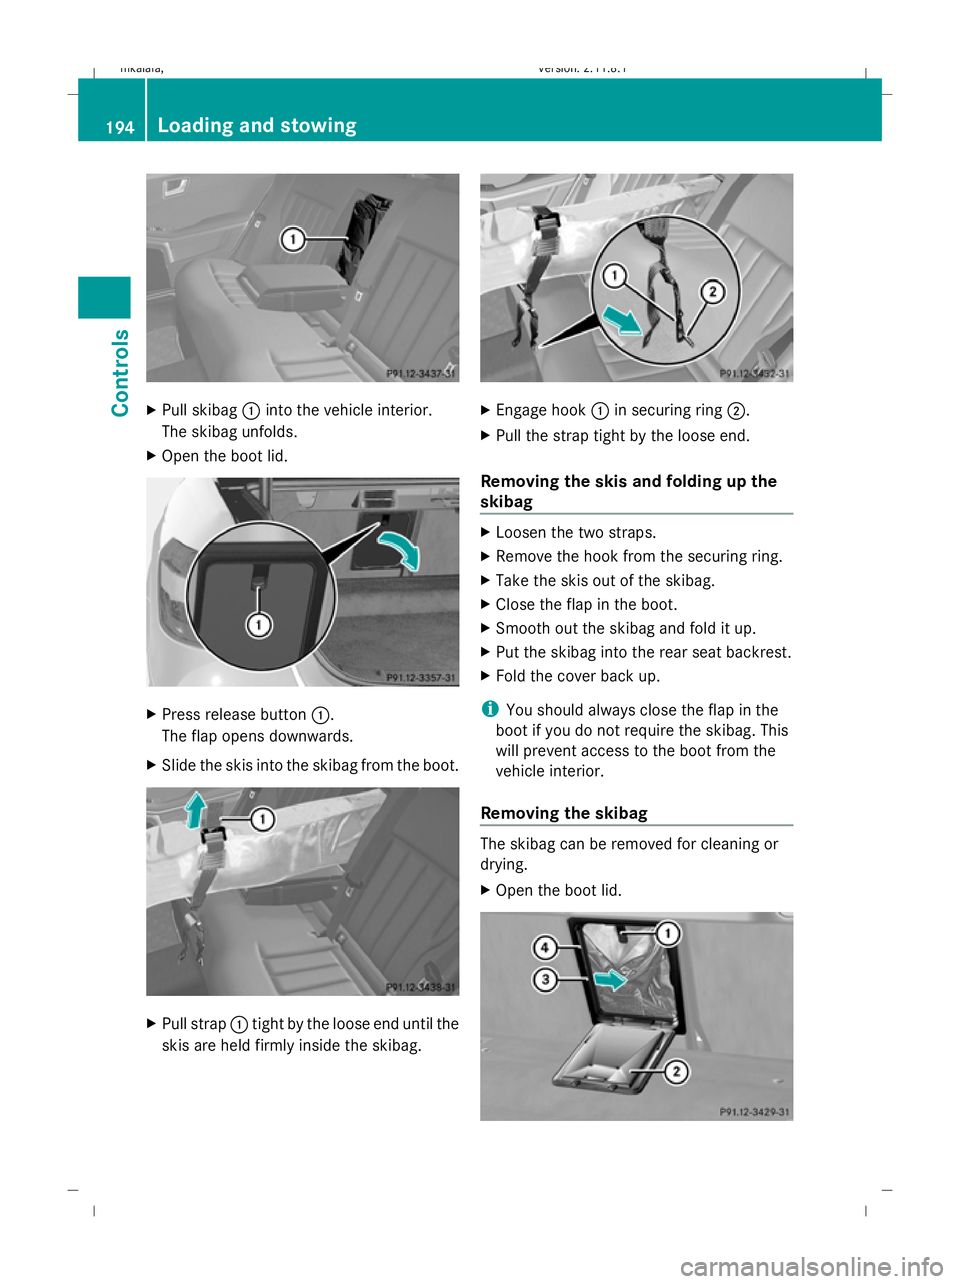
X
Pull skibag :into the vehicle interior.
The skibag unfolds.
X Open the boot lid. X
Press release button :.
The flap opens downwards.
X Slide the skis into the skibag from the boot. X
Pull strap :tight by the loose end until the
skis are held firmly inside the skibag. X
Engage hook :in securing ring ;.
X Pull the strap tight by the loose end.
Removing the skis and folding up the
skibag X
Loosen the two straps.
X Remove the hook from the securing ring.
X Take the skis out of the skibag.
X Close the flap in the boot.
X Smooth out the skibag and fold it up.
X Put the skibag into the rear seat backrest.
X Fold the cover back up.
i You should always close the flap in the
boot if you do not require the skibag. This
will prevent access to the boot from the
vehicle interior.
Removing the skibag The skibag can be removed for cleaning or
drying.
X
Open the boot lid. 194
Loading and stowingControls
212_AKB; 2; 4, en-GB
mkalafa,
Version: 2.11.8.1 2009-05-05T14:17:16+02:00 - Seite 194
Dateiname: 6515346702_buchblock.pdf; erzeugt am 07. May 2009 14:16:39; WK