2009 MERCEDES-BENZ E-CLASS SALOON lights
[x] Cancel search: lightsPage 100 of 373

X
To switch on: press button:.
All turn signals flash.
X To switch on the hazard warning lamps
on one side: also push the combination
switch beyond the pressure point in the
direction of arrow EorG (Ypage 94).
The indicator lamp on the corresponding
side flashes.
X To switch off: press button:.
The hazard warning lamp switches off auto-
matically after full brake application if the
vehicle then reaches a speed of over
10 km/h again.
Intelligent Light System* (bi-xenon
headlamps*) The Intelligent Light System is a system which
adjusts the headlamps automatically to suit
the prevailing driving and weather conditions.
The bi-xenon headlamps offer enhanced func-
tions to improve illumination of the road sur-
face, e.g. depending on the vehicle speed or
weather conditions. The system includes the
active light function, cornering light function,
motorway mode and extended range fog-
lamps. The system is only active when it is
dark.
You can activate or deactivate the "Intelligent
Light System" using the on-board computer
(Y page 132).
Active light function The active light function is a system that
moves the headlamps according to the steer-
ing movements of the front wheels. In this way, relevant areas remain illuminated while
driving. This allows you to recognise pedes-
trians, cyclists and animals.
Cornering light function
The cornering light function improves the illu-
mination of the road surface in the broad
direction you are turning, e.g. making it easier
to see in tight corners. It can only be activated
when the dipped-beam headlamps are
switched on.
Active:
R
if you are driving at speeds below
40 km/h, the cornering light function is
activated either by the turn signal or by the
steering wheel being turned.
R if you are driving at speeds between
40 km/h and 70 km/h, the cornering light
function is activated by the steering wheel
being turned.
Not active: if you are driving at speeds above
70 km/h or you switch off the turn signal or
move the steering wheel to the straight-
ahead position.
The cornering lamp may remain lit for a short
time, but is automatically switched off after
no more than three minutes. Lights
97Controls
* optional
212_AKB; 2; 4, en-GB
mkalafa,
Version: 2.11.8.1 2009-05-05T14:17:16+02:00 - Seite 97 Z
Dateiname: 6515346702_buchblock.pdf; erzeugt am 07. May 2009 14:16:00; WK
Page 101 of 373

Motorway mode
Motorway mode increases the range of the
beam.
Active:
R if you are driving at speeds above
110 km/h and do not make any large steer-
ing movements for 1,000 m.
R if you are driving at speeds above
130 km/h.
Motorway mode remains active unless your
speed drops speeds below 80 km/h.
Not active: if you are driving at speeds below
80 km/h.
Extended range foglamps The extended range foglamps reduce the
glare experienced by the driver and improve
the illumination of the edge of the carriage-
way.
Active: if you are driving at speeds below
70 km/h and switch on the rear foglamp.
If your speed does not exceed 100 km/h, the
extended foglamp function remains active. Not active:
if you are driving at speeds above
100 km/h or you switch off the rear foglamp.
Adjusting the headlamp range (halogen
headlamps) Headlamp range control
g
Driver's seat and front-passenger seat
occupied
1 Driver's seat, front-passenger seat and
rear seats occupied
2 Driver's seat, front-passenger seat and
rear seats occupied, luggage compart-
ment/boot laden
3 Driver's and front-passenger seats occu-
pied and maximum permissible rear axle
load utilised, e.g. when towing a trailer
The headlamp range control allows you to
adjust the cone of light from the headlamps
to suit the vehicle load.
X Start the engine.
X Turn the headlamp range control to the cor-
responding position. Headlamp cleaning system*
The headlamps are cleaned automatically if
the "Wipe with washer fluid" function is oper-
ated while the lights are on and the engine is
running. The headlamps are cleaned again
every tenth time the windscreen is wiped with
washer fluid. When you switch off the ignition,
the automatic headlamp cleaning system is
reset and counting is resumed from 0. 98
LightsControls
* optional
212_AKB; 2; 4, en-GB
mkalafa,
Version: 2.11.8.1 2009-05-05T14:17:16+02:00 - Seite 98
Dateiname: 6515346702_buchblock.pdf; erzeugt am 07. May 2009 14:16:01; WK
Page 108 of 373

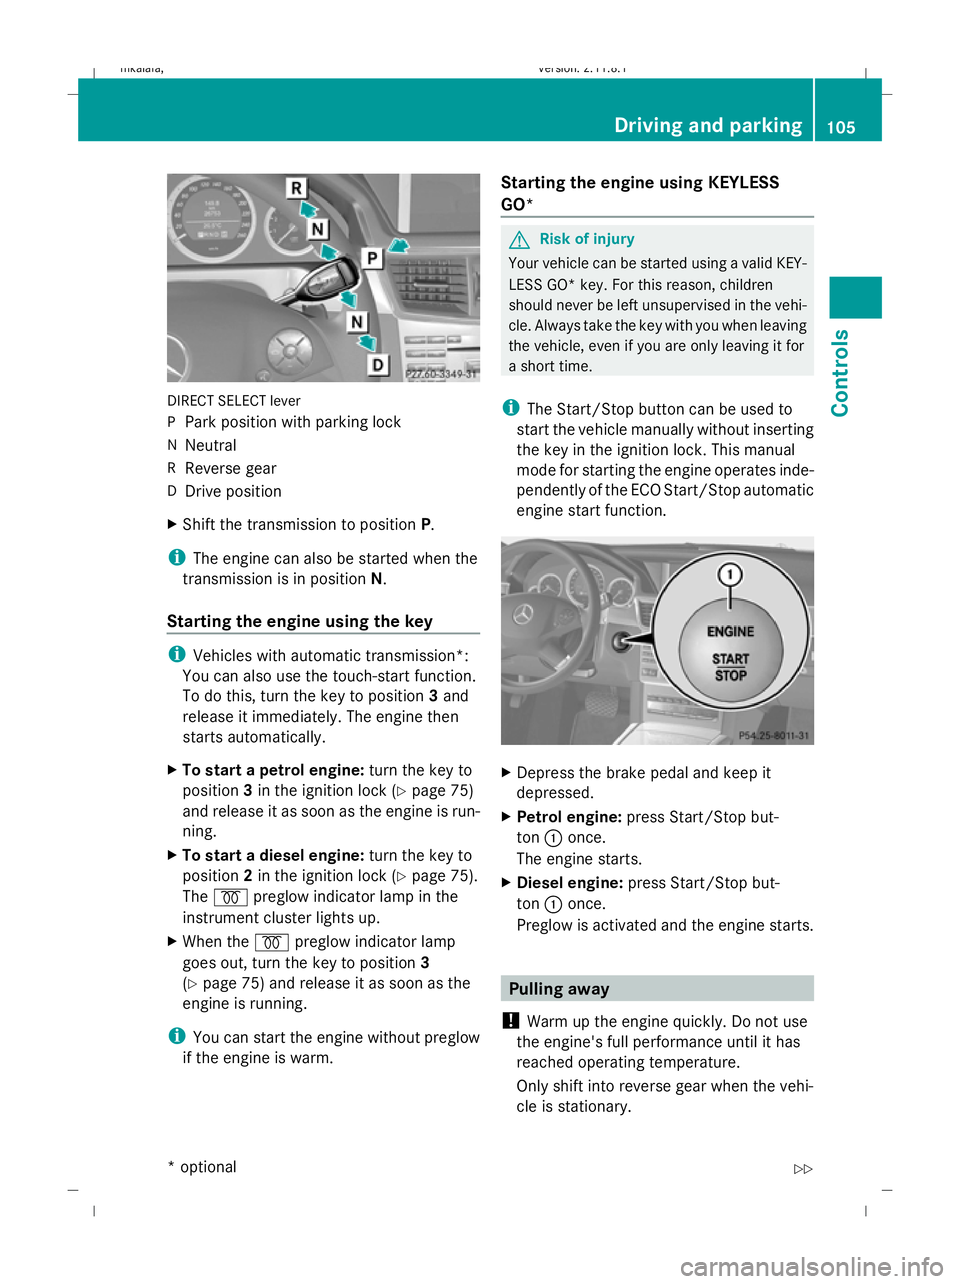
DIRECT SELECT lever
P
Park position with parking lock
N Neutral
R Reverse gear
D Drive position
X Shift the transmission to position P.
i The engine can also be started when the
transmission is in position N.
Starting the engine using the key i
Vehicles with automatic transmission*:
You can also use the touch-start function.
To do this, turn the key to position 3and
release it immediately. The engine then
starts automatically.
X To start a petrol engine: turn the key to
position 3in the ignition lock (Y page 75)
and release it as soon as the engine is run-
ning.
X To start a diesel engine: turn the key to
position 2in the ignition lock (Y page 75).
The % preglow indicator lamp in the
instrument cluster lights up.
X When the %preglow indicator lamp
goes out, turn the key to position 3
(Y page 75) and release it as soon as the
engine is running.
i You can start the engine without preglow
if the engine is warm. Starting the engine using KEYLESS
GO* G
Risk of injury
Your vehicle can be started using a valid KEY-
LESS GO* key. For this reason, children
should never be left unsupervised in the vehi-
cle. Always take the key with you when leaving
the vehicle, even if you are only leaving it for
a short time.
i The Start/Stop button can be used to
start the vehicle manually without inserting
the key in the ignition lock. This manual
mode for starting the engine operates inde-
pendently of the ECO Start/Stop automatic
engine start function. X
Depress the brake pedal and keep it
depressed.
X Petrol engine: press Start/Stop but-
ton :once.
The engine starts.
X Diesel engine: press Start/Stop but-
ton :once.
Preglow is activated and the engine starts. Pulling away
! Warm up the engine quickly. Do not use
the engine's full performance until it has
reached operating temperature.
Only shift into reverse gear when the vehi-
cle is stationary. Driving and parking
105Controls
* optional
212_AKB; 2; 4, en-GB
mkalafa,
Version: 2.11.8.1 2009-05-05T14:17:16+02:00 - Seite 105 Z
Dateiname: 6515346702_buchblock.pdf; erzeugt am 07. May 2009 14:16:04; WK
Page 110 of 373

Parking
G
Risk of accident
Only remove the key from the ignition lock
when the vehicle is stationary, as you cannot
steer the vehicle with the key removed.
Never leave children unsupervised in the vehi-
cle. They could release the parking brake. This
could lead to a serious or fatal accident. G
Risk of fire
Make sure that the exhaust system does not
under any circumstances come into contact
with easily ignitable material such as dry grass
or petrol. Otherwise, the flammable material
may ignite and set the vehicle on fire.
To ensure that the vehicle is secured against
rolling away unintentionally:
R the parking brake must be applied
R on vehicles with manual transmission,
engage first gear or reverse gear
R on vehicles with automatic transmission*,
the transmission must be in position Pand
the key must be removed from the ignition
lock
R on steep uphill or downhill gradients, turn
the front wheels towards the kerb
Parking brake X
To apply: depress parking brake ;firmly.
The J warning lamp in the instrument
cluster lights up if the engine is running. X
To release: depress the brake pedal and
keep it depressed.
On vehicles with automatic transmission*,
the selector lever/parking lock is released.
X Pull release handle :.
The J warning lamp in the instrument
cluster goes out. Switching off the engine
G
Risk of accident
If the engine is not running, there is no power
assistance for the steering and brakes. Steer-
ing and braking will then require significantly
greater effort.
As a result, you might lose control of the vehi-
cle, cause an accident and injure yourself and
others.
Therefore, do not switch off the engine while
you are driving.
Vehicles with manual transmission X
Shift to either first or reverse gear.
X Turn the key to position 0(Y page 75) in
the ignition lock and remove it.
The immobiliser is activated.
Vehicles with automatic transmission* X
Standard vehicles: shift the transmission
to position P. X
AMG vehicles: press thePbutton :. Driving and parking
107Controls
* optional
212_AKB; 2; 4, en-GB
mkalafa,
Version: 2.11.8.1 2009-05-05T14:17:16+02:00 - Seite 107 Z
Dateiname: 6515346702_buchblock.pdf; erzeugt am 07. May 2009 14:16:05; WK
Page 119 of 373

the left-hand steering wheel gearshift pad-
dle until the transmission shifts to the opti-
mal gear for the current speed.
X To deactivate: press program selector
button :repeatedly until Cor Sappears
in the display.
Kickdown
i On vehicles with AMG engines, it is not
possible to use kickdown in manual drive
program M.
You can also use kickdown for maximum
acceleration in manual drive program M.
X Depress the accelerator pedal beyond the
pressure point.
The transmission shifts to a lower gear
depending on the engine speed.
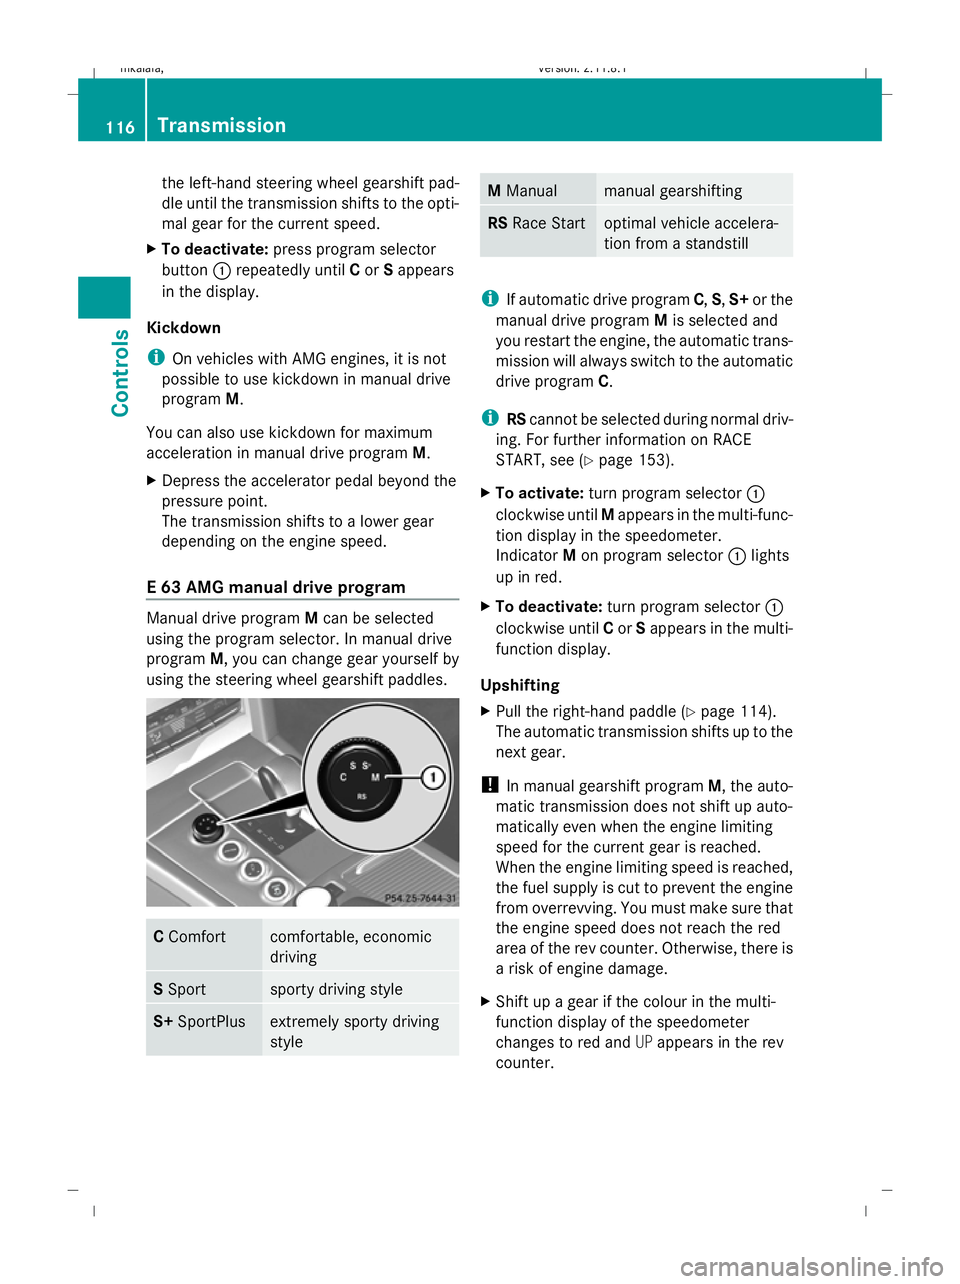
E 63 AMG manual drive program Manual drive program
Mcan be selected
using the program selector. In manual drive
program M, you can change gear yourself by
using the steering wheel gearshift paddles. C
Comfort comfortable, economic
driving
S
Sport sporty driving style
S+
SportPlus extremely sporty driving
style M
Manual manual gearshifting
RS
Race Start optimal vehicle accelera-
tion from a standstill
i
If automatic drive program C,S,S+ or the
manual drive program Mis selected and
you restart the engine, the automatic trans-
mission will always switch to the automatic
drive program C.
i RScannot be selected during normal driv-
ing. For further information on RACE
START, see (Y page 153).
X To activate: turn program selector :
clockwise until Mappears in the multi-func-
tion display in the speedometer.
Indicator Mon program selector :lights
up in red.
X To deactivate: turn program selector :
clockwise until Cor Sappears in the multi-
function display.
Upshifting
X Pull the right-hand paddle (Y page 114).
The automatic transmission shifts up to the
next gear.
! In manual gearshift program M, the auto-
matic transmission does not shift up auto-
matically even when the engine limiting
speed for the current gear is reached.
When the engine limiting speed is reached,
the fuel supply is cut to prevent the engine
from overrevving. You must make sure that
the engine speed does not reach the red
area of the rev counter. Otherwise, there is
a risk of engine damage.
X Shift up a gear if the colour in the multi-
function display of the speedometer
changes to red and UPappears in the rev
counter. 116
TransmissionControls
212_AKB; 2; 4, en-GB
mkalafa
,V ersion: 2.11.8.1
2009-05-05T14:17:16+02:00 - Seite 116
Dateiname: 6515346702_buchblock.pdf; erzeugt am 07. May 2009 14:16:09; WK
Page 122 of 373

Multi-function display
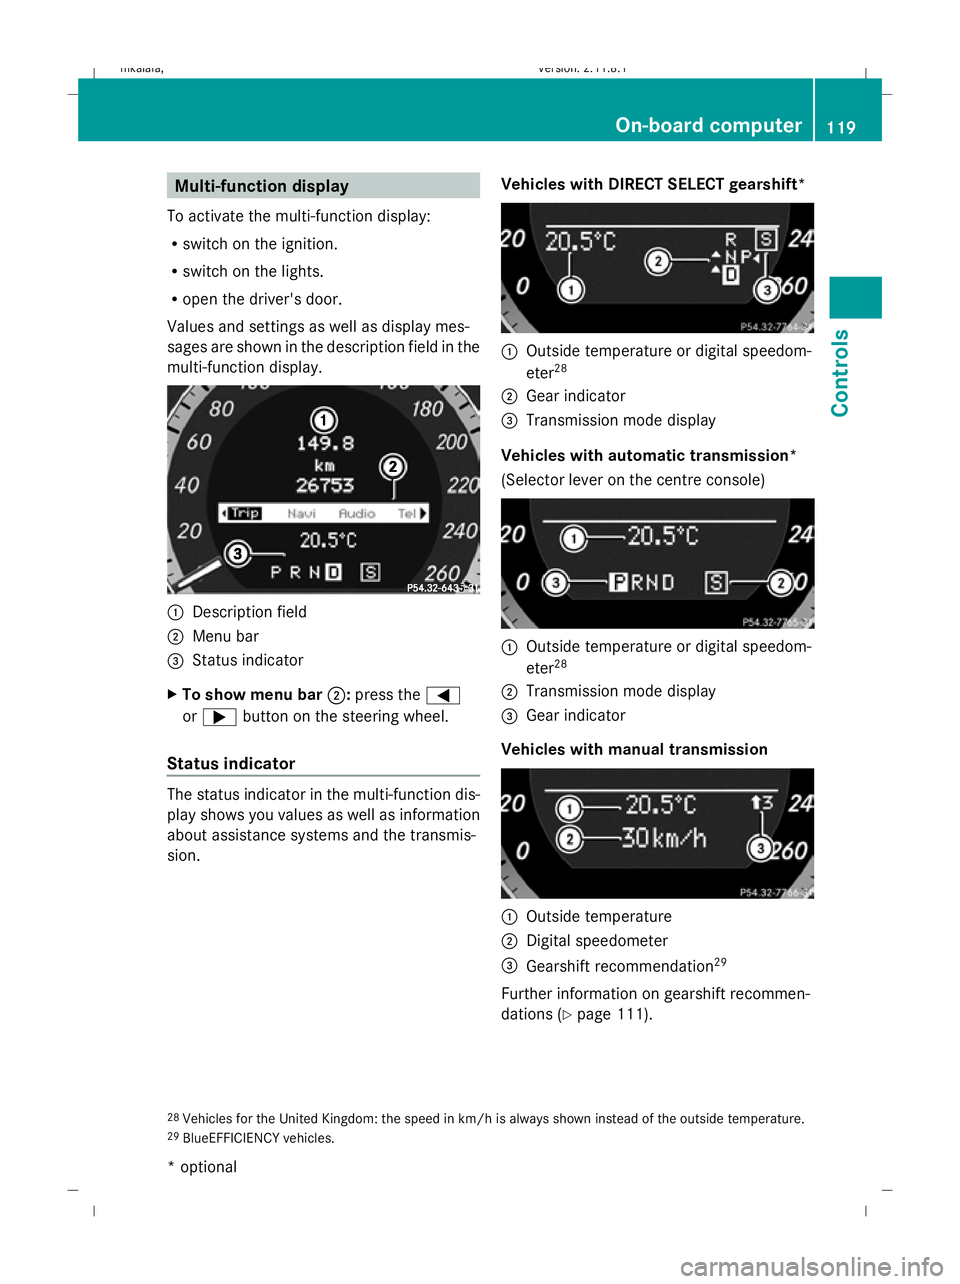
To activate the multi-function display:
R switch on the ignition.
R switch on the lights.
R open the driver's door.
Values and settings as well as display mes-
sages are shown in the description field in the
multi-function display. :
Description field
; Menu bar
= Status indicator
X To show menu bar ;:press the =
or ; button on the steering wheel.
Status indicator The status indicator in the multi-function dis-
play shows you values as well as information
about assistance systems and the transmis-
sion. Vehicles with DIRECT SELECT gearshift* :
Outside temperature or digital speedom-
eter 28
; Gear indicator
= Transmission mode display
Vehicles with automatic transmission*
(Selector lever on the centre console) :
Outside temperature or digital speedom-
eter 28
; Transmission mode display
= Gear indicator
Vehicles with manual transmission :
Outside temperature
; Digital speedometer
= Gearshift recommendation 29
Further information on gearshift recommen-
dations (Y page 111).
28 Vehicles for the United Kingdom: the speed in km/h is always shown instead of the outside temperature.
29 BlueEFFICIENCY vehicles. On-board computer
119Controls
* optional
212_AKB; 2; 4, en-GB
mkalafa,
Version: 2.11.8.1 2009-05-05T14:17:16+02:00 - Seite 119 Z
Dateiname: 6515346702_buchblock.pdf; erzeugt am 07. May 2009 14:16:10; WK
Page 135 of 373

i
Vehicles for the United Kingdom: this
function is not available.
The Permanent display: function allows
you to choose whether the multi-function dis-
play always shows the outside temperature
or the speed in mph.
X Press the =or; button on the steer-
ing wheel to select the Settingsmenu.
X Press the :or9 button to select the
Inst. cluster submenu.
X Press the abutton to confirm.
X Press the :or9 button to select the
Permanent display: function.
You will see the selected setting: outside
temperature orDig. speedo [mph].
X Press the abutton to save the setting.
Time/date This submenu is only available on vehicles
with Audio 20.
Your vehicle may be equipped with one of the
following audio systems:
A: Audio 20
B: Audio 50 APS*
C: COMAND APS*
X You can see which audio system is fitted in
your vehicle by referring to the separate
operating instructions.
Depending on the audio system fitted, time
and date are received from GPS satellites and
therefore cannot be set using the on-board
computer. Refer to the following table. A B C
Setting using the on-board com-
puter X
Automatic GPS satellite recep-
tion X X
Set the time zone once – see
separate operating instructions X X In the
Time/date submenu, you can set the
time and date.
Setting the time
X Press the =or; button on the steer-
ing wheel to select the Settingsmenu.
X Press the :or9 button to select the
Time/date submenu.
X Press the abutton to confirm.
X Press the :or9 button to select the
Time: function.
You will see the time currently set.
X Press the abutton to change it.
X Press the =or; button to select the
display to be changed: hours, minutes.
X Press the :or9 button to set the
selected display.
X Press the abutton to store the entry.
Setting the date
X Press the =or; button on the steer-
ing wheel to select the Settingsmenu.
X Press the :or9 button to select the
Time/date submenu.
X Press the abutton to confirm.
X Press the :or9 button to select the
Date: function.
You will see the date currently set.
X Press the abutton to change it.
X Press the =or; button to select the
display to be changed: day, month, year.
X Press the :or9 button to set the
selected display.
X Press the abutton to store the entry.
Lights Switching the daytime driving lights on/
off
If you have activated the
Daytime driving
lamps: function and the light switch is in the
c position the daytime driving lights are
switched on automatically when the engine is 132
On-board computerControls
* optional
212_AKB; 2; 4, en-GB
mkalafa,
Version: 2.11.8.1 2009-05-05T14:17:16+02:00 - Seite 132
Dateiname: 6515346702_buchblock.pdf; erzeugt am 07. May 2009 14:16:16; WK
Page 136 of 373

running. When it is dark, the side lamps and
the dipped-beam headlamps are switched on
automatically.
In countries where daytime driving lights are
legally required, Onis the factory setting.
X Press the =or; button on the steer-
ing wheel to select the Settingsmenu.
X Press the :or9 button to select the
Light submenu.
X Press the abutton to confirm.
X Press the :or9 button to select the
Daytime driving lamps function.
You will see the selected setting: onor
off.
X Press the abutton to save the setting.
Activating/deactivating the Intelligent
Light System*
When you activate the Intell. Light Sys‐
tem: function, you activate the following:
R motorway mode
R active light function
R cornering light function
R extended range foglamps
X Press the =or; button on the steer-
ing wheel to select the Settingsmenu.
X Press the :or9 button to select the
Light submenu.
X Press the abutton to confirm.
X Press the :or9 button to select the
Intell. Light System: function.
You will see the selected setting: onor
off.
X Press the abutton to save the setting.
Tourist mode
This function is only available on vehicles with
the Intelligent Light System.
If you drive in countries in which traffic drives
on the opposite side of the road to the country
where the vehicle is registered, oncoming
traffic may be dazzled by the asymmetrical
dipped-beam headlamps. Have tourist mode activated as close as pos-
sible to the border, before crossing the border
into such countries. This switches the head-
lamps to symmetrical dipped beam. When
using symmetrical beam, the edge of the car-
riageway is not illuminated as widely and as
far ahead as normal. Observe that if tourist
mode is activated not all lighting functions are
available.
If tourist mode is activated, the multi-function
display shows the display message:
Intell. Light System inoperative in
the Light submenu. Motorway mode and the
extended range foglamps are deactivated.
When you are driving back on the same side
of the road as the country where the vehicle
is registered, have tourist mode deactivated
at a qualified specialised workshop as soon
as possible after crossing the border, e.g. at
a Mercedes-Benz Service Centre.
Switching Adaptive Highbeam Assist*
on/off
X Press the =or; button on the steer-
ing wheel to select the Settingsmenu.
X Press the :or9 button to select the
Light submenu.
X Press the abutton to confirm.
X Press the :or9 button to select the
Adaptive Main-beam Assist: function.
You will see the selected setting: onor
off.
X Press the abutton to save the setting.
Setting the ambient lighting
X Press the =or; button on the steer-
ing wheel to select the Settingsmenu.
X Press the :or9 button to select the
Light submenu.
X Press the abutton to confirm.
X Press the :or9 button to select the
Ambient light Brightness: function.
You will see the selected setting.
X Press the abutton to confirm. On-board computer
133Controls
* optional
212_AKB; 2; 4, en-GB
mkalafa,
Version: 2.11.8.1 2009-05-05T14:17:16+02:00 - Seite 133 Z
Dateiname: 6515346702_buchblock.pdf; erzeugt am 07. May 2009 14:16:16; WK