2009 MERCEDES-BENZ E-CLASS SALOON height adjustment
[x] Cancel search: height adjustmentPage 8 of 373

ASSYST PLUS service interval dis-
play ..................................................... 239
Calling up the date (on-board
computer) ...................................... 239
Display message ............................ 239
ATA (anti-theft alarm system) ............65
Switching off the alarm ....................66
ATTENTION ASSIST ...........................163
Activating/deactivating (on-
board computer) ............................ 130
Display message ............................ 265
AUTO lights
Display message ............................ 271
Automatic car wash ..........................240
Automatic engine start With ECO Start/Stop function .......109
Automatic engine switch-off
Using the ECO Start/Stop func-
tion ................................................ 108
Automatic lane recognition system
see Lane Keeping Assist ................130
Automatic transmission
Changing gear yoursel f.................. 112
Display message ............................ 253
Driving tips .................................... 114
Emergency running mode ..............293
Kickdown ....................................... 114
Malfunction ................................... .293
One-touch gearshifting ..................112
Program selector button ................113
Releasing the parking lock man-
ually ............................................... 301
Selector lever positions .................111
Shift ranges ................................... 113
Trailer towing ................................. 114
Auxiliary heating ............................... 181
Display message ............................ 276
Notes ............................................. 181
Remote control .............................. 182
Setting (on-board computer) .......... 135
Auxiliary ventilation ..........................181 B
Backrest Display message ............................ 277
Bag hook ............................................ 200Ball coupling
Folding in ....................................... 237
Folding out ..................................... 234
BAS (Brake Assist) ............................... 59
BAS PLUS (Brake Assist System
Plus*) .................................................... 59
Battery Changing (auxiliary heating
remote control) .............................. 304
Changing (key )............................... 304
Charging ........................................ 322
Checking (key) ............................... 304
Check lamp (key )........................... 304
Disconnecting ................................ 321
Display message ...........253, 265, 274
Fitting the battery ..........................323
Jump-starting ................................. 323
Maintenance (vehicle) .................... 319
Reconnecting ................................. 323
Removing/fitting ........................... 322
Vehicle battery .............................. 319
Belt force limiters
Activation ......................................... 37
Belt height adjustment .......................91
Belt tensioners Activation ......................................... 37
Belt warning ......................................... 91
Blind Spot Assist ............................... 167
Activating/deactivating (on-
board computer) ............................ 130
Display message ............................ 261
Indicator lamp ................................ 280
Trailer towing ................................. 169
Warning lamp ................................. 280
BlueTEC
AdBlue ®
......................................... 335
Bonnet
Active bonnet (pedestrian protec-
tion) ............................................... 219
Bonnet catch ................................. 220
Display message ............................ 263
Opening/closing ........................... 219
Resetting the active bonnet
(pedestrian protection) after
being triggered .............................. 302
Bonnet release lever
Release leve r................................. 220 Index
5 212_AKB; 2; 4, en-GB
mkalafa,
Version: 2.11.8.1 2009-05-05T14:17:16+02:00 - Seite 5Dateiname: 6515346702_buchblock.pdf; erzeugt am 07. May 2009 14:15:26; WK
Page 17 of 373

Rear window heating
........................179
Rear window wiper ...........................100
Replacing the wiper blade .............. 309
Refuelling ........................................... 216
Remote control Auxiliary heating ............................ 182
Changing the batteries (auxiliary
heating) ......................................... 304
Garage door opene r....................... 211
Programming (garage door
opener) .......................................... 212
Reserve fuel ....................................... 334
Display message ............................ 278
Fuel tank ........................................ 334
Warning lamp ................................. 287
Restraint system
See SRS .......................................... 37
Restraint systems
For children ..................................... 44
Rev counter ........................................ 117
Reverse gear Engaging (manual transmission) ....110
Reversing camera ............................. 162
Cleaning ......................................... 243
Reversing lamps
Display message ............................ 273
Roller blind
see Roller sunblind
Roller sunblind
Panorama sliding sunroo f.............. 187
Rear side windows .........................207
Rear window .................................. 208
Roof carrier ....................................... 206
Roof load (maximum) ........................339
Route see Route guidance .......................125
Route guidance
On-board computer .......................125 S
Safety net .......................................... .200
Seat Adjusting ................................... 76, 77
Correct driver's seat position ........... 92
Storing settings ............................... 87
Seat backrest (rear)
Folding forwards/back ..................196Seat belt
Adjusting the driver's and front-
passenger seat belt .........................90
Adjusting the height ......................... 91
Centre rear-compartment sea t........ 90
Display message ......................91, 263
Fastening ......................................... 89
Switching belt adjustment on/off
(on-board computer) ......................136
Warning lamp ........................... 91, 286
Seat covers
Cleaning ......................................... 244
Seat heating ........................................ .81
Seat ventilation ................................... 81
Malfunction indicator lamp ............279
Securing a load .................................. 197
Selector lever Display message ............................ 253
Selector lever positions ....................112
Sensors Cleaning ......................................... 243
Service indicator
see ASSYST PLUS service interval
displa y........................................... 239
Service products ............................... 333
AdBlue ®
additives .......................... 335
Brake fluid ..................................... 338
Coolant .......................................... 338
Engine oil ....................................... 336
Fuel ................................................ 334
Windscreen washer fluid ................339
Settings
Calling up a stored setting ...............88
Factory (on-board computer) .........137
On-board computer .......................131
SETUP (on-board computer) .............123
Shift ranges ....................................... 113
Sidebag ................................................ 41
Side marker lamp Display message ............................ 273
Side windows
Convenience closing ......................102
Convenience opening ....................102
Fault .............................................. 295
Opening/closing ............................ 100
Skibag ................................................ 193
Ski rack .............................................. 20614
Index 212_AKB; 2; 4, en-GB
mkalafa,
Version: 2.11.8.1 2009-05-05T14:17:16+02:00 - Seite 14Dateiname: 6515346702_buchblock.pdf; erzeugt am 07. May 2009 14:15:27; WK
Page 80 of 373
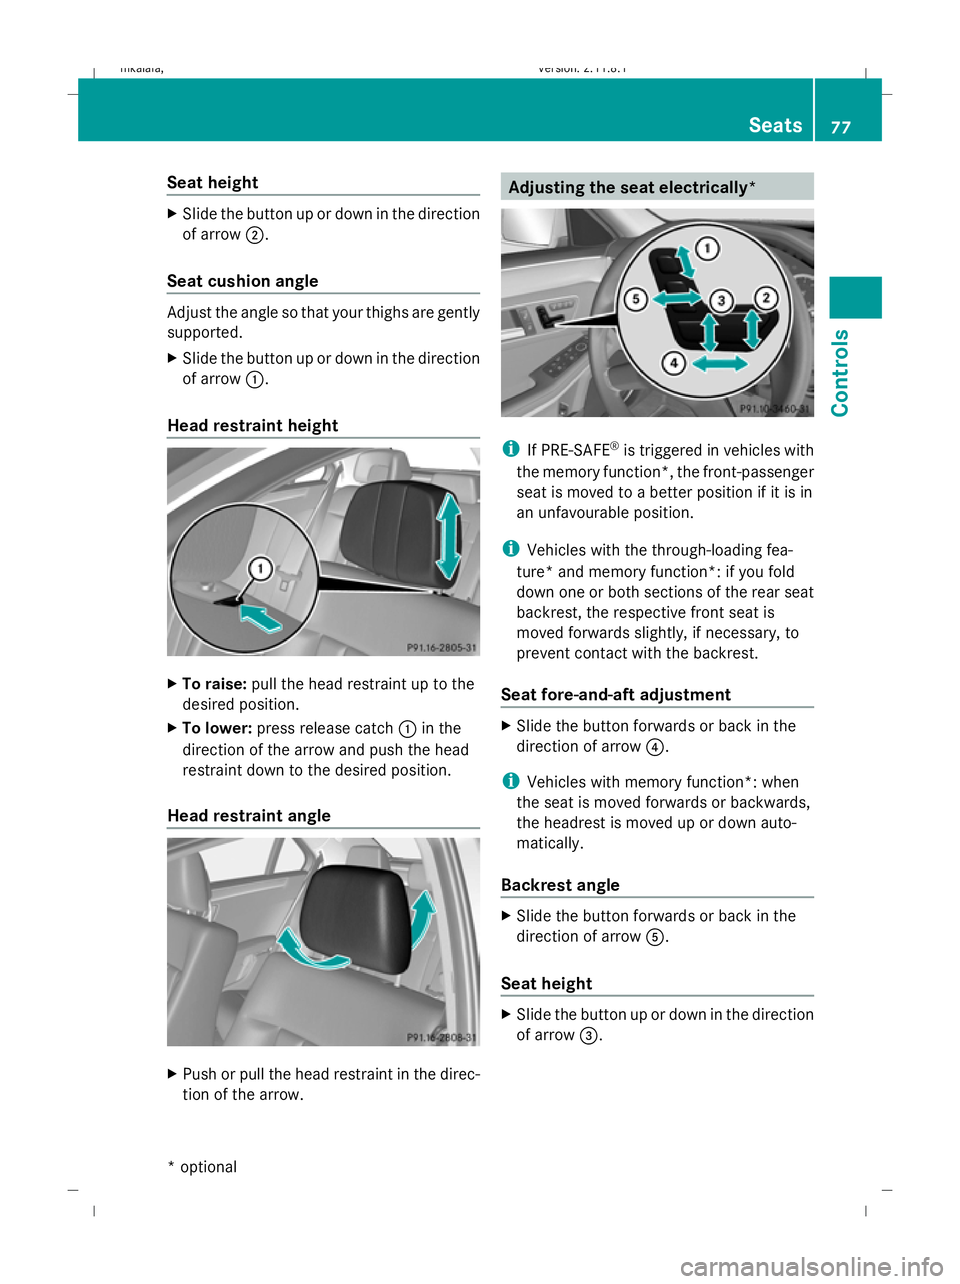
Seat height
X
Slide the button up or down in the direction
of arrow ;.
Seat cushion angle Adjust the angle so that your thighs are gently
supported.
X Slide the button up or down in the direction
of arrow :.
Head restraint height X
To raise: pull the head restraint up to the
desired position.
X To lower: press release catch :in the
direction of the arrow and push the head
restraint down to the desired position.
Head restraint angle X
Push or pull the head restraint in the direc-
tion of the arrow. Adjusting the seat electrically*
i
If PRE-SAFE ®
is triggered in vehicles with
the memory function*, the front-passenger
seat is moved to a better position if it is in
an unfavourable position.
i Vehicles with the through-loading fea-
ture* and memory function*: if you fold
down one or both sections of the rear seat
backrest, the respective front seat is
moved forwards slightly, if necessary, to
prevent contact with the backrest.
Seat fore-and-aft adjustment X
Slide the button forwards or back in the
direction of arrow ?.
i Vehicles with memory function*: when
the seat is moved forwards or backwards,
the headrest is moved up or down auto-
matically.
Backrest angle X
Slide the button forwards or back in the
direction of arrow A.
Seat height X
Slide the button up or down in the direction
of arrow =. Seats
77Controls
* optional
212_AKB; 2; 4, en-GB
mkalafa,
Version: 2.11.8.1 2009-05-05T14:17:16+02:00 - Seite 77 Z
Dateiname: 6515346702_buchblock.pdf; erzeugt am 07. May 2009 14:15:50; WK
Page 81 of 373
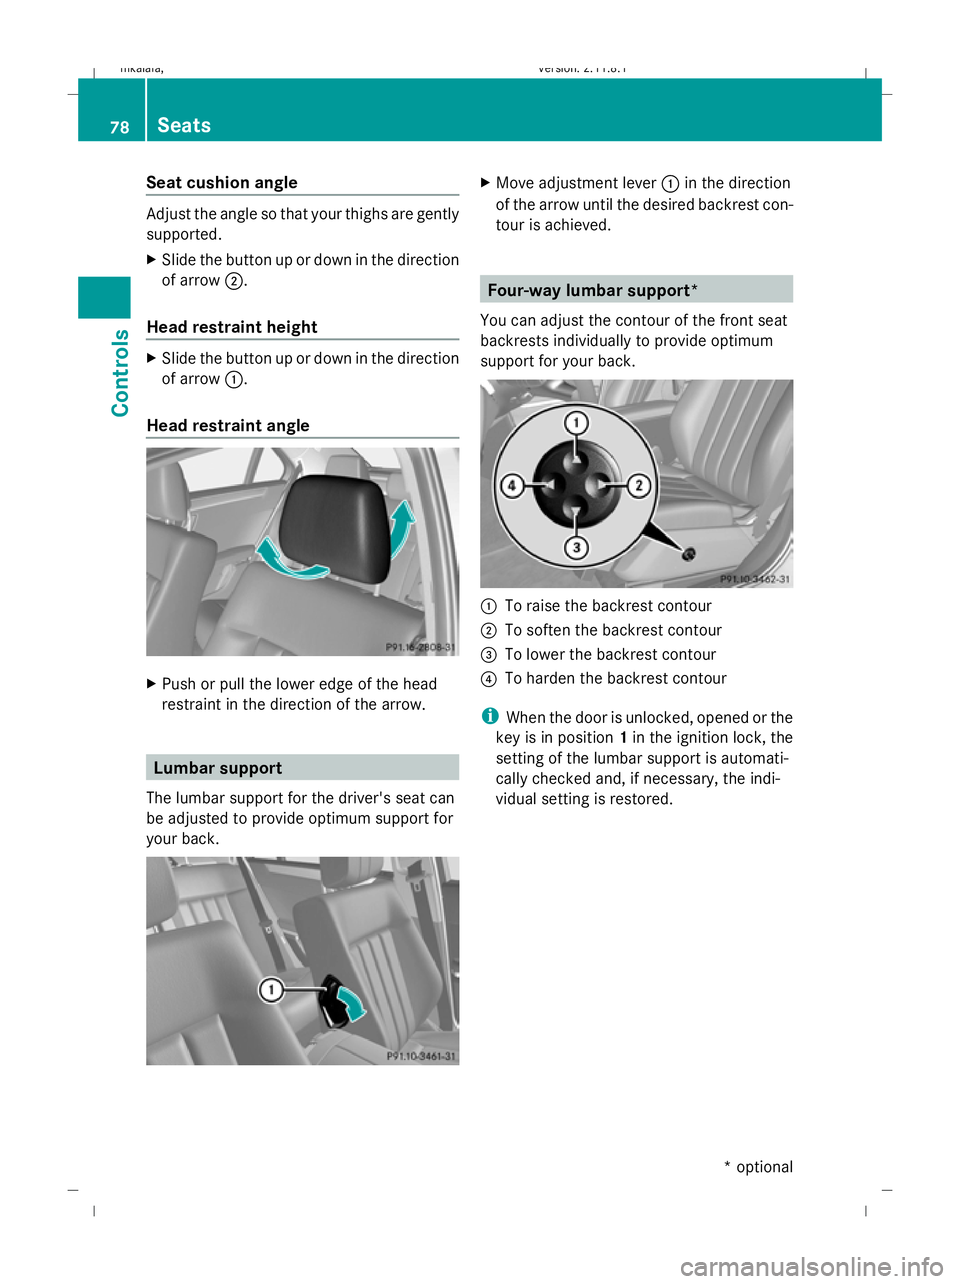
Seat cushion angle
Adjust the angle so that your thighs are gently
supported.
X Slide the button up or down in the direction
of arrow ;.
Head restraint height X
Slide the button up or down in the direction
of arrow :.
Head restraint angle X
Push or pull the lower edge of the head
restraint in the direction of the arrow. Lumbar support
The lumbar support for the driver's seat can
be adjusted to provide optimum support for
your back. X
Move adjustment lever :in the direction
of the arrow until the desired backrest con-
tour is achieved. Four-way lumbar support*
You can adjust the contour of the front seat
backrests individually to provide optimum
support for your back. :
To raise the backrest contour
; To soften the backrest contour
= To lower the backrest contour
? To harden the backrest contour
i When the door is unlocked, opened or the
key is in position 1in the ignition lock, the
setting of the lumbar support is automati-
cally checked and, if necessary, the indi-
vidual setting is restored. 78
SeatsControls
* optional
212_AKB; 2; 4, en-GB
mkalafa,
Version: 2.11.8.1 2009-05-05T14:17:16+02:00 - Seite 78
Dateiname: 6515346702_buchblock.pdf; erzeugt am 07. May 2009 14:15:51; WK
Page 87 of 373
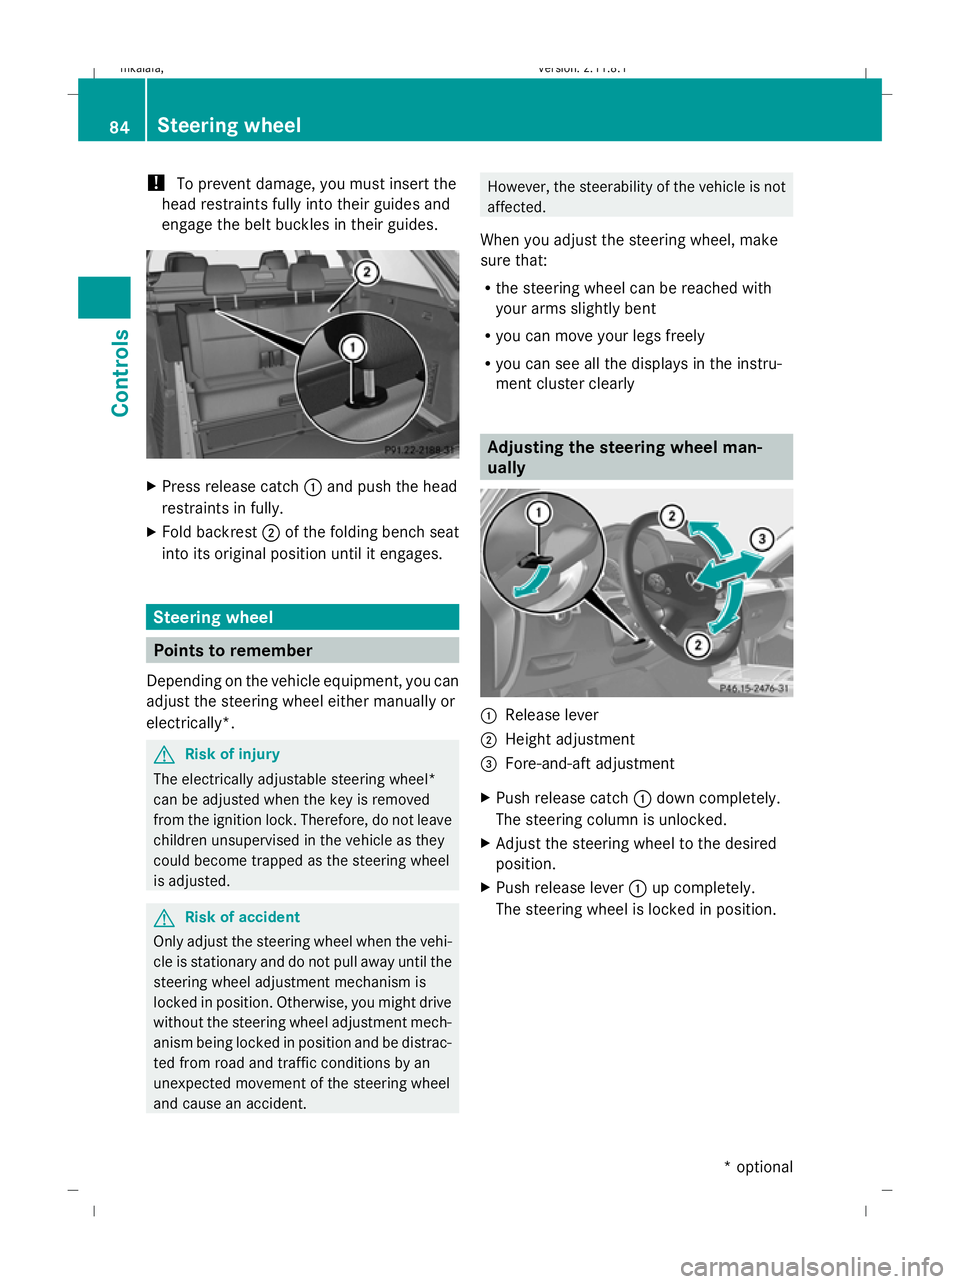
!
To prevent damage, you must insert the
head restraints fully into their guides and
engage the belt buckles in their guides. X
Press release catch :and push the head
restraints in fully.
X Fold backrest ;of the folding bench seat
into its original position until it engages. Steering wheel
Points to remember
Depending on the vehicle equipment, you can
adjust the steering wheel either manually or
electrically*. G
Risk of injury
The electrically adjustable steering wheel*
can be adjusted when the key is removed
from the ignition lock. Therefore, do not leave
children unsupervised in the vehicle as they
could become trapped as the steering wheel
is adjusted. G
Risk of accident
Only adjust the steering wheel when the vehi-
cle is stationary and do not pull away until the
steering wheel adjustment mechanism is
locked in position. Otherwise, you might drive
without the steering wheel adjustment mech-
anism being locked in position and be distrac-
ted from road and traffic conditions by an
unexpected movement of the steering wheel
and cause an accident. However, the steerability of the vehicle is not
affected.
When you adjust the steering wheel, make
sure that:
R the steering wheel can be reached with
your arms slightly bent
R you can move your legs freely
R you can see all the displays in the instru-
ment cluster clearly Adjusting the steering wheel man-
ually
:
Release lever
; Height adjustment
= Fore-and-aft adjustment
X Push release catch :down completely.
The steering column is unlocked.
X Adjust the steering wheel to the desired
position.
X Push release lever :up completely.
The steering wheel is locked in position. 84
Steering wheelControls
* optional
212_AKB; 2; 4, en-GB
mkalafa,
Version: 2.11.8.1 2009-05-05T14:17:16+02:00 - Seite 84
Dateiname: 6515346702_buchblock.pdf; erzeugt am 07. May 2009 14:15:55; WK
Page 88 of 373
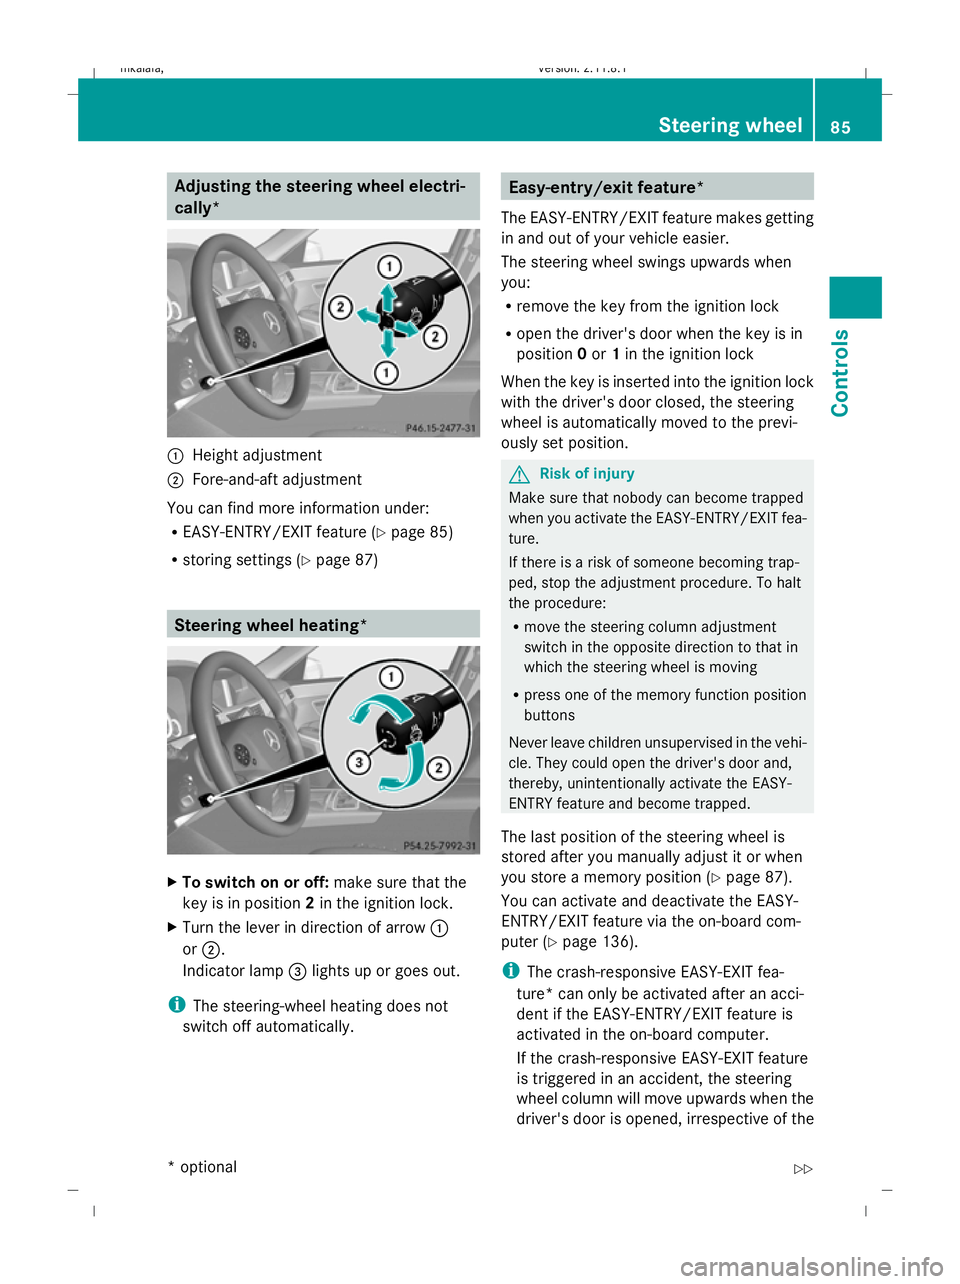
Adjusting the steering wheel electri-
cally*
:
Height adjustment
; Fore-and-aft adjustment
You can find more information under:
R EASY-ENTRY/EXIT feature (Y page 85)
R storing settings (Y page 87) Steering wheel heating*
X
To switch on or off: make sure that the
key is in position 2in the ignition lock.
X Turn the lever in direction of arrow :
or ;.
Indicator lamp =lights up or goes out.
i The steering-wheel heating does not
switch off automatically. Easy-entry/exit feature*
The EASY-ENTRY/EXIT feature makes getting
in and out of your vehicle easier.
The steering wheel swings upwards when
you:
R remove the key from the ignition lock
R open the driver's door when the key is in
position 0or 1in the ignition lock
When the key is inserted into the ignition lock
with the driver's door closed, the steering
wheel is automatically moved to the previ-
ously set position. G
Risk of injury
Make sure that nobody can become trapped
when you activate the EASY-ENTRY/EXIT fea-
ture.
If there is a risk of someone becoming trap-
ped, stop the adjustment procedure. To halt
the procedure:
R move the steering column adjustment
switch in the opposite direction to that in
which the steering wheel is moving
R press one of the memory function position
buttons
Never leave children unsupervised in the vehi-
cle. They could open the driver's door and,
thereby, unintentionally activate the EASY-
ENTRY feature and become trapped.
The last position of the steering wheel is
stored after you manually adjust it or when
you store a memory position (Y page 87).
You can activate and deactivate the EASY-
ENTRY/EXIT feature via the on-board com-
puter (Y page 136).
i The crash-responsive EASY-EXIT fea-
ture* can only be activated after an acci-
dent if the EASY-ENTRY/EXIT feature is
activated in the on-board computer.
If the crash-responsive EASY-EXIT feature
is triggered in an accident, the steering
wheel column will move upwards when the
driver's door is opened, irrespective of the Steering wheel
85Controls
* optional
212_AKB; 2; 4, en-GB
mkalafa
,V ersion: 2.11.8.1
2009-05-05T14:17:16+02:00 - Seite 85 Z
Dateiname: 6515346702_buchblock.pdf; erzeugt am 07. May 2009 14:15:55; WK
Page 93 of 373
G
Risk of injury
A dirty or damaged seat belt or a seat belt that
has been subjected to a load in an accident
or which has been modified no longer offers
the intended level of protection. Under certain
circumstances, this could cause severe or
even fatal injuries.
For this reason, check regularly that the seat
belts are not damaged or dirty.
Always have damaged seat belts or seat belts
that have been subjected to a load in an acci-
dent replaced at a qualified specialist work-
shop. Consult a qualified specialist workshop
which has the necessary specialist knowledge
and tools to carry out the work required.
Mercedes-Benz recommends that you use a
Mercedes-Benz Service Centre for this pur-
pose.
For safety reasons, Mercedes-Benz recom-
mends that you only use seat belts which have
been approved by Mercedes-Benz for your
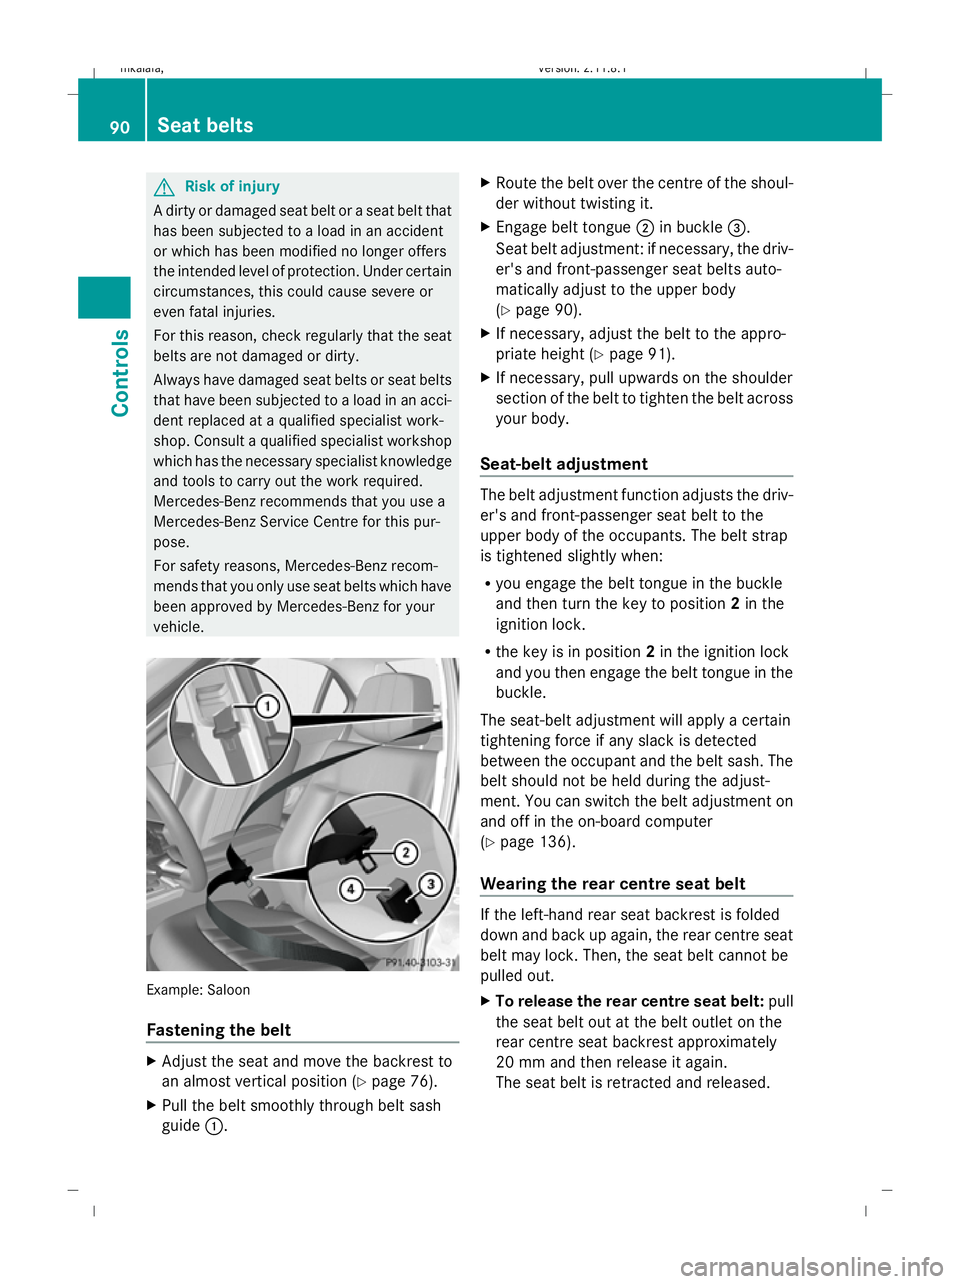
vehicle. Example: Saloon
Fastening the belt
X
Adjust the seat and move the backrest to
an almost vertical position (Y page 76).
X Pull the belt smoothly through belt sash
guide :. X
Route the belt over the centre of the shoul-
der without twisting it.
X Engage belt tongue ;in buckle =.
Seat belt adjustment: if necessary, the driv-
er's and front-passenger seat belts auto-
matically adjust to the upper body
(Y page 90).
X If necessary, adjust the belt to the appro-
priate height (Y page 91).
X If necessary, pull upwards on the shoulder
section of the belt to tighten the belt across
your body.
Seat-belt adjustment The belt adjustment function adjusts the driv-
er's and front-passenger seat belt to the
upper body of the occupants. The belt strap
is tightened slightly when:
R
you engage the belt tongue in the buckle
and then turn the key to position 2in the
ignition lock.
R the key is in position 2in the ignition lock
and you then engage the belt tongue in the
buckle.
The seat-belt adjustment will apply a certain
tightening force if any slack is detected
between the occupant and the belt sash. The
belt should not be held during the adjust-
ment. You can switch the belt adjustment on
and off in the on-board computer
(Y page 136).
Wearing the rear centre seat belt If the left-hand rear seat backrest is folded
down and back up again, the rear centre seat
belt may lock. Then, the seat belt cannot be
pulled out.
X To release the rear centre seat belt: pull
the seat belt out at the belt outlet on the
rear centre seat backrest approximately
20 mm and then release it again.
The seat belt is retracted and released. 90
Seat beltsControls
212_AKB; 2; 4, en-GB
mkalafa
,V ersion: 2.11.8.1
2009-05-05T14:17:16+02:00 - Seite 90
Dateiname: 6515346702_buchblock.pdf; erzeugt am 07. May 2009 14:15:57; WK
Page 94 of 373
Unfastening the belt
X
Press release button ?and guide belt
tongue ;back towards belt sash
guide :. Belt warning for driver and front
passenger
The 7 seat belt warning lamp in the instru-
ment cluster reminds you that all occupants
should fasten their seat belts. It is either lit
continuously or flashes. Additionally, there
may be a warning tone.
The 7 seat belt warning lamp goes out and
the warning tone ceases as soon as the driver
and front passenger have fastened their seat
belts.
For certain countries only: regardless of
whether the driver or the front passenger
already have their seat belt fastened, the
7 seat belt warning lamp lights up for six
seconds after the engine has been started. It
then goes out if both the driver and the front
passenger have fastened their seat belt.
i Further information about the 7seat
belt warning lamp (Y page 286). Belt height adjustment
You can adjust the seat belt height on the
driver's seat and the front-passenger seat.
Estate: you can also adjust the belt height on
the outer rear bench seats.
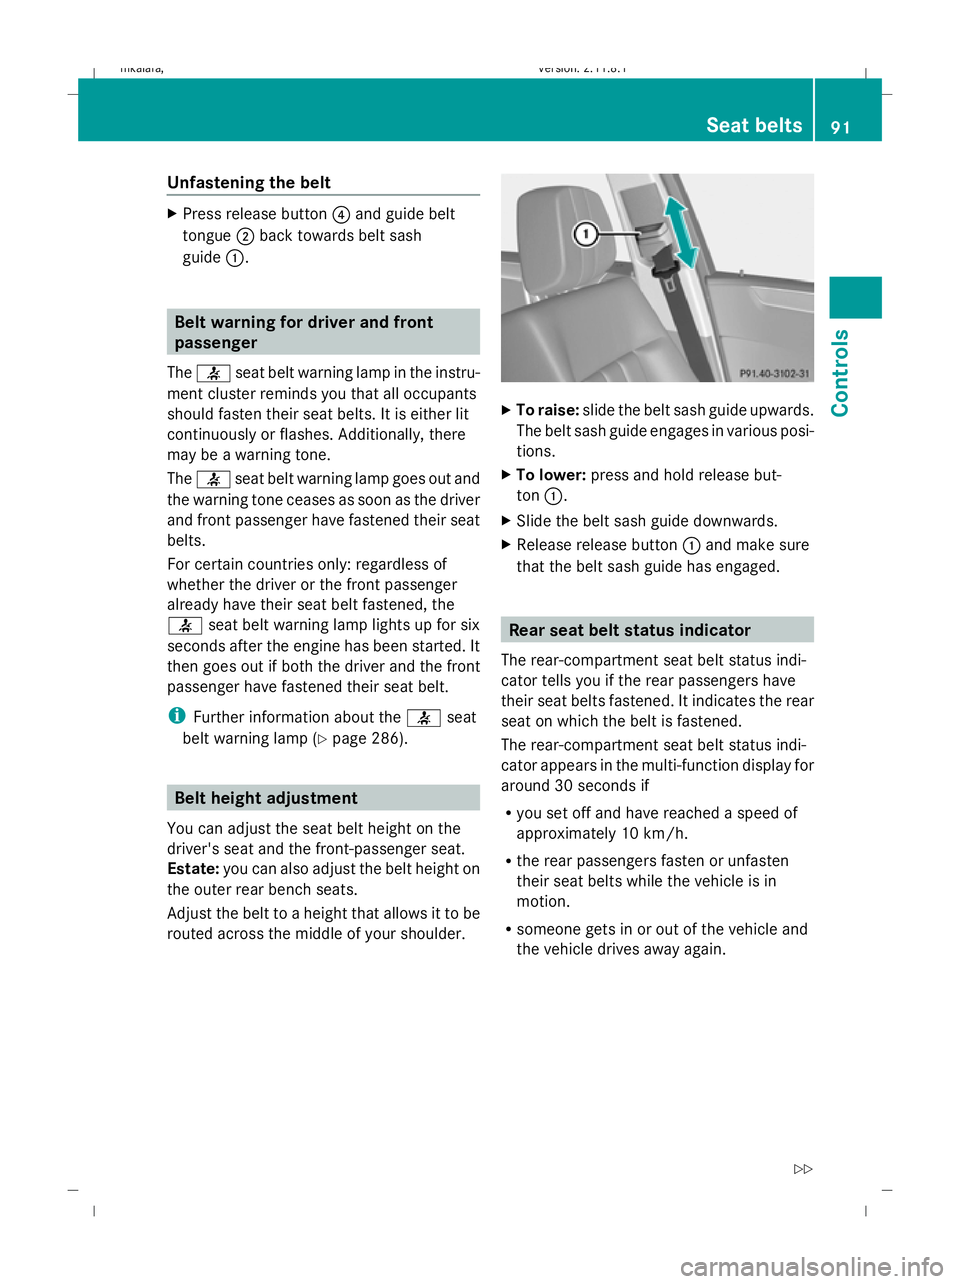
Adjust the belt to a height that allows it to be
routed across the middle of your shoulder. X
To raise: slide the belt sash guide upwards.
The belt sash guide engages in various posi-
tions.
X To lower: press and hold release but-
ton :.
X Slide the belt sash guide downwards.
X Release release button :and make sure
that the belt sash guide has engaged. Rear seat belt status indicator
The rear-compartment seat belt status indi-
cator tells you if the rear passengers have
their seat belts fastened. It indicates the rear
seat on which the belt is fastened.
The rear-compartment seat belt status indi-
cator appears in the multi-function display for
around 30 seconds if
R you set off and have reached a speed of
approximately 10 km/h.
R the rear passengers fasten or unfasten
their seat belts while the vehicle is in
motion.
R someone gets in or out of the vehicle and
the vehicle drives away again. Seat belts
91Controls
212_AKB; 2; 4, en-GB
mkalafa, Version: 2.11.8.1 2009-05-05T14:17:16+02:00 - Seite 91 Z
Dateiname: 6515346702_buchblock.pdf; erzeugt am 07. May 2009 14:15:57; WK