2009 MERCEDES-BENZ E-CLASS SALOON lights
[x] Cancel search: lightsPage 72 of 373

Opening and closing
...........................70
Boot/luggage compartment ..............72
Key positions ....................................... 75
Seats .................................................... 76
Steering wheel .................................... 84
Mirrors ................................................. 86
Memory functions* .............................87
Seat belts ............................................. 89
Lights ................................................... 93
Windscreen wipers .............................99
Side windows .................................... 100
Driving and parking ..........................103
Transmission ..................................... 110
Instrument cluster ............................117
On-board computer ..........................118
Driving systems ................................ 137
Air conditioning ................................. 171
Sliding sunroof .................................. 184
Loading and stowing ........................187
Features ............................................. 207 69Controls
212_AKB; 2; 4, en-GB
mkalafa,
Version: 2.11.8.1 2009-05-05T14:17:16+02:00 - Seite 69
Dateiname: 6515346702_buchblock.pdf; erzeugt am 07. May 2009 14:15:46; WK
Page 88 of 373

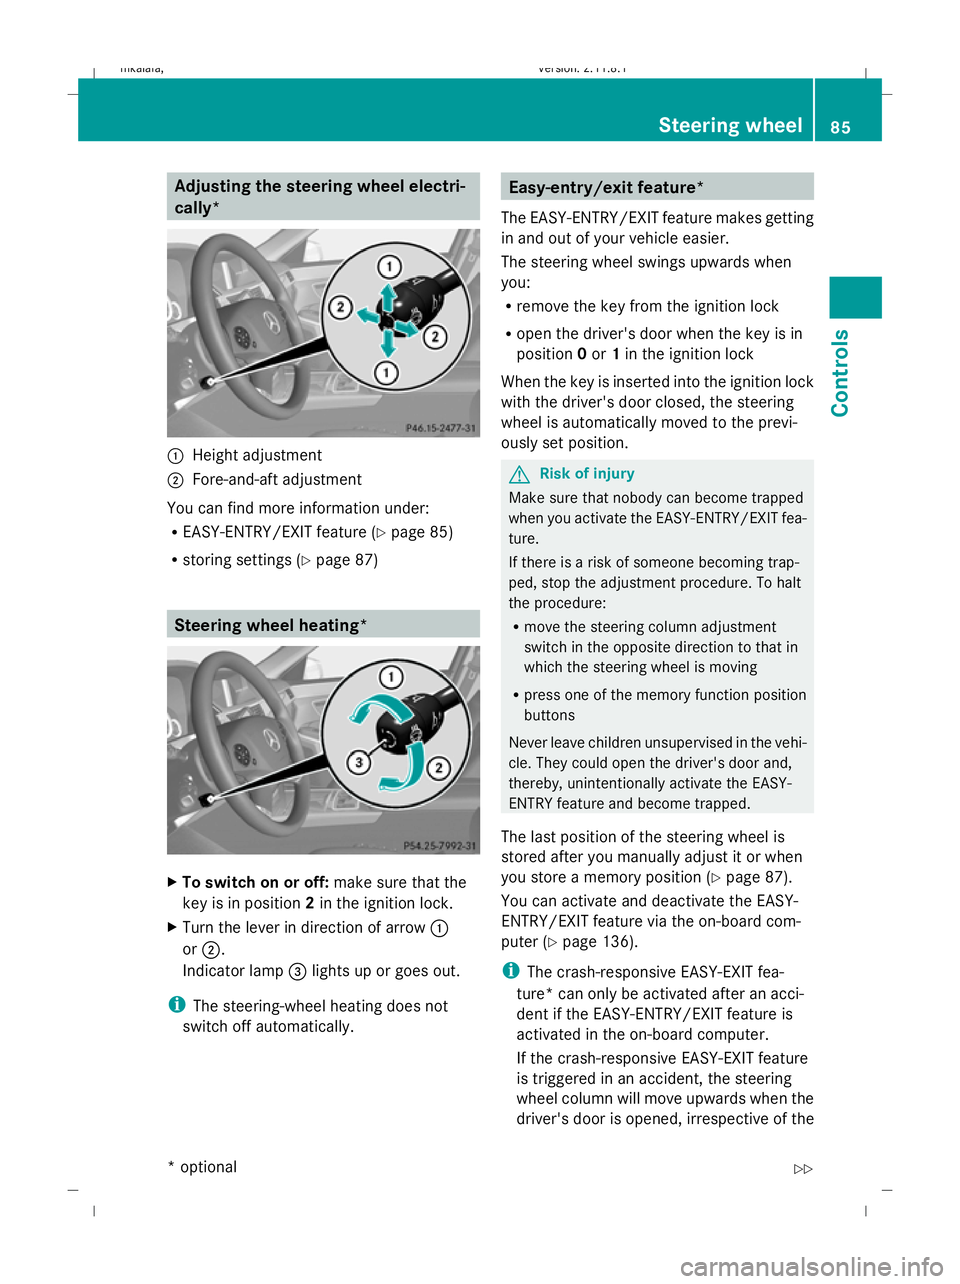
Adjusting the steering wheel electri-
cally*
:
Height adjustment
; Fore-and-aft adjustment
You can find more information under:
R EASY-ENTRY/EXIT feature (Y page 85)
R storing settings (Y page 87) Steering wheel heating*
X
To switch on or off: make sure that the
key is in position 2in the ignition lock.
X Turn the lever in direction of arrow :
or ;.
Indicator lamp =lights up or goes out.
i The steering-wheel heating does not
switch off automatically. Easy-entry/exit feature*
The EASY-ENTRY/EXIT feature makes getting
in and out of your vehicle easier.
The steering wheel swings upwards when
you:
R remove the key from the ignition lock
R open the driver's door when the key is in
position 0or 1in the ignition lock
When the key is inserted into the ignition lock
with the driver's door closed, the steering
wheel is automatically moved to the previ-
ously set position. G
Risk of injury
Make sure that nobody can become trapped
when you activate the EASY-ENTRY/EXIT fea-
ture.
If there is a risk of someone becoming trap-
ped, stop the adjustment procedure. To halt
the procedure:
R move the steering column adjustment
switch in the opposite direction to that in
which the steering wheel is moving
R press one of the memory function position
buttons
Never leave children unsupervised in the vehi-
cle. They could open the driver's door and,
thereby, unintentionally activate the EASY-
ENTRY feature and become trapped.
The last position of the steering wheel is
stored after you manually adjust it or when
you store a memory position (Y page 87).
You can activate and deactivate the EASY-
ENTRY/EXIT feature via the on-board com-
puter (Y page 136).
i The crash-responsive EASY-EXIT fea-
ture* can only be activated after an acci-
dent if the EASY-ENTRY/EXIT feature is
activated in the on-board computer.
If the crash-responsive EASY-EXIT feature
is triggered in an accident, the steering
wheel column will move upwards when the
driver's door is opened, irrespective of the Steering wheel
85Controls
* optional
212_AKB; 2; 4, en-GB
mkalafa
,V ersion: 2.11.8.1
2009-05-05T14:17:16+02:00 - Seite 85 Z
Dateiname: 6515346702_buchblock.pdf; erzeugt am 07. May 2009 14:15:55; WK
Page 89 of 373

position of the key in the ignition lock. This
makes it easier to exit the vehicle and res-
cue the occupants. Mirrors
Rear-view mirror
X Adjust the rear-view mirror by hand so you
have a good overview of the traffic condi-
tions.
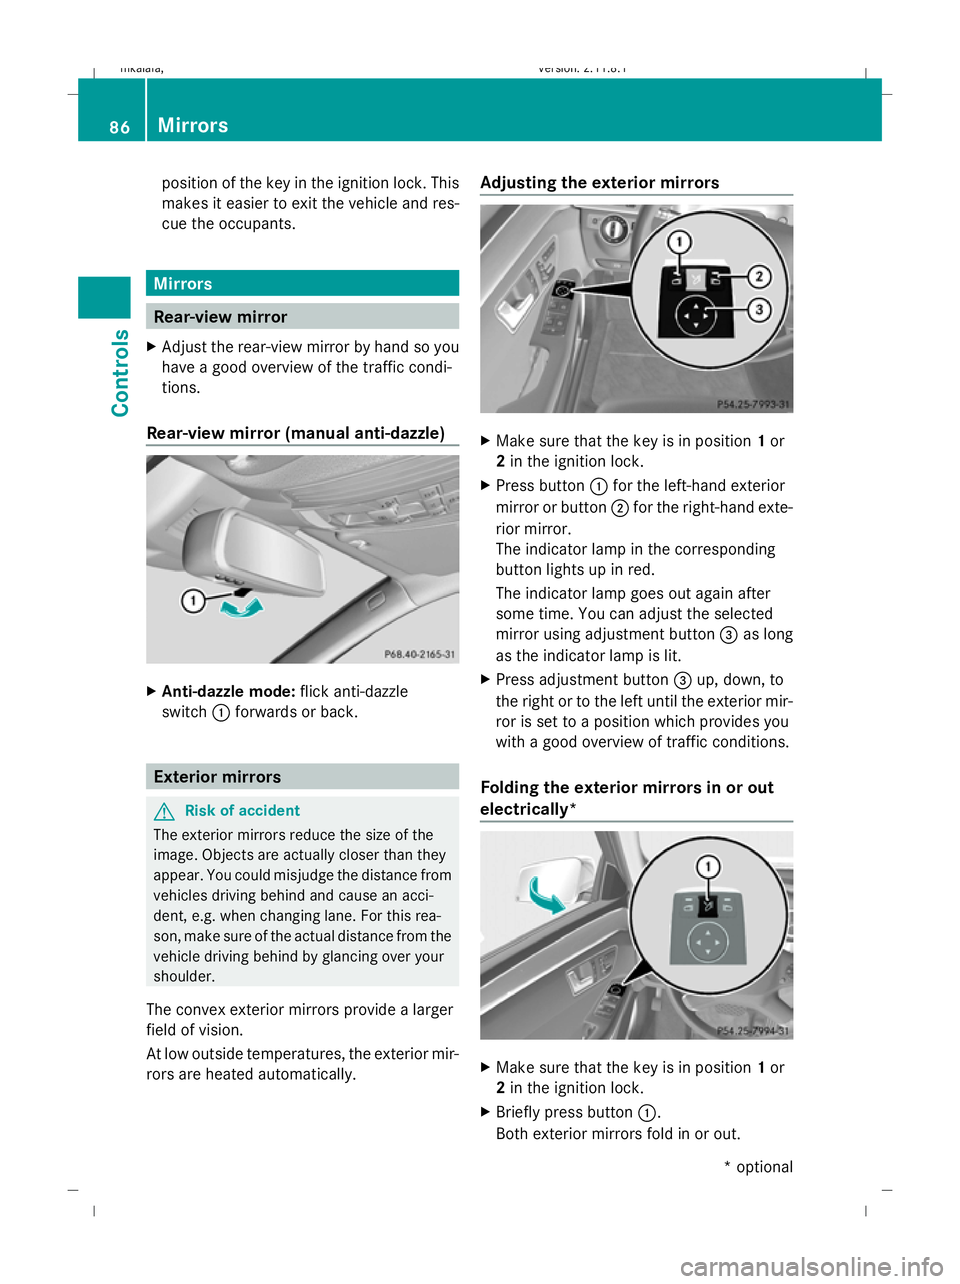
Rear-view mirror (manual anti-dazzle) X
Anti-dazzle mode: flick anti-dazzle
switch :forwards or back. Exterior mirrors
G
Risk of accident
The exterior mirrors reduce the size of the
image. Objects are actually closer than they
appear. You could misjudge the distance from
vehicles driving behind and cause an acci-
dent, e.g. when changing lane. For this rea-
son, make sure of the actual distance from the
vehicle driving behind by glancing over your
shoulder.
The convex exterior mirrors provide a larger
field of vision.
At low outside temperatures, the exterior mir-
rors are heated automatically. Adjusting the exterior mirrors
X
Make sure that the key is in position 1or
2 in the ignition lock.
X Press button :for the left-hand exterior
mirror or button ;for the right-hand exte-
rior mirror.
The indicator lamp in the corresponding
button lights up in red.
The indicator lamp goes out again after
some time. You can adjust the selected
mirror using adjustment button =as long
as the indicator lamp is lit.
X Press adjustment button =up, down, to
the right or to the left until the exterior mir-
ror is set to a position which provides you
with a good overview of traffic conditions.
Folding the exterior mirrors in or out
electrically* X
Make sure that the key is in position 1or
2 in the ignition lock.
X Briefly press button :.
Both exterior mirrors fold in or out. 86
MirrorsControls
* optional
212_AKB; 2; 4, en-GB
mkalafa,
Version: 2.11.8.1 2009-05-05T14:17:16+02:00 - Seite 86
Dateiname: 6515346702_buchblock.pdf; erzeugt am 07. May 2009 14:15:56; WK
Page 94 of 373

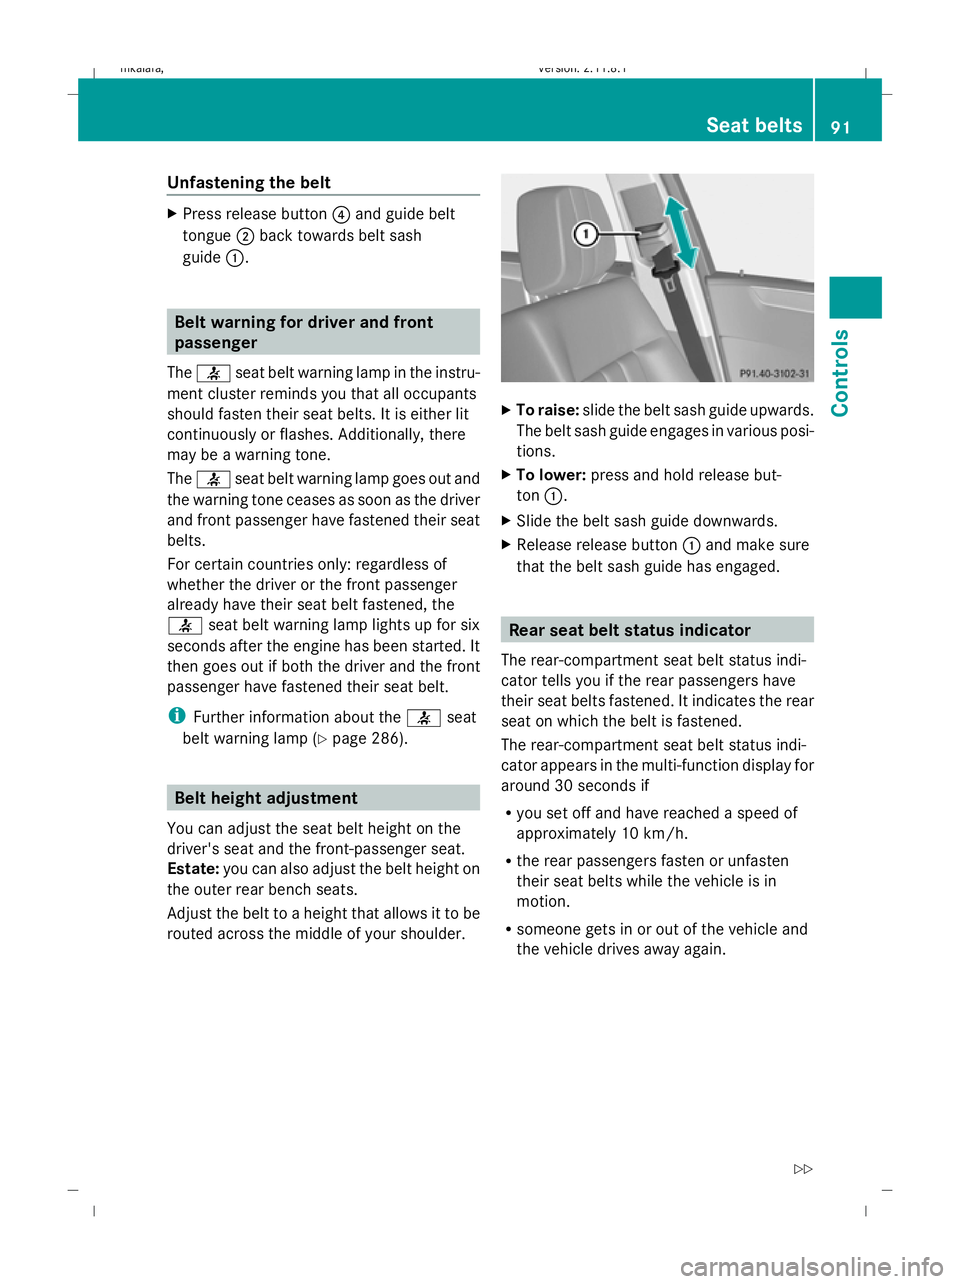
Unfastening the belt
X
Press release button ?and guide belt
tongue ;back towards belt sash
guide :. Belt warning for driver and front
passenger
The 7 seat belt warning lamp in the instru-
ment cluster reminds you that all occupants
should fasten their seat belts. It is either lit
continuously or flashes. Additionally, there
may be a warning tone.
The 7 seat belt warning lamp goes out and
the warning tone ceases as soon as the driver
and front passenger have fastened their seat
belts.
For certain countries only: regardless of
whether the driver or the front passenger
already have their seat belt fastened, the
7 seat belt warning lamp lights up for six
seconds after the engine has been started. It
then goes out if both the driver and the front
passenger have fastened their seat belt.
i Further information about the 7seat
belt warning lamp (Y page 286). Belt height adjustment
You can adjust the seat belt height on the
driver's seat and the front-passenger seat.
Estate: you can also adjust the belt height on
the outer rear bench seats.
Adjust the belt to a height that allows it to be
routed across the middle of your shoulder. X
To raise: slide the belt sash guide upwards.
The belt sash guide engages in various posi-
tions.
X To lower: press and hold release but-
ton :.
X Slide the belt sash guide downwards.
X Release release button :and make sure
that the belt sash guide has engaged. Rear seat belt status indicator
The rear-compartment seat belt status indi-
cator tells you if the rear passengers have
their seat belts fastened. It indicates the rear
seat on which the belt is fastened.
The rear-compartment seat belt status indi-
cator appears in the multi-function display for
around 30 seconds if
R you set off and have reached a speed of
approximately 10 km/h.
R the rear passengers fasten or unfasten
their seat belts while the vehicle is in
motion.
R someone gets in or out of the vehicle and
the vehicle drives away again. Seat belts
91Controls
212_AKB; 2; 4, en-GB
mkalafa, Version: 2.11.8.1 2009-05-05T14:17:16+02:00 - Seite 91 Z
Dateiname: 6515346702_buchblock.pdf; erzeugt am 07. May 2009 14:15:57; WK
Page 96 of 373

It should:
R
fit snugly across your body.
R be routed across the middle of your
shoulder.
R be routed in your pelvic area across the
hip joints. Lights
Exterior lighting
Notes on the exterior lighting For safety reasons, Mercedes-Benz recom-
mends that you drive with the lights switched
on even during the daytime. In some coun-
tries, daytime operation of headlamps varies
due to legal and voluntary requirements. In
these countries, daytime driving lights are
automatically switched on when the engine is
started.
The exterior lighting (except the side lamp/
parking lamp) switches off automatically if
you:
R remove the key from the ignition lock
R open the driver's door with the ignition
turned off (key in position 0in the ignition
lock).
! Switch off the side lamps and parking
lamp when you leave the vehicle. This pre-
vents the battery from discharging. Information about driving abroad Converting to symmetrical dipped beam
when driving abroad:
switch the headlamps
to symmetrical dipped beam in countries in
which traffic drives on the opposite side of the
road to the country where the vehicle is reg-
istered. This prevents oncoming traffic from
being dazzled.
Have the headlamps converted at a qualified
specialist workshop, e.g. a Mercedes-Benz
Service Centre, as close to the border as pos-
sible before driving in these countries. Sym-
metrical lights do not illuminate as large an
area of the edge of the carriageway.
Converting to asymmetrical dipped beam
after returning: have the headlamps conver-
ted back to asymmetrical dipped beam at a
qualified specialist workshop, e.g. a
Mercedes-Benz Service Centre, as soon as
possible after crossing the border when
returning.
Vehicles with Intelligent Light System*: if
the headlamps are converted to symmetrical
dipped beam, not all light functions are avail-
able. "Motorway mode" and the "extended
range foglamps" are deactivated
(Y page 133). Lights
93Controls
* optional
212_AKB; 2; 4, en-GB
mkalafa
,V ersion: 2.11.8.1
2009-05-05T14:17:16+02:00 - Seite 93 Z
Dateiname: 6515346702_buchblock.pdf; erzeugt am 07. May 2009 14:15:59; WK
Page 97 of 373

Function
Light switch
1
W
Left-hand parking lamp 2
X
Right-hand parking lamp 3
T
Side lamps, licence plate and
instrument lighting 4
c
Automatic headlamp mode/
daytime driving lights 5
L
Dipped-beam headlamps/
main-beam headlamps 21 B
R
Rear foglamp C
N
Foglamps 22 Combination switch
D
K
Main-beam headlamps 21 E
!
Right-hand turn signal F
Headlamp flasher
G
#
Left-hand turn signal Dipped-beam headlamps
X
Turn the ignition key to position 2in the
ignition lock or start the engine.
X To activate: turn the light switch to L.
The L indicator lamp in the instrument
cluster lights up.
Daytime driving lights X
Activate the daytime driving lights function
via the on-board computer (Y page 132).
X To activate: turn the light switch to c.
When the engine is on: depending on the
ambient light conditions, the daytime driv-
ing lights or the dipped-beam headlamps
are switched on. When the dipped-beam headlamps are
switched on, the Lindicator lamp in the
instrument cluster lights up.
Automatic headlamp mode G
Risk of accident
If the light switch is set to the cposition,
the light will not come on automatically in
foggy conditions. This could endanger you
and others. Therefore, turn the light switch to
L in the dark or in fog.
The automatic headlamp feature is only an
aid. The driver is responsible for the vehicle's
lighting at all times. G
Risk of accident
When it is dark or foggy, turn the light switch
from c toL in good time. You could
otherwise cause an accident if the headlamps
were to switch off temporarily.
X To switch on: turn the light switch to
c.
Key in position 1in the ignition lock: the
side lamp is switched on or off automati-
cally depending on the brightness of the
ambient light.
When the engine is running: depending on
the ambient light conditions, the daytime
driving lights 23
or the dipped-beam head-
lamps (in addition to the side lamp) are
switched on or off automatically.
When the dipped-beam headlamps are
switched on, the Lindicator lamp in the
instrument cluster lights up.
Foglamps Only vehicles with front foglamps have the
"Foglamps" function.
21 You must switch on the dipped-beam headlamps before you can switch on the main-beam headlamps.
22 Only vehicles with front foglamps have the "Foglamps" function.
23 If you have activated the "Daytime driving lights" function in the on-board computer. 94
LightsControls
212_AKB; 2; 4, en-GB
mkalafa
,V ersion: 2.11.8.1
2009-05-05T14:17:16+02:00 - Seite 94
Dateiname: 6515346702_buchblock.pdf; erzeugt am 07. May 2009 14:15:59; WK
Page 98 of 373

G
Risk of accident
If you suspect that driving conditions will be
foggy, turn the light switch to Lbefore you
start your journey. Otherwise, your vehicle
may not be visible and you could endanger
yourself and others.
i If you switch the engine off (key in posi-
tion 1 in the ignition lock) and then restart
it, the previous foglamp settings are
restored.
X Turn the ignition key to position 2in the
ignition lock or start the engine.
X To switch on: turn the light switch to
T, Lorc.
X Press the Nbutton.
The green Nindicator lamp in the instru-
ment cluster lights up.
X To switch off: press theNbutton.
The green Nindicator lamp in the instru-
ment cluster goes out.
Rear foglamp i
If you switch the engine off (key in posi-
tion 1 in the ignition lock) and then restart
it, the previous settings for the rear fog
lamp are restored.
X Turn the ignition key to position 2in the
ignition lock or start the engine.
X Turn the light switch to Lorc 24
.
X To switch on: press theRbutton.
The yellow Rindicator lamp in the
instrument cluster lights up.
X To switch off: press theRbutton.
The yellow Rindicator lamp in the
instrument cluster goes out.
Vehicles with foglamps: when the light switch
is in position T, the rear fog lamp can only
be switched on if the foglamps (without
dipped-beam headlamps) are switched on. Manual main-beam headlamps X
Turn the ignition key to position 2in the
ignition lock or start the engine.
X To activate: turn the light switch to L.
X Press the combination switch beyond the
pressure point in the direction of arrow
D (Ypage 94).
The K indicator lamp in the instrument
cluster lights up.
X To deactivate: move the combination
switch back to its normal position.
The K indicator lamp in the instrument
cluster goes out.
Adaptive Highbeam Assist* Depending on the road and traffic conditions,
the headlamp range control of the dipped-
beam headlamps and the main-beam head-
lamps is controlled using an optical sensor.
This is located on the front overhead control
panel. This reduces the glare to other road
users and improves the illumination of the
road. There is no sudden change in light inten-
sity during the transition from dipped-beam
to main beam.
G
Risk of accident
Adaptive Highbeam Assist is only an aid
designed to assist driving. The driver is
responsible for adjusting the vehicle's lighting
to the prevailing light, vision and traffic con-
ditions.
The system may be impaired or deactivated:
R if there is poor visibility, e.g. due to snow,
rain, fog or spray
R if the area of the windscreen around the
optical sensor is dirty, misted up or covered
up, e.g. by a sticker.
24 The automatic headlamps are only switched on if you start the engine. Lights
95Controls
* optional
212_AKB; 2; 4, en-GB
mkalafa
,V ersion: 2.11.8.1
2009-05-05T14:17:16+02:00 - Seite 95 Z
Dateiname: 6515346702_buchblock.pdf; erzeugt am 07. May 2009 14:15:59; WK
Page 99 of 373

The system may not recognise the following
road users
R
Road users that have no lighting, e.g.
pedestrians
R Road users that have poor lighting, e.g.
cyclists
R Road users whose lighting is not clearly
visible, e.g. road users behind a crash bar-
rier
R On rare occasions: road users that have
lights may be recognised too late or not at
all.
The automatic main-beam headlamps will not
be deactivated, or they may be activated
despite road users travelling in front of, or
approaching, the vehicle.
Thus, you could cause an accident and injure
yourself and others. Always observe traffic
conditions and, if necessary, dip the lights
manually.
X To activate: activate the Adaptive High-
beam Assist using the on-board computer
(Y page 133).
X Turn the light switch to c.
X Press the combination switch beyond the
pressure point in the direction of arrow
D (Ypage 94).
When the dipped-beam headlamps are
switched on, the _indicator lamp in the
instrument cluster lights up.
If you are driving faster than approximately
40 km/h, the headlamp range is set auto-
matically depending on the distance
between the vehicle and other road users.
If you are driving faster than approximately
55 km/h and no other road users are rec-
ognised, the main-beam headlamps are
switched on automatically. The Kindi-
cator lamp in the instrument cluster also
lights up.
If you are driving slower than approximately
45 km/h and other road users are recog-
nised or the roads are adequately lit, the main-beam headlamps are switched off
automatically. The
Kindicator lamp in
the instrument cluster goes out. The _
indicator lamp in the instrument cluster
stays on.
X To deactivate: move the combination
switch back to its normal position.
The _ indicator lamp in the instrument
cluster goes out.
Turn signal lamp X
To indicate a minor change of direc-
tion: press the combination switch briefly
in the direction of arrow EorG
(Y page 94).
The corresponding turn signal flashes three
times.
X To indicate: push the combination switch
beyond the pressure point in the direction
of arrow EorG (Ypage 94).
The corresponding turn signal indicator
lamp ! or# in the instrument clus-
ter flashes.
Hazard warning lamps The hazard warning lamps automatically
switch on if:
R
an airbag is deployed
R you brake sharply and bring the vehicle to
a halt from a speed of more than
70 km/h
The hazard warning lamps still operate if the
ignition is switched off. 96
LightsControls
212_AKB; 2; 4, en-GB
mkalafa,
Version: 2.11.8.1 2009-05-05T14:17:16+02:00 - Seite 96
Dateiname: 6515346702_buchblock.pdf; erzeugt am 07. May 2009 14:16:00; WK