2009 MERCEDES-BENZ E-CLASS SALOON child restraint
[x] Cancel search: child restraintPage 56 of 373
X
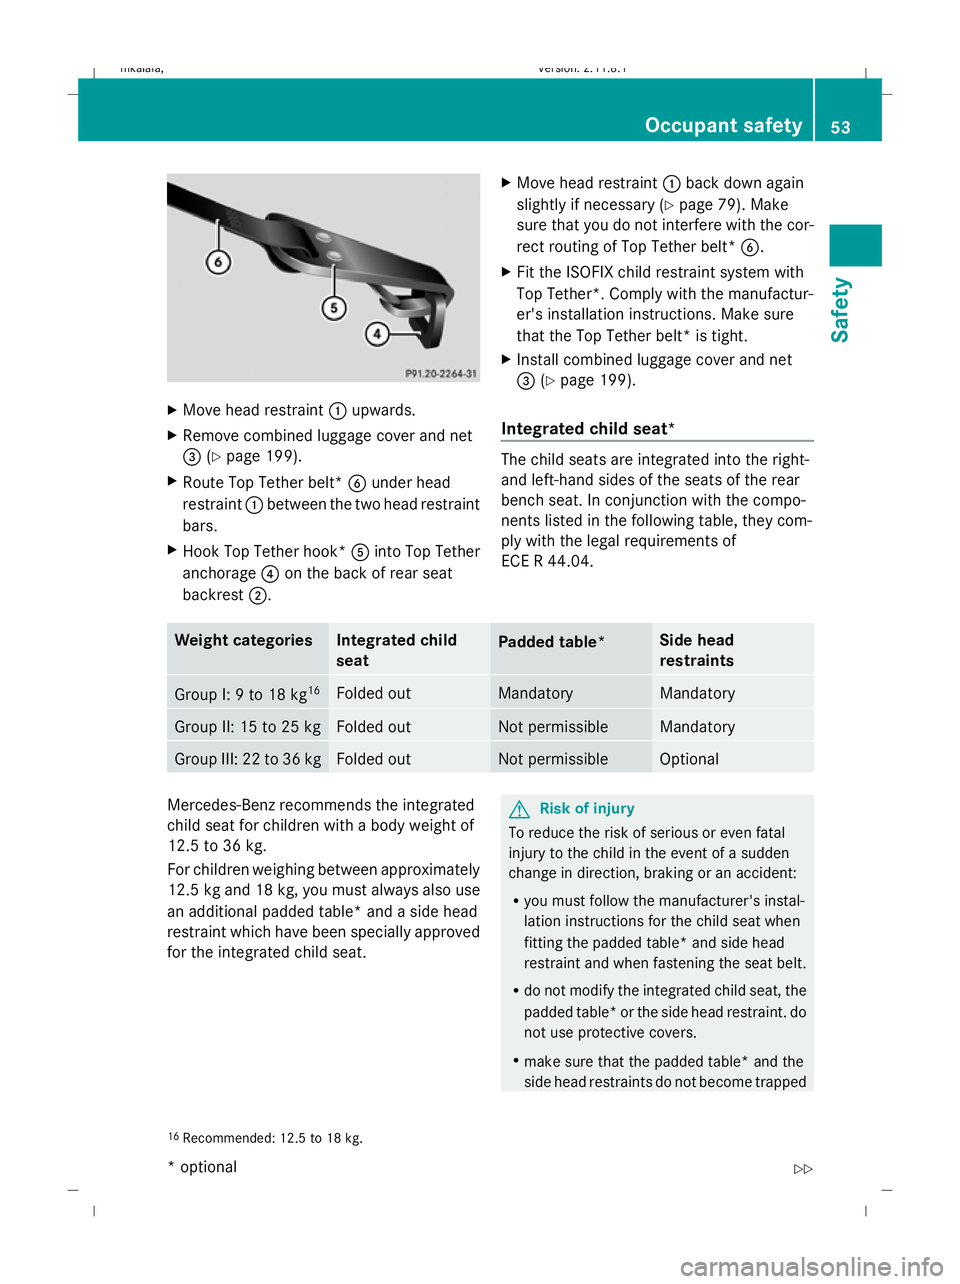
Move head restraint :upwards.
X Remove combined luggage cover and net
= (Ypage 199).
X Route Top Tether belt* Bunder head
restraint :between the two head restraint
bars.
X Hook Top Tether hook* Ainto Top Tether
anchorage ?on the back of rear seat
backrest ;. X
Move head restraint :back down again
slightly if necessary (Y page 79). Make
sure that you do not interfere with the cor-
rect routing of Top Tether belt* B.
X Fit the ISOFIX child restraint system with
Top Tether*. Comply with the manufactur-
er's installation instructions. Make sure
that the Top Tether belt* is tight.
X Install combined luggage cover and net
= (Ypage 199).
Integrated child seat* The child seats are integrated into the right-
and left-hand sides of the seats of the rear
bench seat. In conjunction with the compo-
nents listed in the following table, they com-
ply with the legal requirements of
ECE R 44.04.
Weight categories Integrated child
seat
Padded table* Side head
restraints
Group I: 9 to 18 kg
16 Folded out Mandatory Mandatory
Group II: 15 to 25 kg Folded out Not permissible Mandatory
Group III: 22 to 36 kg Folded out Not permissible Optional
Mercedes-Benz recommends the integrated
child seat for children with a body weight of
12.5 to 36 kg.
For children weighing between approximately
12.5 kg and 18 kg, you must always also use
an additional padded table* and a side head
restraint which have been specially approved
for the integrated child seat. G
Risk of injury
To reduce the risk of serious or even fatal
injury to the child in the event of a sudden
change in direction, braking or an accident:
R you must follow the manufacturer's instal-
lation instructions for the child seat when
fitting the padded table* and side head
restraint and when fastening the seat belt.
R do not modify the integrated child seat, the
padded table* or the side head restraint. do
not use protective covers.
R make sure that the padded table* and the
side head restraints do not become trapped
16 Recommended: 12.5 to 18 kg. Occupant safety
53Safety
* optional
212_AKB; 2; 4, en-GB
mkalafa,
Version: 2.11.8.1 2009-05-05T14:17:16+02:00 - Seite 53 Z
Dateiname: 6515346702_buchblock.pdf; erzeugt am 07. May 2009 14:15:40; WK
Page 57 of 373
or damaged. For instance, this may occur
when you close the doors, adjust the seat,
stow away the padded table* and the side
head restraints or transport heavy items.
R replace the integrated child seat, the pad-
ded table* and the side head restraints if
these were damaged or subjected to heavy
loads during an accident.
R bear in mind that children weighing less
than 12.5 kg require a different child
restraint system. Information about other
child restraint systems is available from any
Mercedes-Benz Service Centre.
R the rear seat backrest in the vehicle must
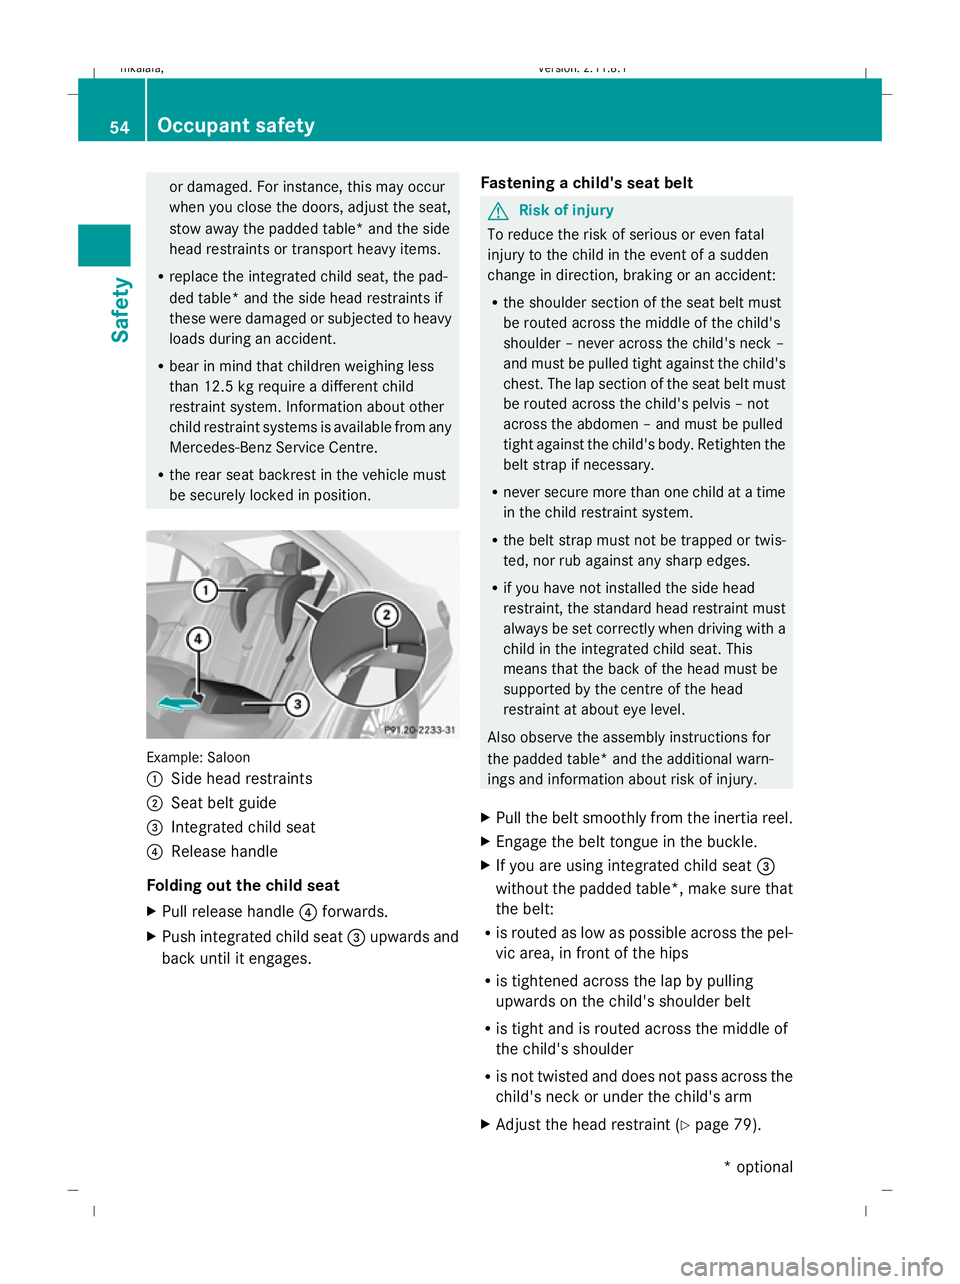
be securely locked in position. Example: Saloon
:
Side head restraints
; Seat belt guide
= Integrated child seat
? Release handle
Folding out the child seat
X Pull release handle ?forwards.
X Push integrated child seat =upwards and
back until it engages. Fastening a child's seat belt G
Risk of injury
To reduce the risk of serious or even fatal
injury to the child in the event of a sudden
change in direction, braking or an accident:
R the shoulder section of the seat belt must
be routed across the middle of the child's
shoulder – never across the child's neck –
and must be pulled tight against the child's
chest. The lap section of the seat belt must
be routed across the child's pelvis – not
across the abdomen – and must be pulled
tight against the child's body. Retighten the
belt strap if necessary.
R never secure more than one child at a time
in the child restraint system.
R the belt strap must not be trapped or twis-
ted, nor rub against any sharp edges.
R if you have not installed the side head
restraint, the standard head restraint must
always be set correctly when driving with a
child in the integrated child seat. This
means that the back of the head must be
supported by the centre of the head
restraint at about eye level.
Also observe the assembly instructions for
the padded table* and the additional warn-
ings and information about risk of injury.
X Pull the belt smoothly from the inertia reel.
X Engage the belt tongue in the buckle.
X If you are using integrated child seat =
without the padded table*, make sure that
the belt:
R is routed as low as possible across the pel-
vic area, in front of the hips
R is tightened across the lap by pulling
upwards on the child's shoulder belt
R is tight and is routed across the middle of
the child's shoulder
R is not twisted and does not pass across the
child's neck or under the child's arm
X Adjust the head restraint (Y page 79).54
Occupant safetySafety
* optional
212_AKB; 2; 4, en-GB
mkalafa,
Version: 2.11.8.1 2009-05-05T14:17:16+02:00 - Seite 54
Dateiname: 6515346702_buchblock.pdf; erzeugt am 07. May 2009 14:15:41; WK
Page 58 of 373
Folding in the child seat
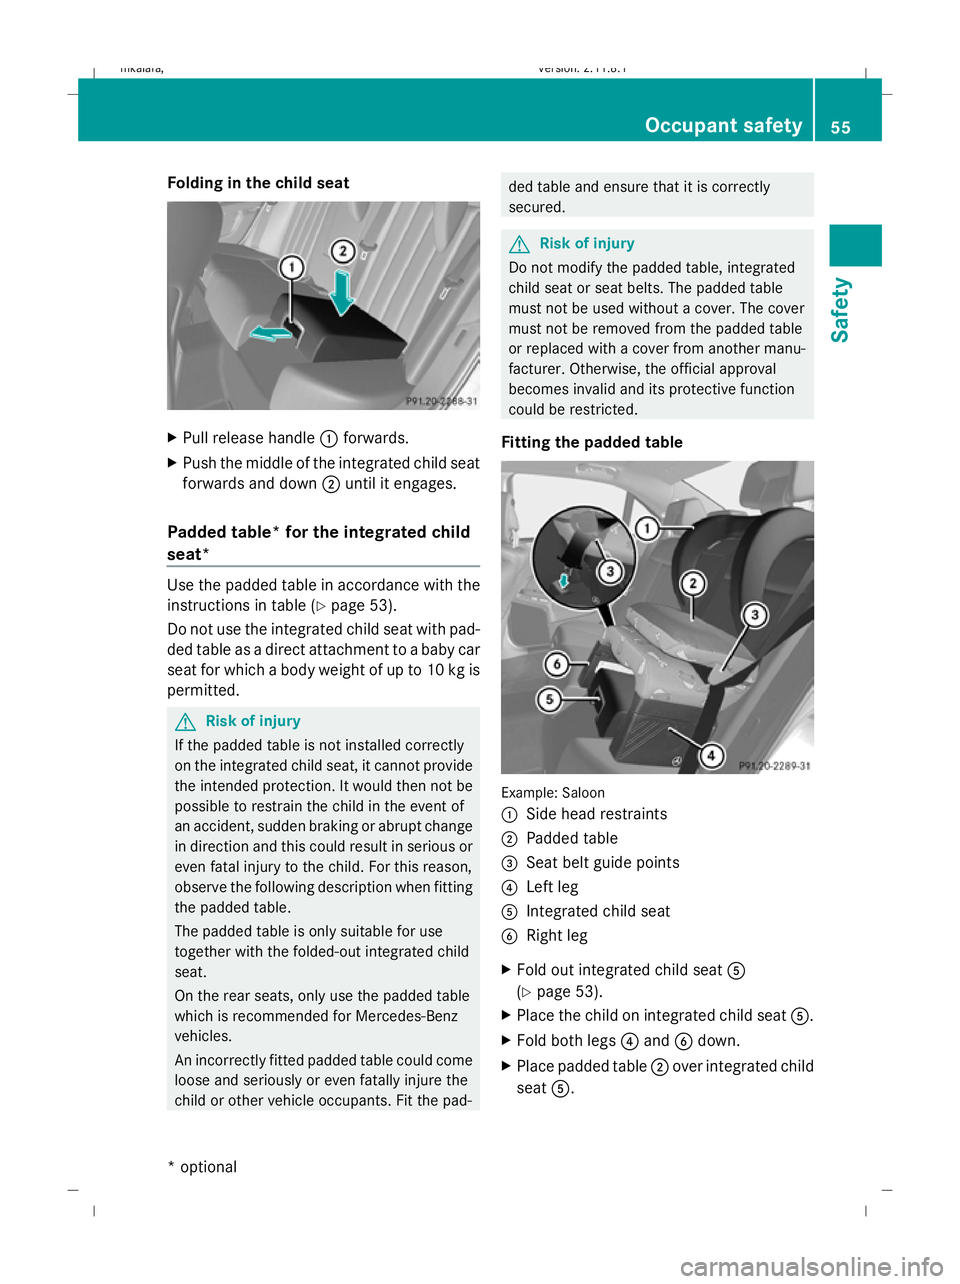
X
Pull release handle :forwards.
X Push the middle of the integrated child seat
forwards and down ;until it engages.
Padded table* for the integrated child
seat* Use the padded table in accordance with the
instructions in table (Y
page 53).
Do not use the integrated child seat with pad-
ded table as a direct attachment to a baby car
seat for which a body weight of up to 10 kg is
permitted. G
Risk of injury
If the padded table is not installed correctly
on the integrated child seat, it cannot provide
the intended protection. It would then not be
possible to restrain the child in the event of
an accident, sudden braking or abrupt change
in direction and this could result in serious or
even fatal injury to the child. For this reason,
observe the following description when fitting
the padded table.
The padded table is only suitable for use
together with the folded-out integrated child
seat.
On the rear seats, only use the padded table
which is recommended for Mercedes-Benz
vehicles.
An incorrectly fitted padded table could come
loose and seriously or even fatally injure the
child or other vehicle occupants. Fit the pad- ded table and ensure that it is correctly
secured.
G
Risk of injury
Do not modify the padded table, integrated
child seat or seat belts. The padded table
must not be used without a cover. The cover
must not be removed from the padded table
or replaced with a cover from another manu-
facturer. Otherwise, the official approval
becomes invalid and its protective function
could be restricted.
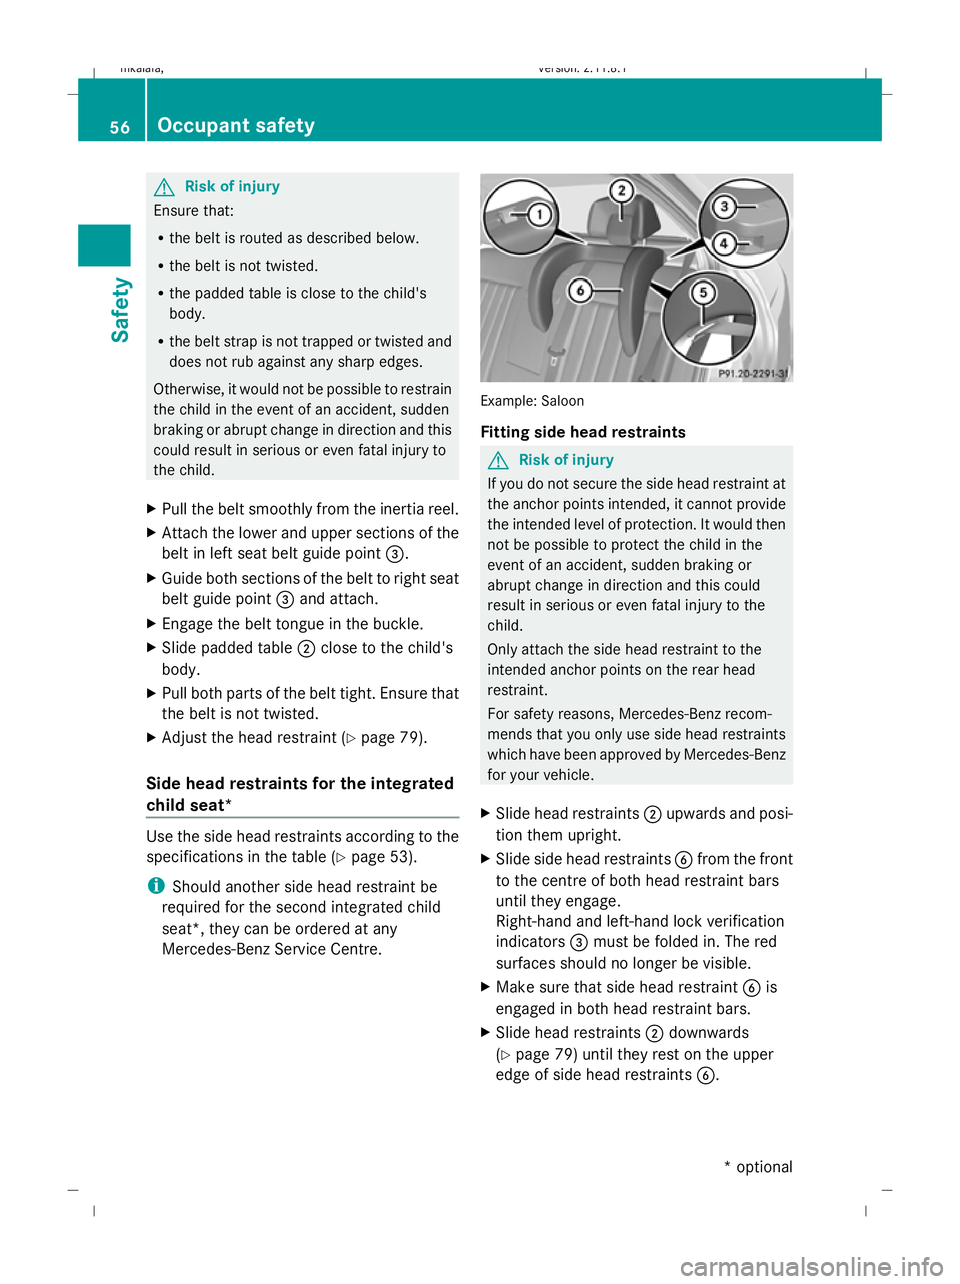
Fitting the padded table Example: Saloon
:
Side head restraints
; Padded table
= Seat belt guide points
? Left leg
A Integrated child seat
B Right leg
X Fold out integrated child seat A
(Y page 53).
X Place the child on integrated child seat A.
X Fold both legs ?and Bdown.
X Place padded table ;over integrated child
seat A. Occupant safety
55Safety
* optional
212_AKB; 2; 4, en-GB
mkalafa
,V ersion: 2.11.8.1
2009-05-05T14:17:16+02:00 - Seite 55 Z
Dateiname: 6515346702_buchblock.pdf; erzeugt am 07. May 2009 14:15:41; WK
Page 59 of 373
G
Risk of injury
Ensure that:
R the belt is routed as described below.
R the belt is not twisted.
R the padded table is close to the child's
body.
R the belt strap is not trapped or twisted and
does not rub against any sharp edges.
Otherwise, it would not be possible to restrain
the child in the event of an accident, sudden
braking or abrupt change in direction and this
could result in serious or even fatal injury to
the child.
X Pull the belt smoothly from the inertia reel.
X Attach the lower and upper sections of the
belt in left seat belt guide point =.
X Guide both sections of the belt to right seat
belt guide point =and attach.
X Engage the belt tongue in the buckle.
X Slide padded table ;close to the child's
body.
X Pull both parts of the belt tight. Ensure that
the belt is not twisted.
X Adjust the head restraint ( Ypage 79).
Side head restraints for the integrated
child seat* Use the side head restraints according to the
specifications in the table (Y page 53).
i Should another side head restraint be
required for the second integrated child
seat*, they can be ordered at any
Mercedes-Benz Service Centre. Example: Saloon
Fitting side head restraints
G
Risk of injury
If you do not secure the side head restraint at
the anchor points intended, it cannot provide
the intended level of protection. It would then
not be possible to protect the child in the
event of an accident, sudden braking or
abrupt change in direction and this could
result in serious or even fatal injury to the
child.
Only attach the side head restraint to the
intended anchor points on the rear head
restraint.
For safety reasons, Mercedes-Benz recom-
mends that you only use side head restraints
which have been approved by Mercedes-Benz
for your vehicle.
X Slide head restraints ;upwards and posi-
tion them upright.
X Slide side head restraints Bfrom the front
to the centre of both head restraint bars
until they engage.
Right-hand and left-hand lock verification
indicators =must be folded in. The red
surfaces should no longer be visible.
X Make sure that side head restraint Bis
engaged in both head restraint bars.
X Slide head restraints ;downwards
(Y page 79) until they rest on the upper
edge of side head restraints B.56
Occupant safetySafety
* optional
212_AKB; 2; 4, en-GB
mkalafa
,V ersion: 2.11.8.1
2009-05-05T14:17:16+02:00 - Seite 56
Dateiname: 6515346702_buchblock.pdf; erzeugt am 07. May 2009 14:15:42; WK
Page 60 of 373
X
Guide the seat belt through seat belt guide
A on the door side on side head restraint
B.
X Secure the child using the seat belt
(Y page 53).
Removing the side head restraints
X Take the seat belt out of seat belt guide
A.
X Move head restraint ;upwards.
X Press left or right release button ?and pull
side head restraint Bforward to remove
it.
Left-hand and right-hand lock verification
indicators :fold out briefly.
X Adjust head restraints ;(Ypage 79).
Storing the padded table and the side
head restraint G
Risk of injury
If the padded table and the side head
restraints are not secured in the vehicle as
specified, they may come loose. In the event
of an accident, sudden braking or abrupt
change in direction, they could injure vehicle
occupants or cause damage to the vehicle.
Secure the padded table in the vehicle as
specified.
On vehicles with TIREFIT kit, the side head
restraints can be stored in the stowage com-
partment under the boot/luggage compart-
ment floor (Y page 204)/(Y page 204).
Child-proof locks If children are travelling in the vehicle, you can
activate the child-proof locks for the rear
doors.
Child-proof locks for the rear doors
The child-proof locks on the rear doors enable
you to secure each door individually. A locked
door cannot be opened from the inside. The
door can be opened from the outside if the
vehicle is unlocked. G
Risk of accident and injury
Activate the child-proof locks for the rear
doors and the override switch for the rear
windows if children are travelling in the vehi-
cle. Otherwise, the children could open doors
or windows while the vehicle is in motion and
injure themselves or others. Example: Saloon
X
To activate: press locking lever
upwards :.
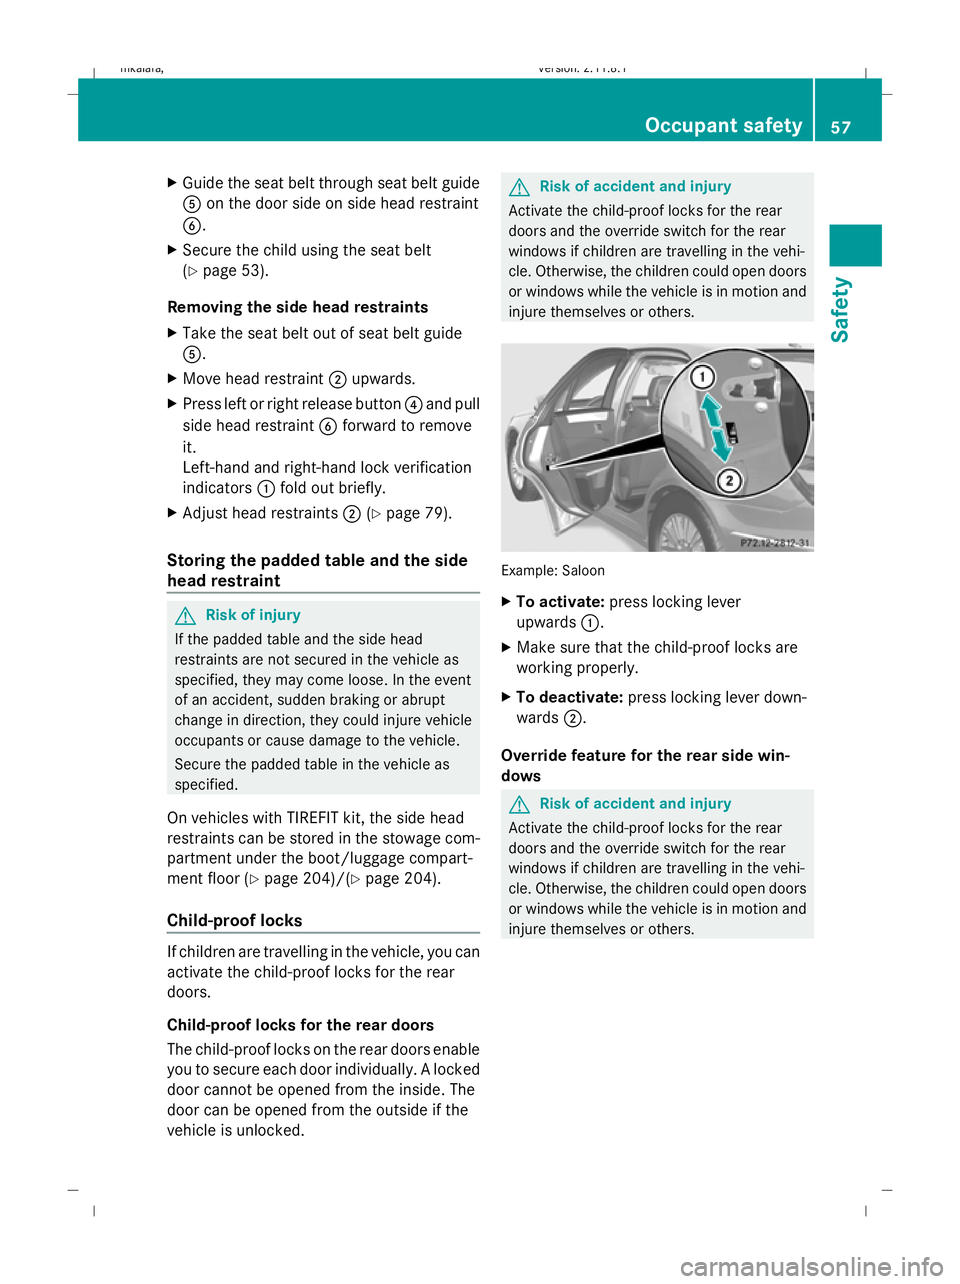
X Make sure that the child-proof locks are
working properly.
X To deactivate: press locking lever down-
wards ;.
Override feature for the rear side win-
dows G
Risk of accident and injury
Activate the child-proof locks for the rear
doors and the override switch for the rear
windows if children are travelling in the vehi-
cle. Otherwise, the children could open doors
or windows while the vehicle is in motion and
injure themselves or others. Occupant safety
57Safety
212_AKB; 2; 4, en-GB
mkalafa,V ersion: 2.11.8.1
2009-05-05T14:17:16+02:00 - Seite 57 Z
Dateiname: 6515346702_buchblock.pdf; erzeugt am 07. May 2009 14:15:42; WK
Page 79 of 373
Seats
Points to remember
You will find information about folding the
rear bench seat forwards in the "Through-
loading feature in the rear bench seat"
(Saloon) (Y page 195) and "EASY-PACK load-
ing-aid feature rear bench seat (Estate)"
(Y page 196) sections.
Depending on the vehicle's equipment, the
seats can adjusted either manually/electri-
cally or electrically*. G
Risk of injury
The seats can still be adjusted when there is
no key in the ignition lock. For this reason,
children should never be left unsupervised in
the vehicle. They could become trapped when
adjusting a seat. G
Risk of accident
Only adjust the driver's seat when the vehicle
is stationary. You will otherwise be distracted
from the road and traffic conditions and you
could lose control of the vehicle as a result of
the seat moving. This could cause an acci-
dent. G
Risk of injury
Make sure that nobody can become trapped
when you adjust the seat.
Observe the notes concerning the airbag sys-
tem.
Secure children as recommended; see "Chil-
dren in the vehicle" section. G
Risk of injury
Make sure that the central area of the head
restraint supports the back of your head at
about eye level. You could seriously injure
your neck if your head is not correctly sup-
ported by the head restraint in the event of an
accident. Never travel without a correctly
adjusted and engaged head restraint.
! When you move the seats, make sure that
there are no objects in the footwell or behind the seats. Otherwise, you could
damage the seats and the objects.
i The head restraints in the front seats are
fitted with the NECK-PRO system
(Y page 43). For this reason, it is not pos-
sible to remove the head restraints from
the front seats.
The head restraints cannot be removed
from the rear compartment seats on vehi-
cles without the through-loading feature*.
Please contact a Mercedes-Benz Service
Centre for more information. Adjusting the seats manually and
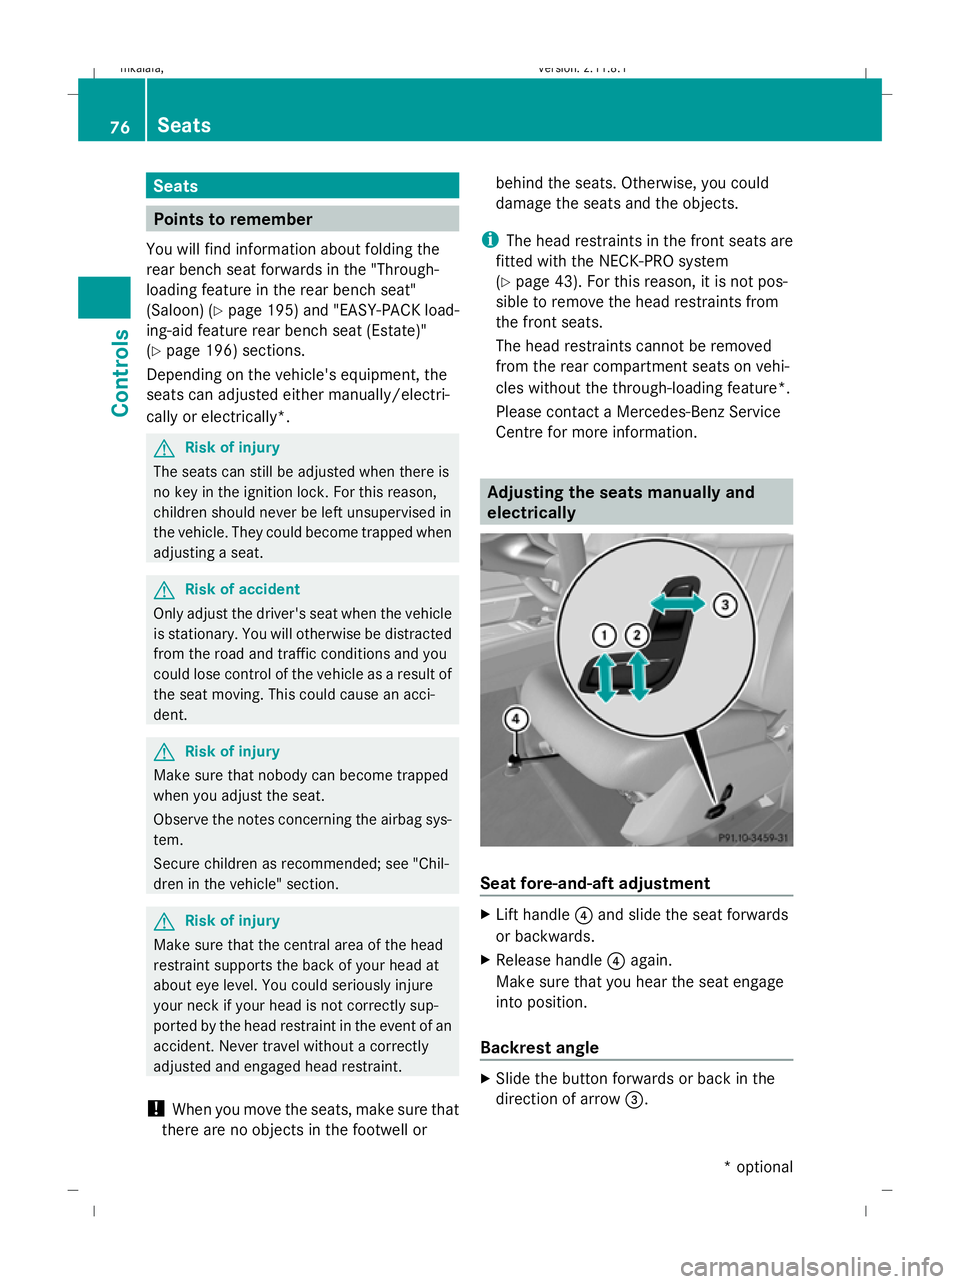
electrically Seat fore-and-aft adjustment
X
Lift handle ?and slide the seat forwards
or backwards.
X Release handle ?again.
Make sure that you hear the seat engage
into position.
Backrest angle X
Slide the button forwards or back in the
direction of arrow =.76
SeatsControls
* optional
212_AKB; 2; 4, en-GB
mkalafa,
Version: 2.11.8.1 2009-05-05T14:17:16+02:00 - Seite 76
Dateiname: 6515346702_buchblock.pdf; erzeugt am 07. May 2009 14:15:49; WK
Page 85 of 373
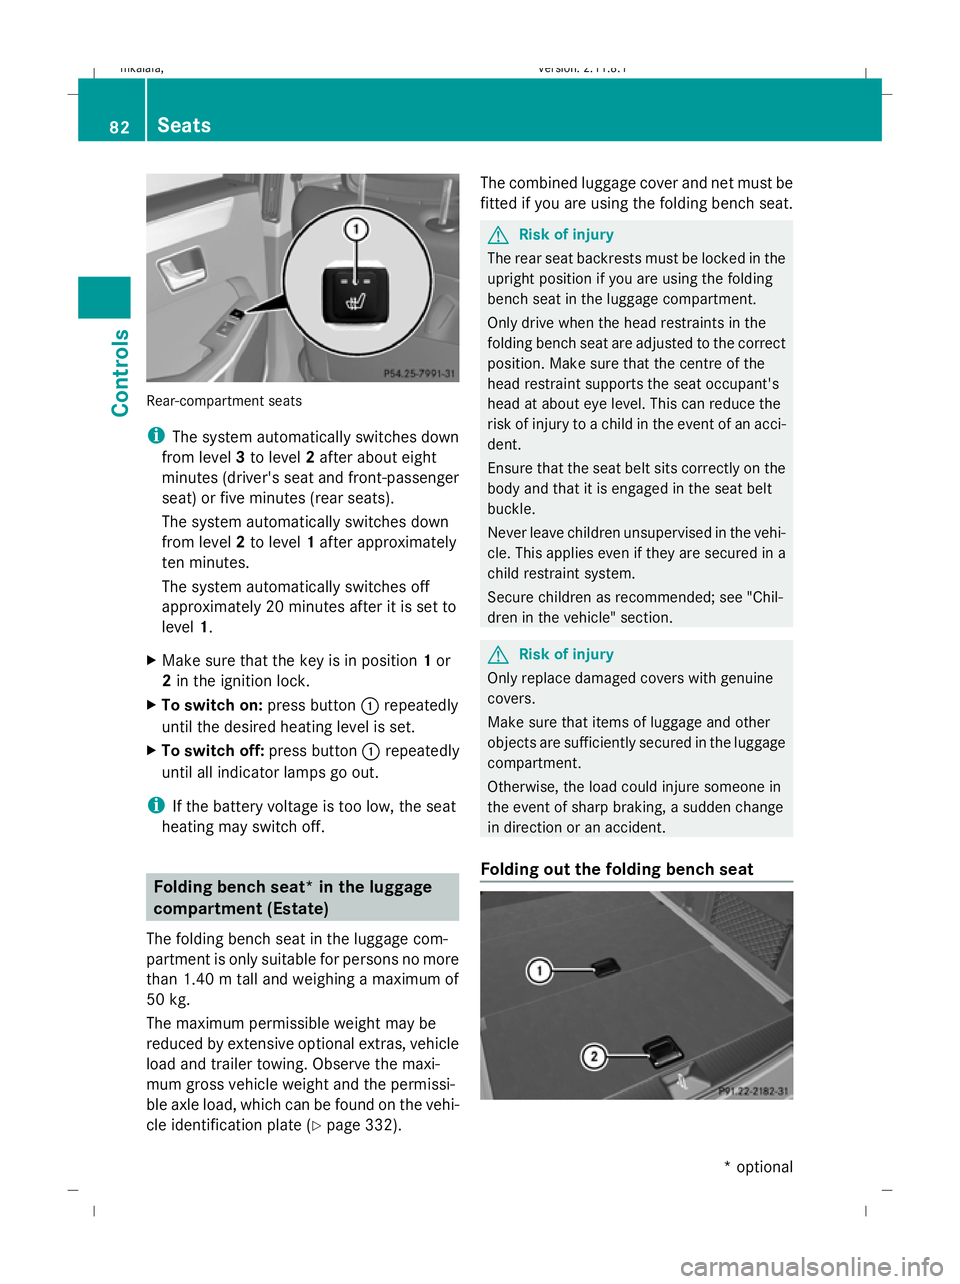
Rear-compartment seats
i
The system automatically switches down
from level 3to level 2after about eight
minutes (driver's seat and front-passenger
seat) or five minutes (rear seats).
The system automatically switches down
from level 2to level 1after approximately
ten minutes.
The system automatically switches off
approximately 20 minutes after it is set to
level 1.
X Make sure that the key is in position 1or
2 in the ignition lock.
X To switch on: press button:repeatedly
until the desired heating level is set.
X To switch off: press button:repeatedly
until all indicator lamps go out.
i If the battery voltage is too low, the seat
heating may switch off. Folding bench seat* in the luggage
compartment (Estate)
The folding bench seat in the luggage com-
partment is only suitable for persons no more
than 1.40 m tall and weighing a maximum of
50 kg.
The maximum permissible weight may be
reduced by extensive optional extras, vehicle
load and trailer towing. Observe the maxi-
mum gross vehicle weight and the permissi-
ble axle load, which can be found on the vehi-
cle identification plate (Y page 332).The combined luggage cover and net must be
fitted if you are using the folding bench seat. G
Risk of injury
The rear seat backrests must be locked in the
upright position if you are using the folding
bench seat in the luggage compartment.
Only drive when the head restraints in the
folding bench seat are adjusted to the correct
position. Make sure that the centre of the
head restraint supports the seat occupant's
head at about eye level. This can reduce the
risk of injury to a child in the event of an acci-
dent.
Ensure that the seat belt sits correctly on the
body and that it is engaged in the seat belt
buckle.
Never leave children unsupervised in the vehi-
cle. This applies even if they are secured in a
child restraint system.
Secure children as recommended; see "Chil-
dren in the vehicle" section. G
Risk of injury
Only replace damaged covers with genuine
covers.
Make sure that items of luggage and other
objects are sufficiently secured in the luggage
compartment.
Otherwise, the load could injure someone in
the event of sharp braking, a sudden change
in direction or an accident.
Folding out the folding bench seat 82
SeatsCont
rols
* optional
212_AKB; 2; 4, en-GB
mkalafa
,V ersion: 2.11.8.1
2009-05-05T14:17:16+02:00 - Seite 82
Dateiname: 6515346702_buchblock.pdf; erzeugt am 07. May 2009 14:15:53; WK
Page 87 of 373
!
To prevent damage, you must insert the
head restraints fully into their guides and
engage the belt buckles in their guides. X
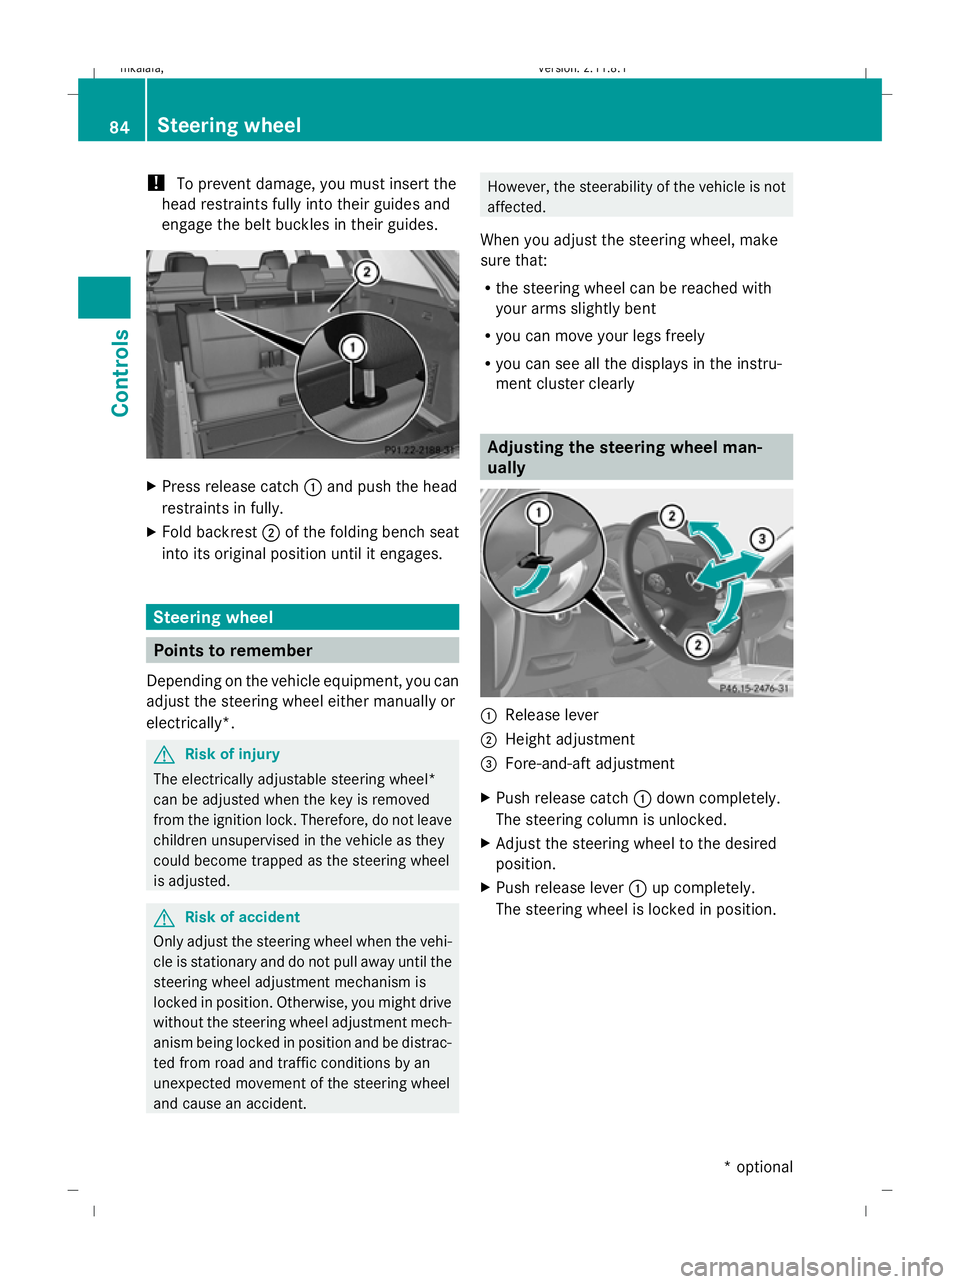
Press release catch :and push the head
restraints in fully.
X Fold backrest ;of the folding bench seat
into its original position until it engages. Steering wheel
Points to remember
Depending on the vehicle equipment, you can
adjust the steering wheel either manually or
electrically*. G
Risk of injury
The electrically adjustable steering wheel*
can be adjusted when the key is removed
from the ignition lock. Therefore, do not leave
children unsupervised in the vehicle as they
could become trapped as the steering wheel
is adjusted. G
Risk of accident
Only adjust the steering wheel when the vehi-
cle is stationary and do not pull away until the
steering wheel adjustment mechanism is
locked in position. Otherwise, you might drive
without the steering wheel adjustment mech-
anism being locked in position and be distrac-
ted from road and traffic conditions by an
unexpected movement of the steering wheel
and cause an accident. However, the steerability of the vehicle is not
affected.
When you adjust the steering wheel, make
sure that:
R the steering wheel can be reached with
your arms slightly bent
R you can move your legs freely
R you can see all the displays in the instru-
ment cluster clearly Adjusting the steering wheel man-
ually
:
Release lever
; Height adjustment
= Fore-and-aft adjustment
X Push release catch :down completely.
The steering column is unlocked.
X Adjust the steering wheel to the desired
position.
X Push release lever :up completely.
The steering wheel is locked in position. 84
Steering wheelControls
* optional
212_AKB; 2; 4, en-GB
mkalafa,
Version: 2.11.8.1 2009-05-05T14:17:16+02:00 - Seite 84
Dateiname: 6515346702_buchblock.pdf; erzeugt am 07. May 2009 14:15:55; WK