2009 MERCEDES-BENZ E-CLASS SALOON length
[x] Cancel search: lengthPage 83 of 373
X
Release the rear seat backrest and fold it
slightly forwards ( Ypage 195).
X To remove: pull the head restraint up to
the stop.
X Press release catch :and pull the head
restraint out of the guides.
X To refit: insert the head restraint so that
the notches on the bar are on the left when
viewed in the direction of travel.
X Push the head restraint down until you hear
it click into place.
X Fold back the rear seat backrest until it
engages (Y page 195). Multicontour seat*
You can adjust the contour of the front seat
backrests individually to provide optimum
support for your back. :
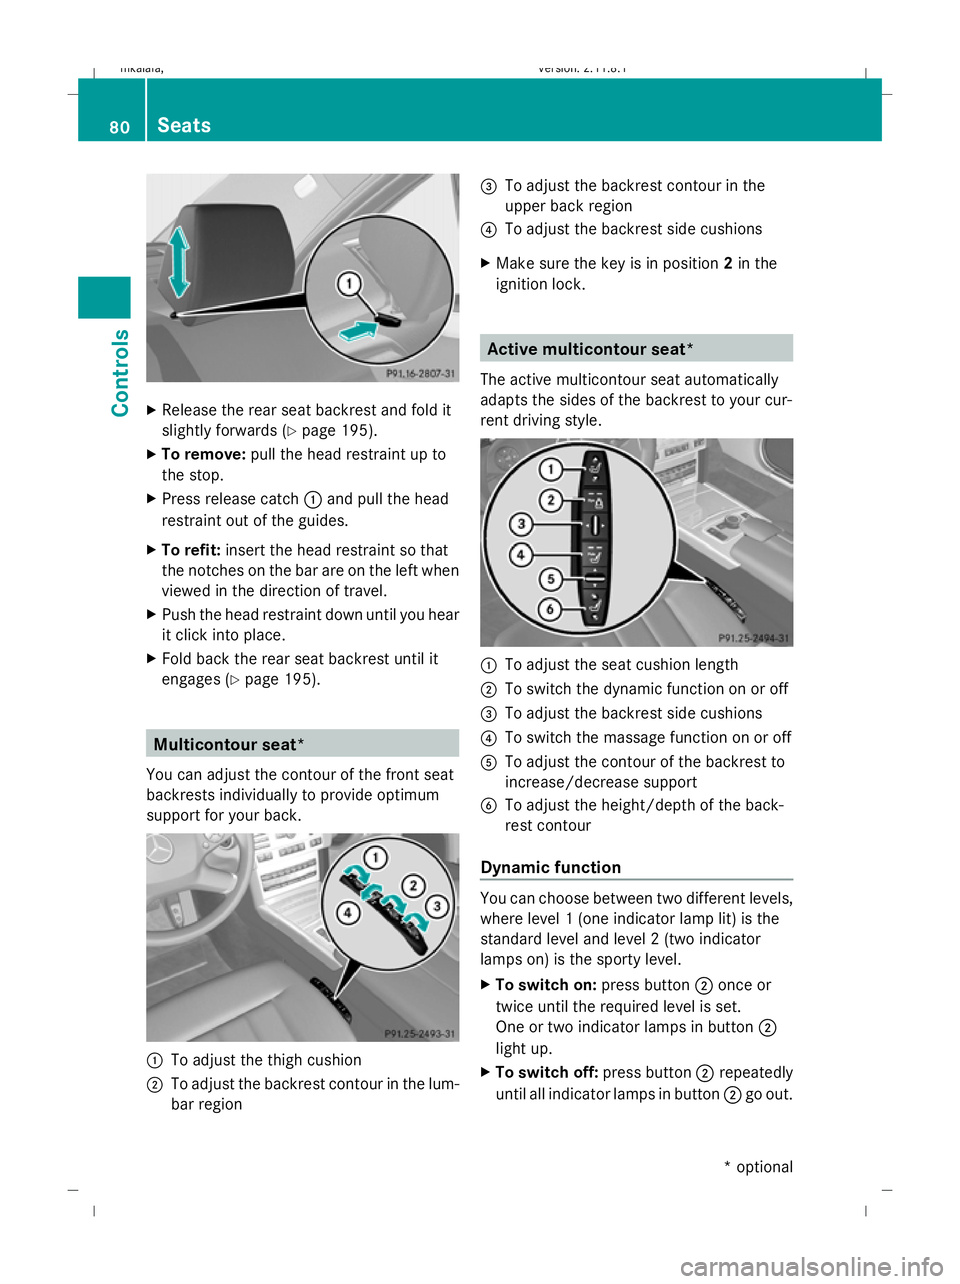
To adjust the thigh cushion
; To adjust the backrest contour in the lum-
bar region =
To adjust the backrest contour in the
upper back region
? To adjust the backrest side cushions
X Make sure the key is in position 2in the
ignition lock. Active multicontour seat*
The active multicontour seat automatically
adapts the sides of the backrest to your cur-
rent driving style. :
To adjust the seat cushion length
; To switch the dynamic function on or off
= To adjust the backrest side cushions
? To switch the massage function on or off
A To adjust the contour of the backrest to
increase/decrease support
B To adjust the height/depth of the back-
rest contour
Dynamic function You can choose between two different levels,
where level 1 (one indicator lamp lit) is the
standard level and level 2 (two indicator
lamps on) is the sporty level.
X To switch on: press button;once or
twice until the required level is set.
One or two indicator lamps in button ;
light up.
X To switch off: press button;repeatedly
until all indicator lamps in button ;go out. 80
SeatsCont
rols
* optional
212_AKB; 2; 4, en-GB
mkalafa
,V ersion: 2.11.8.1
2009-05-05T14:17:16+02:00 - Seite 80
Dateiname: 6515346702_buchblock.pdf; erzeugt am 07. May 2009 14:15:52; WK
Page 128 of 373
X
Press =or; on the steering wheel
to select the AMGmenu.
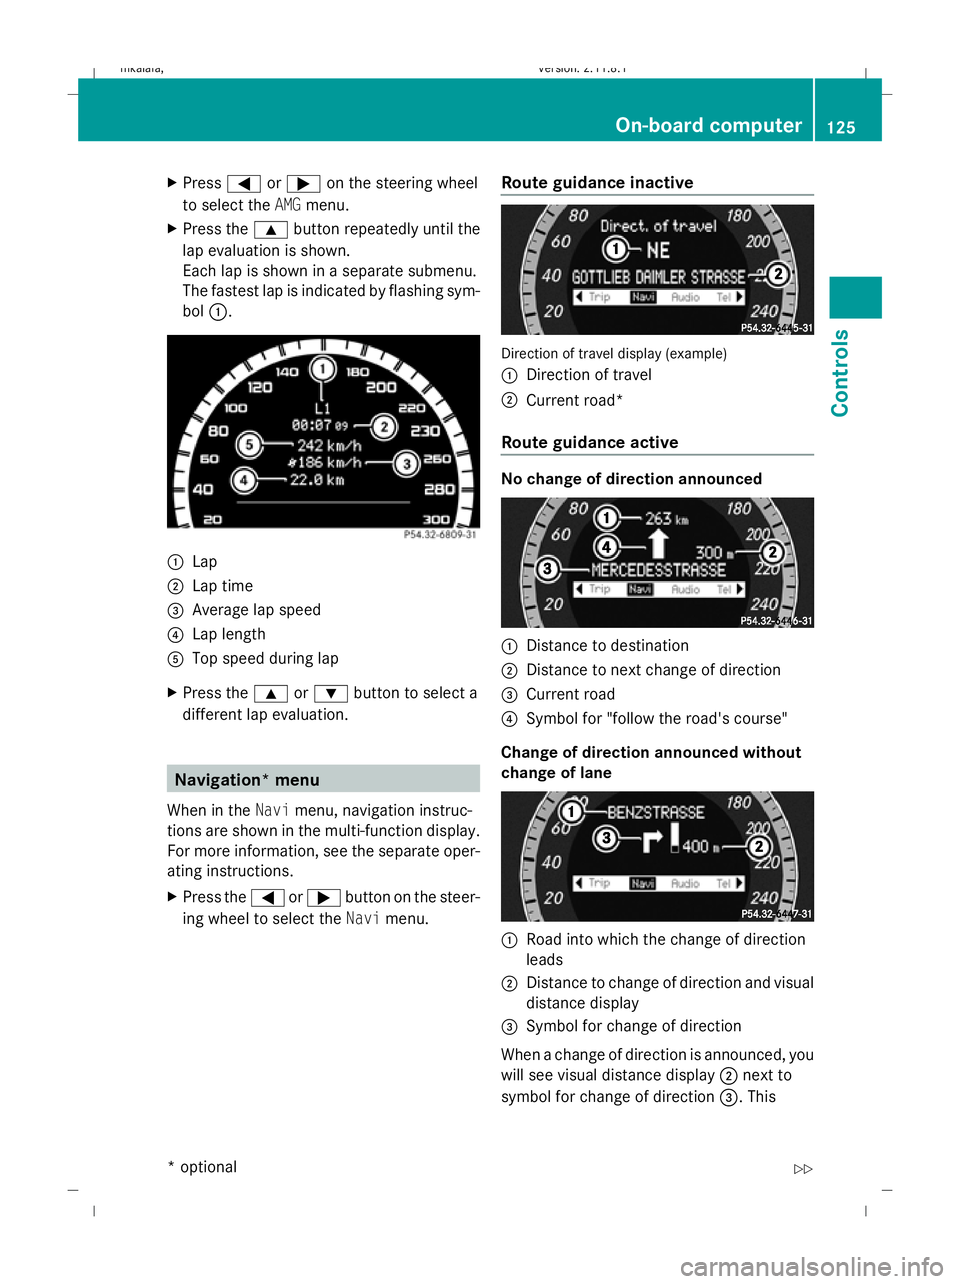
X Press the 9button repeatedly until the
lap evaluation is shown.
Each lap is shown in a separate submenu.
The fastest lap is indicated by flashing sym-
bol :. :
Lap
; Lap time
= Average lap speed
? Lap length
A Top speed during lap
X Press the 9or: button to select a
different lap evaluation. Navigation* menu
When in the Navimenu, navigation instruc-
tions are shown in the multi-function display.
For more information, see the separate oper-
ating instructions.
X Press the =or; button on the steer-
ing wheel to select the Navimenu. Route guidance inactive Direction of travel display (example)
:
Direction of travel
; Current road*
Route guidance active No change of direction announced
:
Distance to destination
; Distance to next change of direction
= Current road
? Symbol for "follow the road's course"
Change of direction announced without
change of lane :
Road into which the change of direction
leads
; Distance to change of direction and visual
distance display
= Symbol for change of direction
When a change of direction is announced, you
will see visual distance display ;next to
symbol for change of direction =. This On-board computer
125Controls
* optional
212_AKB; 2; 4, en-GB
mkalafa,
Version: 2.11.8.1 2009-05-05T14:17:16+02:00 - Seite 125 Z
Dateiname: 6515346702_buchblock.pdf; erzeugt am 07. May 2009 14:16:13; WK
Page 132 of 373
X
If only one telephone number is stored
for a name: press the6ora button
to start dialling.
or
X If there is more than one number for a
particular name: press the6ora
button to display the numbers.
X Press the 9or: button to select the
number you want to dial.
X Press the 6ora button to start dial-
ling.
or
X If you do not want to make a call: press
the ~ button.
Redialling The on-board computer saves the last names
or numbers dialled in the redial memory.
X
Press the =or; button on the steer-
ing wheel to select the Telmenu.
X Press the 6button to switch to the
redial memory.
X Press the 9or: button to select the
desired name or number.
X Press the 6ora button to start dial-
ling. Assistance menu
In the Assist. (Assistance) menu, you can:
R display Speed Limit Assist * (Ypage 129)
R activate/deactivate the Speed Limit Assist
message function* (Y page 129)
R show the distance display* ( Ypage 130)
R activate/deactivate PRE-SAFE ®
Brake*
(Y page 130)
R activate/deactivate ATTENTION ASSIST
(Y page 130) R
activate/deactivate Blind Spot
Assist* (Y page 130)
R activate/deactivate Lane Keeping
Assist* (Y page 130)
Speed Limit Assist* In the
Speed Lim. Asst. function, a detec-
ted speed limit is displayed under certain
conditions. You can set Speed Limit Assist to
display a detected speed limit automatically
for five seconds. Other messages in the multi-
function display will be faded out for this
length of time.
When Speed Limit Assist is operational and
the message function is activated, the multi-
function display shows the Äsymbol
when the ignition is switched on.
Displaying Speed Limit Assist
X Press =or; on the steering wheel
to select the Assist.menu.
X Press 9or: to select Speed Lim.
Asst.
X Press the abutton.
Speed Limit Assist appears in the multi-
function display.
When a speed limit is detected, this
appears in the multi-function display until:
R the speed limit ceases to apply.
R you pass city limits.
R the type of road changes, e.g. motorway
or country road.
R the speed limit is not detected anymore
after a certain distance.
Activating/deactivating the Speed Limit
Assist message function
X Press =or; on the steering wheel
to select the Assist.menu.
X Press 9or: to select Speed Lim.
Asst. On-board computer
129Controls
* optional
212_AKB; 2; 4, en-GB
mkalafa,
Version: 2.11.8.1 2009-05-05T14:17:16+02:00 - Seite 129 Z
Dateiname: 6515346702_buchblock.pdf; erzeugt am 07. May 2009 14:16:15; WK
Page 165 of 373
steer in a different direction and then
change gear. In this case, further displays
in the multi-function display will direct you
to the final position.
X Manoeuvre, if necessary.
X Always observe the warning messages dis-
played by PARKTRONIC (Y page 157).
Cancelling Parking Guidance X
Press the PARKTRONIC button on the
centre console (Y page 157).
Parking Guidance is cancelled immediately
and PARKTRONIC is deactivated.
Parking Guidance is cancelled automatically
if it is no longer possible to guide you into the
parking space, or if a malfunction occurs.
The parking space symbol disappears and the
Parking Guidance cancelled message
appears in the multi-function display.
Trailer towing* For vehicles with a trailer coupling, the mini-
mum length for parking spaces is slightly
increased.
If you have attached a trailer to your vehicle,
you should not use Parking Guidance. When
the electrical connection is established
between your vehicle and the trailer, Parking
Guidance ceases to be available. PARK-
TRONIC is deactivated for the rear area. Reversing camera*
The reversing camera is an optical aid. It
shows the area behind your vehicle in the
COMAND APS display. G
Risk of injury
Make sure that no persons or animals are in
the manoeuvring range. Otherwise, they
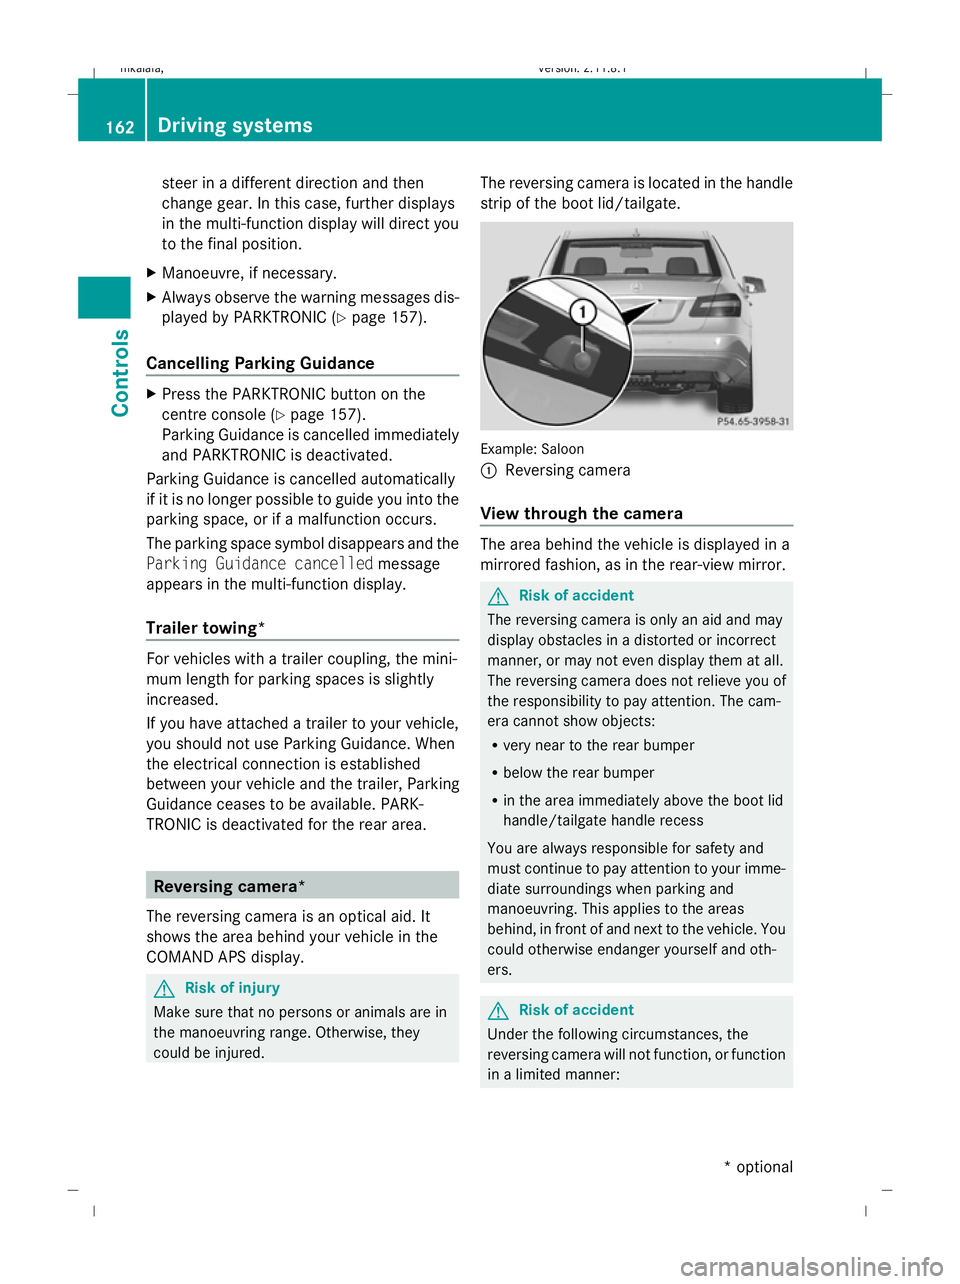
could be injured. The reversing camera is located in the handle
strip of the boot lid/tailgate.
Example: Saloon
:
Reversing camera
View through the camera The area behind the vehicle is displayed in a
mirrored fashion, as in the rear-view mirror.
G
Risk of accident
The reversing camera is only an aid and may
display obstacles in a distorted or incorrect
manner, or may not even display them at all.
The reversing camera does not relieve you of
the responsibility to pay attention. The cam-
era cannot show objects:
R very near to the rear bumper
R below the rear bumper
R in the area immediately above the boot lid
handle/tailgate handle recess
You are always responsible for safety and
must continue to pay attention to your imme-
diate surroundings when parking and
manoeuvring. This applies to the areas
behind, in front of and next to the vehicle. You
could otherwise endanger yourself and oth-
ers. G
Risk of accident
Under the following circumstances, the
reversing camera will not function, or function
in a limited manner: 162
Driving systemsControls
* optional
212_AKB; 2; 4, en-GB
mkalafa,
Version: 2.11.8.1 2009-05-05T14:17:16+02:00 - Seite 162
Dateiname: 6515346702_buchblock.pdf; erzeugt am 07. May 2009 14:16:24; WK
Page 311 of 373

Turn signal lamp (halogen headlamps)
Due to their location, have the bulbs in the
left-hand headlamp changed at a qualified
specialist workshop, e.g. a Mercedes-Benz
Service Centre.
X Switch off the lights.
X Open the bonnet.
X Turn bulb holder :anti-clockwise and
remove it.
X Turn the bulb anti-clockwise, applying
slight pressure, and remove it from bulb
holder :.
X Insert the new bulb into bulb holder :and
turn it clockwise.
X Insert bulb holder :and turn it clockwise. Replacing the wiper blades
Windscreen wiper blades
G
Risk of accident
The windscreen will no longer be wiped prop-
erly if the wiper blades are worn. This could
prevent you from observing the traffic condi-
tions, thereby causing an accident. Replace
the wiper blades twice a year, ideally in spring
and autumn. G
Risk of accident
The wiper arms could start moving and cause
an injury if you leave the windscreen wipers
switched on. Remove the key from the ignition lock before
replacing the wiper blades.
! To avoid damaging the windscreen wiper
blades, make sure that you touch only the
wiper arm of the windscreen wiper.
To remove X
Remove the key from the ignition lock or
turn the key to position 0(KEYLESS GO).
X Fold the wiper arm away from the wind-
screen until it engages.
X Set the wiper blade at right angles to the
wiper arm. X
Remove the wiper blade from the retainer
on the wiper arm in the direction of the
arrow.
Fitting !
The two wiper blades are different
lengths. If you swap the wiper blades they
may scratch the windscreen. Make sure
that the longer wiper blade is fitted on the
driver's side.
X Compare the lengths of the two new wiper
blades.
X Slide the longer of the two new wiper
blades into the retainer on the wiper arm
on the driver's side in the opposite direc-
tion to the arrow.
X Repeat the same procedure on the front-
passenger's side with the shorter of the two
new wiper blades. 308
Replacing the
wiper bladesPractical advice
212_AKB; 2; 4, en-GB
mkalafa, Version: 2.11.8.1 2009-05-05T14:17:16+02:00 - Seite 308
Dateiname: 6515346702_buchblock.pdf; erzeugt am 07. May 2009 14:17:19; WK
Page 322 of 373
loss warning system or with the tyre pressure
monitor*.
! The maximum permissible distance which
can be driven in run-flat mode depends on
the load in the vehicle. It is 80 km if the
vehicle is partially laden and 30 km if fully
laden.
The maximum permissible distance which
can be driven in run-flat mode is counted
from the moment the tyre pressure loss
warning appears in the multi-function dis-
play.
You must not exceed a maximum speed of
80 km/h. G
Risk of accident
The handling characteristics of your vehicle
deteriorate in run-flat mode, for example:
R when cornering
R when braking
R when accelerating rapidly
Adapt your driving style accordingly and avoid
sudden changes in direction and sudden
acceleration, as well as driving over obstacles
(i.e. kerbs, potholes), and driving off-road.
This is particularly the case when the vehicle
is heavily laden.
The maximum permissible distance that can
be driven in run-flat mode depends to a large
extent on the loads placed on the vehicle. It
can be shorter due to high speeds, a heavy
load, sudden acceleration and/or manoeu-
vring, the road surface condition, outside tem-
perature, etc., or further, if you drive carefully
and conservatively.
Do not continue to drive in run-flat mode if:
R you hear banging noises.
R the vehicle starts to shake.
R you see smoke and smell rubber.
R ESP ®
is intervening constantly.
R there are tears in the sidewalls of the tyre. After driving in run-flat mode, you must have
the wheel(s) checked for damage at a quali-
fied specialist workshop which has the nec-
essary specialist knowledge and tools to carry
out the work required. The faulty tyre must be
replaced in every case.
Mercedes-Benz recommends that you use a
Mercedes-Benz Service Centre for this pur-
pose. In particular, work relevant to safety or
on safety-related systems must be carried out
at a qualified specialist workshop.
Vehicles with MOExtended tyres*: if you
change one or all of the tyres, make sure that
you only use tyres marked MOExtended of the
specified size for the vehicle. Battery
Notes on the vehicle battery
In order for the battery to achieve the maxi-
mum possible service life, it must always be
sufficiently charged.
Have the battery charge checked more fre-
quently if you use the vehicle mainly for short
trips or if you leave it standing idle for a
lengthy period.
To prevent damage from corrosion, only
replace the battery with one that has a central
ventilation cover.
Consult a Mercedes-Benz Service Centre if
you wish to leave your vehicle parked up for
a long period of time. G
Risk of injury
Comply with safety precautions and take pro-
tective measures when handling batteries. Risk of explosion
Fire, naked flames and
smoking are prohibited
when handling the battery.
Avoid creating sparks. Battery
319Practical advice
* optional
212_AKB; 2; 4, en-GB
mkalafa,
Version: 2.11.8.1 2009-05-05T14:17:16+02:00 - Seite 319 Z
Dateiname: 6515346702_buchblock.pdf; erzeugt am 07. May 2009 14:17:24; WK
Page 326 of 373

the jump-starting procedure
(Y
page 323).
Fitting the battery X
Install the battery. To do this, follow the
steps described in "Removing the battery"
(Y page 322) in reverse order.
X Reconnect the battery (Y page 323).Reconnecting the battery
! Always connect the battery in the order
described below. Never swap the terminal
clamps. Otherwise, you may damage the
vehicle electronics.
X Switch off all electrical consumers (e.g.
radio, blower, etc.).
X Connect the positive terminal clamp and
secure the cover.
X Connect the negative terminal clamp.
X Connect the breather hose.
X On vehicles with the battery in the
engine compartment: put the filter box
back in place, then clip in and close the
retaining clamps.
Close the bonnet.
X Vehicles with the battery in the boot:
close the boot.
i If the battery power supply has been inter-
rupted (e.g. if it has been reconnected), you
must carry out the following tasks:
R set the time ( Ypage 132)
R reset the function for folding the exterior
mirrors in/out automatically* by folding
the mirrors out once ( Ypage 87) Jump-starting
If your vehicle's battery is discharged, the
engine can be jump-started from another
vehicle or from an external battery using jump
leads. Observe the following points:
R
you may only jump-start when the engine
and catalytic converter are cold.
R do not start the engine if the battery is fro-
zen. Let the battery thaw first.
R jump-starting may only be performed from
batteries with a nominal voltage of 12 V.
R only use jump leads which have a sufficient
cross-section and insulated terminal
clamps.
i Jump leads and further information about
jump-starting can be obtained from any
Mercedes-Benz Service Centre.
! Avoid repeated and lengthy starting
attempts.
Do not use a rapid-charging device to start
the engine. G
Risk of injury
There is a risk of acid burns when jump-start-
ing a vehicle due to the gases which escape
from the battery. Do not lean over the battery
while the engine is being jump-started. G
Risk of explosion
Gases escaping from the battery during jump-
starting may cause minor explosions. Avoid
creating sparks. Keep naked flames away
from the battery, and do not smoke.
Comply with safety precautions and take pro-
tective measures when handling batteries.
You will find these under "Battery" in the
index.
X Make sure that the two vehicles do not
touch.
X Depress the parking brake firmly.
X Manual transmission: engage neutral.
X Automatic transmission*: shift the trans-
mission to position P.
X Switch off all electrical consumers (e.g.
radio, blower, etc.).
X Open the bonnet (Y page 219). Jump-starting
323Practical advice
* optional
212_AKB; 2; 4, en-GB
mkalafa
,V ersion: 2.11.8.1
2009-05-05T14:17:16+02:00 - Seite 323 Z
Dateiname: 6515346702_buchblock.pdf; erzeugt am 07. May 2009 14:17:26; WK
Page 329 of 373
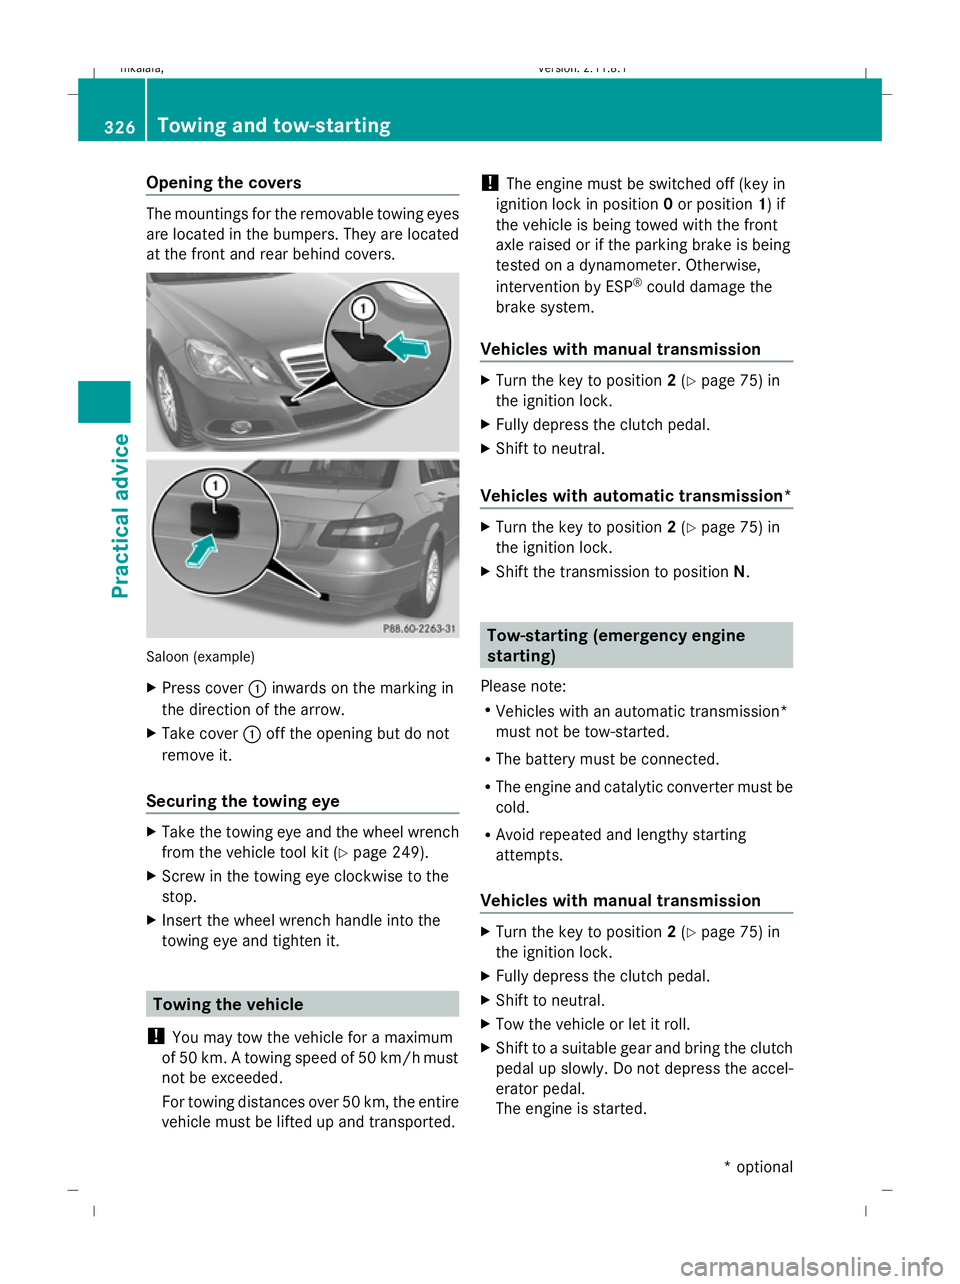
Opening the covers
The mountings for the removable towing eyes
are located in the bumpers. They are located
at the front and rear behind covers. Saloon (example)
X
Press cover :inwards on the marking in
the direction of the arrow.
X Take cover :off the opening but do not
remove it.
Securing the towing eye X
Take the towing eye and the wheel wrench
from the vehicle tool kit (Y page 249).
X Screw in the towing eye clockwise to the
stop.
X Insert the wheel wrench handle into the
towing eye and tighten it. Towing the vehicle
! You may tow the vehicle for a maximum
of 50 km. A towing speed of 50 km/hm ust
not be exceeded.
For towing distances over 50 km, the entire
vehicle must be lifted up and transported. !
The engine must be switched off (key in
ignition lock in position 0or position 1) if
the vehicle is being towed with the front
axle raised or if the parking brake is being
tested on a dynamometer. Otherwise,
intervention by ESP ®
could damage the
brake system.
Vehicles with manual transmission X
Turn the key to position 2(Y page 75) in
the ignition lock.
X Fully depress the clutch pedal.
X Shift to neutral.
Vehicles with automatic transmission* X
Turn the key to position 2(Y page 75) in
the ignition lock.
X Shift the transmission to position N. Tow-starting (emergency engine
starting)
Please note:
R Vehicles with an automatic transmission*
must not be tow-started.
R The battery must be connected.
R The engine and catalytic converter must be
cold.
R Avoid repeated and lengthy starting
attempts.
Vehicles with manual transmission X
Turn the key to position 2(Y page 75) in
the ignition lock.
X Fully depress the clutch pedal.
X Shift to neutral.
X Tow the vehicle or let it roll.
X Shift to a suitable gear and bring the clutch
pedal up slowly. Do not depress the accel-
erator pedal.
The engine is started. 326
Towing and tow-startingPractical advice
* optional
212_AKB; 2; 4, en-GB
mkalafa,
Version: 2.11.8.1 2009-05-05T14:17:16+02:00 - Seite 326
Dateiname: 6515346702_buchblock.pdf; erzeugt am 07. May 2009 14:17:28; WK