2009 MERCEDES-BENZ E-CLASS SALOON ESP
[x] Cancel search: ESPPage 65 of 373
You should always adapt your driving style to
suit prevailing road and weather conditions.
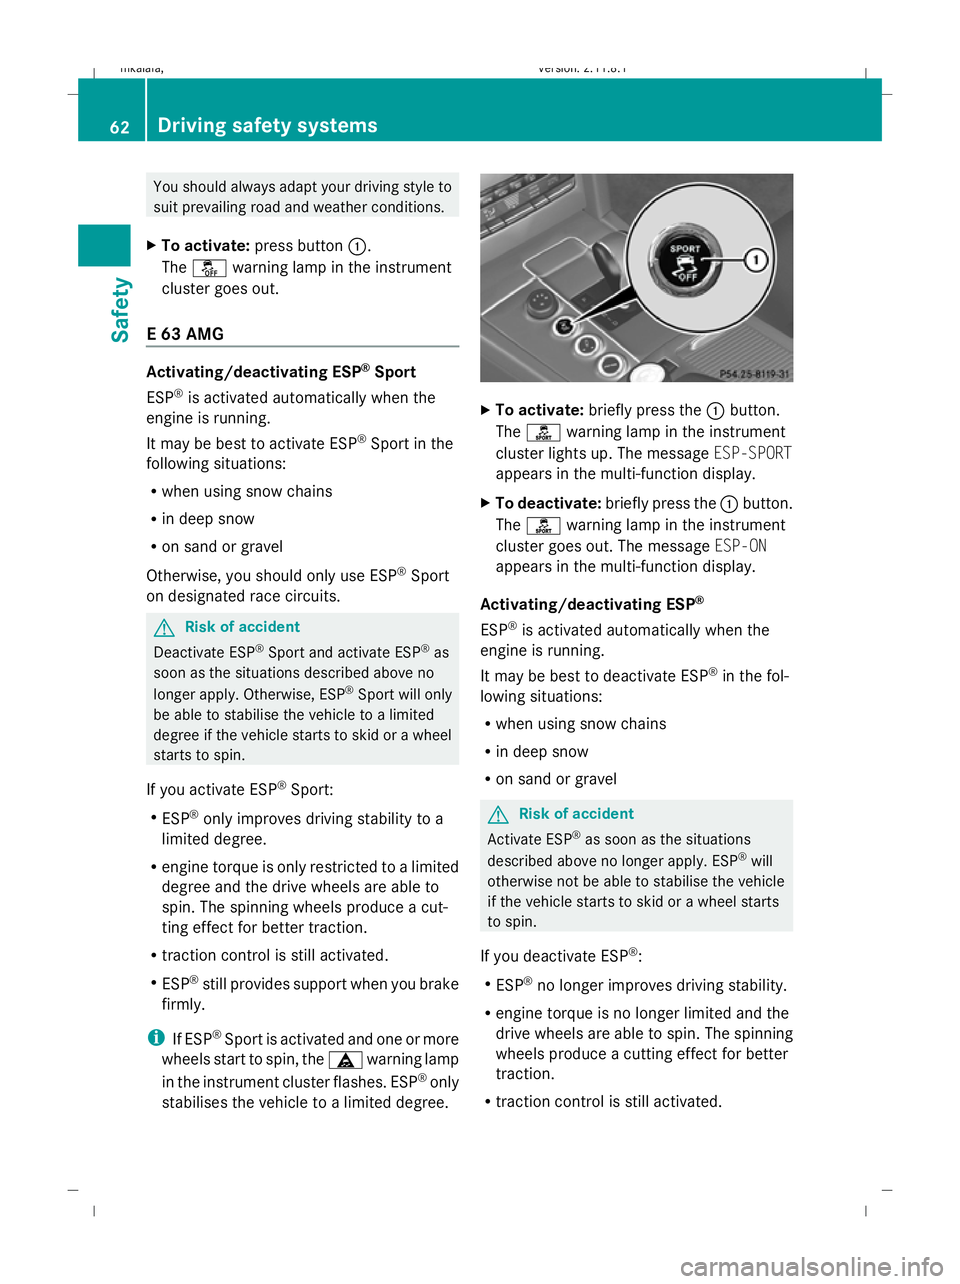
X To activate: press button :.
The å warning lamp in the instrument
cluster goes out.
E 63 AMG Activating/deactivating ESP
®
Sport
ESP ®
is activated automatically when the
engine is running.
It may be best to activate ESP ®
Sport in the
following situations:
R when using snow chains
R in deep snow
R on sand or gravel
Otherwise, you should only use ESP ®
Sport
on designated race circuits. G
Risk of accident
Deactivate ESP ®
Sport and activate ESP ®
as
soon as the situations described above no
longer apply. Otherwise, ESP ®
Sport will only
be able to stabilise the vehicle to a limited
degree if the vehicle starts to skid or a wheel
starts to spin.
If you activate ESP ®
Sport:
R ESP ®
only improves driving stability to a
limited degree.
R engine torque is only restricted to a limited
degree and the drive wheels are able to
spin. The spinning wheels produce a cut-
ting effect for better traction.
R traction control is still activated.
R ESP ®
still provides support when you brake
firmly.
i If ESP ®
Sport is activated and one or more
wheels start to spin, the äwarning lamp
in the instrument cluster flashes. ESP ®
only
stabilises the vehicle to a limited degree. X
To activate: briefly press the :button.
The ì warning lamp in the instrument
cluster lights up. The message ESP-SPORT
appears in the multi-function display.
X To deactivate: briefly press the :button.
The ì warning lamp in the instrument
cluster goes out. The message ESP-ON
appears in the multi-function display.
Activating/deactivating ESP ®
ESP ®
is activated automatically when the
engine is running.
It may be best to deactivate ESP ®
in the fol-
lowing situations:
R when using snow chains
R in deep snow
R on sand or gravel G
Risk of accident
Activate ESP ®
as soon as the situations
described above no longer apply. ESP ®
will
otherwise not be able to stabilise the vehicle
if the vehicle starts to skid or a wheel starts
to spin.
If you deactivate ESP ®
:
R ESP ®
no longer improves driving stability.
R engine torque is no longer limited and the
drive wheels are able to spin. The spinning
wheels produce a cutting effect for better
traction.
R traction control is still activated. 62
Driving safety systemsSafety
212_AKB; 2; 4, en-GB
mkalafa,
Version: 2.11.8.1 2009-05-05T14:17:16+02:00 - Seite 62
Dateiname: 6515346702_buchblock.pdf; erzeugt am 07. May 2009 14:15:43; WK
Page 66 of 373
R
ESP ®
still provides support when you brake
firmly.
R PRE-SAFE ®
is not available. It will also not
be activated if you brake firmly with the
assistance of ESP.
R PRE-SAFE ®
Brake* is not available. It will
also not be activated if you brake firmly
with the assistance of ESP ®
.
i If ESP ®
is deactivated and one or more
wheels start to spin, the äwarning lamp
in the instrument cluster does not flash. In
such situations, ESP ®
will not stabilise the
vehicle. X
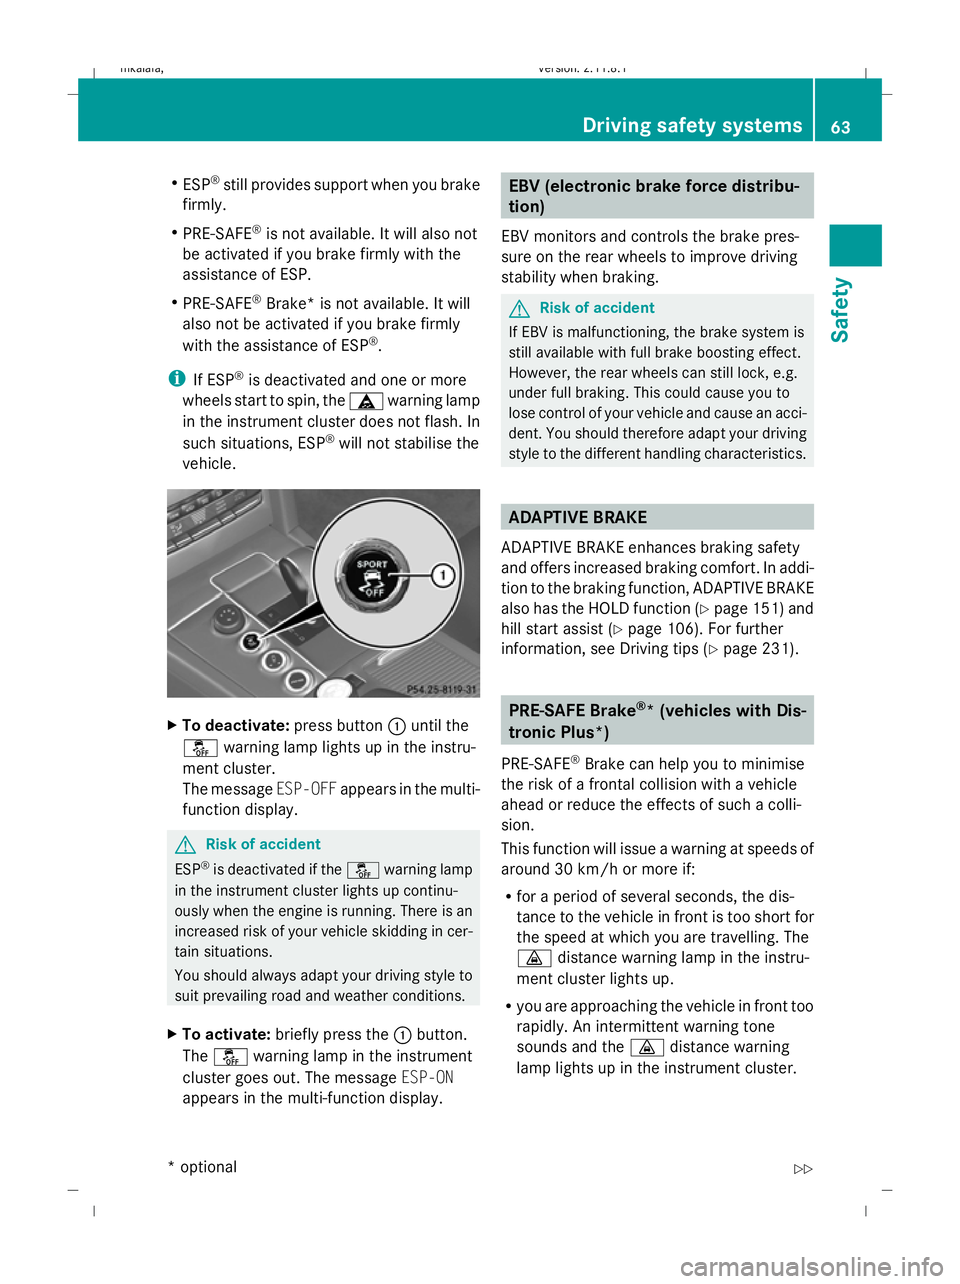
To deactivate: press button:until the
å warning lamp lights up in the instru-
ment cluster.
The message ESP-OFFappears in the multi-
function display. G
Risk of accident
ESP ®
is deactivated if the åwarning lamp
in the instrument cluster lights up continu-
ously when the engine is running. There is an
increased risk of your vehicle skidding in cer-
tain situations.
You should always adapt your driving style to
suit prevailing road and weather conditions.
X To activate: briefly press the :button.
The å warning lamp in the instrument
cluster goes out. The message ESP-ON
appears in the multi-function display. EBV (electronic brake force distribu-
tion)
EBV monitors and controls the brake pres-
sure on the rear wheels to improve driving
stability when braking. G
Risk of accident
If EBV is malfunctioning, the brake system is
still available with full brake boosting effect.
However, the rear wheels can still lock, e.g.
under full braking. This could cause you to
lose control of your vehicle and cause an acci-
dent. You should therefore adapt your driving
style to the different handling characteristics. ADAPTIVE BRAKE
ADAPTIVE BRAKE enhances braking safety
and offers increased braking comfort. In addi-
tion to the braking function, ADAPTIVE BRAKE
also has the HOLD function (Y page 151) and
hill start assist (Y page 106). For further
information, see Driving tips (Y page 231). PRE-SAFE Brake
®
* (vehicles with Dis-
tronic Plus*)
PRE-SAFE ®
Brake can help you to minimise
the risk of a frontal collision with a vehicle
ahead or reduce the effects of such a colli-
sion.
This function will issue a warning at speeds of
around 30 km/h or more if:
R for a period of several seconds, the dis-
tance to the vehicle in front is too short for
the speed at which you are travelling. The
· distance warning lamp in the instru-
ment cluster lights up.
R you are approaching the vehicle in front too
rapidly. An intermittent warning tone
sounds and the ·distance warning
lamp lights up in the instrument cluster. Driving safety systems
63Safety
* optional
212_AKB; 2; 4, en-GB
mkalafa,
Version: 2.11.8.1 2009-05-05T14:17:16+02:00 - Seite 63 Z
Dateiname: 6515346702_buchblock.pdf; erzeugt am 07. May 2009 14:15:43; WK
Page 67 of 373

Due to the nature of the system, particularly
complicated driving conditions may cause the
system to display an unnecessary warning. G
Risk of accident
Pay particular attention to the traffic condi-
tions if the ·distance warning lamp in the
instrument cluster lights up or an intermittent
warning tone sounds. If necessary, brake or
manoeuvre to avoid an obstacle.
If the driver and passengers have fastened
their seat belts, PRE-SAFE ®
Brake can also
can also perform the following at speeds of
above approximately 30 km/h:
R brake the vehicle automatically from a
speed of up to around 200 km/h
R trigger preventative passenger protection
measures (PRE-SAFE ®
) G
Risk of accident
PRE-SAFE ®
Brake is only an aid to assist you
when driving. You are responsible for main-
taining a safe distance from other vehicles,
the vehicle's speed and for braking in good
time. Always pay attention to the traffic con-
ditions. Otherwise, you may recognise dan-
gers too late, cause an accident and injure
yourself and others.
With the help of the radar sensor system,
PRE-SAFE ®
Brake can detect obstacles that
are in front of your vehicle for an extended
period of time. If you approach an obstacle
and PRE-SAFE ®
Brake detects a risk of a col-
lision, the system will initially alert you both
visually and acoustically. If you do not brake
or steer, the vehicle will at first automatically
brake slightly. In the event of an increased
risk of a collision, PRE-SAFE ®
is activated
(Y page 42). If the risk of collision persists and
you do not brake, manoeuvre or accelerate
significantly yourself, an automatic full brake
application may be carried out. G
Risk of accident
Only clearly identified obstacles will trigger a
warning and initiate braking assistance by
PRE-SAFE ®
Brake.
In particular, the detection of obstacles can
be restricted if there is:
R dirt on the sensors or the sensors are cov-
ered
R snow or heavy rain
R interference by other radar sources
R the possibility of strong radar reflections,
for example in multi-storey car parks
PRE-SAFE ®
Brake does not react to persons,
animals, oncoming vehicles, crossing traffic
or when cornering.
PRE-SAFE ®
Brake may not detect narrow
vehicles such as motorcycles and vehicles
driving on a different line. G
Risk of accident
Depending on the current speed, PRE-SAFE ®
Brake decelerates your vehicle by up to
4 m/s 2
before performing possible emer-
gency braking. This is equivalent to approx-
imately 40 % of the maximum braking power
of the vehicle. You must also apply the brakes
yourself to limit the effects of the collision or
to avoid the collision. Automatic emergency
braking is not performed until immediately
prior to an accident in the event that you are
unable to avoid one by, for instance, taking
evasive action.
In order to maintain the appropriate distance
to the vehicle in front and thus prevent a
crash, you must apply the brakes yourself.
At speeds up to approximately 70 km/h,
PRE-SAFE ®
Brake can also detect stationary
obstacles, for example stopped or parked
vehicles. 64
Driving safety systemsSafety
212_AKB; 2; 4, en-GB
mkalafa,
Version: 2.11.8.1 2009-05-05T14:17:16+02:00 - Seite 64
Dateiname: 6515346702_buchblock.pdf; erzeugt am 07. May 2009 14:15:44; WK
Page 78 of 373

Key positions
Key
g
To remove the key
1 Power supply for some consumers, such
as the windscreen wipers
2 Ignition (power supply for all consumers)
and drive position
3 To start the engine
i Even if the key is not for the vehicle in
question, it will still turn in the ignition lock.
The ignition is not switched on. The engine
cannot be started. KEYLESS GO*
If you press the Start/Stop button repeatedly
without depressing the brake pedal, its func-
tion corresponds to the different key posi-
tions in the ignition lock.
If you depress the brake pedal and press the
Start/Stop button, the engine starts immedi-
ately. X
Position 0: if Start/Stop button :has not
yet been pressed, this corresponds to "key
removed".
X Position 1: press Start/Stop button :
once.
It is now possible to switch on the wind-
screen wipers, for example.
i If you open the driver's door in this posi-
tion, the power supply is disconnected
again.
X Position 2(ignition): press Start/Stop but-
ton :twice.
i If you press Start/Stop button :in this
position once and the driver's door is open,
the power supply is disconnected again.
Removing the Start/Stop button You can remove the Start/Stop button from
the ignition lock and start the vehicle with a
key as usual.
i You do not need to remove the Start/
Stop button from the ignition lock when you
leave the vehicle. X
Remove Start/Stop button :from ignition
lock ;.
i If you switch from key mode to KEYLESS
GO mode, the system requires a two-sec-
ond recognition period before you can use
the Start/Stop button. Key positions
75Controls
* optional
212_AKB; 2; 4, en-GB
mkalafa
,V ersion: 2.11.8.1
2009-05-05T14:17:16+02:00 - Seite 75 Z
Dateiname: 6515346702_buchblock.pdf; erzeugt am 07. May 2009 14:15:49; WK
Page 80 of 373
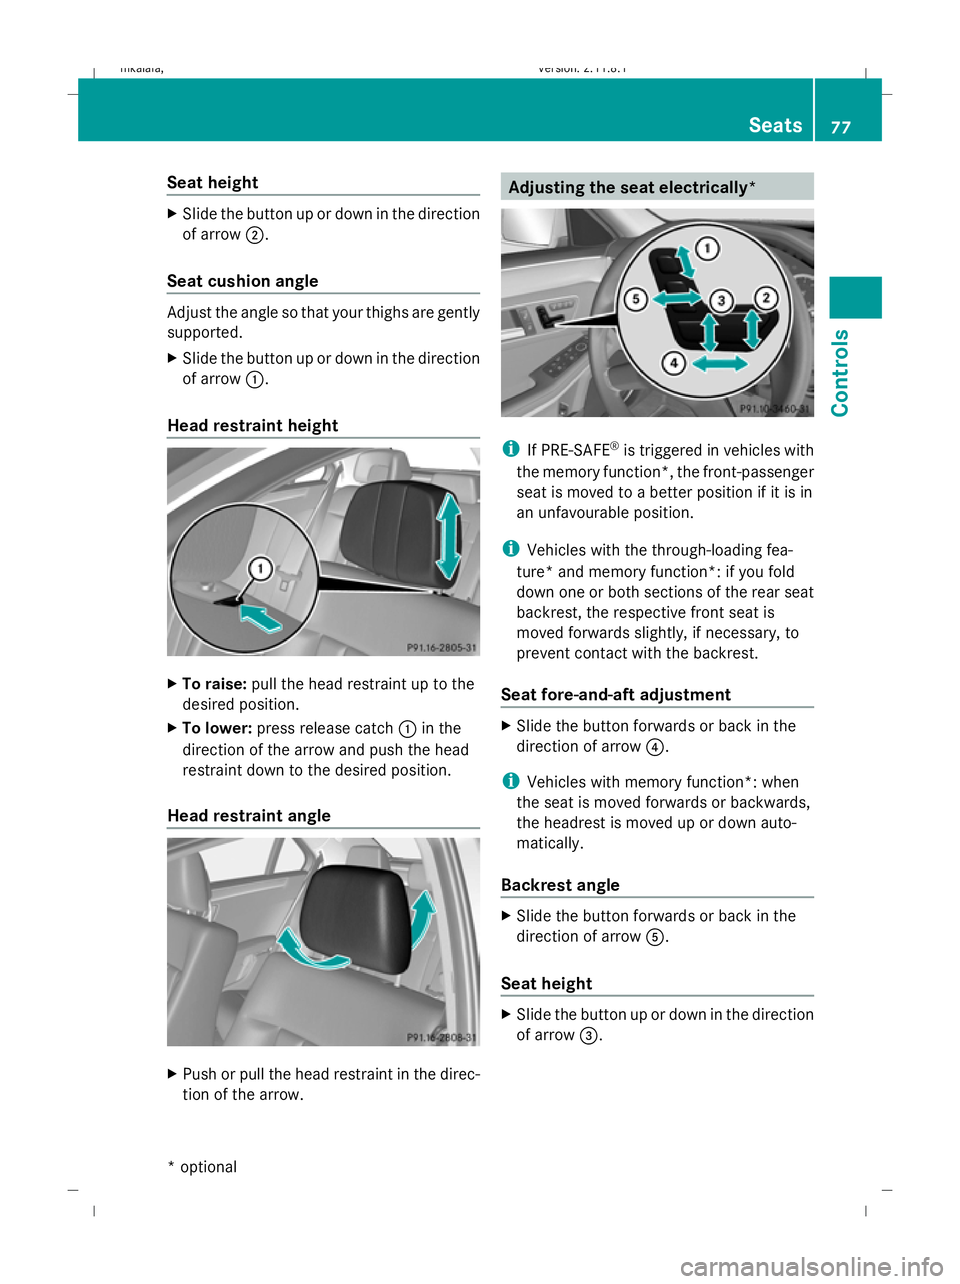
Seat height
X
Slide the button up or down in the direction
of arrow ;.
Seat cushion angle Adjust the angle so that your thighs are gently
supported.
X Slide the button up or down in the direction
of arrow :.
Head restraint height X
To raise: pull the head restraint up to the
desired position.
X To lower: press release catch :in the
direction of the arrow and push the head
restraint down to the desired position.
Head restraint angle X
Push or pull the head restraint in the direc-
tion of the arrow. Adjusting the seat electrically*
i
If PRE-SAFE ®
is triggered in vehicles with
the memory function*, the front-passenger
seat is moved to a better position if it is in
an unfavourable position.
i Vehicles with the through-loading fea-
ture* and memory function*: if you fold
down one or both sections of the rear seat
backrest, the respective front seat is
moved forwards slightly, if necessary, to
prevent contact with the backrest.
Seat fore-and-aft adjustment X
Slide the button forwards or back in the
direction of arrow ?.
i Vehicles with memory function*: when
the seat is moved forwards or backwards,
the headrest is moved up or down auto-
matically.
Backrest angle X
Slide the button forwards or back in the
direction of arrow A.
Seat height X
Slide the button up or down in the direction
of arrow =. Seats
77Controls
* optional
212_AKB; 2; 4, en-GB
mkalafa,
Version: 2.11.8.1 2009-05-05T14:17:16+02:00 - Seite 77 Z
Dateiname: 6515346702_buchblock.pdf; erzeugt am 07. May 2009 14:15:50; WK
Page 88 of 373
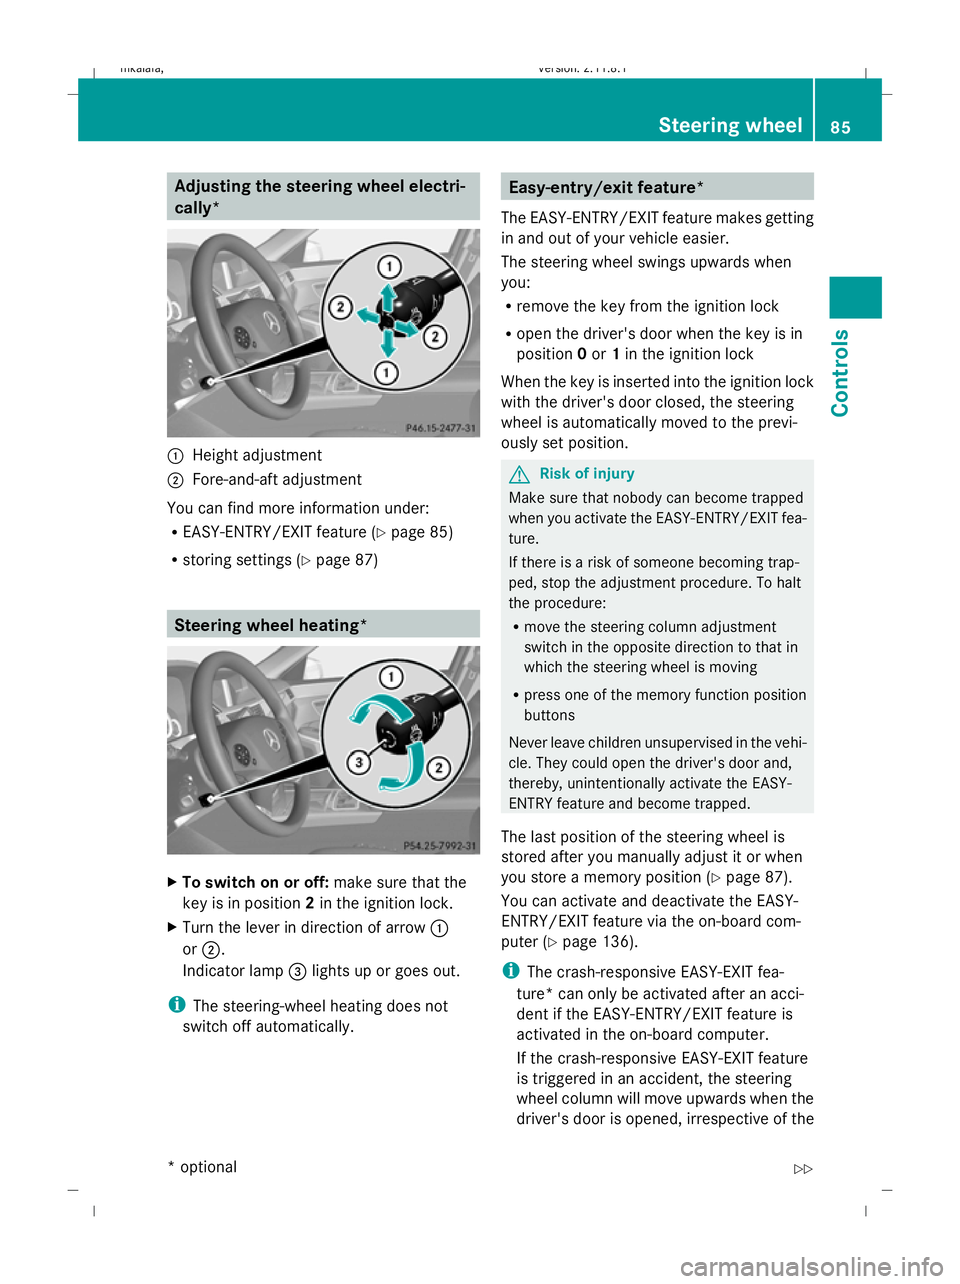
Adjusting the steering wheel electri-
cally*
:
Height adjustment
; Fore-and-aft adjustment
You can find more information under:
R EASY-ENTRY/EXIT feature (Y page 85)
R storing settings (Y page 87) Steering wheel heating*
X
To switch on or off: make sure that the
key is in position 2in the ignition lock.
X Turn the lever in direction of arrow :
or ;.
Indicator lamp =lights up or goes out.
i The steering-wheel heating does not
switch off automatically. Easy-entry/exit feature*
The EASY-ENTRY/EXIT feature makes getting
in and out of your vehicle easier.
The steering wheel swings upwards when
you:
R remove the key from the ignition lock
R open the driver's door when the key is in
position 0or 1in the ignition lock
When the key is inserted into the ignition lock
with the driver's door closed, the steering
wheel is automatically moved to the previ-
ously set position. G
Risk of injury
Make sure that nobody can become trapped
when you activate the EASY-ENTRY/EXIT fea-
ture.
If there is a risk of someone becoming trap-
ped, stop the adjustment procedure. To halt
the procedure:
R move the steering column adjustment
switch in the opposite direction to that in
which the steering wheel is moving
R press one of the memory function position
buttons
Never leave children unsupervised in the vehi-
cle. They could open the driver's door and,
thereby, unintentionally activate the EASY-
ENTRY feature and become trapped.
The last position of the steering wheel is
stored after you manually adjust it or when
you store a memory position (Y page 87).
You can activate and deactivate the EASY-
ENTRY/EXIT feature via the on-board com-
puter (Y page 136).
i The crash-responsive EASY-EXIT fea-
ture* can only be activated after an acci-
dent if the EASY-ENTRY/EXIT feature is
activated in the on-board computer.
If the crash-responsive EASY-EXIT feature
is triggered in an accident, the steering
wheel column will move upwards when the
driver's door is opened, irrespective of the Steering wheel
85Controls
* optional
212_AKB; 2; 4, en-GB
mkalafa
,V ersion: 2.11.8.1
2009-05-05T14:17:16+02:00 - Seite 85 Z
Dateiname: 6515346702_buchblock.pdf; erzeugt am 07. May 2009 14:15:55; WK
Page 89 of 373
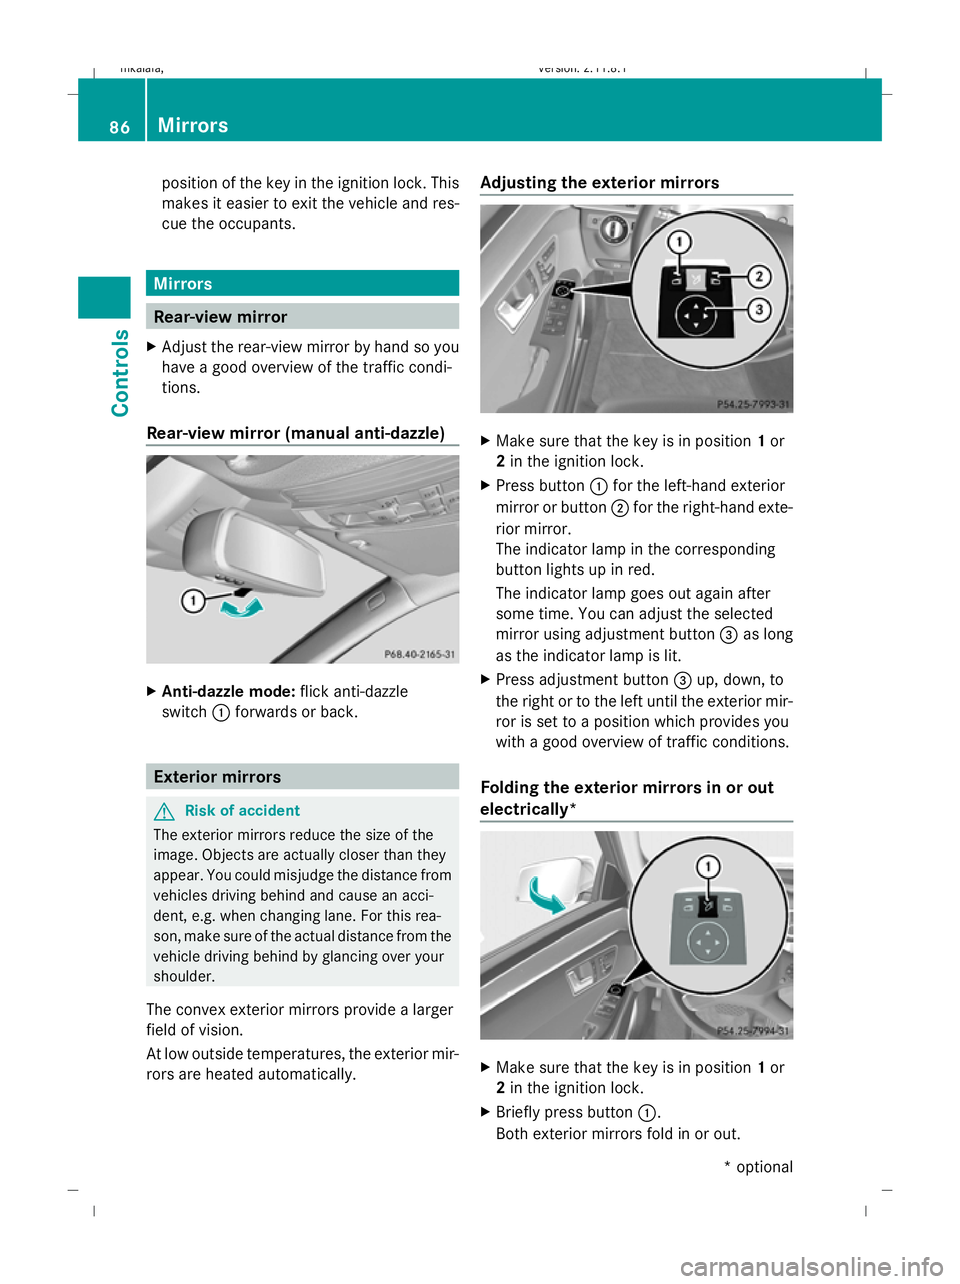
position of the key in the ignition lock. This
makes it easier to exit the vehicle and res-
cue the occupants. Mirrors
Rear-view mirror
X Adjust the rear-view mirror by hand so you
have a good overview of the traffic condi-
tions.
Rear-view mirror (manual anti-dazzle) X
Anti-dazzle mode: flick anti-dazzle
switch :forwards or back. Exterior mirrors
G
Risk of accident
The exterior mirrors reduce the size of the
image. Objects are actually closer than they
appear. You could misjudge the distance from
vehicles driving behind and cause an acci-
dent, e.g. when changing lane. For this rea-
son, make sure of the actual distance from the
vehicle driving behind by glancing over your
shoulder.
The convex exterior mirrors provide a larger
field of vision.
At low outside temperatures, the exterior mir-
rors are heated automatically. Adjusting the exterior mirrors
X
Make sure that the key is in position 1or
2 in the ignition lock.
X Press button :for the left-hand exterior
mirror or button ;for the right-hand exte-
rior mirror.
The indicator lamp in the corresponding
button lights up in red.
The indicator lamp goes out again after
some time. You can adjust the selected
mirror using adjustment button =as long
as the indicator lamp is lit.
X Press adjustment button =up, down, to
the right or to the left until the exterior mir-
ror is set to a position which provides you
with a good overview of traffic conditions.
Folding the exterior mirrors in or out
electrically* X
Make sure that the key is in position 1or
2 in the ignition lock.
X Briefly press button :.
Both exterior mirrors fold in or out. 86
MirrorsControls
* optional
212_AKB; 2; 4, en-GB
mkalafa,
Version: 2.11.8.1 2009-05-05T14:17:16+02:00 - Seite 86
Dateiname: 6515346702_buchblock.pdf; erzeugt am 07. May 2009 14:15:56; WK
Page 91 of 373
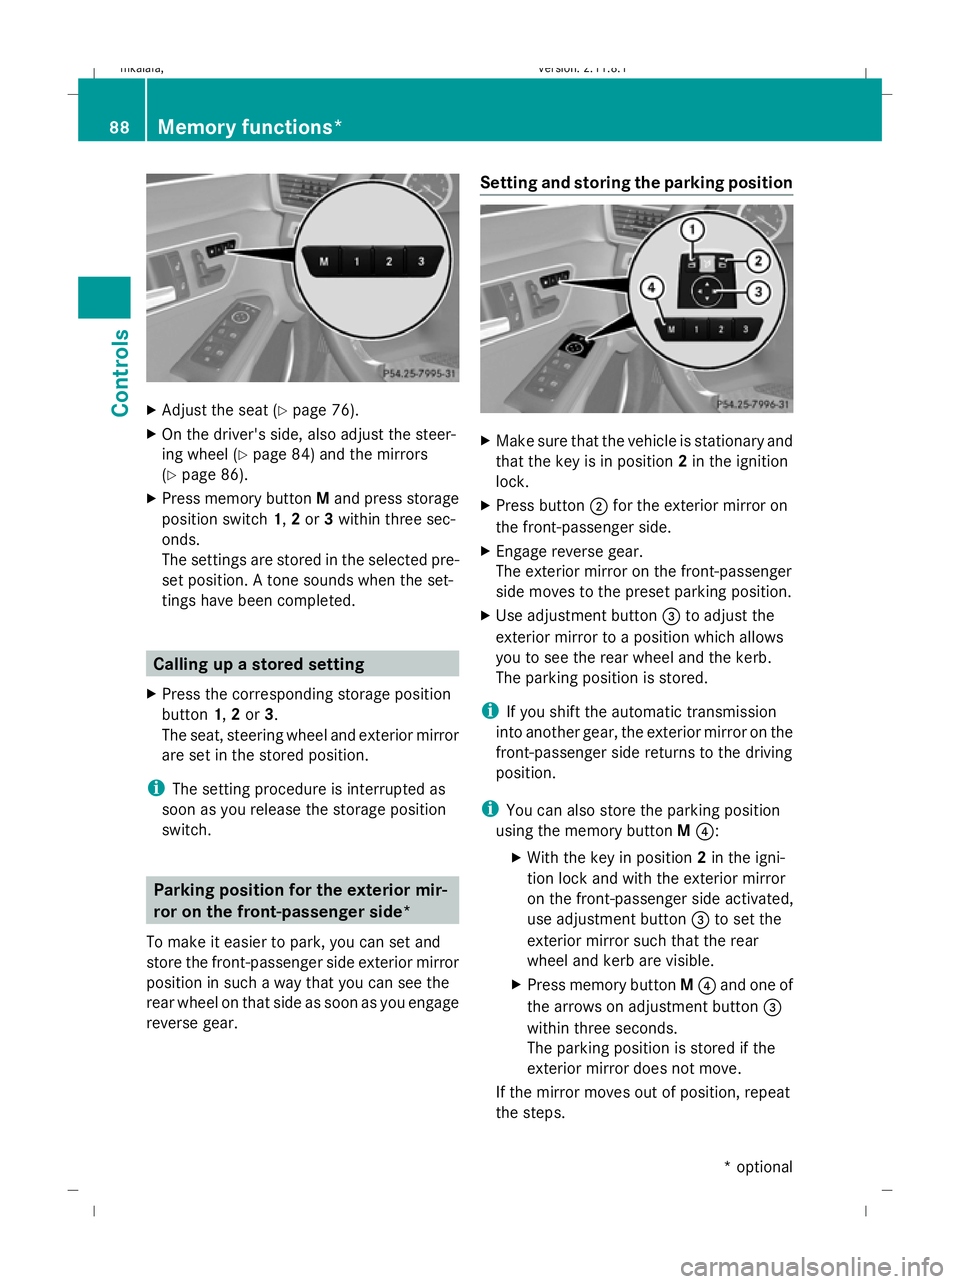
X
Adjust the seat ( Ypage 76).
X On the driver's side, also adjust the steer-
ing wheel (Y page 84) and the mirrors
(Y page 86).
X Press memory button Mand press storage
position switch 1,2or 3within three sec-
onds.
The settings are stored in the selected pre-
set position. A tone sounds when the set-
tings have been completed. Calling up a stored setting
X Press the corresponding storage position
button 1,2or 3.
The seat, steering wheel and exterior mirror
are set in the stored position.
i The setting procedure is interrupted as
soon as you release the storage position
switch. Parking position for the exterior mir-
ror on the front-passenger side*
To make it easier to park, you can set and
store the front-passenger side exterior mirror
position in such a way that you can see the
rear wheel on that side as soon as you engage
reverse gear. Setting and storing the parking position
X
Make sure that the vehicle is stationary and
that the key is in position 2in the ignition
lock.
X Press button ;for the exterior mirror on
the front-passenger side.
X Engage reverse gear.
The exterior mirror on the front-passenger
side moves to the preset parking position.
X Use adjustment button =to adjust the
exterior mirror to a position which allows
you to see the rear wheel and the kerb.
The parking position is stored.
i If you shift the automatic transmission
into another gear, the exterior mirror on the
front-passenger side returns to the driving
position.
i You can also store the parking position
using the memory button M?:
X With the key in position 2in the igni-
tion lock and with the exterior mirror
on the front-passenger side activated,
use adjustment button =to set the
exterior mirror such that the rear
wheel and kerb are visible.
X Press memory button M? and one of
the arrows on adjustment button =
within three seconds.
The parking position is stored if the
exterior mirror does not move.
If the mirror moves out of position, repeat
the steps. 88
Memory functions*Controls
* optional
212_AKB; 2; 4, en-GB
mkalafa,
Version: 2.11.8.1 2009-05-05T14:17:16+02:00 - Seite 88
Dateiname: 6515346702_buchblock.pdf; erzeugt am 07. May 2009 14:15:57; WK