2009 MERCEDES-BENZ E-CLASS ESTATE door lock
[x] Cancel search: door lockPage 214 of 373

When you take the key out of the ignition lock,
the mobile phone stays on but you can no
longer use the hands-free system.
If you are making a call and you would like to
take the key out of the ignition lock, first
remove the mobile phone from the bracket.
Otherwise, the call will be ended.
Sliding adapter for the mobile phone
bracket (automatic vehicles with
DIRECT SELECT selector lever*) Certain mobile phone brackets require a slid-
ing adapter so the bracket can be installed
correctly.
:
Previous model: example of a mobile
phone bracket
; New model: example of a mobile phone
bracket
= Sliding adapter
Fitting the sliding adapter X
Insert sliding adapter :by aligning the
openings with lugs ;of contact plate =.
X Attach the mobile phone bracket to sliding
adapter :; see the separate mobile phone
bracket fitting instructions.
X Press both release buttons 4and press
sliding adapter :with the mobile phone
bracket down until it engages.
X Insert the mobile phone into the mobile
phone bracket; see the separate mobile
phone bracket fitting instructions.
Removing the sliding adapter X
Remove the mobile phone from its bracket;
see the separate mobile phone bracket fit-
ting instructions.
X Press both release buttons ;and press
sliding adapter :with the mobile phone
bracket upwards until it disengages.
X Remove the mobile phone bracket from
sliding adapter :; see the separate mobile
phone bracket fitting instructions.
X Detach sliding adapter :using suitable
tool =and remove. Garage door opener*
The remote control integrated in the rear-view
mirror allows you to operate up to three dif-
ferent door and gate systems. Features
211Controls
* optional
212_AKB; 2; 4, en-GB
mkalafa,
Version: 2.11.8.1 2009-05-05T14:17:16+02:00 - Seite 211 Z
Dateiname: 6515346702_buchblock.pdf; erzeugt am 07. May 2009 14:16:52; WK
Page 215 of 373

i
The garage door opener is only available
for certain countries. Observe the legal
requirements in all countries concerned.
The HomeLink ®
garage door opener is
compatible with most European garage and
gate opener drives. More information on
HomeLink ®
and/or compatible products is
available from:
R any Mercedes-Benz Service Centre
R the HomeLink ®
hotline
(0) 08000 466 354 65 (free of charge) or
+49 (0) 6838 907-277 (charges apply)
R the Internet: www.homelink.com G
Risk of accident
Only press the transmitter button on the inte-
grated remote control if there are no persons
or objects present within the sweep of the
garage door. Persons could otherwise be
injured as the door moves.
Programming the remote control i
You will achieve the best results by insert-
ing new batteries in the garage door's
remote control before programming it.
X Erase the memory of the integrated remote
control (Y page 213) before programming
it for the first time.
X Turn the key to position 2in the ignition
lock. X
Press and hold one of transmitter but-
tons ;to? on the integrated remote
control.
Indicator lamp :starts to flash after a
short while. It flashes about once a second.
i Indicator lamp :flashes immediately
the first time the transmitter button is pro-
grammed. If this transmitter button has
already been programmed, indicator
lamp :will only start flashing at a rate of
once a second after 20 seconds have
elapsed.
X Keep the transmitter buttons depressed.
X Point the garage door's remote control with
the transmitter towards the left-hand side
of the rear-view mirror from a distance of 5
to 20 cm.
i The distance between the garage door's
remote control and the integrated garage
door opener depends on the system of the
garage door drive. You might require sev-
eral attempts. You should test every posi-
tion for at least 20 seconds before trying
another position.
X Keep the transmitter button on the garage
door's remote control depressed until indi-
cator lamp :starts to flash rapidly.
The programming was successful if indica-
tor lamp :flashes rapidly.
X Release the transmitter buttons on the
garage door's remote control and the inte-
grated remote control.
If indicator lamp :goes out after approx-
imately 20 seconds and did not flash rapidly
before this:
X Release the transmitter buttons on the
integrated and portable remote controls.
X Repeat the programming procedure. When
doing so, change the distance between the
garage door's remote control and the trans-
mitter buttons in the rear-view mirror.
i If the garage door system works with a
rolling code, after programming you must 212
FeaturesControls
212_AKB; 2; 4, en-GB
mkalafa,
Version: 2.11.8.1 2009-05-05T14:17:16+02:00 - Seite 212
Dateiname: 6515346702_buchblock.pdf; erzeugt am 07. May 2009 14:16:52; WK
Page 216 of 373

synchronise the remote control integrated
in the rear-view mirror with the garage door
system receiver.
You will find further information in the
garage door opening system's operating
instructions, e.g. the sections on "Synchro-
nising the transmitter" or "Registering a
new transmitter". You can also call the hot-
line mentioned above.
Opening or closing the garage door Once programmed, the integrated remote
control will assume the function of the garage
door system's remote control. Please read
the operating instructions for the garage door
system.
X Turn the key to position 2in the ignition
lock.
X Press the transmitter button on the rear-
view mirror that you have programmed to
operate the garage door.
Garage door system with fixed code: indi-
cator lamp :lights up continuously.
Garage door system with rolling code: indi-
cator lamp :flashes briefly and then lights
up for approximately two seconds. This is
repeated for up to 20 seconds.
i The transmitter will transmit a signal for
as long as the transmitter button is being
pressed. The transmission will be halted
after a maximum of 20 seconds and indi-
cator lamp :will flash. Press the trans-
mitter button again, if necessary.
Clearing the remote control memory X
Turn the key to position 2in the ignition
lock.
X Press and hold transmitter buttons ;
and ?for approximately 20 seconds until
indicator lamp :flashes rapidly.
The memory is cleared.
i You should clear the remote control mem-
ory before selling the vehicle. Floormat* on the driver's side
G
Risk of accident
Make sure that there is sufficient clearance
around the pedals when floormats are used,
and that the floormats are properly secured.
The floormats must be correctly secured at all
times using retainers and press-studs.
Before you drive off, check the floormats and
secure if necessary. A floormat which is not
properly secured can slip and, thereby, inter-
fere with the movement of the pedals.
Do not place floormats on top of one another. X
Slide seat backwards.
X To fit: place the floormat in position.
X Press studs :onto retainers ;.
X To remove: pull floormat off retainers ;.
X Remove the floormat. Features
213Controls
* optional
212_AKB; 2; 4, en-GB
mkalafa,
Version: 2.11.8.1 2009-05-05T14:17:16+02:00 - Seite 213 Z
Dateiname: 6515346702_buchblock.pdf; erzeugt am 07. May 2009 14:16:52; WK
Page 244 of 373

If the vehicle is very dirty, pre-wash it before
cleaning it in an automatic car wash.
! Make sure that the automatic car wash is
suitable for the size of the vehicle. Fold in
the exterior mirrors before the vehicle is
washed. There is otherwise a risk of dam-
age to the exterior mirrors.
! When washing your vehicle in a tow-
through car wash, make sure that the auto-
matic transmission* is in position N. The
vehicle could otherwise be damaged.
R Vehicles with DIRECT SELECT lever and
key:
Do not remove the key from the ignition
lock. Do not open the driver's or front-
passenger door when the engine is
switched off, as this automatically shifts
the automatic transmission to park posi-
tion Pand locks the wheels, unless you
have previously shifted the automatic
transmission to N.
R Vehicles with DIRECT SELECT lever and
KEYLESS GO*:
Do not open the driver's or front-
passenger door when the engine is
switched off, as this shifts the automatic
transmission to park position Pand locks
the wheels.
! Make sure that the side windows are
closed completely, that the blower for the
ventilation/heating is switched off and that
the windscreen wiper switch is in position
0. The rain/light sensor could otherwise be
activated and thereby cause unintentional
wiping. This could result in damage to the
vehicle.
After using an automatic car wash, wipe off
wax and drying agents from the windscreen
and the wiper blades. This will prevent smears
and reduce wiping noises caused by residue
on the windscreen. High-pressure cleaners G
Risk of accident
Do not use high-pressure cleaners with circu-
lar-jet nozzles (dirt grinders) to clean your
vehicle, in particular the tyres. You could oth-
erwise damage the tyres and cause an acci-
dent.
! Observe the instructions issued by the
equipment manufacturer concerning the
distance to be maintained between the
nozzle of the high-pressure cleaner and the
vehicle (at least 30 cm).
Move the high-pressure cleaner nozzle
around when cleaning your vehicle.
Do not aim directly at any of the following:
R tyres
R door joint
R electrical components
R battery
R connectors
R lights
R seals
R trim elements
R ventilation slots
Damaged seals or electrical components
can lead to failures or leaks.
Care and treatment of matt paint-
work* Your vehicle has a clear matt finish. For this
reason, you should make sure that you
adhere to the following instructions to avoid
damage to paintwork due to improper treat-
ment.
!
Under no circumstances should you pol-
ish the vehicle. Polishing will make the
paintwork shine.
! When caring for your paintwork, do not
use paint cleaner, grinding or polishing Care
241Operation
* optional
212_AKB; 2; 4, en-GB
mkalafa
,V ersion: 2.11.8.1
2009-05-05T14:17:16+02:00 - Seite 241 Z
Dateiname: 6515346702_buchblock.pdf; erzeugt am 07. May 2009 14:17:01; WK
Page 253 of 373
(e.g. if the engine is started or if a door or the
boot lid/tailgate is opened or closed) and you
could be seriously injured.
i When using the jack, you should also
observe the safety notes in the "Flat tyre"
section (Y page 316).
Vehicles with a TIREFIT kit X
Saloon: open the boot floor (Y page 204).
X Estate: open the EASY-PACK folding lug-
gage compartment floor (Y page 204).:
TIREFIT kit
; Folding wheel chock
= Electric air pump
? Towing eye
A Jack
B Centring pin
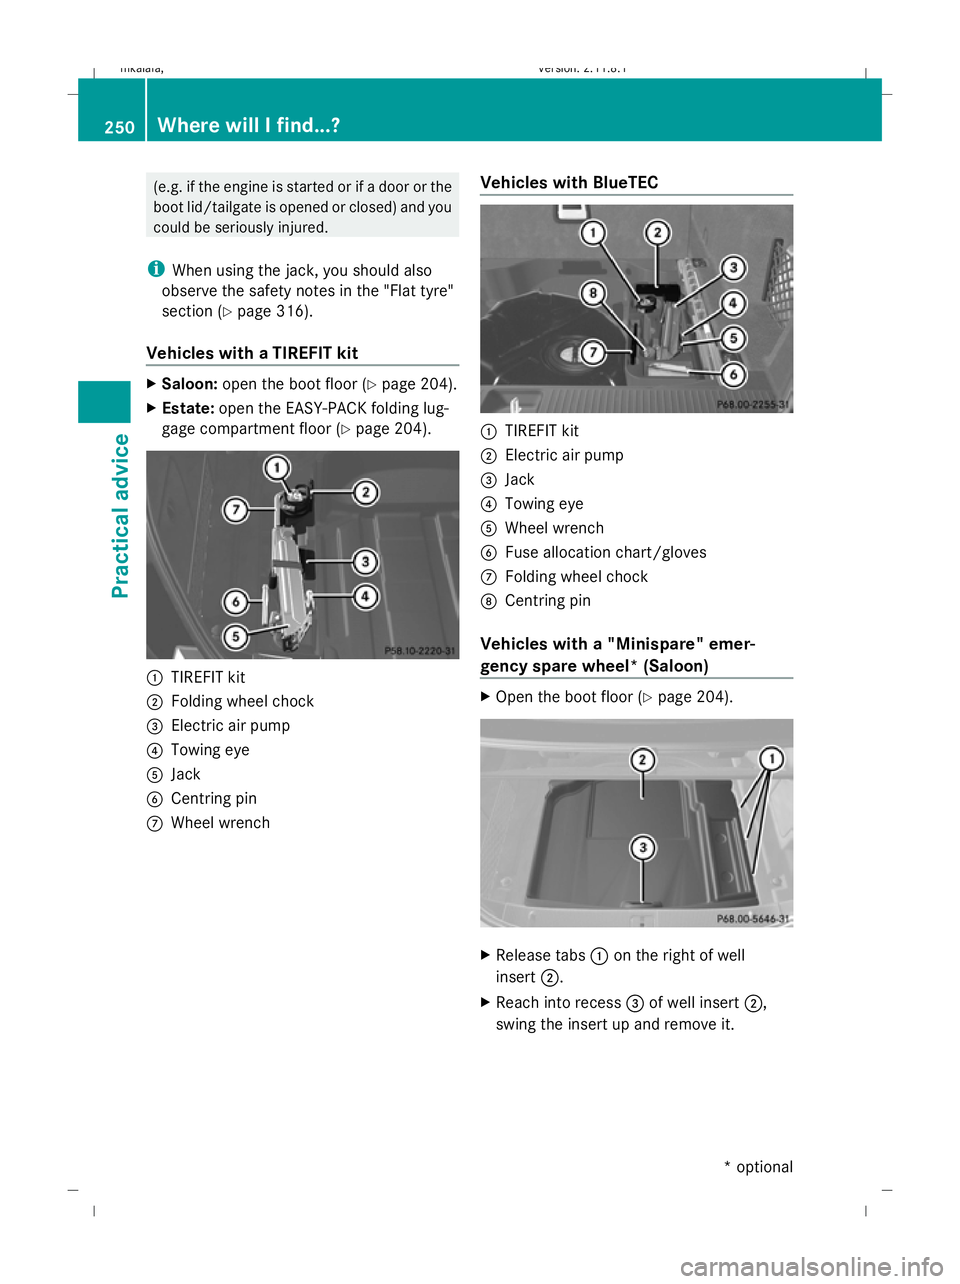
C Wheel wrench Vehicles with BlueTEC :
TIREFIT kit
; Electric air pump
= Jack
? Towing eye
A Wheel wrench
B Fuse allocation chart/gloves
C Folding wheel chock
D Centring pin
Vehicles with a "Minispare" emer-
gency spare wheel* (Saloon) X
Open the boot floor (Y page 204). X
Release tabs :on the right of well
insert ;.
X Reach into recess =of well insert ;,
swing the insert up and remove it. 250
Where will I find...?Practical advice
* optional
212_AKB; 2; 4, en-GB
mkalafa,
Version: 2.11.8.1
2009-05-05T14:17:16+02:00 - Seite 250
Dateiname: 6515346702_buchblock.pdf; erzeugt am 07. May 2009 14:17:06; WK
Page 256 of 373

Display messages
Possible causes/consequences and
X
X Solutions 120 km/h Maximum
speed
exceeded
The maximum speed has been exceeded
40
.
X Drive more slowly. Adaptive
Main-beam
Assist inopera‐
tive
Adaptive Highbeam Assist* is faulty.
X
Visit a qualified specialist workshop. Active
bonnet malfunc‐
tion See
Owner's
Manual The active bonnet function (pedestrian protection) is not
active due to a malfunction.
X
Visit a qualified specialist workshop. Auxiliary
battery malfunc‐
tion The auxiliary battery for the automatic transmission is no lon-
ger being charged.
X
Visit a qualified specialist workshop. P Select
Park (P)
Vehicles with automatic transmission* with a selector lever:
You have switched off the engine with the start/stop but-
ton* and opened the driver's door.
You attempted to lock the vehicle.
A warning tone also sounds.
X
Move the selector lever to P.P Select
Park (P)
Vehicles with automatic transmission* with a selector lever:
With the HOLD function or Distronic Plus
*activated, you
have:
R opened the driver's door and released the seat belt or
R switched off the engine or
R opened the bonnet
A tone may also sound at regular intervals. The tone becomes
louder if you attempt to lock the vehicle.
You cannot start the engine.
X Move the selector lever to P.
You can restart the engine. Only
select Park (P)
when vehi‐
cle is
stationary
Vehicles with a DIRECT SELECT lever*: the vehicle is still in
motion.
X
Stop the vehicle.
X Shift the automatic transmission* to P.40
Only for certain countries. Display messages
253Practical advice
* optional
212_AKB; 2; 4, en-GB
mkalafa
,V ersion: 2.11.8.1
2009-05-05T14:17:16+02:00 - Seite 253 Z
Dateiname: 6515346702_buchblock.pdf; erzeugt am 07. May 2009 14:17:08; WK
Page 257 of 373

Display messages
Possible causes/consequences and
X
X Solutions Vehicle not in
position P
Vehicles with a DIRECT SELECT lever*: the driver's door is
open and the automatic transmission* is in position
R,Nor
D. A warning tone also sounds.
X Shift the automatic transmission* to P.
X Engage the parking brake. To start
engine, shift to
P or N You have attempted to start the engine and the selector lever
is in position
Dor R.
X Move the selector lever to Por N. Apply
brake to
deselect Park (P)
position
X
Depress the brake pedal. Without
changing
gear, consult
workshop You cannot change the transmission position.
X
In transmission position D: consult a qualified specialist
workshop without changing the transmission position.
or
X In transmission positions N,Ror P: contact a qualified spe-
cialist workshop. DISTRONIC
PLUS deactiva‐
ted
autom.
See Own‐
er's Man‐
ual
Vehicles with a navigation system*: the vehicle is close to a
radio-telescope facility and, therefore, must not transmit any
radar signals. The radar sensor system has switched off auto-
matically. A warning tone also sounds.
X
Drive on.
Distronic Plus* is available again as soon as the vehicle is
far enough away from the radio telescope facility
(Y page 362). 254
Display
messagesPractical advice
* optional
212_AKB; 2; 4, en-GB
mkalafa
,V ersion: 2.11.8.1
2009-05-05T14:17:16+02:00 - Seite 254
Dateiname: 6515346702_buchblock.pdf; erzeugt am 07. May 2009 14:17:08; WK
Page 259 of 373

Display messages
Possible causes/consequences and
X
X Solutions DISTRONIC
PLUS - - - km/h
A condition for activating Distronic Plus
*has not been met or
the system is outside the operating temperature range.
X Close the bonnet and the driver's door.
X Vehicles with a selector lever: move the selector lever to
D.
Vehicles with a DIRECT SELECT lever*: move the automatic
transmission to D.
X If conditions permit, drive faster than 30 km/h and switch
on Distronic Plus* again.
X Activate ESP ®
.
X Wait until the system is in the operating temperature range. DISTRONIC
PLUS and
SPEED‐
TRONIC inopera‐
tive
Distronic Plus* and Speedtronic are faulty. A warning tone
also sounds.
X
Visit a qualified specialist workshop. Speed
Limit
Assist currently
unavaila‐
ble See
Owner's
Manual
Speed Limit Assist* is deactivated and temporarily inopera-
tive, if:
R
the windscreen is dirty in the camera’s field of vision.
R visibility is impaired due to heavy rain, snow, spray or fog.
Speed Limit Assist* is operational again and the display mes-
sage disappears when:
R the dirt (e.g. slush) drops away while you are driving.
R the system detects that the camera is fully operational
again.
If the display message continues to be shown:
X Clean the windscreen (Y page 242).Speed
Limit
Assist: Unavaila‐
ble in
this coun‐
try
Speed Limit Assist* is only available in certain countries.
X
Drive on.
Speed Limit Assist *is available again as soon as you drive
into a country in which its use is approved. Speed
Limit
Assist inopera‐
tive
Speed Limit Assist* has failed.
X
Visit a qualified specialist workshop. 256
Display messagesPractical advice
* optional
212_AKB; 2; 4, en-GB
mkalafa,
Version: 2.11.8.1 2009-05-05T14:17:16+02:00 - Seite 256
Dateiname: 6515346702_buchblock.pdf; erzeugt am 07. May 2009 14:17:08; WK