2009 MERCEDES-BENZ E-CLASS ESTATE door lock
[x] Cancel search: door lockPage 302 of 373
Locking/unlocking in an emergency
Emergency key element
If the vehicle can no longer be locked or
unlocked with the key, use the emergency
key element.
If you use the emergency key element to
unlock and open the driver's door or the boot
lid, the anti-theft alarm system* will be trig-
gered (Y page 65).
There are several ways to turn off the alarm:
X Press the %or& button on the key.
or
X Insert the key into the ignition lock.
or
X Press the start/stop button *in the ignition
lock. The key must be in the vehicle.
or
X Lock or unlock the vehicle using KEYLESS
GO*. The key must be outside the vehicle.
If you unlock the vehicle using the emergency
key element, the fuel filler flap will not be
unlocked automatically.
X To unlock the fuel filler flap: insert the
key in the ignition lock.
Removing the emergency key element X
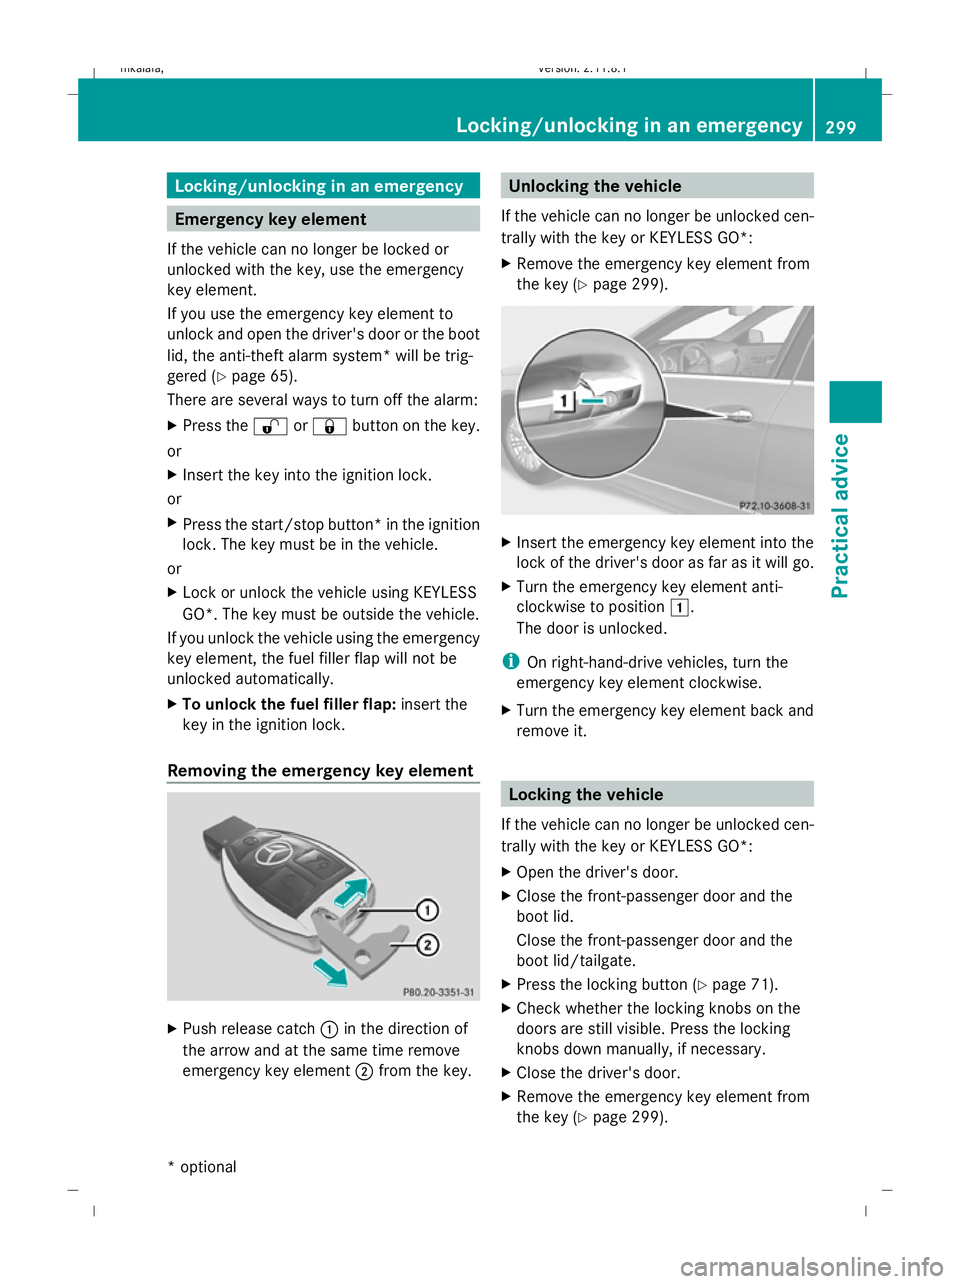
Push release catch :in the direction of
the arrow and at the same time remove
emergency key element ;from the key. Unlocking the vehicle
If the vehicle can no longer be unlocked cen-
trally with the key or KEYLESS GO*:
X Remove the emergency key element from
the key (Y page 299). X
Insert the emergency key element into the
lock of the driver's door as far as it will go.
X Turn the emergency key element anti-
clockwise to position 1.
The door is unlocked.
i On right-hand-drive vehicles, turn the
emergency key element clockwise.
X Turn the emergency key element back and
remove it. Locking the vehicle
If the vehicle can no longer be unlocked cen-
trally with the key or KEYLESS GO*:
X Open the driver's door.
X Close the front-passenger door and the
boot lid.
Close the front-passenger door and the
boot lid/tailgate.
X Press the locking button (Y page 71).
X Check whether the locking knobs on the
doors are still visible. Press the locking
knobs down manually, if necessary.
X Close the driver's door.
X Remove the emergency key element from
the key (Y page 299). Locking/unlocking in an emergency
299Practical advice
* optional
212_AKB; 2; 4, en-GB
mkalafa,
Version: 2.11.8.1 2009-05-05T14:17:16+02:00 - Seite 299 Z
Dateiname: 6515346702_buchblock.pdf; erzeugt am 07. May 2009 14:17:15; WK
Page 303 of 373
X
Insert the emergency key element into the
lock of the driver's door as far as it will go.
X Turn the emergency key element clockwise
as far as it will go to position 1.
i On right-hand-drive vehicles, turn the
emergency key element anti-clockwise.
X Turn the emergency key element back and
remove it.
X Check whether the doors and the boot lid/
tailgate are locked. Opening the boot (Saloon)
! The boot lid swings upwards when
opened. Therefore, make sure that there is
sufficient clearance above the boot lid.
If the boot can no longer be unlocked with the
key or KEYLESS GO*:
X Remove the emergency key element from
the key (Y page 299). X
Insert the emergency key element fully into
the tailgate lock.
X Turn the emergency key element anti-
clockwise as far as it will go to position
1.
The boot is unlocked.
X Turn the emergency key element back and
remove it. Opening the tailgate (Estate)
If the tailgate can no longer be opened from
the outside, use the emergency release on
the inside of the tailgate.
On vehicles with a folding bench seat*, you
can use the handle to open the tailgate from
the inside (Y page 73).
X Remove the emergency key element from
the key (Y page 299). !
When opening, the tailgate swings up and
out. Therefore, make sure that there is suf-
ficient clearance above and behind the tail-
gate.
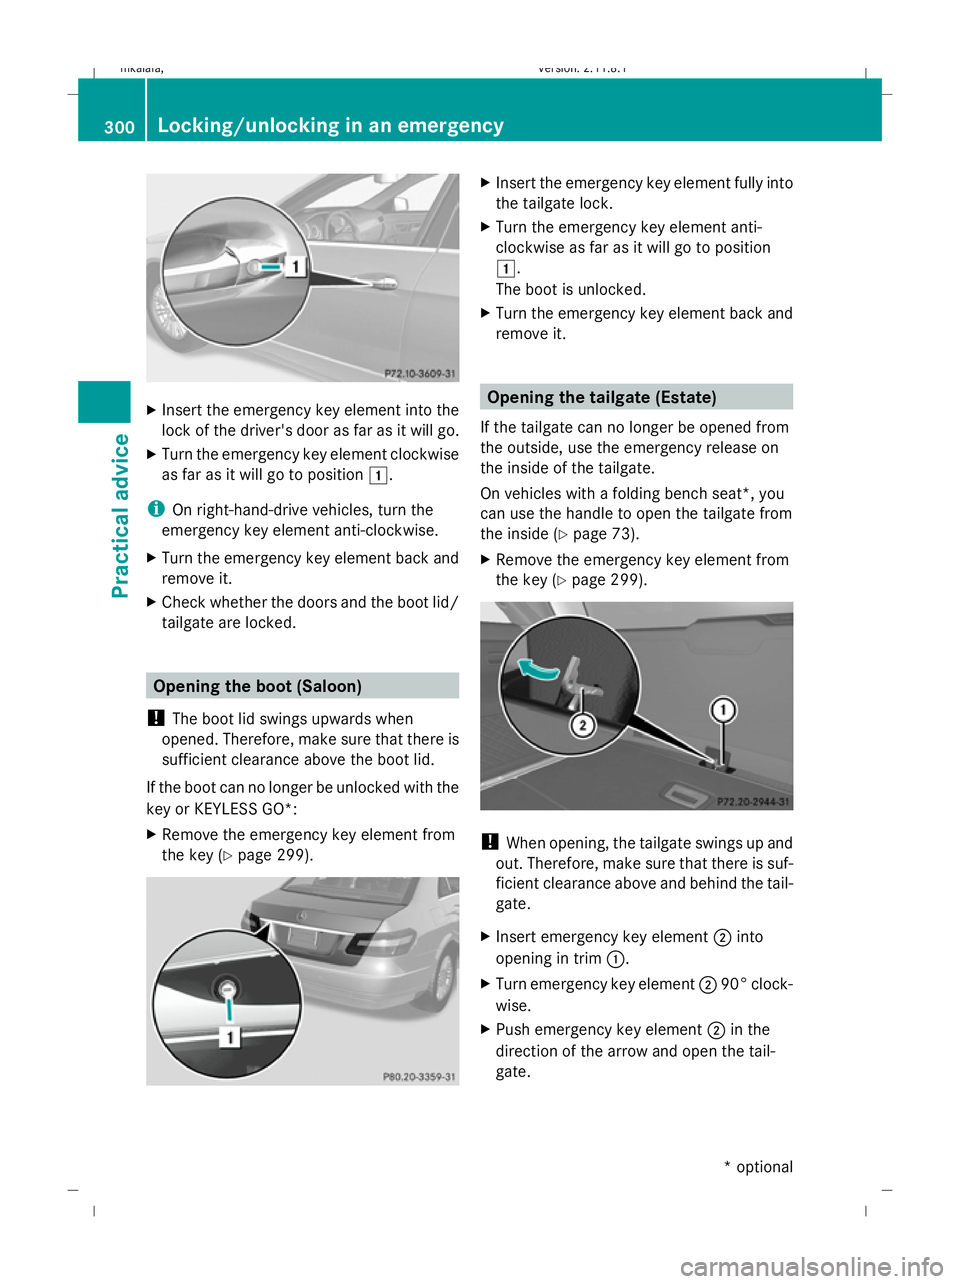
X Insert emergency key element ;into
opening in trim :.
X Turn emergency key element ;90° clock-
wise.
X Push emergency key element ;in the
direction of the arrow and open the tail-
gate. 300
Locking/unlocking in an emergencyPractical advice
* optional
212_AKB; 2; 4, en-GB
mkalafa
,V ersion: 2.11.8.1
2009-05-05T14:17:16+02:00 - Seite 300
Dateiname: 6515346702_buchblock.pdf; erzeugt am 07. May 2009 14:17:15; WK
Page 313 of 373
X
Vehicles without KEYLESS GO*: remove
the key from the ignition lock.
X Vehicles with KEYLESS GO*: open the
driver's door.
The on-board electronics have status 0,
which is the same as the key having been
removed.
X Get out of the vehicle.
X Close the driver’s door.
X Place the warning triangle (Y page 248) at
a suitable distance. Observe legal require-
ments. Using the TIREFIT kit
You can use the TIREFIT kit to seal small
punctures, particularly those in the tyre tread.
You can use TIREFIT at outside temperatures
down to -20 †. G
Risk of accident
In the following cases your safety is especially
endangered, as tyre sealant is insufficient if:
R there are cuts or punctures in the tyre
greater than 4 mm.
R the wheel rim is damaged.
R you have driven at very low tyre pressures
or on a flat tyre.
Do not drive any further. Consult a qualified
specialist workshop which has the necessary
specialist knowledge and tools to carry out
the work required.
Mercedes-Benz recommends that you use a
Mercedes-Benz Service Centre for this pur-
pose. In particular, work relevant to safety or
on safety-related systems must be carried out
at a qualified specialist workshop.
X Do not remove any foreign objects which
have penetrated the tyre, e.g. screws or
nails.
X Remove the TIREFIT kit, the accompanying
"max. 80 km/h" sticker and the electric air
pump from the stowage well underneath the boot/luggage compartment floor
(Y
page 249). X
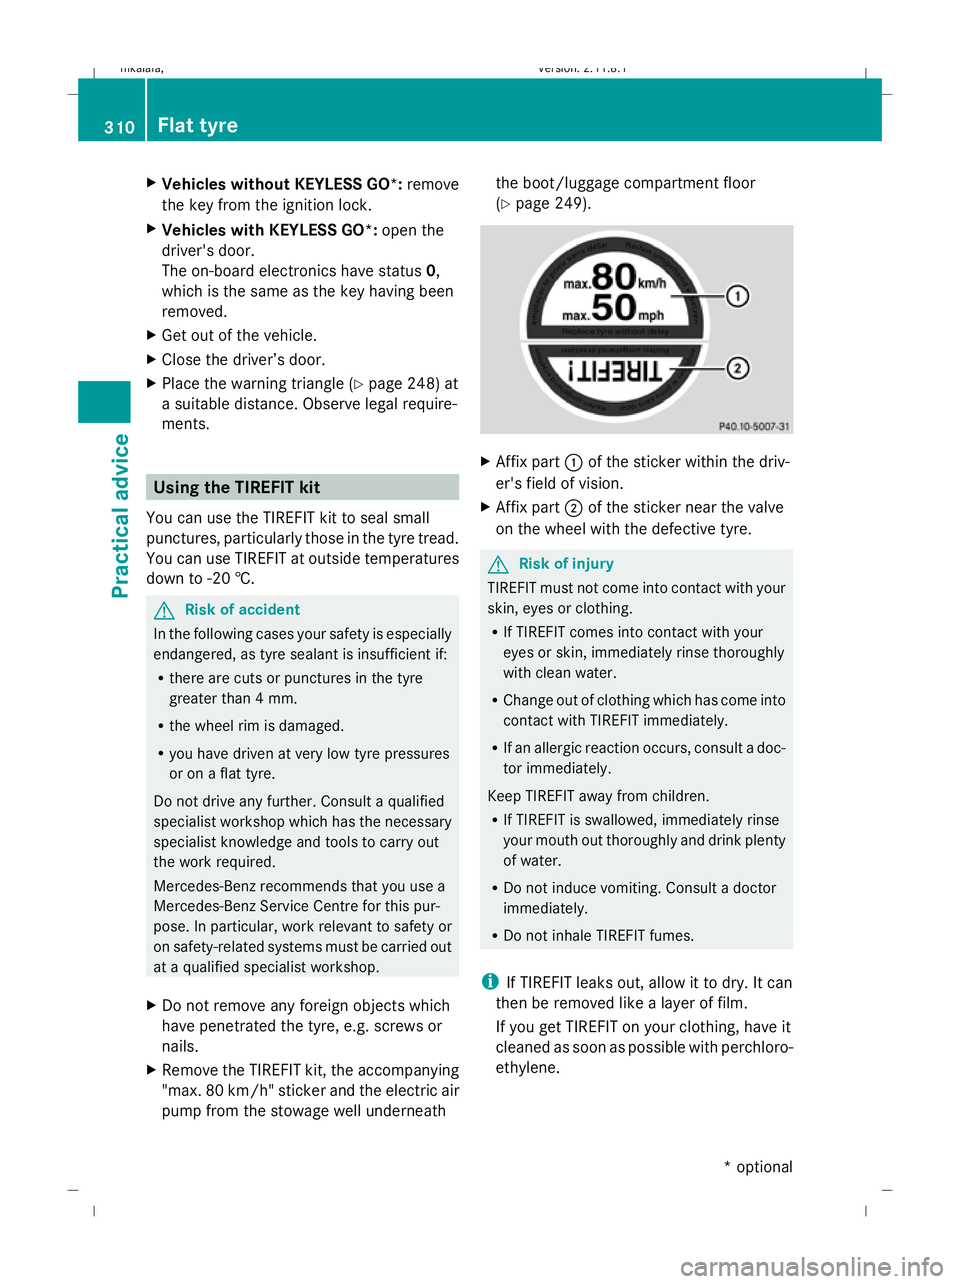
Affix part :of the sticker within the driv-
er's field of vision.
X Affix part ;of the sticker near the valve
on the wheel with the defective tyre. G
Risk of injury
TIREFIT must not come into contact with your
skin, eyes or clothing.
R If TIREFIT comes into contact with your
eyes or skin, immediately rinse thoroughly
with clean water.
R Change out of clothing which has come into
contact with TIREFIT immediately.
R If an allergic reaction occurs, consult a doc-
tor immediately.
Keep TIREFIT away from children.
R If TIREFIT is swallowed, immediately rinse
your mouth out thoroughly and drink plenty
of water.
R Do not induce vomiting. Consult a doctor
immediately.
R Do not inhale TIREFIT fumes.
i If TIREFIT leaks out, allow it to dry. It can
then be removed like a layer of film.
If you get TIREFIT on your clothing, have it
cleaned as soon as possible with perchloro-
ethylene. 310
Flat tyrePractical advice
* optional
212_AKB; 2; 4, en-GB
mkalafa
,V ersion: 2.11.8.1
2009-05-05T14:17:16+02:00 - Seite 310
Dateiname: 6515346702_buchblock.pdf; erzeugt am 07. May 2009 14:17:20; WK
Page 319 of 373
X
On downhill gradients: place foldable
chocks or similar items behind the wheels
of the front and rear axle. X
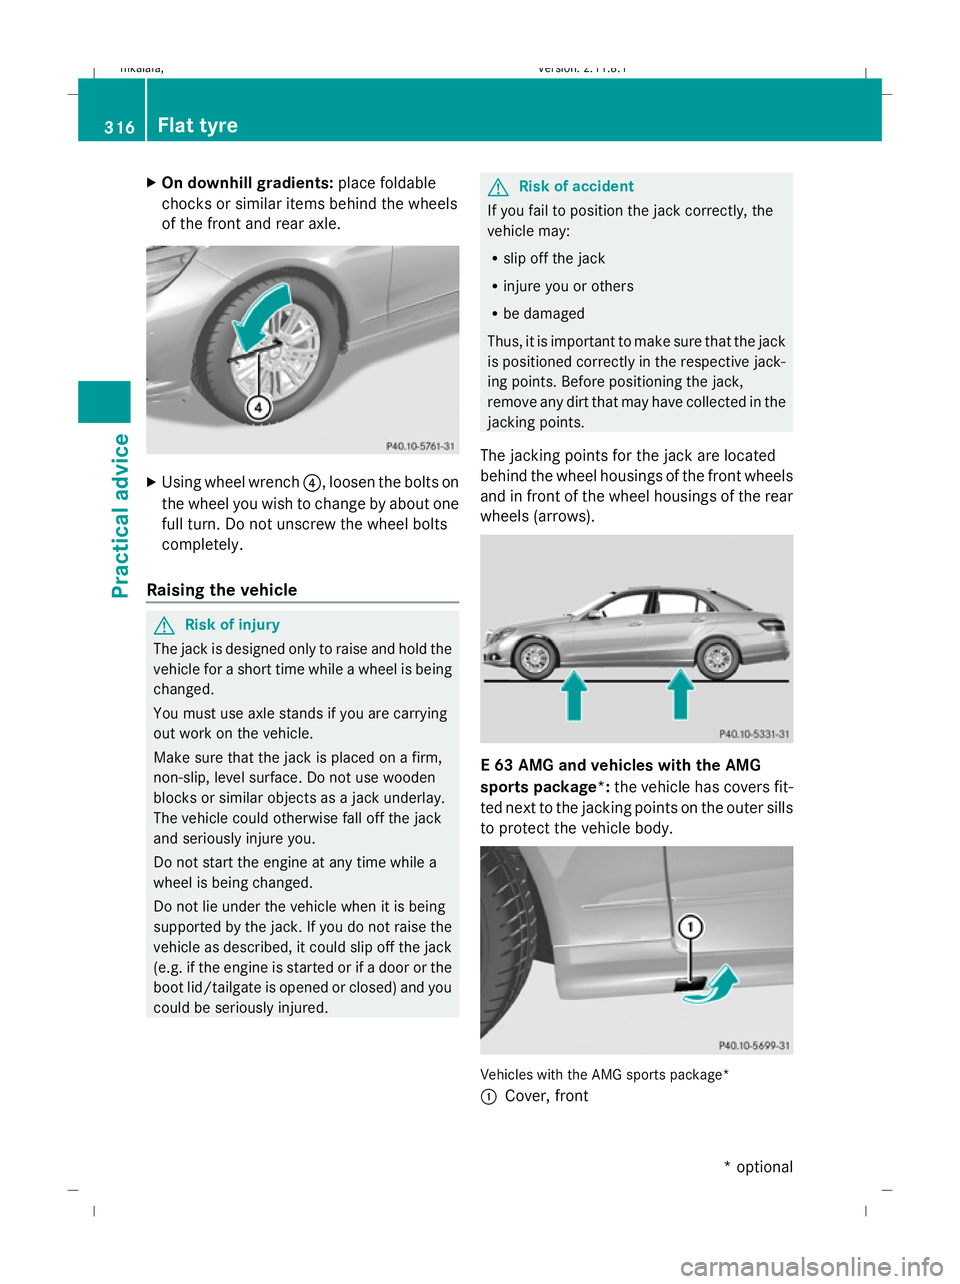
Using wheel wrench ?, loosen the bolts on
the wheel you wish to change by about one
full turn. Do not unscrew the wheel bolts
completely.
Raising the vehicle G
Risk of injury
The jack is designed only to raise and hold the
vehicle for a short time while a wheel is being
changed.
You must use axle stands if you are carrying
out work on the vehicle.
Make sure that the jack is placed on a firm,
non-slip, level surface. Do not use wooden
blocks or similar objects as a jack underlay.
The vehicle could otherwise fall off the jack
and seriously injure you.
Do not start the engine at any time while a
wheel is being changed.
Do not lie under the vehicle when it is being
supported by the jack. If you do not raise the
vehicle as described, it could slip off the jack
(e.g. if the engine is started or if a door or the
boot lid/tailgate is opened or closed) and you
could be seriously injured. G
Risk of accident
If you fail to position the jack correctly, the
vehicle may:
R slip off the jack
R injure you or others
R be damaged
Thus, it is important to make sure that the jack
is positioned correctly in the respective jack-
ing points. Before positioning the jack,
remove any dirt that may have collected in the
jacking points.
The jacking points for the jack are located
behind the wheel housings of the front wheels
and in front of the wheel housings of the rear
wheels (arrows). E 63 AMG and vehicles with the AMG
sports package*:
the vehicle has covers fit-
ted next to the jacking points on the outer sills
to protect the vehicle body. Vehicles with the AMG sports package*
:
Cover, front 316
Flat tyrePractical advice
* optional
212_AKB; 2; 4, en-GB
mkalafa,
Version: 2.11.8.1 2009-05-05T14:17:16+02:00 - Seite 316
Dateiname: 6515346702_buchblock.pdf; erzeugt am 07. May 2009 14:17:23; WK
Page 332 of 373
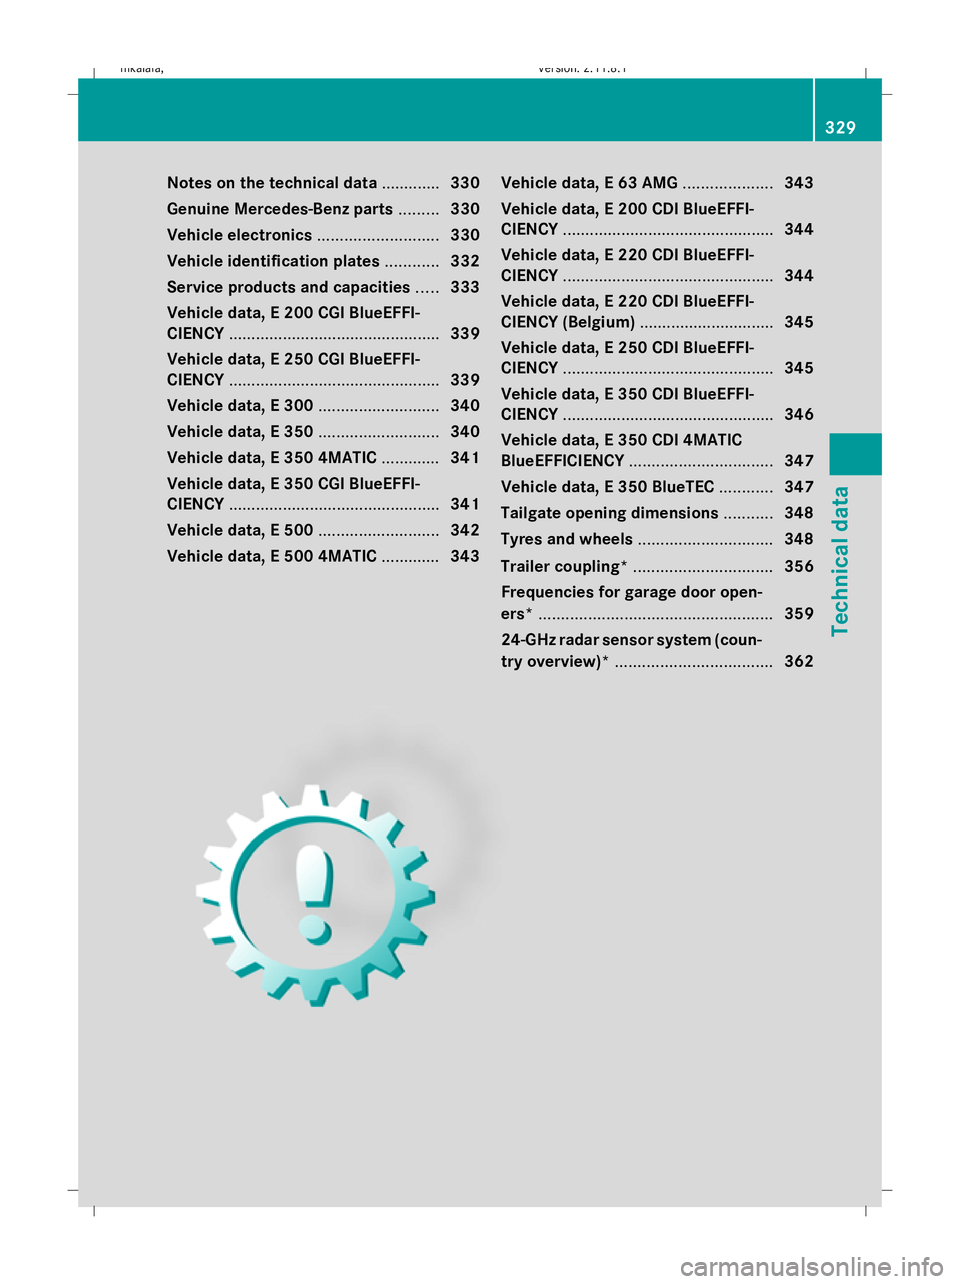
Notes on the technical data
.............330
Genuine Mercedes-Benz parts .........330
Vehicle electronics ...........................330
Vehicle identification plates ............332
Service products and capacities .....333
Vehicle data, E 200 CGI BlueEFFI-
CIENCY ............................................... 339
Vehicle data, E 250 CGI BlueEFFI-
CIENCY ............................................... 339
Vehicle data, E 300 ...........................340
Vehicle data, E 350 ...........................340
Vehicle data, E 350 4MATIC .............341
Vehicle data, E 350 CGI BlueEFFI-
CIENCY ............................................... 341
Vehicle data, E 500 ...........................342
Vehicle data, E 500 4MATIC .............343Vehicle data, E 63 AMG
....................343
Vehicle data, E 200 CDI BlueEFFI-
CIENCY ............................................... 344
Vehicle data, E 220 CDI BlueEFFI-
CIENCY ............................................... 344
Vehicle data, E 220 CDI BlueEFFI-
CIENCY (Belgium) .............................. 345
Vehicle data, E 250 CDI BlueEFFI-
CIENCY ............................................... 345
Vehicle data, E 350 CDI BlueEFFI-
CIENCY ............................................... 346
Vehicle data, E 350 CDI 4MATIC
BlueEFFICIENCY ................................ 347
Vehicle data, E 350 BlueTEC ............347
Tailgate opening dimensions ...........348
Tyres and wheels .............................. 348
Trailer coupling* ............................... 356
Frequencies for garage door open-
ers* .................................................... 359
24-GHz radar sensor system (coun-
try overview)* ................................... 362 329Technical data
212_AKB; 2; 4, en-GB
mkalafa,
Version: 2.11.8.1 2009-05-05T14:17:16+02:00 - Seite 329
Dateiname: 6515346702_buchblock.pdf; erzeugt am 07. May 2009 14:17:30; WK
Page 335 of 373
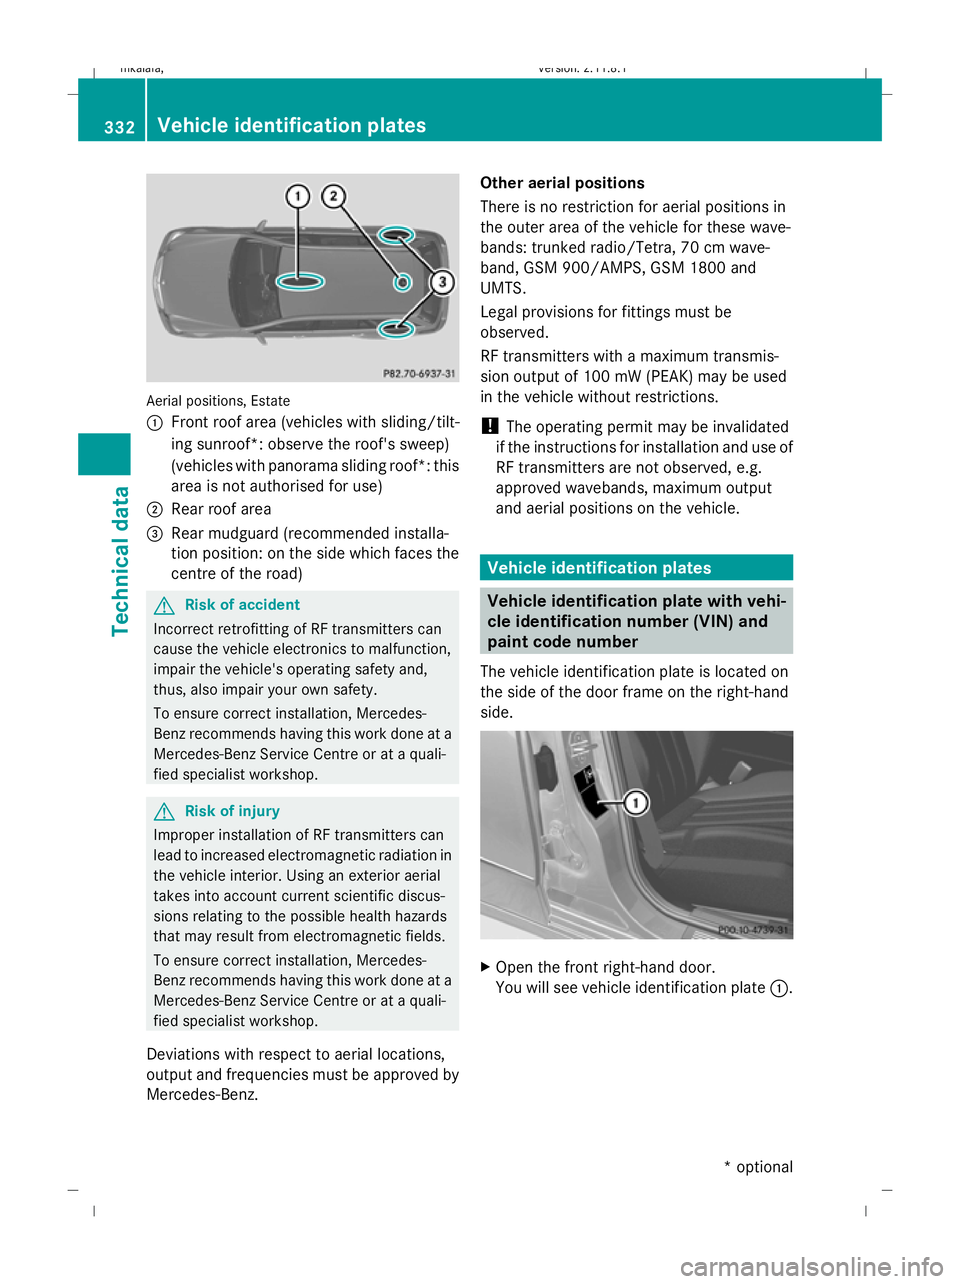
Aerial positions, Estate
:
Front roof area (vehicles with sliding/tilt-
ing sunroof*: observe the roof's sweep)
(vehicles with panorama sliding roof*: this
area is not authorised for use)
; Rear roof area
= Rear mudguard (recommended installa-
tion position: on the side which faces the
centre of the road) G
Risk of accident
Incorrect retrofitting of RF transmitters can
cause the vehicle electronics to malfunction,
impair the vehicle's operating safety and,
thus, also impair your own safety.
To ensure correct installation, Mercedes-
Benz recommends having this work done at a
Mercedes-Benz Service Centre or at a quali-
fied specialist workshop. G
Risk of injury
Improper installation of RF transmitters can
lead to increased electromagnetic radiation in
the vehicle interior. Using an exterior aerial
takes into account current scientific discus-
sions relating to the possible health hazards
that may result from electromagnetic fields.
To ensure correct installation, Mercedes-
Benz recommends having this work done at a
Mercedes-Benz Service Centre or at a quali-
fied specialist workshop.
Deviations with respect to aerial locations,
output and frequencies must be approved by
Mercedes-Benz. Other aerial positions
There is no restriction for aerial positions in
the outer area of the vehicle for these wave-
bands: trunked radio/Tetra, 70 cm wave-
band, GSM 900/AMPS, GSM 1800 and
UMTS.
Legal provisions for fittings must be
observed.
RF transmitters with a maximum transmis-
sion output of 100 mW (PEAK) may be used
in the vehicle without restrictions.
!
The operating permit may be invalidated
if the instructions for installation and use of
RF transmitters are not observed, e.g.
approved wavebands, maximum output
and aerial positions on the vehicle. Vehicle identification plates
Vehicle identification plate with vehi-
cle identification number (VIN) and
paint code number
The vehicle identification plate is located on
the side of the door frame on the right-hand
side. X
Open the front right-hand door.
You will see vehicle identification plate :.332
Vehicle identification platesTechnical data
* optional
212_AKB; 2; 4, en-GB
mkalafa
,V ersion: 2.11.8.1
2009-05-05T14:17:16+02:00 - Seite 332
Dateiname: 6515346702_buchblock.pdf; erzeugt am 07. May 2009 14:17:31; WK
Page 362 of 373
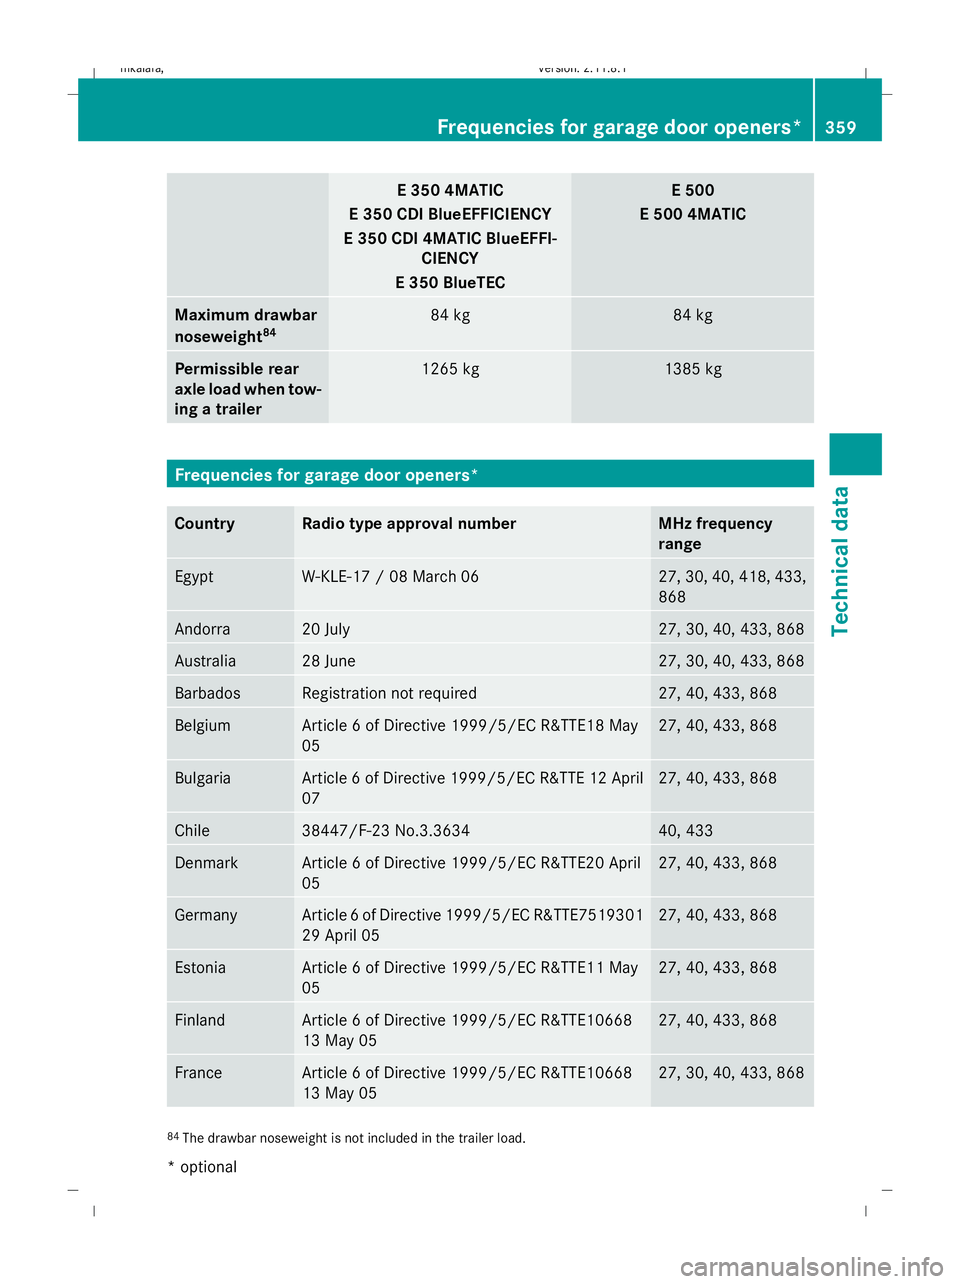
E 350 4MATIC
E 350 CDI BlueEFFICIENCY
E 350 CDI 4MATIC BlueEFFI- CIENCY
E 350 BlueTEC E 500
E 500 4MATIC Maximum drawbar
noseweight
84 84 kg 84 kg
Permissible rear
axle load when tow-
ing a trailer
1265 kg 1385 kg
Frequencies for garage door openers*
Country Radio type approval number MHz frequency
range
Egypt W-KLE-17 / 08 March 06 27, 30, 40, 418, 433,
868
Andorra 20 July 27, 30, 40, 433, 868
Australia 28 June 27, 30, 40, 433, 868
Barbados Registration not required 27, 40, 433, 868
Belgium Article 6 of Directive 1999/5/EC R&TTE18 May
05 27, 40, 433, 868
Bulgaria Article 6 of Directive 1999/5/EC R&TTE 12 April
07 27, 40, 433, 868
Chile 38447/F-23 No.3.3634 40, 433
Denmark Article 6 of Directive 1999/5/EC R&TTE20 April
05 27, 40, 433, 868
Germany Article 6 of Directive 1999/5/EC R&TTE7519301
29 April 05 27, 40, 433, 868
Estonia Article 6 of Directive 1999/5/EC R&TTE11 May
05 27, 40, 433, 868
Finland Article 6 of Directive 1999/5/EC R&TTE10668
13 May 05 27, 40, 433, 868
France Article 6 of Directive 1999/5/EC R&TTE10668
13 May 05 27, 30, 40, 433, 868
84
The drawbar noseweight is not included in the trailer load. Frequencies for garage door openers*
359Technical data
* optional
212_AKB; 2; 4, en-GB
mkalafa,
Version: 2.11.8.1 2009-05-05T14:17:16+02:00 - Seite 359 Z
Dateiname: 6515346702_buchblock.pdf; erzeugt am 07. May 2009 14:17:37; WK
Page 363 of 373
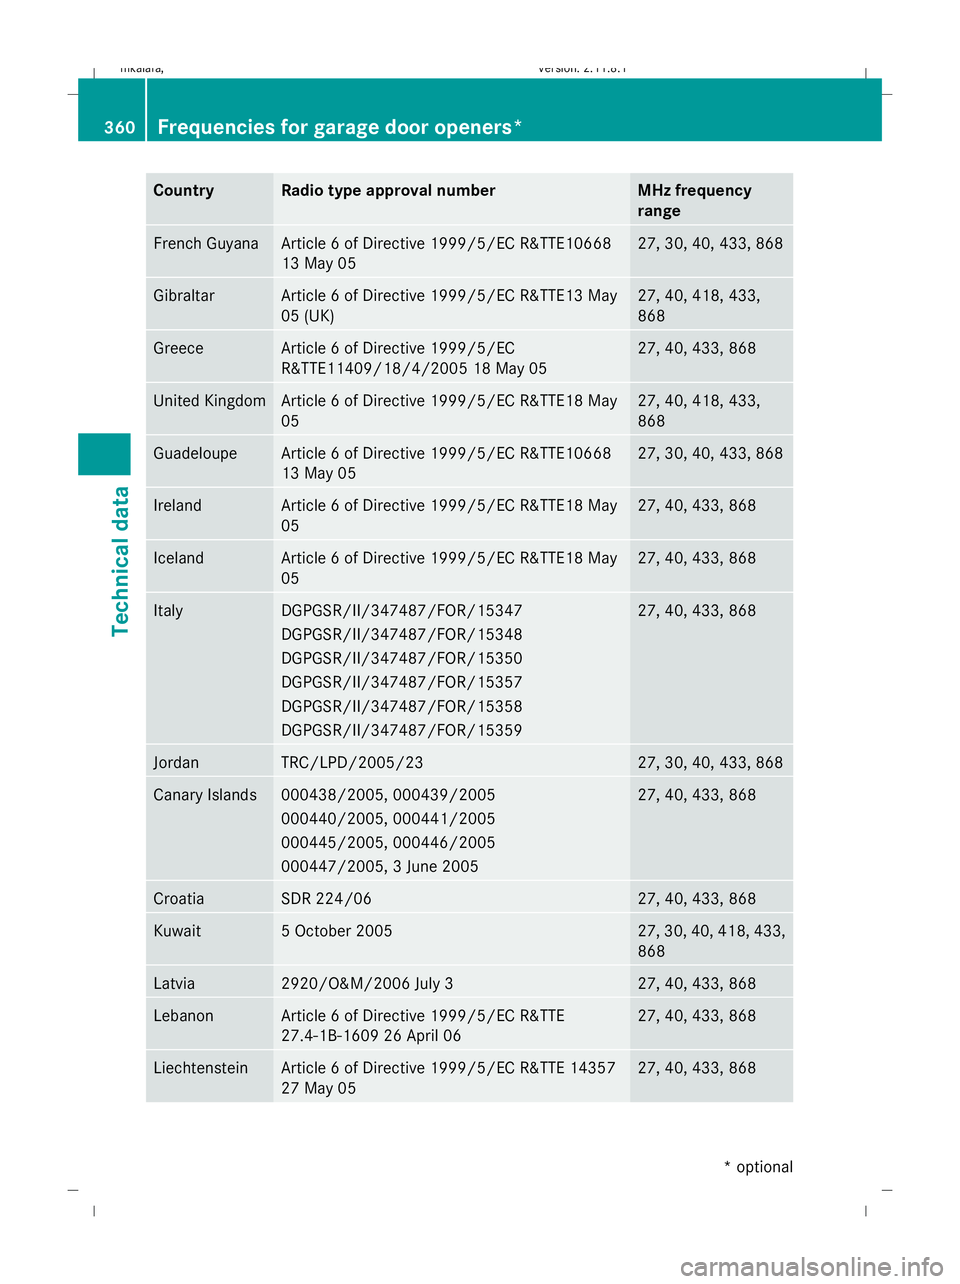
Country Radio type approval number MHz frequency
range
French Guyana Article 6 of Directive 1999/5/EC R&TTE10668
13 May 05 27, 30, 40, 433, 868
Gibraltar Article 6 of Directive 1999/5/EC R&TTE13 May
05 (UK) 27, 40, 418, 433,
868
Greece Article 6 of Directive 1999/5/EC
R&TTE11409/18/4/2005 18 May 05 27, 40, 433, 868
United Kingdom Article 6 of Directive 1999/5/EC R&TTE18 May
05 27, 40, 418, 433,
868
Guadeloupe Article 6 of Directive 1999/5/EC R&TTE10668
13 May 05 27, 30, 40, 433, 868
Ireland Article 6 of Directive 1999/5/EC R&TTE18 May
05 27, 40, 433, 868
Iceland Article 6 of Directive 1999/5/EC R&TTE18 May
05 27, 40, 433, 868
Italy DGPGSR/II/347487/FOR/15347
DGPGSR/II/347487/FOR/15348
DGPGSR/II/347487/FOR/15350
DGPGSR/II/347487/FOR/15357
DGPGSR/II/347487/FOR/15358
DGPGSR/II/347487/FOR/15359 27, 40, 433, 868
Jordan TRC/LPD/2005/23 27, 30, 40, 433, 868
Canary Islands 000438/2005, 000439/2005
000440/2005, 000441/2005
000445/2005, 000446/2005
000447/2005, 3 June 2005 27, 40, 433, 868
Croatia SDR 224/06 27, 40, 433, 868
Kuwait 5 October 2005 27, 30, 40, 418, 433,
868
Latvia 2920/O&M/2006 July 3 27, 40, 433, 868
Lebanon Article 6 of Directive 1999/5/EC R&TTE
27.4-1B-1609 26 April 06 27, 40, 433, 868
Liechtenstein Article 6 of Directive 1999/5/EC R&TTE 14357
27 May 05 27, 40, 433, 868360
Frequencies for garage door openers*Technical data
* optional
212_AKB; 2; 4, en-GB
mkalafa,
Version: 2.11.8.1 2009-05-05T14:17:16+02:00 - Seite 360
Dateiname: 6515346702_buchblock.pdf; erzeugt am 07. May 2009 14:17:37; WK