2009 MERCEDES-BENZ E-CLASS COUPE lights
[x] Cancel search: lightsPage 143 of 313
One or more segments light up as the vehicle
approaches an obstacle, depending on the
vehicle's distance to the obstacle.
From the:
R
sixth segment onwards, you will hear an
intermittent warning tone for approx-
imately two seconds.
R seventh segment onwards, you will hear a
warning tone for approximately two sec-
onds. You have reached the minimum dis-
tance.
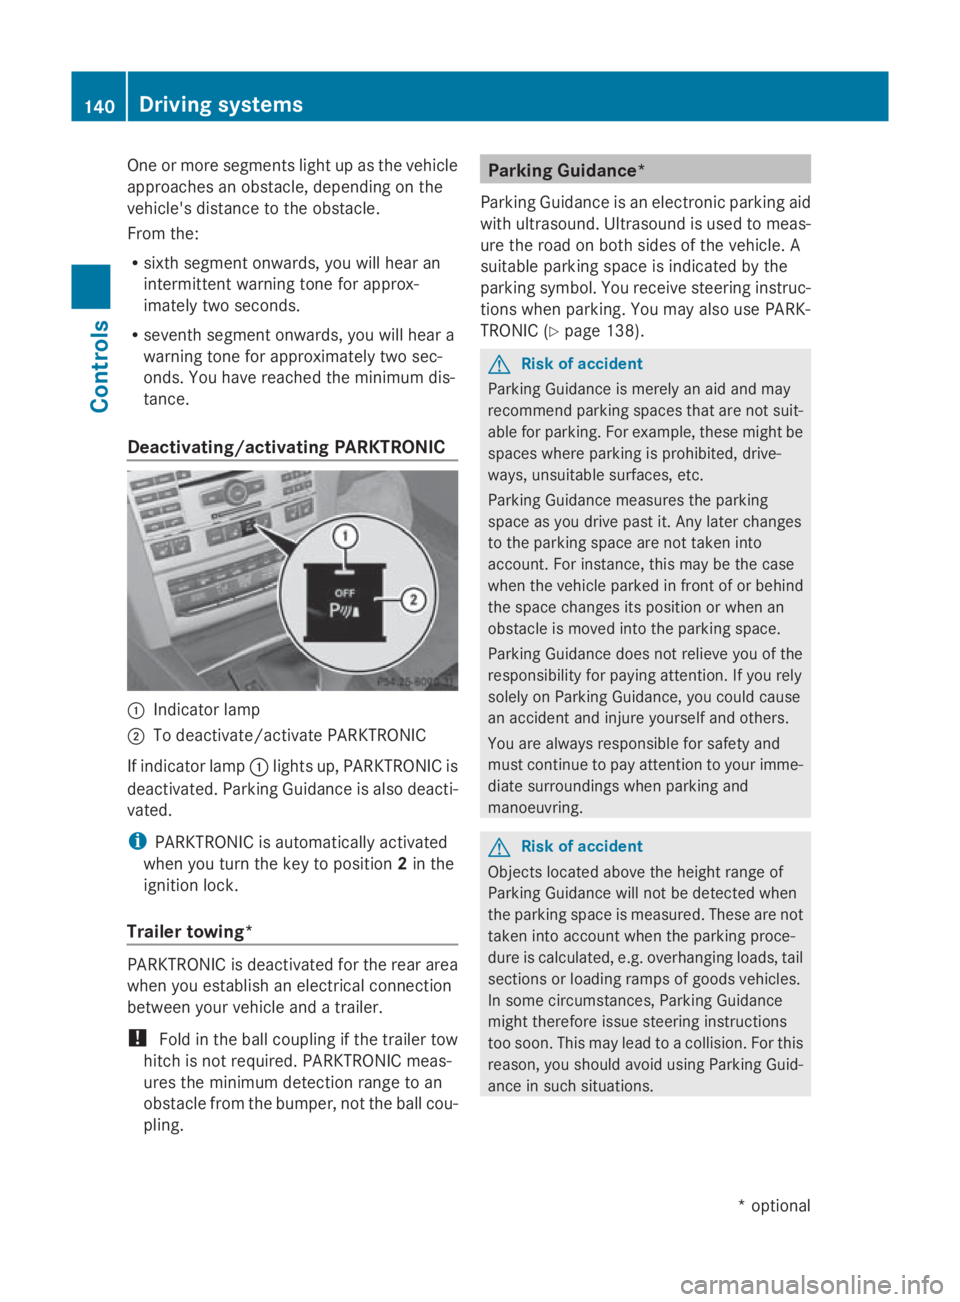
Deactivating/activating PARKTRONIC 0046
Indicator lamp
0047 To deactivate/activate PARKTRONIC
If indicator lamp 0046lights up, PARKTRONIC is
deactivated. Parking Guidance is also deacti-
vated.
i PARKTRONIC is automaticallya ctivated
when you turn the key to position 2in the
ignition lock.
Trailer towing* PARKTRONIC is deactivated for the rear area
when you establish an electrical connection
between your vehicle and atrailer.
! Fold in the ball coupling if the trailer tow
hitch is not required.P ARKTRONIC meas-
ures the minimum detection range to an
obstacle from the bumper, not the ball cou-
pling. Parking Guidance*
Parking Guidance is an electronic parking aid
with ultrasound. Ultrasound is used to meas-
ure the road on both sides of the vehicle. A
suitablep arking space is indicated by the
parking symbol. You receive steering instruc-
tions when parking. You may also use PARK-
TRONIC (Y page 138). G
Risk of accident
Parking Guidance is merely an aid and may
recommend parking spaces that are not suit-
able for parking. For example, these might be
spaces where parking is prohibited, drive-
ways, unsuitables urfaces, etc.
Parking Guidance measures the parking
space as you drive past it. Any later changes
to the parking space are not taken into
account. For instance, this may be the case
when the vehicle parked in front of or behind
the space changes its position or when an
obstacle is moved into the parking space.
Parking Guidance does not relieve you of the
responsibility for paying attention. If you rely
solely on Parking Guidance, you could cause
an accident and injure yourselfa nd others.
You are always responsible for safety and
must continue to pay attention to your imme-
diate surroundings when parking and
manoeuvring. G
Risk of accident
Objects located above the height range of
Parking Guidance will not be detected when
the parking space is measured. These are not
taken into account when the parking proce-
dure is calculated, e.g. overhanging loads, tail
sections or loading ramps of goods vehicles.
In some circumstances, Parking Guidance
might therefore issue steering instructions
too soon. This may lead to acollision. For this
reason, you should avoid using Parking Guid-
ance in such situations. 140
Driving systemsControls
*o
ptional
207_AKB;2;3,e
n-GB
mkalafa, Version: 2.11.8.1 2009-07-23T10:23:49+02:00-Seite 140
Page 154 of 313
X
To activate: press the005Cbutton.
The indicator lamp above the 005Cbutton
come son.
X To switc hoff:press the 005Cbutton.
The indicator lamp above the 005Cbutton
goe sout.T he cooling with ai rdehumidifi-
cation functio nhasad elayed switch-off
feature. Controllin
gthe air conditioning auto-
matically
In automatic mode, the set temperatur eis
maintaine dautomaticall yataconstant level.
The system automaticall yregulate sthe tem-
peratur eofthe dispensed air, the airflow and
the ai rdistribution.
The automatic ai rconditioning will achieve
optima lope ratio nif" cooling with ai rdehu-
midification" is also activated .Ifnecessary,
cooling with ai rdehumidifica tion can be deac-
tivated.
X Turn the key to position 2in the ignition
lock.
X Set the desired temperature.
X To switc hon:press the 005Abutton.
The indicator lamp above the 005Abutton
lights up .Automatic ai rdistributio nand air-
flo wa reactivated.
X Thermotroni c3-zone luxur yautomatic cli-
mate control* :press button 0072up or down
and select the desired level (Y page 149).
FOCUS Air flo whigh/ai rdistributio nvia
the centre and side vents
MEDIU MAir flow medium/air distribution
via the centr eand side vents
DIFFUSE Air flow low/air distribution via the centre, side and defroster vents
i This settin gisespecially effective in auto-
matic mode when outside temperatures
are high.
X To deactivate: press the air distribution
button. Thermatic 2-zon
eautomatic climate con-
trol: press button 0071(Ypage 148).
Thermotronic 3-zon eluxury automatic cli-
mat econtrol*: press button 0074
(Y page 149).
The indicator lamp above the 005Abutton
goes out.
or
X Press the airflow button.
Thermatic 2-zon eautomatic climate con-
trol: press button 0072(Ypage 148).
Thermotronic 3-zon eluxury automatic cli-
mat econtrol*: press button 0073
(Y page 149).
The indicator lamp above the 005Abutton
goes out. Setting th
etemperature
2-zone THERMATIC automatic air condi-
tioning Different temperatures can be set for the
driver's and front-passenger sides.
X
Turn the key to position 2in the ignition
lock.
X To increase/reduce: press button0070or
0073 up or down ( Ypage 148). Only change
the temperature settin ginsmall incre-
ments .Start at 22 †. Air conditioning
151Controls
*optional
207_AKB; 2; 3, en-GB
mkalafa,
Version: 2.11.8.1 2009-07-23T10:23:49+02:00-Seite1 51 Z
Page 157 of 313

X
To open/close: turnc ontrol 0046up or
down. Settin
gthe air distribution
0063 directs the airflow throug hthe demis-
ter vents
009E directs the airflow throug hthe centre
and side ai rvents
009D directs the airflow throug hthe footwell
ai rv ents
00A1 directs the airflow throug hthe centre
and side ai rvents as well as the foot-
well ai rvents 34
0089 directs the airflow throug hthe centre
and side ai rvents ,asw ellast he demis-
ter vents
0088 directs the airflow throug hthe footwell
and demister vents
i Regardless of the ai rdistributio nsetting,
airflow is always directe dthroug hthe side
ai rv ents .The side ai rvents can onl ybe
closed when the controls on the side air
vents ar eturned downwards.
2-zone THERMATIC automatic air condi-
tioning X
Turn the key to position 2in the ignition
lock.
X Press button 0071up or down repeatedly
unti lthe desired symbo lappears in the dis-
play (Y page 148).
THERMOTRONIC 3-zone luxury auto-
matic climate control* X
Turn the key to position 2in the ignition
lock.
X Press button 0074up or down repeatedly
unti lthe desired symbo lappears in the dis-
play (Y page 149). Settin
gthe airflow
Thermati c2-zone automatic climate
control X
Turn the key to position 2in the ignition
lock.
X To increase/reduce: press button0072up
or down (Y page 148).
Thermotronic 3-zone luxury automatic
climate control* X
Turn the key to position 2in the ignition
lock.
X To increase/reduce: press button0073up
or down (Y page 149). Switchin
gthe ZONE function on/off
X To activate: press the00D8butt-
ton ( Ypage 148) ,(Ypage 149).
The indicator lamp above the 00D8button
lights up.
Thermatic 2-zone automatic climate con-
trol :the temperatur esetting for the driver's
side is not adopted for the front-passenger
side.
Thermotroni clux ury3 -zone automatic cli-
mate control* :the temperatur esetting on
the driver's side is not adopted for the
front-passenger side or the rea rcompart-
ment.
Whe nthe buttons for temperature, airflow or
ai rd istributio nareactivated ,the temperature
setting on the driver's side is not adopted for
the othe rairconditioning zones.
X To deactivate: press the00D8button
(Y page 148) ,(Ypage 149).
The indicator lamp above the 00D8button
goe sout.
Thermatic 2-zone automatic climate con-
trol :the temperatur esetting for the driver's
34 Thi sairdistributio nsetting is onl yavailable on the Cabriolet. 154
Ai
rc onditioningControls
*optional
207_AKB; 2; 3, en-GB
mkalafa,
Version: 2.11.8.1 2009-07-23T10:23:49+02:00-Seite 154
Page 158 of 313
side is not adopted for the front-passenger
side.
Thermotronic luxury 3-zone automatic cli-
mate control*: the temperature setting on
the driver's side is not adopted for the
front-passenger side or the rear compart-
ment. Demisting the windscreen
i You should only select the "demisting"
function until the windscreen is clear again.
X Turn the key to position 2in the ignition
lock.
X To activate: press the0066button.
The indicator lamp above the 0066button
lights up.
The system automaticallys witches to the
following functions:
R cooling with air dehumidification on
R high airflow 35
R high temperature 35
R air distribution to the windscreen and
front side windows
R air-recirculation mode off
X To switch off: press the0066button.
The indicator lamp above the 0066button
goes out. The previouslys elected settings
come into effect again. The cooling with air
dehumidification function remains on. Air-
recirculation mode remains deactivated.
or
X Press the 005Abutton.
The indicator lamp above the 0066button
goes out. Airflow and air distribution are set
to automatic mode.
or
X Thermatic 2-zone automatic climate
control: press button 0070or0073 up or down
(Y page 148). Thermotronic luxury 3-zone automatic
climate control*:
press button0071or0075
up or down (Y page 149).
or
X Thermatic 2-zone automatic climate
control: press button 0072up or down
(Y page 148).
Thermotronic luxury 3-zone automatic
climate control*: press button0073up or
down (Y page 149). Demisting the windows
Windows misted up on the inside X
Activate the "cooling function with air dehu-
midification" function.
X Activate automatic mode.
X If the windows continue to mist up, activate
the demisting function.
i You should only select this setting until
the windscreen is clear again.
Windows misted up on the outside X
Activate the windscreen wipers.
X Thermatic 2-zone automatic climate
control: press button 0071up or down
(Y page 148) until the 009Eor009D symbol
appears in the display.
X Thermotronic luxury 3-zone automatic
climate control*: press button0074up or
down (Y page 149), until 009Eor009D
appears in the display.
i You should only select this setting until
the windscreen is clear again.
35 Depending on the outside temperature. Air conditioning
155Controls
*optional
207_AKB;2;3,e
n-GB
mkalafa, Version: 2.11.8.1 2009-07-23T10:23:49+02:00-Seite 155 Z
Page 159 of 313
Switching the rear window heating
on/off
G
Risk of accident
Clear all windows of ice or snow before setting
off. Otherwise, impaired visibility could
endanger you and others.
i The rear window heating has ahigh cur-
rent draw. You should therefore switch it
off as soon as the window is clear, as it only
switches off automatically after several
minutes.
i If the battery voltage is too low, the rear
window heating may switch off.
X Turn the key to position 2in the ignition
lock.
X Press the 006Ebutton.
The indicator lamp above the 006Ebutton
lights up or goes out. Activating/deactivating air-recircula-
tion mode
You can deactivate the flow of fresh air if
unpleasant odours are enteringt he vehicle
from outside. The air already inside the vehi-
cle will then be recirculated. G
Risk of accident
Only switch over to air-recirculation mode
briefly at low outside temperatures. Other-
wise, the windows could mist up, thus impair-
ing visibility and endangering yourself and
others. This may prevent you from observing
the traffic conditions, thereby causing an
accident.
X Turn the key to position 2in the ignition
lock.
X To activate: press the0074button.
The indicator lamp above the 0074button
lights up. i
Air-recirculation mode is activated auto-
matically at high outside temperatures.
When air-recirculation mode is activated
automatically, the indicator lamp above the
0074 button is not lit.
Outside air is added after about 30
minutes.
X To switch off: press the0074button.
The indicator lamp above the 0074button
goes out.
i Air-recirculation mode switches off auto-
matically:
R after approximately five minutes at out-
side temperatures below approximately
5†
R after approximately five minutes if cool-
ing with air dehumidification is deactiva-
ted
R after approximately 30 minutes at out-
side temperatures above approximately
5†
Convenience opening/closing (Coupé) G
Risk of injury
Make sure that nobody can become trapped
between the side window and the door frame
as the side windows are opened and closed.
Do not place objectsorl ean against the side
windows when they are being opened or
closed. You or the objectsc ould be drawn in
or become trapped between the side window
and the door frame as the window moves. If
there is arisk of entrapment, press the
0074 button again. Press the button for stop-
ping, opening or closing the side windows in
the opposite direction as appropriate.
Make sure that nobody can become trapped
as the panorama sliding sunroof* is opened
and closed. If there is arisk of entrapment,
press the 0074button again. Press the button
to stop, open or close the panorama sliding
sunroof* in the opposite direction as appro-
priate. 156
Air conditioningControls
*o
ptional
207_AKB; 2; 3, en-GB
mkalafa,
Version: 2.11.8.1 2009-07-23T10:23:49+02:00-Seite 156
Page 161 of 313
X
Turn the key to position 0in the ignition
lock or remove it.
X To switch on: press the004Dbutton.
The indicator lamp above the 004Dbutton
lights up.
X To deactivate: press the004Dbutton.
The indicator lamp above the 004Dbutton
goes out.
i The residual heat automatically switches
off after around 30 minutes or if:
R the ignition is switched on
R the battery voltage drops Sliding sunroof (Coupé)
General notes
G
Risk of injury
Make sure that nobody can become trapped
when closing the sliding sunroof. If there is a
risk of entrapment, release the switch and
push it briefly in any direction to stop the slid-
ing sunroof. G
Risk of injury
Children could injure themselves if they oper-
ate the sliding sunroof.
Never leave children unsupervised in the vehi-
cle. Always take the key with you when leaving
the vehicle, even if you are only leaving it for
as hort time. G
Risk of injury
The glass in the panorama sunroof could
break in an accident .Ifyou are not wearing a
seat belt, there is arisk that you could be
thrown through the opening in the event of the
vehicle overturning. Therefore, alway swear a
seat belt to reduce the risk of injuries.
! Only open the panorama sliding sunroof
if it is free of snow and ice. Otherwise, mal-
functions may occur. Do not allow anything to protrude from the
sliding sunroof. Otherwise, the seals could
be damaged.
i When the sliding sunroof is open, apart
from the normal airflow noises, resonance
noises may also occur. They are caused by
minor pressure fluctuation sinthe vehicle
interior. Change the position of the sliding
sunroof or open aside window slightly to
reduce or eliminate these noises.
i Related topics:
R convenienc eopening from out-
side(Y page 96) or inside the vehicle
(Y page 156)
R convenienc eclosing from out-
side(Y page 97) or inside vehicle
(Y page 156)
R automatic closing of the sliding sunroof
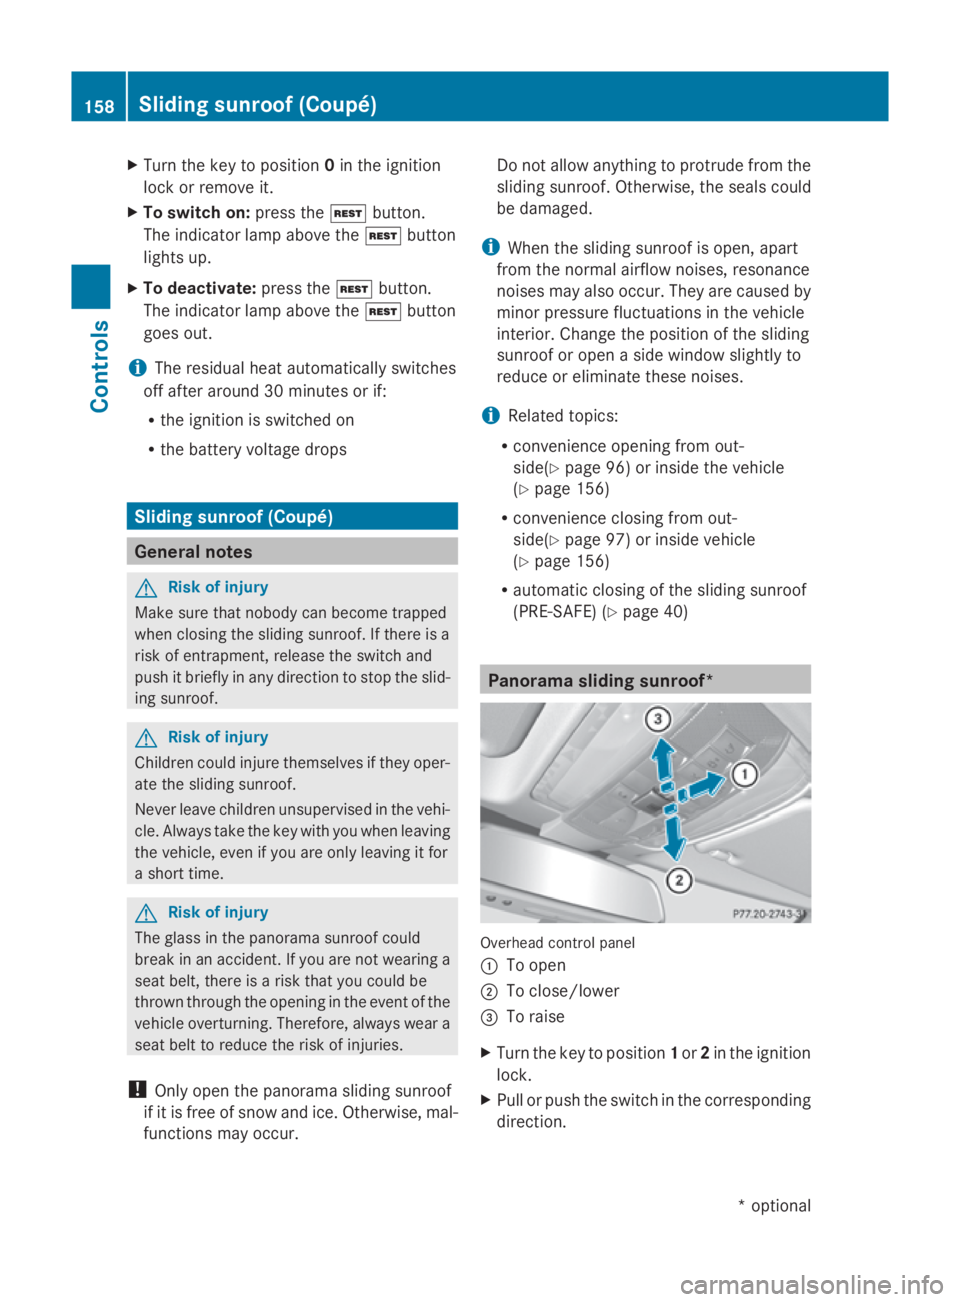
(PRE-SAFE)( Ypage 40) Panoram
asliding sunroof* Overhead control panel
0046
To open
0047 To close/lower
008A To raise
X Turn the key to position 1or 2in the ignition
lock.
X Pull or push the switch in the corresponding
direction. 158
Sliding sunroof (Coupé)Controls
*o
ptional
207_AKB; 2; 3, en-GB
mkalafa,
Version: 2.11.8.1 2009-07-23T10:23:49+02:00-Seite 158
Page 196 of 313
countries. Whe
nusing symmetrical lights, the
edg eoft he carriageway is not illuminated as
widel yand as far ahea dasnormal.
On vehicle swithI ntelligent Light System*,
yo uc an switch the headlamp susing the "Tou-
ris tm ode" function in the on-board computer
(Y page 119).
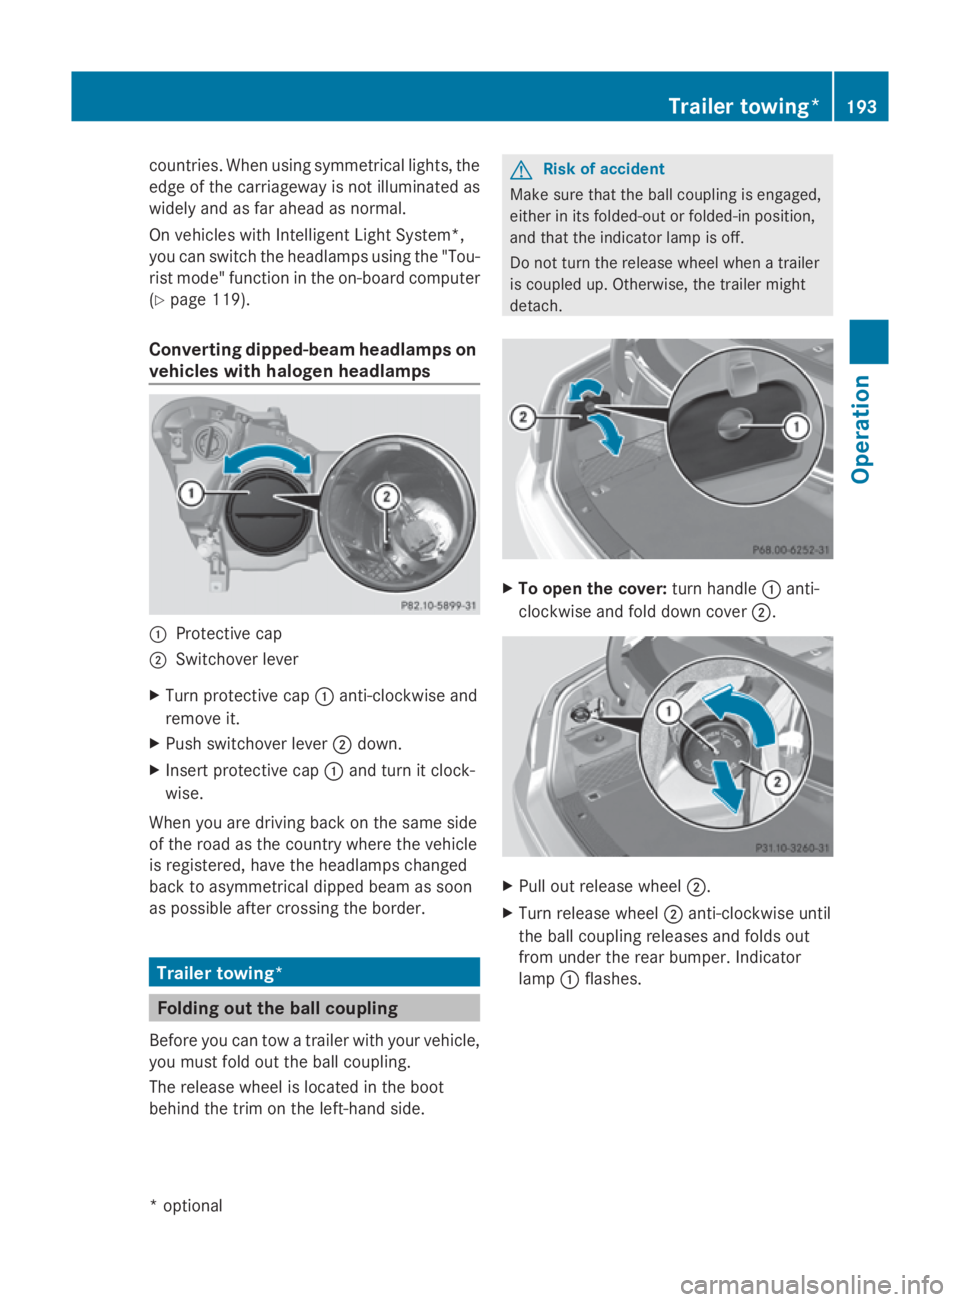
Converting dipped-beam headlamps on
vehicle swithh aloge nheadlamps 0046
Protective cap
0047 Switchove rlev er
X Turn protective cap 0046anti-clockwise and
remove it.
X Push switchove rlev er 0047 down.
X Inser tprotective cap 0046and turn it clock-
wise.
Whe nyou are driving back on the same side
of the roa dasthe country where the vehicle
is registered ,havet he headlamp schanged
back to asymmetrical dippe dbeamass oon
as possible afte rcrossing the border. Trailer towing*
Folding out the bal
lcou pling
Before yo ucan tow atraile rwithy ourvehicle,
yo um ustfoldo utthe ball coupling.
The release wheel is locate dinthe boot
behind the trim on the left-hand side. G
Risk of accident
Make sure that the ball coupling is engaged,
either in its folded-ou torfolded-in position,
and that the indicator lamp is off.
Do not turn the release wheel whe natrailer
is coupled up .Otherwise, the traile rmight
detach. X
To ope nthe cover: turn handle 0046anti-
clockwise and fol ddownc over 0047. X
Pull ou trelease wheel 0047.
X Turn release wheel 0047anti-clockwise until
the ball coupling releases and folds out
from under the rea rbum per. Indicator
lamp 0046flashes. Traile
rtowing* 193Operation
*o
ptional
207_AKB; 2; 3, en-GB
mkalafa
,V ersion: 2.11.8.1
2009-07-23T10:23:49+02:00
-Seite 193 Z
Page 202 of 313

G
Risk of accident
Braking efficiency is reduce dafterw ashing
the vehicle .Thisc ould cause an accident. For
this reason, following acar wash, drive with
particula rcare unti lthe brakes are dry.
You can wash the vehicle in an automatic car
wash from the beginning.
! We recommend automatic car washes
with an adjustable 38
high-pressure pre-
cleaning program. In car washe sthat use
hig hw ater pressures, there is adanger that
as mall quantity of water may leak into the
vehicle.
! Cabriolet: do not treatthe vehicle with
hot wa xunder any circumstances.
! Cabriolet: pull the key ou tofthe ignition
lock whe nwashing the vehicle .This
ensures that the wind deflector on the
windscreen is retracted. The wind deflector
may otherwise be damaged.
If the vehicle is very dirty, pre-wash it before
cleaning it in an automatic car wash.
! Make sure that the automatic car wash is
suitabl efor the size of the vehicle .Fold in
the exterior mirrors before the vehicle is
washed. There is otherwise ariskofd am-
ag etot he exterior mirrors.
! Whe nwashing your vehicle in atow-
through car wash, make sure that the auto-
mati ctransmission* is in position N.The
vehicle could otherwise be damaged.
! Make sure that the sid ewindow sare com-
pletel yclosed, that the ventilation/heater
blower is fully turne doff and that the wind-
scree nwiper switch is set to 0.Otherwise,
the rain/light senso rmay be activated, trig-
gering unintende dwiper movements. This
could cause damag etothe vehicle.
After using an automatic car wash, wipe off
wa xa nd drying agents from the windscreen and the wiper blades. Thi
swillp revent smears
and reduce wiping noises caused by residue
on the windscreen.
High-pressure cleaners G
Risk of accident
Do not us ehigh-pressure cleaners with circu-
lar-jet nozzle s(dirt grinders )toclean your
vehicle ,inparticula rthe tyres. You could oth-
erwise damag ethe tyre sand cause an acci-
dent.
! Observe the instructions issue dbythe
equipment manufacturer concerning the
distance to be maintained between the
nozzle of the high-pressure cleane rand the
vehicle (a tleast 30 cm).
Move the high-pressure cleane rnozzle
around whe ncleaning your vehicle.
Do not ai mdirectl yata ny of the following:
R tyres
R doo rjoint
R soft top (Cabriolet)
R wind deflector net (Cabriolet)
R electrical components
R battery
R connectors
R lights
R seals
R trim elements
R ventilation slots
Damaged seals or electrical components
can lead to failures or leaks.
Care and treatmen tofmatt paint-
work* You
rvehicle ha saclear matt finish. For this
reason, yo ushoul dmake sure that you
adhere to the following instructions to avoid
38 In accordance with the specifications for Cabriole tprograms. Care
199Operation
*optional
207_AKB
;2;3,en-GB
mkalafa ,V ersion: 2.11.8.1
2009-07-23T10:23:49+02:00
-Seite 199 Z