2009 MERCEDES-BENZ E-CLASS COUPE seats
[x] Cancel search: seatsPage 168 of 313

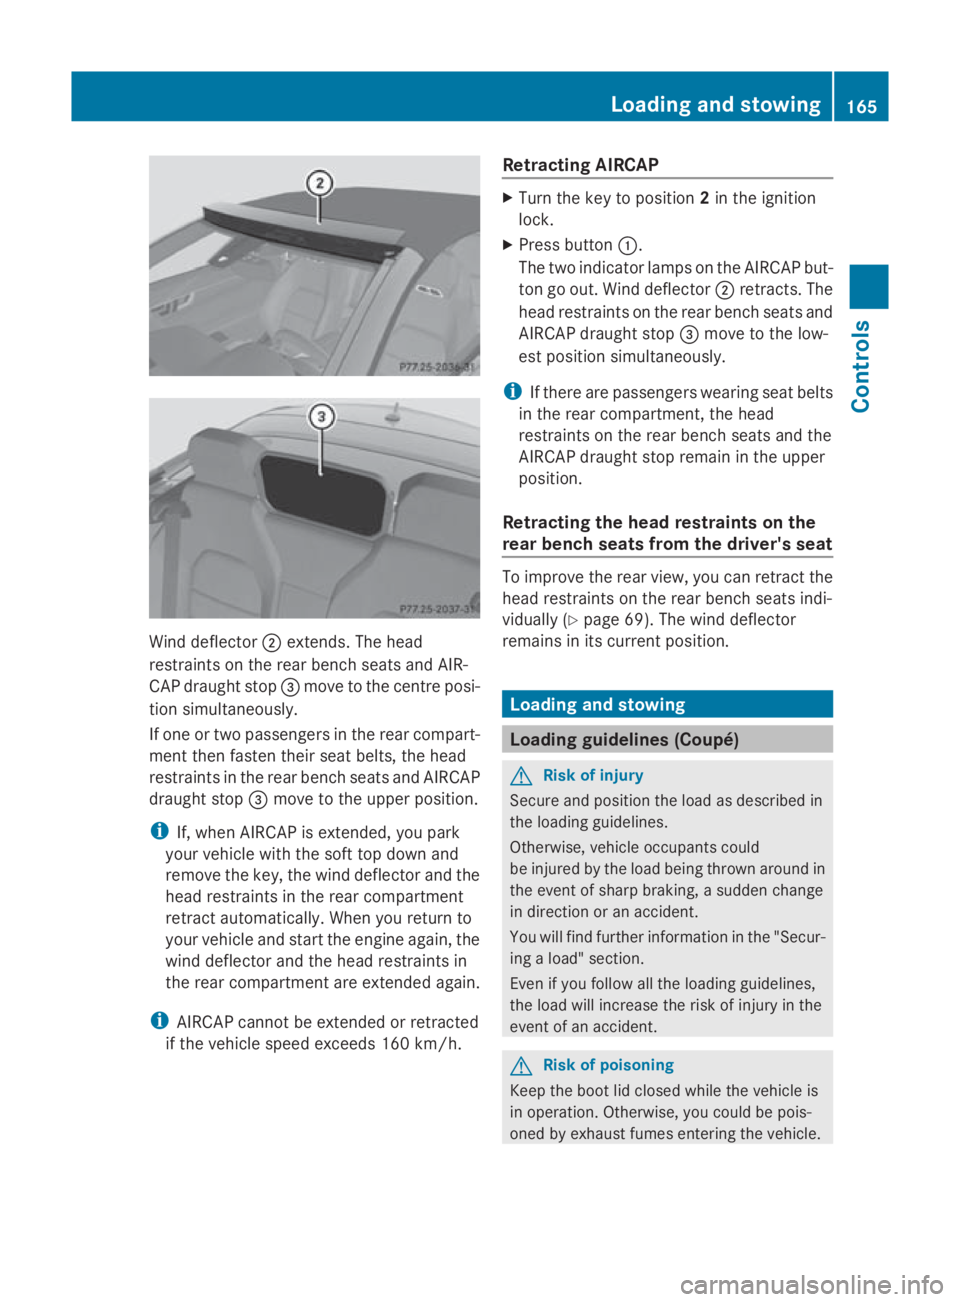
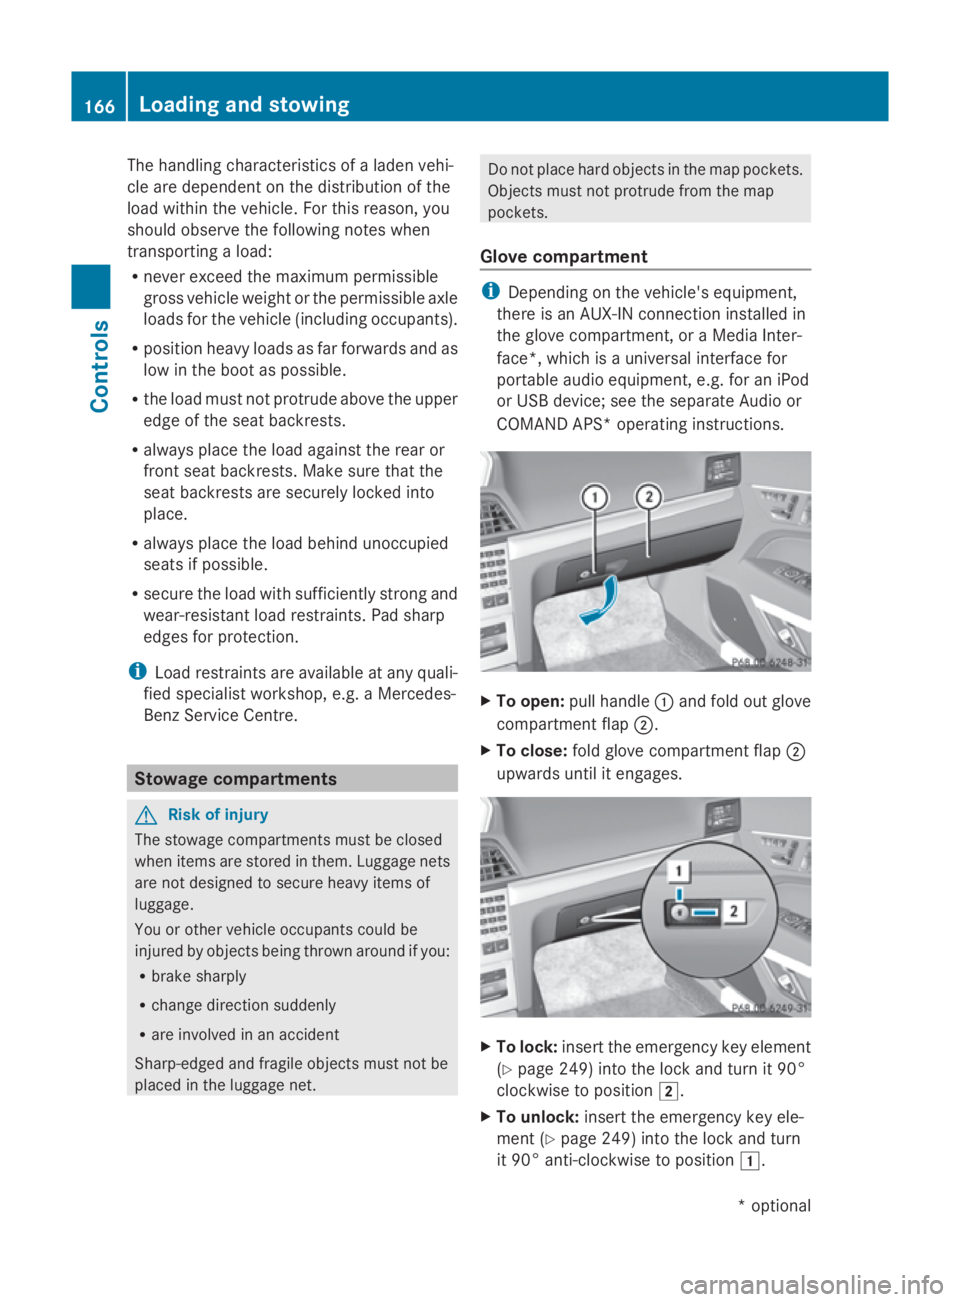
Wind deflector
0047extends. The head
restraints on the rear bench seats and AIR-
CAP draught stop 008Amove to the centre posi-
tion simultaneously.
If one or two passengers in the rear compart-
ment then fasten their seat belts, the head
restraints in the rear bench seats and AIRCAP
draught stop 008Amove to the upper position.
i If, when AIRCAP is extended, you park
your vehicle with the soft top down and
remove the key, the wind deflector and the
head restraints in the rear compartment
retract automatically. When you return to
your vehicle and start the engine again, the
wind deflector and the head restraints in
the rear compartment are extended again.
i AIRCAP cannot be extended or retracted
if the vehicle speed exceeds 160 km/h. Retracting AIRCAP X
Turn the key to position 2in the ignition
lock.
X Press button 0046.
The two indicato rlamps on the AIRCAP but-
ton go out. Wind deflector 0047retracts. The
head restraints on the rear bench seats and
AIRCAP draught stop 008Amove to the low-
est position simultaneously.
i If there are passengers wearing seat belts
in the rear compartment ,the head
restraints on the rear bench seats and the
AIRCAP draught stop remain in the upper
position.
Retracting the head restraints on the
rear bench seats from the driver's seat To improve the rear view, you can retract the
head restraints on the rear bench seats indi-
vidually (Y
page 69). The wind deflector
remains in its curren tposition. Loading and stowing
Loading guidelines (Coupé)
G
Risk of injury
Secure and position the load as described in
the loading guidelines.
Otherwise, vehicle occupant scould
be injured by the load being thrown around in
the event of sharp braking, asudden change
in direction or an accident.
You will find further information in the "Secur-
ing aload" section.
Even if you follow all the loading guidelines,
the load will increase the risk of injury in the
event of an accident. G
Risk of poisoning
Keep the boot lid closed while the vehicle is
in operation .Otherwise, you could be pois-
oned by exhaust fumes entering the vehicle. Loading and stowing
165Controls
207_AKB; 2; 3, en-GB
mkalafa, Version: 2.11.8.1 2009-07-23T10:23:49+02:00-Seite 165 Z
Page 169 of 313

The handling characteristics of
aladen vehi-
cle are dependent on the distribution of the
load within the vehicle. For this reason, you
should observe the following notes when
transportin gaload:
R never exceed the maximum permissible
gross vehicle weight or the permissible axle
loads for the vehicle (including occupants).
R position heavy loads as far forwards and as
low in the boot as possible.
R the load must not protrude above the upper
edge of the seat backrests.
R alway splace the load against the rear or
fronts eat backrests. Make sure that the
seat backrest sare securely locked into
place.
R alway splace the load behind unoccupied
seats if possible.
R secure the load with sufficiently stron gand
wear-resistan tload restraints. Pad sharp
edges for protection.
i Load restraints are available at any quali-
fied specialist workshop, e.g. aMercedes-
Benz Servic eCentre. Stowage compartments
G
Risk of injury
The stowage compartmentsm ust be closed
when items are stored in them. Luggage nets
are not designed to secure heavy items of
luggage.
You or other vehicle occupant scould be
injured by object sbeing thrown around if you:
R brake sharply
R change direction suddenly
R are involved in an accident
Sharp-edged and fragile object smust not be
placed in the luggage net. Do not place hard object
sinthe map pockets.
Object smust not protrude from the map
pockets.
Glove compartment i
Dependin gonthe vehicle's equipment,
there is an AUX-IN connection installed in
the glove compartment,oraM edia Inter-
face*, which is auniversal interface for
portable audio equipment, e.g. for an iPod
or USB device; see the separate Audio or
COMAND APS* operating instructions. X
To open: pull handle 0046and fold out glove
compartment flap 0047.
X To close: fold glove compartment flap 0047
upwards until it engages. X
To lock: insert the emergenc ykey element
(Y page 249) into the lock and turn it 90°
clockwise to position 004B.
X To unlock: insert the emergenc ykey ele-
ment (Y page 249) into the lock and turn
it 90° anti-clockwise to position 004A.166
Loading and stowingControls
*o
ptional
207_AKB; 2; 3, en-GB
mkalafa,
Version: 2.11.8.1 2009-07-23T10:23:49+02:00-Seite 166
Page 189 of 313

i
Vehicles with the MOExtended run-flat
system are not equipped with the TIREFIT
kit. 36
It is therefore recommended to additionally
equipy ourvehicle with the TIREFIT kit when
fitting tyres that do not feature run-flat
properties, e.g. winter tyres.
i ATIREFIT kit is availablef rom any quali-
fied specialist workshop, e.g. aMercedes-
Benz Service Centre.
You willf ind notes on driving with aflat tyre
in the "Practical advice" section
(Y page 272). Tyre tread
G
Risk of accident
Bear in mind that:
R tyre grip decreases rapidly on wet roads
when the tread depth is less than 3mm.
Thus, you should replace tyres that have
insufficient tread.
R winter tyres should be replaced when the
tread depth is 4mmorless as they will no
longer provide adequate grip.
R the tread on atyre may not wear evenly.
Thus, you should regularly check the tread
depth and the condition of the tread across
the entire width of all tyres. If necessary,
turn the front wheelstof ull lock in order to
inspect the tyre tread more easily.
Otherwise, you could lose control of the vehi-
cle and cause an accident due to the reduced
grip of the tyres on the road. Tyre pressures
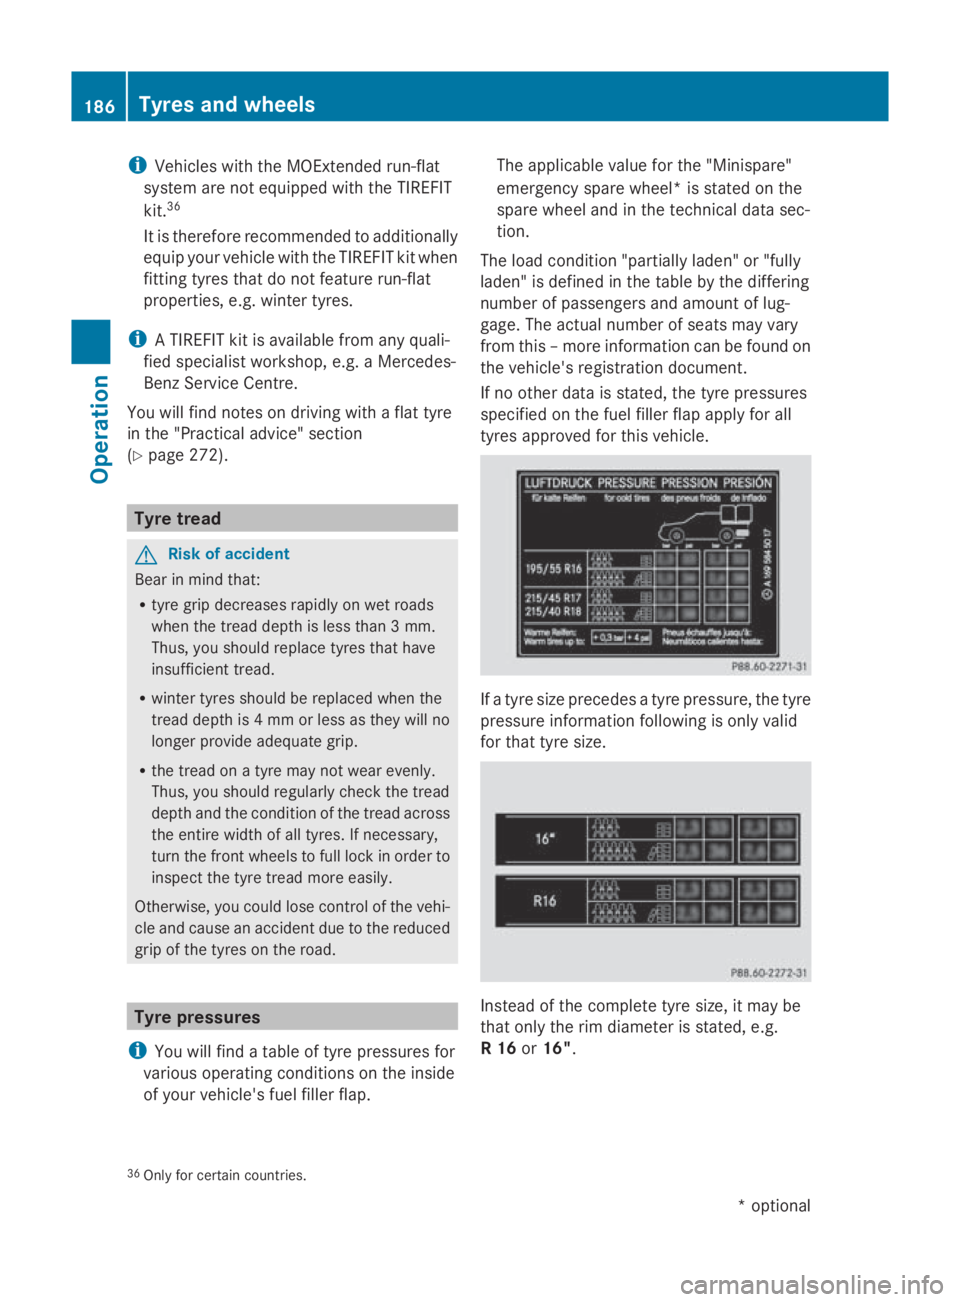
i You willf indatable of tyre pressures for
variouso perating conditions on the inside
of yourv ehicle's fuel filler flap. The applicable valuef
or the "Minispare"
emergency spare wheel*i sstated on the
spare wheel and in the technical data sec-
tion.
The load condition "partially laden" or "fully
laden" is defined in the table by the differing
number of passengers and amount of lug-
gage. The actual number of seats may vary
from this –more information can be found on
the vehicle's registration document.
If no other data is stated, the tyre pressures
specified on the fuel filler flap applyf or all
tyres approved for this vehicle. If
at yre size precedes atyre pressure, the tyre
pressure information following is only valid
for that tyre size. Instead of the complete tyre size, it may be
that only the rim diameter is stated, e.g.
R16or
16".
36 Only for certain countries. 186
Tyres and wheelsOperation
*o
ptional
207_AKB; 2; 3, en-GB
mkalafa,
Version: 2.11.8.1 2009-07-23T10:23:49+02:00-Seite 186
Page 241 of 313

Problem Possible causes/consequences and
0050
0050Solutions You hear
awarning
tone. The red distance warning lamp*
00BAlights up while the vehicle
is in motion.
X Observe the explanations for the distance warning lamp*
(Y page 232). Accident
Problem Possible causes/consequences and
0050 0050Solutions Fuel is leaking from the
vehicle.
G
Risk of fire
The fuel line or the fuel tank has been damaged. The leaking fuel
creates arisk of fire or explosion.
X Switch off the ignition immediately.
X Remove the ignition key.
Do not restart the engine under any circumstances. The leaking
fuel creates arisk of fire or explosion.
X Consult aqualified specialist workshop. You are unable to
determine the extentof
the damage.
X
Consult aqualified specialist workshop. You cannot detect any
damage.
X
Start the engine as normal. The active bonnet func-
tion (pedestrian protec-
tion) has been trig-
gered. Your vehicle has been involved in
afrontal collision.
X Reset the triggered active bonnet (pedestrian protection)
(Y page 256). The NECK-PRO head
restraint
sonthe driv-
er's and front-
passenger seats have
been triggered. Your vehicle has been involved in
arear-end collision.
X Reset the NECK-PRO head restraint s(Ypage 257). 238
TroubleshootingPractical advice
*o
ptional
207_AKB; 2; 3, en-GB
mkalafa,
Version: 2.11.8.1 2009-07-23T10:23:49+02:00-Seite 238
Page 253 of 313

X
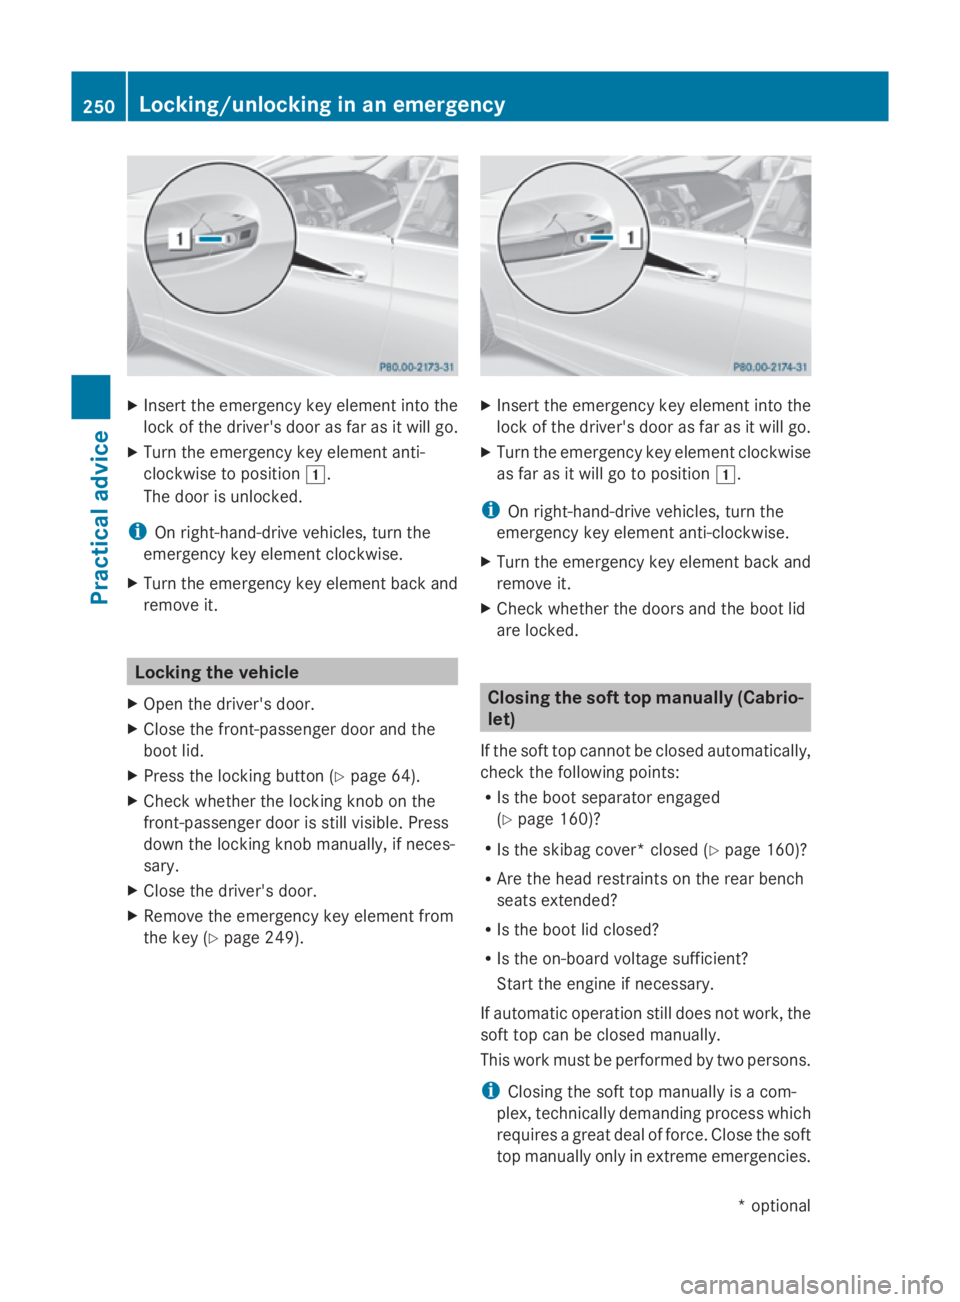
Insert the emergency key element into the
lock of the driver's door as far as it willg o.
X Turn the emergency key element anti-
clockwise to position 004A.
The door is unlocked.
i On right-hand-drive vehicles, turn the
emergency key element clockwise.
X Turn the emergency key element back and
remove it. Locking the vehicle
X Open the driver's door.
X Close the front-passenger door and the
boot lid.
X Press the locking button (Y page 64).
X Check whether the locking knob on the
front-passenger door is still visible. Press
down the locking knob manually,ifn eces-
sary.
X Close the driver's door.
X Remove the emergency key element from
the key (Y page 249). X
Insert the emergency key element into the
lock of the driver's door as far as it willg o.
X Turn the emergency key element clockwise
as far as it willgotop osition004A.
i On right-hand-drive vehicles, turn the
emergency key element anti-clockwise.
X Turn the emergency key element back and
remove it.
X Check whether the doors and the boot lid
are locked. Closing the soft top manually (Cabrio-
let)
If the soft top cannot be closed automatically,
check the following points:
R Is the boot separator engaged
(Y page 160)?
R Is the skibag cover* closed (Y page 160)?
R Are the head restraints on the rear bench
seats extended?
R Is the boot lid closed?
R Is the on-board voltage sufficient?
Start the engine if necessary.
If automatic operation still does not work, the
soft top can be closed manually.
This work must be performed by two persons.
i Closing the soft top manually is acom-
plex, technically demanding process which
requires agreat deal of force. Close the soft
top manually only in extreme emergencies. 250
Locking/unlocking in an emergencyPractical advice
*o
ptional
207_AKB; 2; 3, en-GB
mkalafa
,V ersion: 2.11.8.1
2009-07-23T10:23:49+02:00
-Seite 250
Page 260 of 313

X
If bonnet actuator covers 0047
0047lie flat
against th ehousing: close bonnet 0046
(Y page 180).
or
X If bonnet actuator covers 0047 0047do not lie
fla ta gainst th ehousing: swingupb on-
net 0046at left 0088and then at right 0087.Swing
bonnet 0046upward suntil th erelevan tbon-
ne ta ctuato rcover 0047 no longer moves.
Bonnet actuato rcovers 0047should no wlie
flat against housing 008A(arrow).
X Close bonnet 0046(Ypage 180).
If bonnet 0046canno tbeclosed or the 005A
symbol appear sinthemultifunction display,
repeat th esteps again. G
Ris
kofa ccident
If th ebonne tcan still no tbeengaged properly
or the 005Asymbol appear sinthemultifunc-
tio nd isplay, do no tcontin ue driving .The bon-
ne tc an then open when th evehicle is in
motion and obscure your fiel dofvision.Con-
sult aqualified specialist workshop. Other-
wise, you may caus eanacciden tand injure
yourself and others. Resetting triggered NECK-PR
Ohead
restraints
If th eNECK-PRO head restraint sare triggered
in an accident, you must reset th ehead
restraint sonthedriver' sand th efront-pa s-
senger's seats. Otherwise, th eadditional pro-
tection will no tbeavailable in th eevent of
another rear-end collision. You can recognise
when head restraint shave been triggered by
th ef acttha tthe yh ave moved forwards and
can no longer be adjusted.
Mercedes-Ben zrecommends that you have
NECK-PRO head restraint schecked at aquali-
fied specialist workshop, e.g. aMercedes-
Ben zServic eCentre, followin garear-end col-
lision. i
This work requires alot of strength. If you
have difficult yresettin gthe head
restraints, have this work carried out at a
qualified specialist workshop, e.g. a
Mercedes-Ben zServic eCentre. Example
:Coupé
X Tilt th etop of th ehead restraint cushion
forwards in th edirection of arrow 0046.
X Push th ehead restraint cushion down in
th ed irection of arrow 0047as far as it will go.
X Push th ehead restraint cushion firmly
backwards in th edirection of arrow 008Auntil
it engages.
X Repeat this procedure for th esecon dhead
restraint. Manually lowering th
ehead
restraints in th erear(Cabriolet)
If th ehead restraint sintherear compartment
are in th eupper position, th esoftt op cannot
be closed fully. If th ehead restraint electron-
ics are malfunctionin gand th eadjustment
procedure of th esoftt op is interrupted leav-
ing th esoftt op compartmen tcover open ,you
therefor ehave to lower th ehead restraint sin
th er ear compartmen tmanually. Cover 0047
can only be released when th esoftt op is in
this position. Manually lowerin
gthe hea drestraint sintherea r(Cabriolet)
257Practical advice
207_AKB;2;3,en-GB
mkalafa ,V ersion: 2.11.8.1
2009-07-23T10:23:49+02:00
-Seite 257 Z