2009 MERCEDES-BENZ CL COUPE light
[x] Cancel search: lightPage 198 of 421

4
c
Automatic headlamp mode/day-
time driving lights
5 T
Side lamps, licence plate and instru-
ment lighting
6 L
Dipped-beam/main-beam head-
lamps
7 N
Foglamps
8 R
Rear foglamp
i The exterior lighting (except for side
lamps and parking lamps) automatically
switches off when you remove the key from
the ignition lock or open the driver's door
while the ignition is switched off (ignition
key in position 0).
! Switch off the side lamps and parking
lamp when you leave the vehicle. This pre-
vents the battery from discharging.
Dipped-beam headlamps X
Turn the ignition key to position 2in the
ignition lock or start the engine.
X To switch on: turn the light switch to
L.
The T indicator lamp on the light switch
lights up.
Daytime driving lights You can activate or deactivate "daytime driv-
ing lights" using the on-board computer
(Y page 225).
X To switch on: turn the light switch to
$ orc.
Engine start: the dipped-beam headlamps
are switched on.
Automatic headlamp mode G
Risk of accident
If the light switch is set to the cposition,
the light will not come on automatically in
foggy conditions. This could endanger you and others. Therefore, turn the light switch to
L
in the dark or in fog.
The automatic headlamp feature is only an
aid. The driver is responsible for the vehicle's
lighting at all times. G
Risk of accident
When it is dark or foggy, turn the light switch
from c toL in good time. Otherwise,
the headlamps could switch off temporarily
and you could cause an accident.
X To switch on: turn the light switch to
c.
Key in position 1in the ignition lock: the
side lamp is switched on or off automati-
cally depending on the brightness of the
ambient light.
Engine start: depending on the ambient
light conditions, the side lamp and the
dipped-beam headlamps are switched on
or off automatically.
When the side lamps or dipped-beam head-
lamps are switched on, the Tindicator
lamp on the light switch lights up.
Foglamps G
Risk of accident
If you suspect that driving conditions will be
foggy, turn the light switch to Lbefore you
start your journey. Otherwise, your vehicle
may not be visible and you could endanger
yourself and others.
X Turn the key to position 2in the ignition
lock.
X To switch on: turn the light switch to
L orT. If the light switch is set to
c, you cannot switch on the foglamps. Lights
195Controls
216_AKB; 2; 3, en-GB
bjanott, Version: 2.11.7.7 2009-02-27T14:54:17+01:00 - Seite 195 Z
Dateiname: 6515230602_buchblock.pdf; erzeugt am 04. Mar 2009 11:15:43; WK
Page 199 of 421

X
Pull the light switch out to the first detent.
The N green indicator lamp on the light
switch lights up.
X To switch off: press the light switch in as
far as it will go.
The N green indicator lamp on the light
switch goes out.
Rear foglamp X
Turn the key to position 2in the ignition
lock.
X To switch on: turn the light switch to
L orT. When the light switch is set
to c, you cannot switch on the rear fog-
lamp.
X Pull the light switch out to the second stop.
The R yellow indicator lamp on the light
switch lights up.
X To switch off: press the light switch in as
far as it will go.
The R yellow indicator lamp on the light
switch goes out. Combination switch (turn signals,
main-beam headlamps and headlamp
flasher) Turn signal lamp
X
To switch on: press the combination
switch in the direction of arrow ;or?.
The corresponding turn signal indicator
lamp ! or# in the instrument clus-
ter flashes.
i If you only wish to indicate a minor change
of direction, press the combination switch
briefly in the respective direction. The cor-
responding turn signal flashes three times.
Main-beam headlamps X
Turn the ignition key to position 2in the
ignition lock or start the engine.
X Turn the light switch to Lorc 26
.
X To switch on: press the combination
switch in the direction of arrow :.
The K indicator lamp in the instrument
cluster lights up.
X To deactivate: move the combination
switch back to its normal position.
The K indicator lamp in the instrument
cluster goes out.
Headlamp flasher X
To switch on: briefly pull the combination
switch in the direction of arrow =. Hazard warning lamps
26
In the cposition, the main-beam headlamps are only switched on when it is dark. 196
LightsControls
216_AKB; 2; 3, en-GB
bjanott,
Version: 2.11.7.7 2009-02-27T14:54:17+01:00 - Seite 196
Dateiname: 6515230602_buchblock.pdf; erzeugt am 04. Mar 2009 11:15:44; WK
Page 200 of 421

The hazard warning lamps still operate if the
ignition is switched off. They switch on auto-
matically if an airbag is deployed or if you
brake sharply and bring the vehicle to a halt
from a speed of more than 70 km/h.
X To switch on: press button:.
All turn signals flash. If you now switch on
a turn signal using the combination switch
(Y page 196), only the turn signal lamp on
the corresponding side of the vehicle will
flash.
X To switch off: press button:. Headlamp cleaning system
The headlamps are cleaned automatically if
the "Wipe with washer fluid" function is oper-
ated five times while the lights are on and the
engine is running. When you switch off the
ignition, the automatic headlamp cleaning
system is reset and counting is resumed
from 0. Intelligent Light System
The Intelligent Light System is a system which
adjusts the headlamps automatically to suit
the prevailing driving and weather conditions.
The bi-xenon headlamps offer enhanced func-
tions to improve illumination of the road sur-
face, e.g. depending on the vehicle speed or
weather conditions. The system includes the
active light system, cornering light function,
motorway mode and extended range fog-
lamps. The system is only active when it is
dark. Active light system The active light function is a system that
moves the headlamps according to the steer-
ing movements of the front wheels. In this
way, relevant areas remain illuminated while
driving. This allows you to recognise pedes-
trians, cyclists and animals.
Cornering light
The cornering light function improves the illu-
mination of the road surface in the broad
direction you are turning, e.g. making it easier
to see in tight corners. It can only be activated
when the dipped-beam headlamps are
switched on.
Active:
R
if you are driving at speeds below
40 km/h, the cornering light function is
activated either by the turn signal or by the
steering wheel being turned.
R if you are driving at speeds between
40 km/h and 70 km/h, the cornering light Lights
197Controls
216_AKB; 2; 3, en-GB
bjanott, Version: 2.11.7.7 2009-02-27T14:54:17+01:00 - Seite 197 Z
Dateiname: 6515230602_buchblock.pdf; erzeugt am 04. Mar 2009 11:15:45; WK
Page 201 of 421

function is activated by the steering wheel
being turned.
Not active: if you are driving at speeds above
70 km/h or you switch off the turn signal or
move the steering wheel to the straight-
ahead position.
The cornering lamp may remain lit for a short
time, but is automatically switched off after
no more than three minutes.
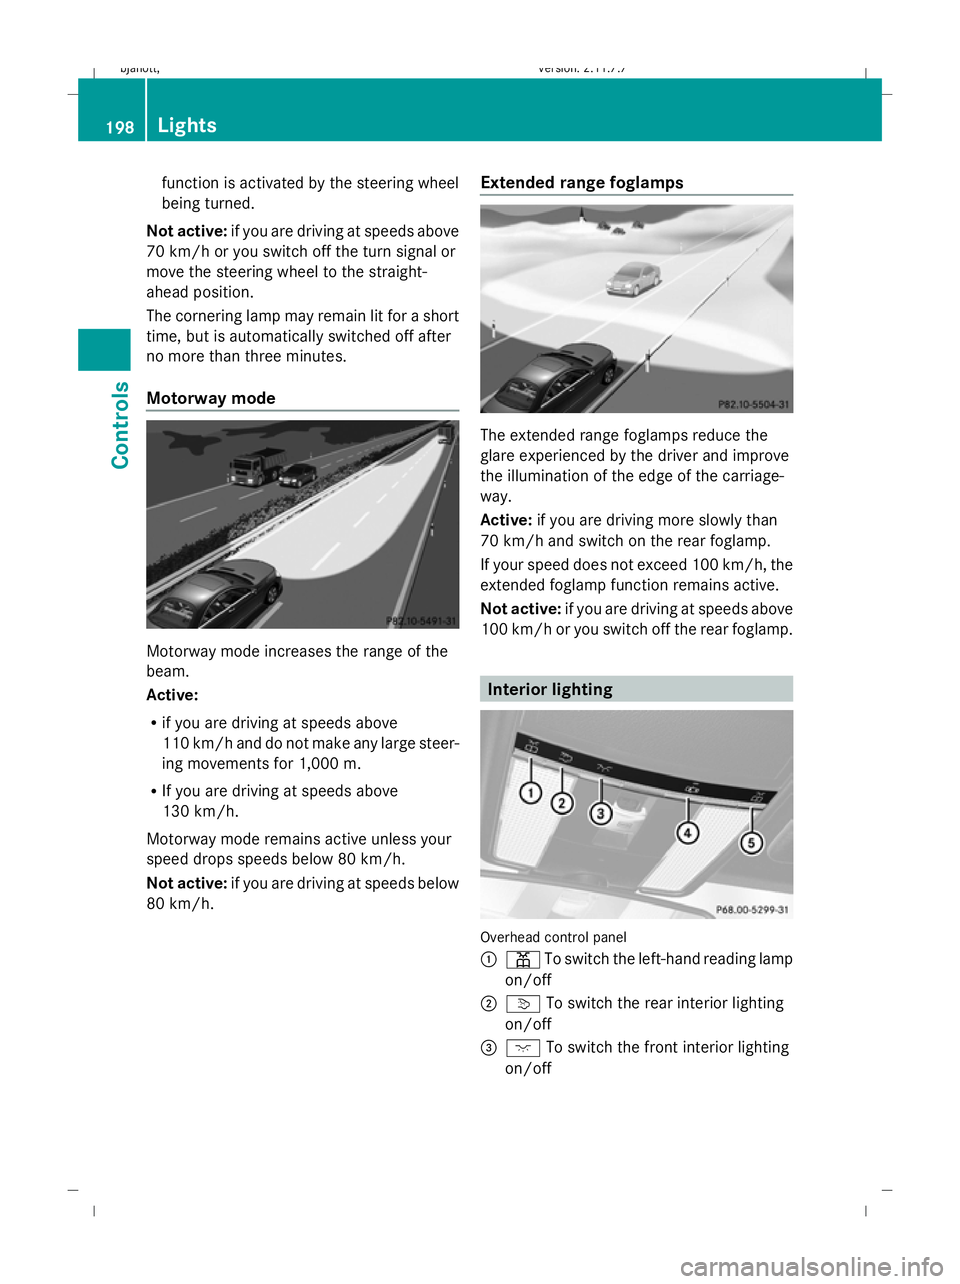
Motorway mode Motorway mode increases the range of the
beam.
Active:
R if you are driving at speeds above
110 km/h and do not make any large steer-
ing movements for 1,000 m.
R If you are driving at speeds above
130 km/h.
Motorway mode remains active unless your
speed drops speeds below 80 km/h.
Not active: if you are driving at speeds below
80 km/h. Extended range foglamps The extended range foglamps reduce the
glare experienced by the driver and improve
the illumination of the edge of the carriage-
way.
Active:
if you are driving more slowly than
70 km/h and switch on the rear foglamp.
If your speed does not exceed 100 km/h, the
extended foglamp function remains active.
Not active: if you are driving at speeds above
100 km/h or you switch off the rear foglamp. Interior lighting
Overhead control panel
:
p To switch the left-hand reading lamp
on/off
; v To switch the rear interior lighting
on/off
= c To switch the front interior lighting
on/off 198
LightsControls
216_AKB; 2; 3, en-GB
bjanott,
Version: 2.11.7.7 2009-02-27T14:54:17+01:00 - Seite 198
Dateiname: 6515230602_buchblock.pdf; erzeugt am 04. Mar 2009 11:15:45; WK
Page 202 of 421

?
| To switch the automatic interior
lighting control on/off
A p To switch the right-hand reading
lamp on/off
Automatic interior lighting control X
To switch on/off: press the|button.
The OFF indicator lamp goes out/lights up.
The interior lighting switches on automati-
cally in darkness, when you unlock the vehi-
cle, open a door or remove the key from the
ignition lock.
The interior lighting switches off after a delay.
You can set the delayed switch-off using
COMAND (Y page 166). If the door is left
open, the interior lighting goes out after
approximately five minutes.
Emergency accident lighting The interior lighting is activated automatically
if the vehicle is involved in an accident.
X To switch off: press the hazard warning
lamp button (Y page 196).
or
X Unlock the vehicle using the key.
or
X Press the |button (Y page 199). Windscreen wipers
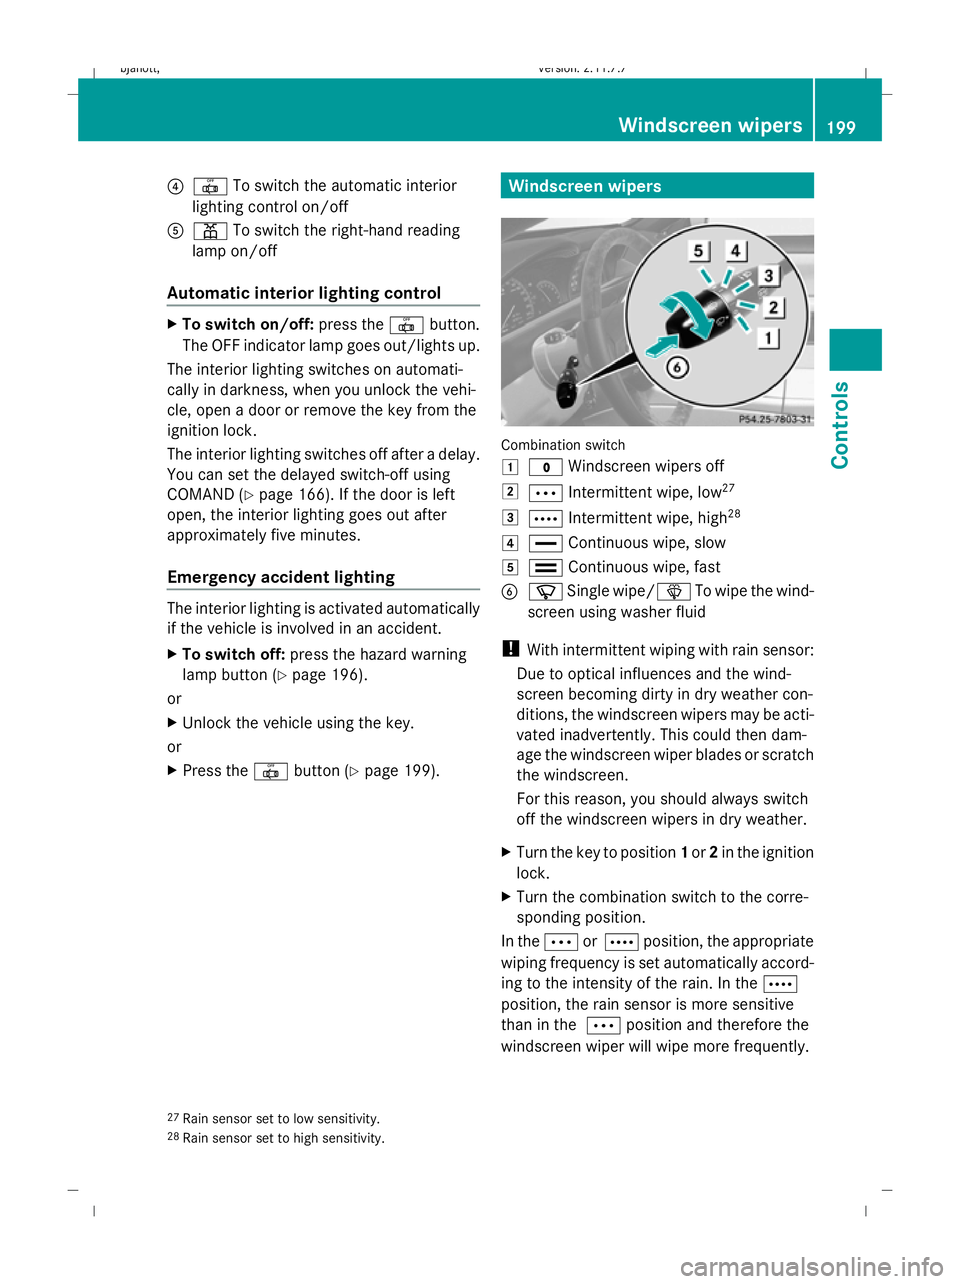
Combination switch
1
$ Windscreen wipers off
2 Ä Intermittent wipe, low 27
3 Å Intermittent wipe, high 28
4 ° Continuous wipe, slow
5 ¯ Continuous wipe, fast
B í Single wipe/î To wipe the wind-
screen using washer fluid
! With intermittent wiping with rain sensor:
Due to optical influences and the wind-
screen becoming dirty in dry weather con-
ditions, the windscreen wipers may be acti-
vated inadvertently. This could then dam-
age the windscreen wiper blades or scratch
the windscreen.
For this reason, you should always switch
off the windscreen wipers in dry weather.
X Turn the key to position 1or 2in the ignition
lock.
X Turn the combination switch to the corre-
sponding position.
In the ÄorÅ position, the appropriate
wiping frequency is set automatically accord-
ing to the intensity of the rain. In the Å
position, the rain sensor is more sensitive
than in the Äposition and therefore the
windscreen wiper will wipe more frequently.
27 Rain sensor set to low sensitivity.
28 Rain sensor set to high sensitivity. Windscreen wipers
199Controls
216_AKB; 2; 3, en-GB
bjanott, Version: 2.11.7.7 2009-02-27T14:54:17+01:00 - Seite 199 Z
Dateiname: 6515230602_buchblock.pdf; erzeugt am 04. Mar 2009 11:15:46; WK
Page 204 of 421

function remains active for five minutes or
until one of the front doors is opened.
X To open: press the corresponding switch.
X To close: pull the corresponding switch.
i When opening or closing the front side
windows you can start automatic opera-
tion. Briefly press the switch beyond the
point of resistance in the corresponding
direction. By pressing again, you can stop
automatic operation.
Closing with increased force and with-
out the anti-entrapment feature G
Risk of injury
Closing the side windows with increased force
or without the anti-entrapment feature could
lead to serious or even fatal injury. Make sure
that nobody can become trapped when clos-
ing the side windows.
If a side window is blocked during closing and
reopens slightly:
X Immediately after the window blocks, pull
on the corresponding switch again until the
side window has closed.
The side window is closed with increased
force.
If a side window blocks again during closing
and reopens slightly:
X Immediately after the window blocks, pull
on the corresponding switch again until the
side window has closed.
The side window is closed without the anti-
entrapment feature. Convenience opening
You can ventilate the vehicle before a journey.
To do this, you can use the key to simultane-
ously:
R open the side windows
R open the sliding/tilting sunroof
R switch on the seat ventilation* of the driv-
er's seat
i The "Convenience opening" feature can
only be operated using the key. X
Point the tip of the key at the driver's door
handle.
X Unlock the vehicle by pressing the %
button.
X Press and hold the %button until the
side windows and the sliding/tilting sun-
roof are in the desired position. Convenience closing
When you lock the vehicle, you can simulta-
neously:
R close the side windows
R close the sliding/tilting sunroof G
Risk of injury
When using the convenience closing feature,
make sure that nobody can become trapped.
Proceed as follows if there is a risk of entrap-
ment: Side windows
201Controls
* optional
216_AKB; 2; 3, en-GB
bjanott,
Version: 2.11.7.7 2009-02-27T14:54:17+01:00 - Seite 201 Z
Dateiname: 6515230602_buchblock.pdf; erzeugt am 04. Mar 2009 11:15:46; WK
Page 208 of 421

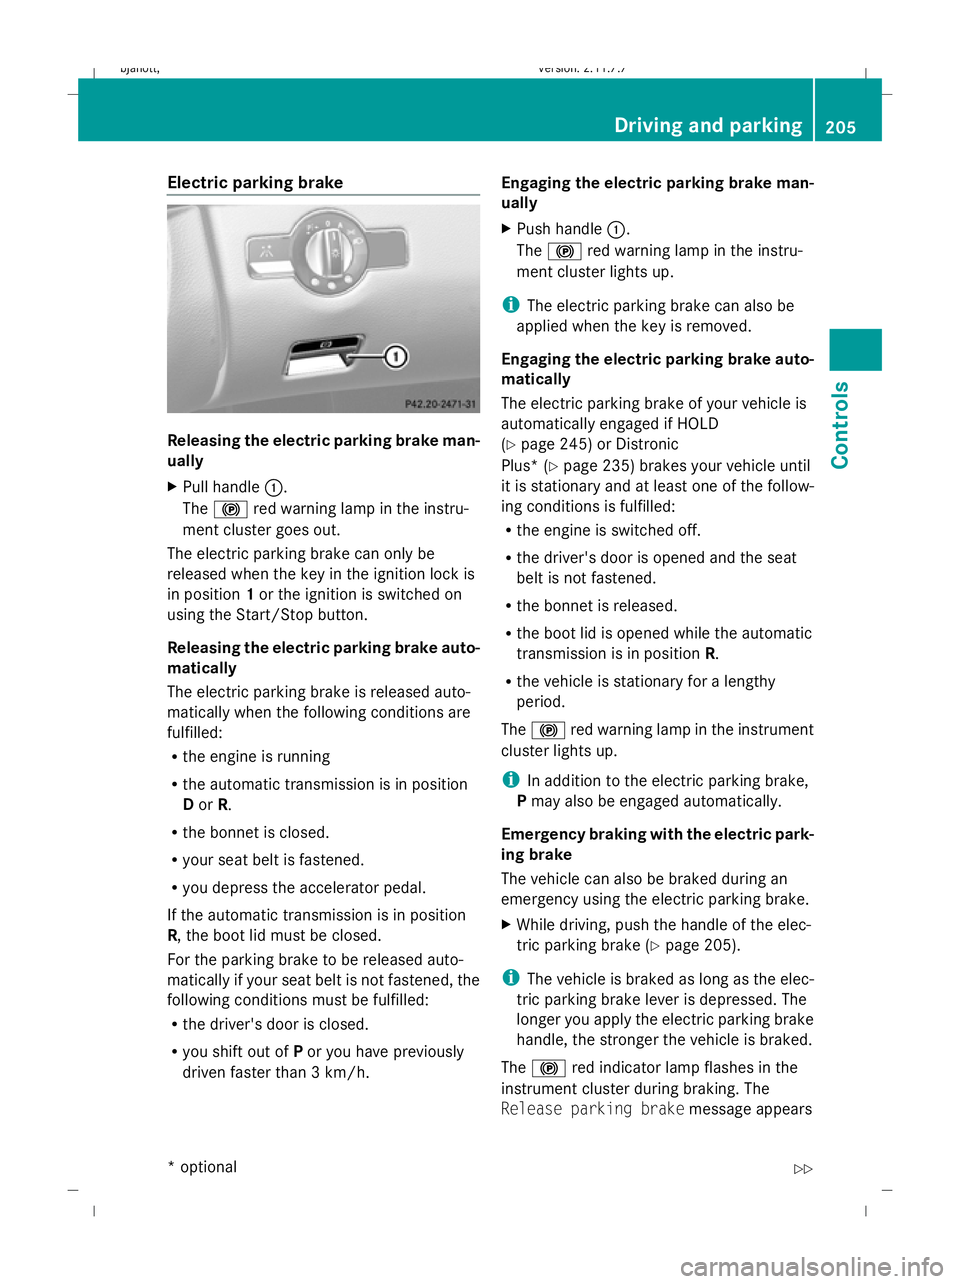
Electric parking brake
Releasing the electric parking brake man-
ually
X
Pull handle :.
The ! red warning lamp in the instru-
ment cluster goes out.
The electric parking brake can only be
released when the key in the ignition lock is
in position 1or the ignition is switched on
using the Start/Stop button.
Releasing the electric parking brake auto-
matically
The electric parking brake is released auto-
matically when the following conditions are
fulfilled:
R the engine is running
R the automatic transmission is in position
D or R.
R the bonnet is closed.
R your seat belt is fastened.
R you depress the accelerator pedal.
If the automatic transmission is in position
R, the boot lid must be closed.
For the parking brake to be released auto-
matically if your seat belt is not fastened, the
following conditions must be fulfilled:
R the driver's door is closed.
R you shift out of Por you have previously
driven faster than 3 km/h. Engaging the electric parking brake man-
ually
X
Push handle :.
The ! red warning lamp in the instru-
ment cluster lights up.
i The electric parking brake can also be
applied when the key is removed.
Engaging the electric parking brake auto-
matically
The electric parking brake of your vehicle is
automatically engaged if HOLD
(Y page 245) or Distronic
Plus* ( Ypage 235) brakes your vehicle until
it is stationary and at least one of the follow-
ing conditions is fulfilled:
R the engine is switched off.
R the driver's door is opened and the seat
belt is not fastened.
R the bonnet is released.
R the boot lid is opened while the automatic
transmission is in position R.
R the vehicle is stationary for a lengthy
period.
The ! red warning lamp in the instrument
cluster lights up.
i In addition to the electric parking brake,
P may also be engaged automatically.
Emergency braking with the electric park-
ing brake
The vehicle can also be braked during an
emergency using the electric parking brake.
X While driving, push the handle of the elec-
tric parking brake (Y page 205).
i The vehicle is braked as long as the elec-
tric parking brake lever is depressed. The
longer you apply the electric parking brake
handle, the stronger the vehicle is braked.
The ! red indicator lamp flashes in the
instrument cluster during braking. The
Release parking brake message appears Driving and parking
205Controls
* option al
216_AKB; 2; 3, en-GB
bjanott
,V ersion: 2.11.7.7
2009-02-27T14:54:17+01:00 - Seite 205 Z
Dateiname: 6515230602_buchblock.pdf; erzeugt am 04. Mar 2009 11:15:48; WK
Page 215 of 421

X
Pull the left-hand steering wheel gearshift
paddle (Y page 210).
The automatic transmission shifts down to
the next gear.
i If you slow down or stop without shifting
down, the automatic transmission auto-
matically shifts down.
Kickdown
i Vehicles with an AMG engine: it is not
possible to use kickdown in manual drive
program M.
You can also use kickdown for maximum
acceleration in manual drive program M.
X Depress the accelerator pedal beyond the
pressure point.
The transmission shifts to a lower gear
depending on the engine speed.
X Shift back up once the desired speed is
reached.
i Vehicles without an AMG engine: if you
apply full throttle, the automatic transmis-
sion shifts up to the next gear at maximum
engine speed. This prevents the engine
from overrevving. Instrument cluster
Points to remember
You will find an illustration of the instrument
cluster in the "At a glance" section
(Y page 27). G
Risk of accident
If the instrument cluster or the multi-function
display fails, it can no longer show any display
messages.
You will not then be able to see information
about the vehicle status, such as speed, out-
side temperature, warning and indicator
lamps, display messages or the failure of sys-
tems. Handling characteristics may be affec-
ted. Adjust your driving style and speed
accordingly. Immediately consult a qualified specialist
workshop which has the necessary specialist
knowledge and tools to carry out the work
required. Mercedes-Benz recommends that
you use a Mercedes-Benz Service Centre for
this purpose. In particular, work relevant to
safety or on safety-related systems must be
carried out at a qualified specialist workshop. Coolant temperature display
The coolant temperature gauge is in the
instrument cluster on the left-hand side.
Under normal operating conditions and with
the specified coolant level, the coolant tem-
perature may rise to 120 †. Rev counter
The red band in the rev counter indicates the
engine's overrevving range. The fuel supply is
interrupted to protect the engine when the
red band is reached.
! Do not drive in the overrevving range.
Doing so will damage the engine. Outside temperature display
G
Risk of accident
If the temperature is slightly above freezing,
the road may be icy, especially in wooded
areas or on bridges. If you do not adjust your
driving style, the vehicle may start to skid. For
this reason, you should always adjust your
driving style and speed to the weather condi-
tions.
Changes in the outside temperature are dis-
played after a short delay. 212
Instrument clusterControls
216_AKB; 2; 3, en-GB
bjanott,
Version: 2.11.7.7 2009-02-27T14:54:17+01:00 - Seite 212
Dateiname: 6515230602_buchblock.pdf; erzeugt am 04. Mar 2009 11:15:50; WK