2009 LINCOLN TOWN CAR instrument cluster
[x] Cancel search: instrument clusterPage 177 of 280
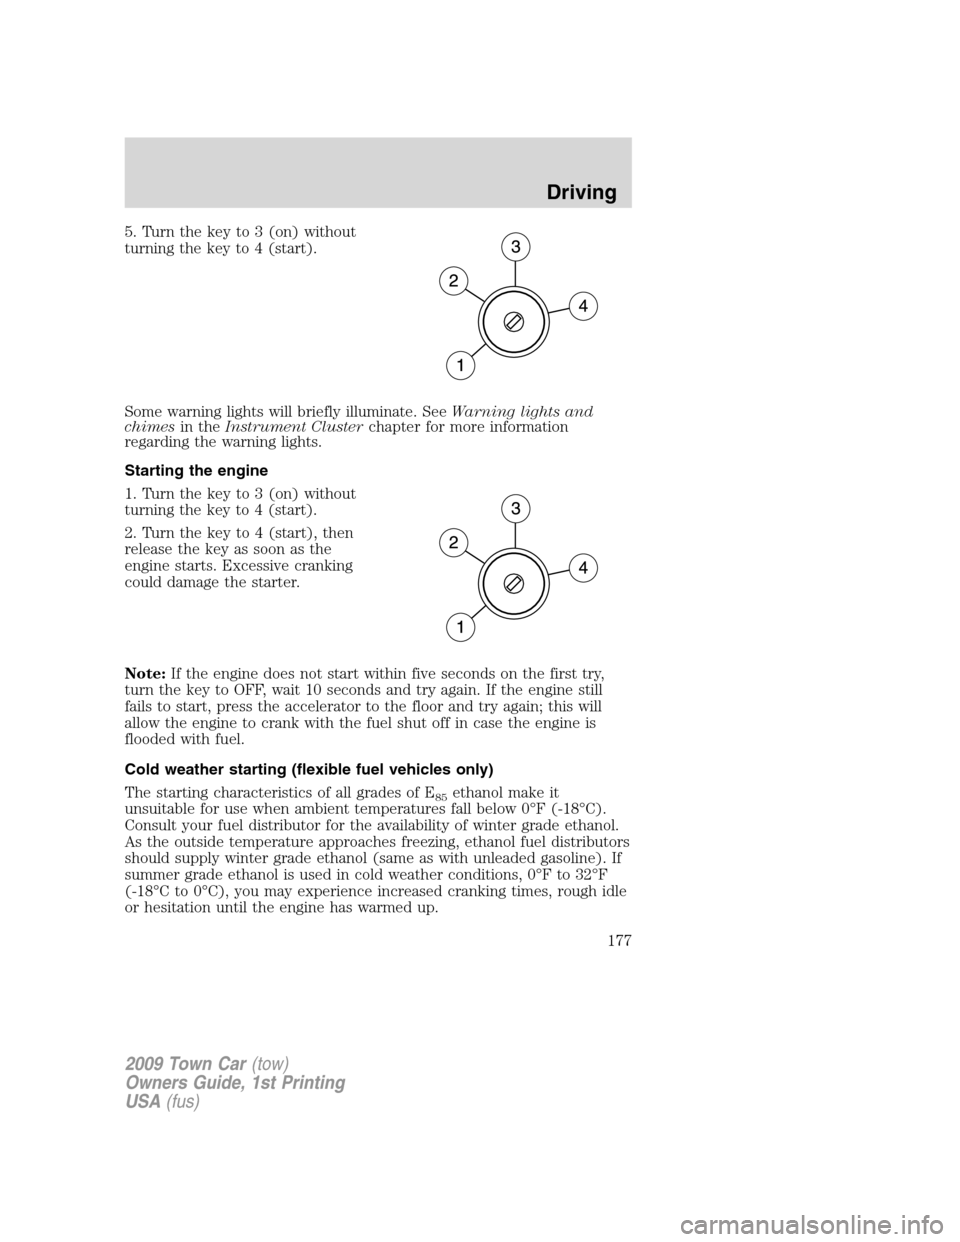
5. Turn the key to 3 (on) without
turning the key to 4 (start).
Some warning lights will briefly illuminate. SeeWarning lights and
chimesin theInstrument Clusterchapter for more information
regarding the warning lights.
Starting the engine
1. Turn the key to 3 (on) without
turning the key to 4 (start).
2. Turn the key to 4 (start), then
release the key as soon as the
engine starts. Excessive cranking
could damage the starter.
Note:If the engine does not start within five seconds on the first try,
turn the key to OFF, wait 10 seconds and try again. If the engine still
fails to start, press the accelerator to the floor and try again; this will
allow the engine to crank with the fuel shut off in case the engine is
flooded with fuel.
Cold weather starting (flexible fuel vehicles only)
The starting characteristics of all grades of E
85ethanol make it
unsuitable for use when ambient temperatures fall below 0°F (-18°C).
Consult your fuel distributor for the availability of winter grade ethanol.
As the outside temperature approaches freezing, ethanol fuel distributors
should supply winter grade ethanol (same as with unleaded gasoline). If
summer grade ethanol is used in cold weather conditions, 0°F to 32°F
(-18°C to 0°C), you may experience increased cranking times, rough idle
or hesitation until the engine has warmed up.
2009 Town Car(tow)
Owners Guide, 1st Printing
USA(fus)
Driving
177
Page 180 of 280
•Be sure that the engine block heater, heater cord and extension cord
are solidly connected. A poor connection can cause the cord to
become very hot and may result in an electrical shock or fire. Be sure
to check for heat anywhere in the electrical hookup once the system
has been operating for approximately a half hour.
•Finally, have the engine block heater system checked during your fall
tune-up to be sure it’s in good working order.
How to use the engine block heater
Ensure the receptacle terminals are clean and dry prior to use. To clean
them, use a dry cloth.
Depending on the type of factory installed equipment, your engine block
heater system may consume anywhere between 400 watts or 1000 watts
of energy per hour. Your factory installed block heater system does not
have a thermostat; however, maximum temperature is attained after
approximately three hours of operation. Block heater operation longer
than three hours will not improve system performance and will
unnecessarily use additional electricity.
Make sure system is unplugged and properly stowed before driving the
vehicle. While not in use, make sure the protective cover seals the
prongs of the engine block heater cord plug.
BRAKES
Occasional brake noise is normal. If a metal-to-metal, continuous grinding
or continuous squeal sound is present, the brake linings may be worn-out
and should be inspected by an authorized dealer. If the vehicle has
continuous vibration or shudder in the steering wheel while braking, the
vehicle should be inspected by an authorized dealer.
Refer toBrake system warning
lightin theInstrument Cluster
chapter for information on the brake
system warning light.
Four-wheel anti-lock brake system (ABS)
Your vehicle is equipped with an Anti-lock Braking System (ABS). This
system helps you maintain steering control during emergency stops by
keeping the brakes from locking. Noise from the ABS pump motor and
brake pedal pulsation may be observed during ABS braking and the
brake pedal may suddenly travel a little farther as soon as ABS braking is
done and normal brake operation resumes. These are normal
characteristics of the ABS and should be no reason for concern.
P!
BRAKE
2009 Town Car(tow)
Owners Guide, 1st Printing
USA(fus)
Driving
180
Page 181 of 280
Using ABS
When hard braking is required, apply continuous force on the brake
pedal; do not pump the brake pedal since this will reduce the
effectiveness of the ABS and will increase your vehicle’s stopping
distance. The ABS will be activated immediately, allowing you to retain
steering control during hard braking and on slippery surfaces. However,
the ABS does not decrease stopping distance.
ABS warning lamp
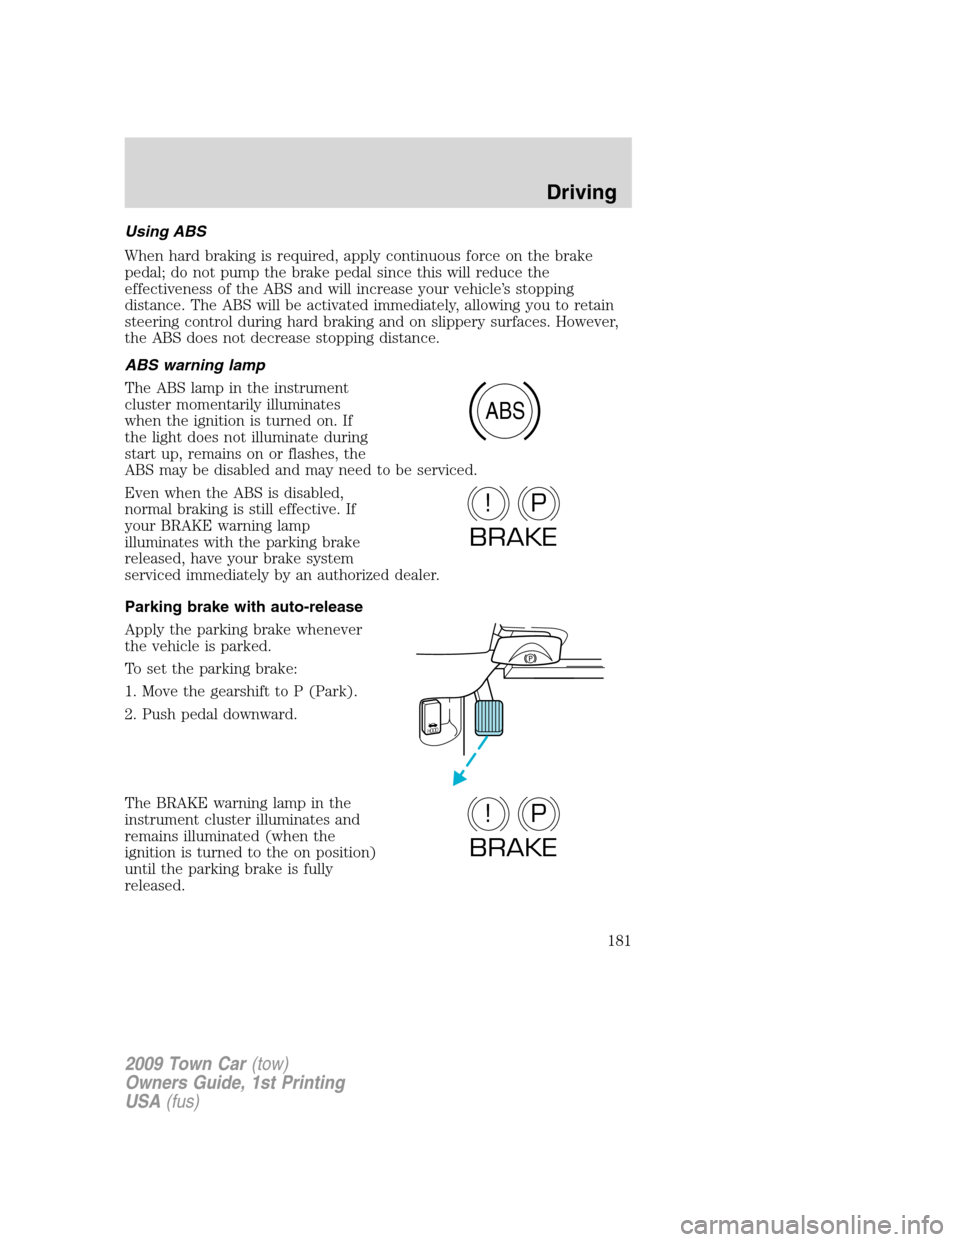
The ABS lamp in the instrument
cluster momentarily illuminates
when the ignition is turned on. If
the light does not illuminate during
start up, remains on or flashes, the
ABS may be disabled and may need to be serviced.
Even when the ABS is disabled,
normal braking is still effective. If
your BRAKE warning lamp
illuminates with the parking brake
released, have your brake system
serviced immediately by an authorized dealer.
Parking brake with auto-release
Apply the parking brake whenever
the vehicle is parked.
To set the parking brake:
1. Move the gearshift to P (Park).
2. Push pedal downward.
The BRAKE warning lamp in the
instrument cluster illuminates and
remains illuminated (when the
ignition is turned to the on position)
until the parking brake is fully
released.
ABS
P!
BRAKE
HOOD
P!
BRAKE
2009 Town Car(tow)
Owners Guide, 1st Printing
USA(fus)
Driving
181
Page 182 of 280
WARNING:Always set the parking brake fully and make sure
the gearshift is latched in P (Park). Turn the ignition to the
OFF/LOCK position and remove the key whenever you leave your
vehicle.
The parking brake is not recommended to stop a moving vehicle.
However, if the normal brakes fail, the parking brake can be used to stop
your vehicle in an emergency. Since the parking brake applies only the
rear brakes, the vehicle’s stopping distance will increase greatly and the
handling of your vehicle will be adversely affected.
Your vehicle has an automatic parking brake release. To release the
parking brake:
1. Start the vehicle.
2. Press the brake pedal.
3. Move the gearshift from the P (Park) position to one of the forward
gears (the parking brake will not release automatically when you shift
into reverse). The brake pedal must remain pressed while the gearshift is
moved.
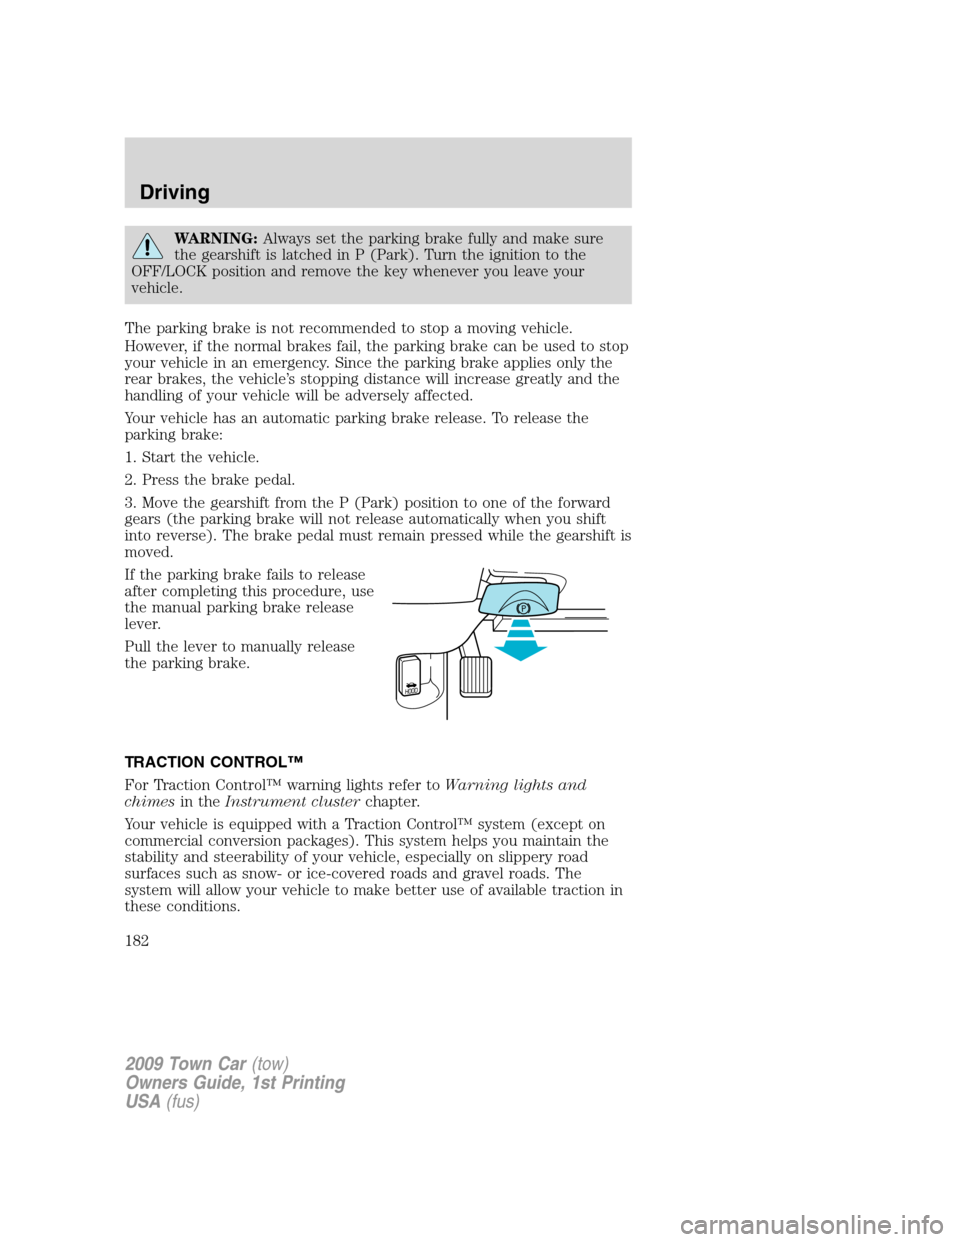
If the parking brake fails to release
after completing this procedure, use
the manual parking brake release
lever.
Pull the lever to manually release
the parking brake.
TRACTION CONTROL™
For Traction Control™ warning lights refer toWarning lights and
chimesin theInstrument clusterchapter.
Your vehicle is equipped with a Traction Control™ system (except on
commercial conversion packages). This system helps you maintain the
stability and steerability of your vehicle, especially on slippery road
surfaces such as snow- or ice-covered roads and gravel roads. The
system will allow your vehicle to make better use of available traction in
these conditions.
2009 Town Car(tow)
Owners Guide, 1st Printing
USA(fus)
Driving
182
Page 229 of 280
vehicle’s glass or the wiper blades may be the cause. These may include
hot wax treatments used by commercial car washes, water repellent
coatings, tree sap, or other organic contamination; these contaminants
may cause squeaking or chatter noise from the blades, and streaking and
smearing of the windshield. To clean these items, follow these tips:
•The windshield, rear windows and side windows may be cleaned with
a non-abrasive cleaner such as Motorcraft Ultra-Clear Spray Glass
Cleaner (ZC-23), available from your authorized dealer.
•The wiper blades can be cleaned with isopropyl (rubbing) alcohol or
Motorcraft Premium Windshield Washer Concentrate (ZC-32-A),
available from your authorized dealer. This washer fluid contains
special solution in addition to alcohol which helps to remove the hot
wax deposited on the wiper blade and windshield from automated car
wash facilities. Be sure to replace wiper blades when they appear
worn or do not function properly.
•Do not use abrasives, as they may cause scratches.
•Do not use fuel, kerosene, or paint thinner to clean any parts.
If you cannot remove those streaks after cleaning with the glass cleaner
or if the wipers chatter and move in a jerky motion, clean the outer
surface of the windshield and the wiper blades using a sponge or soft
cloth with a neutral detergent or mild-abrasive cleaning solution. After
cleaning, rinse the windshield and wiper blades with clean water. The
windshield is clean if beads do not form when you rinse the windshield
with water.
Do not use sharp objects, such as a razor blade, to clean the
inside of the rear window or to remove decals, as it may cause
damage to the rear window defroster’s heated grid lines.
INSTRUMENT PANEL/INTERIOR TRIM AND CLUSTER LENS
Clean the instrument panel, interior trim areas and cluster lens with a
clean and damp white cotton cloth, then with a clean and dry white
cotton cloth; you may also use Motorcraft Dash & Vinyl Cleaner
(ZC-38-A) on the instrument panel and interior trim areas.
•Avoid cleaners or polishes that increase the gloss of the upper portion
of the instrument panel. The dull finish in this area helps protect the
driver from undesirable windshield reflection.
•Be certain to wash or wipe your hands clean if you have been in
contact with certain products such as insect repellent and suntan
lotion in order to avoid possible damage to the interior painted
surfaces.
2009 Town Car(tow)
Owners Guide, 1st Printing
USA(fus)
Cleaning
229
Page 230 of 280
•Do not use household or glass cleaners as these may damage the
finish of the instrument panel, interior trim and cluster lens.
WARNING:Do not use chemical solvents or strong detergents
when cleaning the steering wheel or instrument panel to avoid
contamination of the airbag system.
If a staining liquid like coffee/juice has been spilled on the instrument
panel or on interior trim surfaces, clean as follows:
1. Wipe up spilled liquid using a clean, white, cotton cloth.
2. Apply Motorcraft Deluxe Leather and Vinyl Cleaner (ZC-11-A) [In
Canada use Motorcraft Multi-Purpose Cleaner (CXC-101)] to the wiped
area and spread around evenly.
3. Apply more Motorcraft cleaner to a clean, white, cotton cloth and
press the cloth onto the soiled area–allow this to set at room
temperature for 30 minutes.
4. Remove the soaked cloth, and if it is not soiled badly, use this cloth to
clean the area by using a rubbing motion for 60 seconds.
5. Following this, wipe area dry with a clean, white, cotton cloth.
INTERIOR
For fabric, carpets, cloth seats, safety belts and seats equipped with side
airbags:
•Remove dust and loose dirt with a vacuum cleaner.
•Remove light stains and soil with Motorcraft Professional Strength
Carpet & Upholstery Cleaner (ZC-54).
•If grease or tar is present on the material, spot-clean the area first
with Motorcraft Spot and Stain Remover (ZC-14). In Canada, use
Motorcraft Multi-Purpose Cleaner (CXC-101).
•If a ring forms on the fabric after spot cleaning, clean the entire area
immediately (but do not oversaturate) or the ring will set.
•Do not use household cleaning products or glass cleaners, which can
stain and discolor the fabric and affect the flame retardant abilities of
the seat materials.
WARNING:Do not use cleaning solvents, bleach or dye on the
vehicle’s safety belts, as these actions may weaken the belt
webbing.
2009 Town Car(tow)
Owners Guide, 1st Printing
USA(fus)
Cleaning
230
Page 254 of 280
Unleaded gasoline engines
If you are experiencing starting, rough idle or hesitation driveability
problems during a cold start, try a different brand of “Regular” unleaded
gasoline. “Premium” unleaded gasoline is not recommended because it
may cause these problems to become more pronounced. If the problems
persist, see your authorized dealer.
FFV engine (if equipped)
To identify if your vehicle is an FFV, it may be equipped with a yellow
fuel cap with the text “E85/Gasoline”, or check if there is a label on the
fuel filler door.
It is best not to alternate repeatedly between gasoline and E85. If you do
switch fuels, it is recommended that you add as much fuel as
possible—at least half a tank. Do not add less than five gallons (18.9 L)
when refueling. You should drive the vehicle immediately after refueling
for at least 5 miles (8 km) to allow the vehicle to adapt to the change in
ethanol concentration.
If you operate your vehicle 50% or more of the time on ethanol, you
should follow a different maintenance schedule. In addition to this, it is
also recommended to fill the fuel tank with regular unleaded gasoline
once every 3,000 miles (4,800 km). Seescheduled maintenance
informationfor more information.
Running out of fuel
Avoid running out of fuel because this situation may have an adverse
effect on powertrain components.
If you have run out of fuel:
•You may need to cycle the ignition from off to on several times after
refueling to allow the fuel system to pump the fuel from the tank to
the engine. On restarting, cranking time will take a few seconds longer
than normal.
•Normally, adding 1 gallon (3.8L) of fuel is enough to restart the
engine. If the vehicle is out of fuel and on a steep grade, more than
1 gallon (3.8L) may be required.
•TheService engine soon
indicator may come on. For more
information on theService engine soon
indicator, refer to
Warning lights and chimesin theInstrument Clusterchapter.
ESSENTIALS OF GOOD FUEL ECONOMY
Measuring techniques
Your best source of information about actual fuel economy is you, the
driver. You must gather information as accurately and consistently as
2009 Town Car(tow)
Owners Guide, 1st Printing
USA(fus)
Maintenance and Specifications
254
Page 277 of 280
Fluid capacities .........................267
Fuel ............................................248
calculating fuel
economy ............................64, 254
cap ...........................................251
capacity ...................................267
choosing the right fuel ...........252
comparisons with EPA fuel
economy estimates .................257
detergent in fuel .....................253
filling your vehicle
with fuel ..................248, 251, 255
filter, specifications ........248, 265
fuel filler door override ............75
fuel filler door release ..............75
fuel pump shut-off switch .....195
improving fuel economy ........254
octane rating ...................253, 270
quality ..............................253–254
running out of fuel .................254
safety information relating to
automotive fuels .....................248
Fuel - flex fuel vehicle
(FFV) .........................248, 252–253
Fuses ..................................195–196
G
Gas cap (see Fuel cap) ............251
Gas mileage (see Fuel
economy) ...................................254
Gauges .........................................16
H
Hazard flashers .........................194
Head restraints ...........................93
Headlamps ...................................35
aiming ........................................37
autolamp system .......................35bulb specifications ....................40
daytime running lights .............36
flash to pass ..............................36
high beam .................................36
replacing bulbs .........................42
turning on and off ....................35
Homelink wireless control
system ..........................................58
Hood ..........................................234
I
Ignition ...............................175, 270
Illuminated visor mirror .............47
Infant seats (see Safety
seats) .........................................131
Inspection/maintenance (I/M)
testing ........................................260
Instrument panel
cleaning ...................................229
cluster ........................................12
lighting up panel and
interior .......................................37
J
Jack ............................................202
positioning ...............................202
storage .....................................202
Jump-starting your vehicle ......210
K
Keyless entry system .................86
keypad .......................................86
locking and unlocking doors ....87
programming entry code .........86
Keys .......................................76, 90
positions of the ignition .........175
2009 Town Car(tow)
Owners Guide, 1st Printing
USA(fus)
Index
277