Page 171 of 371
Driving your vehicle24
4
1
2
3
4
5
6
7
8
9
✽ ✽
NOTICEWhen you jump start your vehicle
because of a drained battery, the
engine may not run as smoothly and
the ABS warning light may turn on
at the same time. This happens
because of the low battery voltage. It
does not mean your ABS is malfunc-
tioning.
• Do not pump your brakes!
• Have the battery recharged before
driving the vehicle.
Page 185 of 371
Driving your vehicle38
4
1
2
3
4
5
6
7
8
9
Trip computer (if equipped)The trip computer is a microcomput-
er-controlled driver information sys-
tem that displays information related
to driving, including distance traveled
("tripmeter"), driving time, average
fuel consumption and distance to
empty on the LCD. All stored driving
information is reset if the battery is
disconnected.
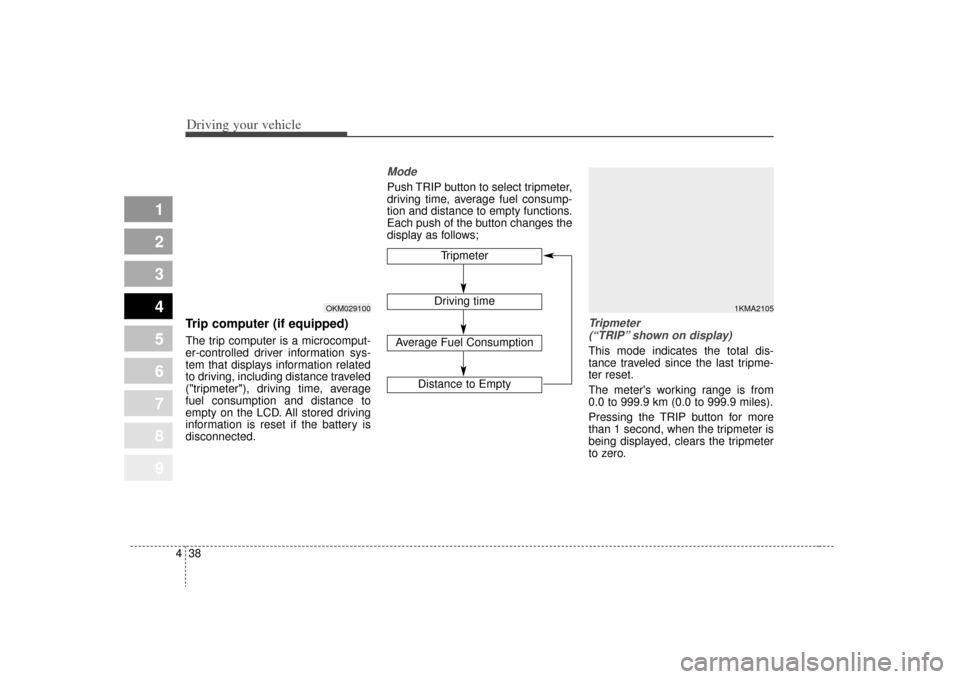
ModePush TRIP button to select tripmeter,
driving time, average fuel consump-
tion and distance to empty functions.
Each push of the button changes the
display as follows;
Tripmeter
(“TRIP” shown on display)This mode indicates the total dis-
tance traveled since the last tripme-
ter reset.
The meter's working range is from
0.0 to 999.9 km (0.0 to 999.9 miles).
Pressing the TRIP button for more
than 1 second, when the tripmeter is
being displayed, clears the tripmeter
to zero.
Tripmeter
Driving time
Average Fuel Consumption
Distance to Empty
1KMA2105
OKM029100
Page 187 of 371
Driving your vehicle40
4
1
2
3
4
5
6
7
8
9
✽ ✽
NOTICE• If the vehicle is not on level ground
or the battery power has been
interrupted, the “Distance to
empty” function may not operate
correctly.
The trip computer may not regis-
ter additional fuel if less than 6
liters (1.6 gallons) of fuel are
added to the vehicle.
• The fuel consumption and dis- tance to empty values may vary
significantly based on driving con-
ditions, driving habits, and condi-
tion of the vehicle.
• The distance to empty value is an estimate of the available driving
distance. This value may differ
from the actual driving distance
available.
Instrument panel illumination
(if equipped)When the vehicle’s parking lights or
headlights are on, rotate the illumina-
tion control knob to adjust the instru-
ment panel illumination intensity.
7KMS2108
Page 197 of 371
Driving your vehicle50
4
1
2
3
4
5
6
7
8
9
4) Make sure the vehicle windshield
wipers are turned off.
5) Drive your vehicle in at least 2 complete (either clockwise or
counter-clockwise) circles at less
than 8 km/h (5 mph) until the com-
pass heading appears. Driving in
a circle in right-handed direction
and opposite direction is possible
and if possible, stop the wiper
operation.
6) If the vehicle's compass headings become inaccurate again, repeat
steps 1 through 6 above.✽ ✽NOTICEIf new vehicle is first driven or if the
battery has been disconnected, do
the calibration procedure as above.
Setting the compass zoneThis compass must be set to com-
pensate for the variation between
true north and magnetic north. To set
variation:
1. Find your current location and
variance zone number on the zone
map.
2. Press and hold the ON/OFF but- ton for 6~9 seconds. The current
zone number will appear in the
display.
3. Release and press the ON/OFF button until the new zone number
appears in the display. After you
stop pressing the button in, the
display will show a compass direc-
tion within a few seconds.
✽ ✽NOTICE1. Do not install a ski rack, antenna,
etc. that are attached to the vehi-
cle using a magnet as anything
attached to the roof of the vehicle
with a magnet will effect compass
operation.
2. If the compass deviates from the correct indication soon after
repeated adjustment, have the
compass checked at an authorized
dealer.
3. The compass may not indicate the correct compass point in tunnels
or while driving up or down a
steep hill.
(The compass returns to the cor-
rect compass point when the vehi-
cle moves to an area where the
geomagnetism is stabilized.)
Page 199 of 371
Driving your vehicle52
4
1
2
3
4
5
6
7
8
9
Battery saver function The purpose of this feature is to
prevent the battery from being dis-
charged. The system automatically
turns off the headlights and park-
ing lights when the driver removes
the ignition key and opens the dri-
ver- side door.
With this feature, the parklight will be turned off automatically if the
driver parks on the side of road at
night.
If necessary, to keep the lights on
when the ignition key is removed,
perform the following :
1) Open the driver-side door.
2) Turn the parklights OFF and ON again using the light switch on the
steering column.
Lighting control The light switch has a Headlight and
a Parklight position.
To operate the lights, turn the knob at
the end of the control lever to one of
the following positions:➀
OFF position
➁
Parklight position
➂
Headlight position
Parklight position ( )When the light switch is in the park-
light position (1st position), the tail,
position, license and instrument
panel lights are ON.
LIGHTING
9KMC2111
9KMC2110
Page 200 of 371
453
Driving your vehicle
1
2
3
4
5
6
7
8
9
Headlight position ( )When the light switch is in the head-
light position (2nd position) the head,
tail, position, license and instrument
panel lights are ON.
High - beam operation To turn on the high beam headlights,
push the lever forward.
The high-beam indicator will light
when the headlight high beams are
switched on.
To prevent the battery from being
discharged, do not leave the lights
on for a prolonged time while the
engine is not running.
Flashing headlights To flash the headlights, pull the lever
towards you. It will return to the nor-
mal (low-beam) position when
released. The headlight switch does
not need to be on to use this flashing
feature.
9KMC2112
9KMC2114
9KMC2115
Page 202 of 371
455
Driving your vehicle
1
2
3
4
5
6
7
8
9
✽ ✽
NOTICEWhen in operation, the fog lights
consume large amounts of vehicle
electrical power. Only use the fog
lights when visibility is poor.
Unnecessary battery and generator
drain could occur if the fog lights
are used excessively.
Daytime running light
(if equipped)Daytime Running Lights (DRL) can
make it easier for others to see the
front of your vehicle during the day.
DRL can be helpful in many different
driving conditions, and it is especial-
ly helpful after dawn and before sun-
set.
The DRL system will make your
high-beam headlights turn OFF
when:
1. The head light switch is ON.
2. The parking brake engaged.
3. Engine stops.
Page 207 of 371
Driving your vehicle60
4
1
2
3
4
5
6
7
8
9
✽ ✽
NOTICE• To prevent damage to the conduc-
tors bonded to the inside surface
of the rear window, never use
sharp instruments or window
cleaners containing abrasives to
clean the window.
• To prevent the battery from being discharged, the rear window
defroster will only operate when
the engine is running.
• If you want to defrost and defog on the front windshield, refer to
“Windshield Defrosting and
Defogging” in this section. To activate the rear window
defroster, press the rear window
defroster button located in the center
console switch panel. The indicator
on the rear window defroster button
illuminates when the defroster is ON.
If there is heavy accumulation of
snow on the rear window, brush it off
before operating the rear defroster. The rear window defroster automati-
cally turns off after 20 minutes or
when the ignition switch is turned off.
To turn off the defroster, press the
rear window defroster button again.
Outside mirror heater
(if equipped)There is no control button for the out-
side mirror heater, instead the out-
side mirror heater automatically
turns on when the rear window
defroster is turned on.Front windshield deicer(if equipped)There is no control button for the
front windshield deicer, instead the
front windshield deicer automatically
turns on when the rear window
defroster is turned on. The hazard warning flasher causes
the rear tail lights and front turn sig-
nal lights to flash on and off, which
serves as a warning to other drivers
to exercise caution when approach-
ing or passing your vehicle.
To activate the flasher, depress the
hazard warning flasher switch. This
switch operates in any ignition switch
position.
To turn the flashers off, depress the
switch again.
HAZARD WARNING FLASHER
OKM049109