Page 137 of 457
NOTE:The vehicle should be traveling at a steady
speed and on level ground before pressing the SET lever.
To Deactivate
A soft tap on the brake pedal, pulling the speed control
lever toward you “CANCEL”, normal braking, or clutch
pressure while slowing the vehicle, will deactivate speed
control without erasing the set speed memory. Pressing
the ON/OFF button or turning off the ignition switch
erases the set speed memory.
To Resume Speed
To resume a previously set speed, push the RESUME
ACCEL lever up and release. Resume can be used at any
speed above 20 mph (32 km/h).
To Vary The Speed Setting
When the Electronic Speed Control is on, speed can be
increased by pushing up and holding RESUME ACCEL.
Release the lever when the desired speed is reached, and
the new speed will be set.Tapping RESUME ACCEL once will result ina1mph
(1.6 km/h) speed increase. Each time the lever is tapped,
speed increases so that tapping the lever three times will
increase speed by 3 mph (4.8 km/h), etc.
To decrease speed while speed control is ON, push down
and hold SET DECEL. Release the lever when the desired
speed is reached, and the new speed will be set.
Tapping the SET DECEL button once will result in a
1 mph (1.6 km/h) speed decrease. Each time the button is
tapped, speed decreases.
NOTE:The Electronic Speed Control system has been
designed to shut down if multiple speed control switch
functions are operated simultaneously in order to ensure
proper operation. If this occurs, the system can be
reactivated by pushing the Electronic Speed Control
switch ON/OFF button and resetting the desired vehicle
set speed.
UNDERSTANDING THE FEATURES OF YOUR VEHICLE 135
3
Page 140 of 457
Programming HomeLink�
Before You Begin
If you have not trained any of the HomeLink�buttons,
erase all channels before you begin training.
To do this, press and hold the two outside buttons for
20 seconds until the red indicator flashes.
It is recommended that a new battery be placed in the
hand-held transmitter of the device being programmed
to HomeLink�for more efficient training and accurate
transmission of the radio-frequency signal.
Your vehicle should be parked outside of the garage
when programming.
1. Turn the ignition switch to the ON/RUN position.
2. Hold the battery side of the hand-held transmitter
away from the HomeLink�button you wish to program.Place the hand-held transmitter 1–3 in (3-8 cm) away
from the HomeLink�button you wish to program while
keeping the indicator light in view.
3. Simultaneously press and hold both the chosen
HomeLink�button and the hand-held transmitter button
until the HomeLink�indicator changes from a slow to a
rapidly blinking light, then release both the HomeLink�
and hand-held transmitter buttons.
Watch for the HomeLink�indicator to change flash rates.
When it changes, it is programmed. It may take up to
30 seconds, or longer in rare cases. The garage door may
open and close while you train.
NOTE:
•Some gate operators and garage door openers may
require you to replace Step 3 with procedures noted in
the “Gate Operator/Canadian Programming” section.
138 UNDERSTANDING THE FEATURES OF YOUR VEHICLE
Page 143 of 457

has successfully accepted the frequency signal. The
indicator light will flash slowly and then rapidly when
fully trained.
If you unplugged the device for training, plug it back in
at this time.
Then proceed with Step 4 under “Programming
HomeLink�” earlier in this section.
Using HomeLink�
To operate, simply press and release the programmed
HomeLink�button. Activation will now occur for the
trained device (i.e., garage door opener, gate operator,
Security system, entry door lock, home/office lighting,
etc. The hand-held transmitter of the device may also be
used at any time.
Reprogramming A Single HomeLink�Button
To re-program a channel that has been previously
trained, follow these steps:1. Turn the ignition switch to the ON/RUN position.
2. Press and hold the desired HomeLink�button until
the indicator light begins to flash after 20 seconds.Do not
release the button.
3.Without releasing the button,proceed with Program-
ming Homelink�Step 2 and follow all remaining steps.
Security
It is advised to erase all channels before you sell or turn
in your vehicle.
To do this, press and hold the two outside buttons for
20 seconds until the red indicator flashes. Note that all
channels will be erased. Individual channels cannot be
erased.
The HomeLink�Universal Transceiver is disabled when
the Vehicle Security Alarm is active.
UNDERSTANDING THE FEATURES OF YOUR VEHICLE 141
3
Page 145 of 457
POWER SUNROOF — IF EQUIPPED
The power sunroof switch is located in the reading light.WARNING!
•Never leave children in a vehicle, with the key in
the ignition switch. Occupants, particularly unat-
tended children, can become entrapped by the
power sunroof while operating the power sunroof
switch. Such entrapment may result in serious
injury or death.
•In an accident, there is a greater risk of being
thrown from a vehicle with an open sunroof. You
could also be seriously injured or killed. Always
fasten your seat belt properly and make sure all
passengers are properly secured too.
•Do not allow small children to operate the sun-
roof. Never allow fingers or other body parts, or
any object to project through the sunroof opening.
Injury may result.Power Sunroof Switch
UNDERSTANDING THE FEATURES OF YOUR VEHICLE 143
3
Page 148 of 457
Sunroof Maintenance
Use only a non-abrasive cleaner and a soft cloth to clean
the glass panel.
Ignition Off Operation
The sunroof will also operate up to 45 seconds after the
ignition has been turned OFF. The sunroof operation will
be canceled if either of the front doors are opened during
the 45 second time period.
ELECTRICAL POWER OUTLETS
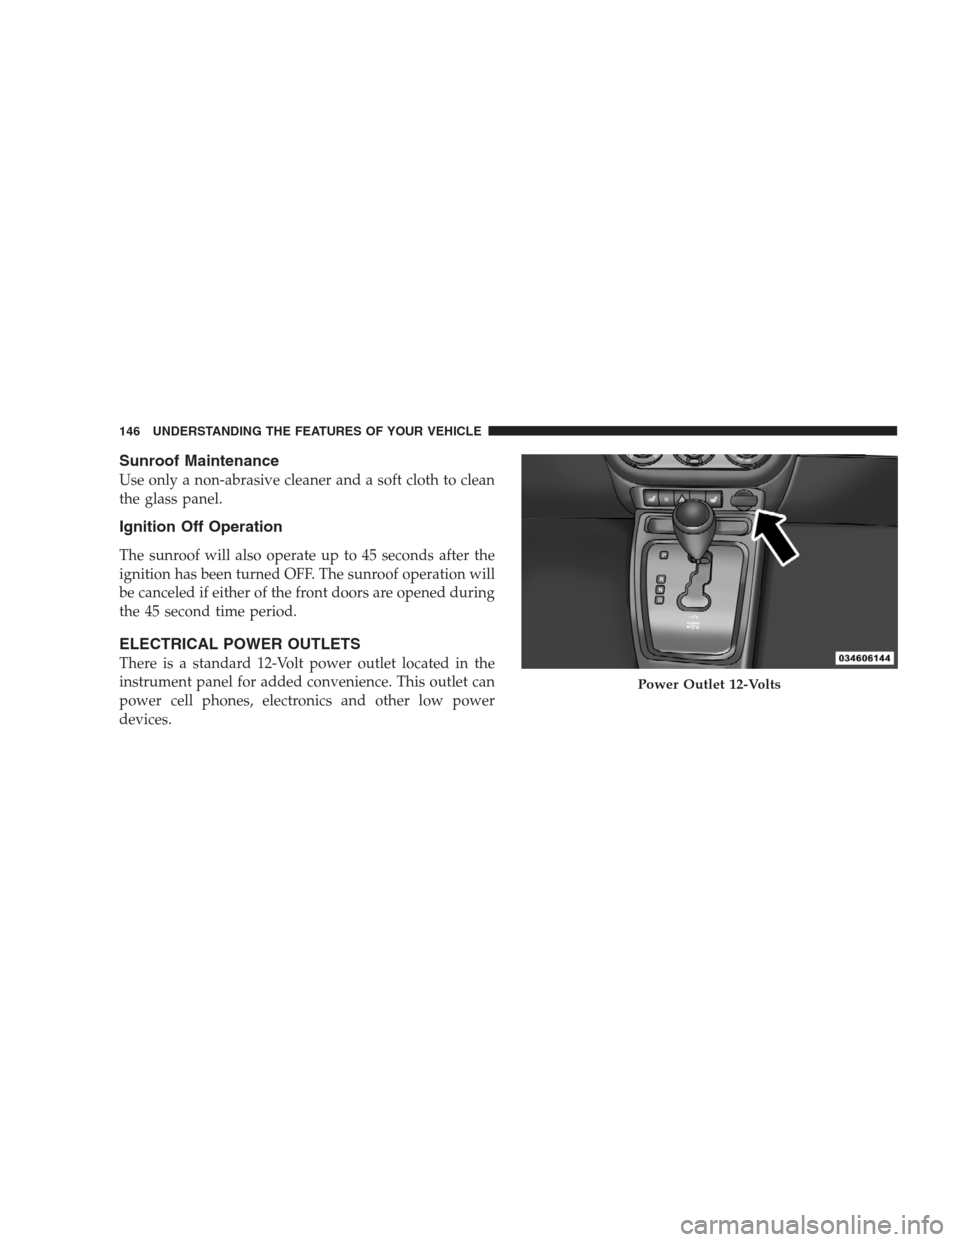
There is a standard 12-Volt power outlet located in the
instrument panel for added convenience. This outlet can
power cell phones, electronics and other low power
devices.
Power Outlet 12-Volts
146 UNDERSTANDING THE FEATURES OF YOUR VEHICLE
Page 160 of 457

activate the wiper. The rear wiper operates in an inter-
mittent mode only. Rotating the center of the switch all
the way forward will turn on the wash function. The
wash pump will continue to operate as long as the button
is pressed. Upon release, the wipers will cycle two times
before returning to the set position.If the rear wiper is operating when the ignition is turned
OFF, the wiper will automatically return to the “Park”
position if power accessory delay is active. Power acces-
sory delay can be cancelled by opening the door, if this
happens the rear wiper will stop at its current position
and will not go to “Park”.
Rear Window Defroster
The pushbutton is located on
the bottom right side of the
blower control knob. Press
this button to turn on the rear
window defroster. An amber
light shows that the defroster
is on.
The defroster will automatically turn off after approxi-
mately 10 minutes. For an additional five minutes of
Rear Wiper/Washer Control
158 UNDERSTANDING THE FEATURES OF YOUR VEHICLE
Page 169 of 457

INSTRUMENT CLUSTER DESCRIPTIONS
1. Fuel Gauge/Fuel Door Reminder
When the ignition switch is in the ON position,
the pointer will show the level of fuel remain-
ing in the fuel tank. The fuel pump symbol
points to the side of the vehicle where the fuel
door is located.
2. Charging System Light
This light shows the status of the electrical charg-
ing system. The light should come on when the
ignition switch is first turned ON and remain on briefly
as a bulb check. If the light stays on or comes on while
driving, turn off some of the vehicle’s non-essential
electrical devices or increase engine speed (if at idle). If
the charging system light remains on, it means that the
vehicle is experiencing a problem with the charging
system. Obtain SERVICE IMMEDIATELY. See an autho-
rized dealer.3. Electronic Throttle Control (ETC) Light
This light informs you of a problem with the
Electronic Throttle Control (ETC) system. If a
problem is detected, the light will come on
while the engine is running. Cycle the ignition
key when the vehicle has completely stopped and the
shift lever is placed in the PARK position. The light
should turn off. If the light remains lit with the engine
running your vehicle will usually be drivable, however,
see an authorized dealer for service as soon as possible. If
the light is flashing when the engine is running, imme-
diate service is required and you may experience reduced
performance, an elevated/rough idle or engine stall and
your vehicle may require towing. The light will come on
when the ignition is first turned ON and remain on
briefly as a bulb check. If the light does not come on
during starting, have the system checked by an autho-
rized dealer.
UNDERSTANDING YOUR INSTRUMENT PANEL 167
4
Page 170 of 457

4. Oil Pressure Warning Light
This light indicates low engine oil pressure. The
light should turn on momentarily when the engine
is started. If the light turns on while driving, stop the
vehicle and shut off the engine as soon as possible. A
chime will sound for four minutes when this light turns
on.
Do not operate the vehicle until the cause is corrected.
This light does not show how much oil is in the engine.
The engine oil level must be checked under the hood.
5. Low Fuel Light
When the fuel level reaches approximately 2.0 gal
(7.8 L) this light will turn on, and remain on until
fuel is added.
6. Speedometer
Indicates vehicle speed.7. Airbag Warning Light
This light turns on and remains on for seven
seconds as a bulb check, when the ignition
switch is first turned ON. If the light is not on
during starting, stays on, or turns on while
driving, have the system inspected by an authorized
dealer as soon as possible.
8. Turn Signal Indicators
The arrow will flash with the exterior turn signal
when the turn signal lever is operated.
9. High Beam Indicator
This indicator shows that the headlights are on
high beam. Push the multifunction lever forward
to switch the headlights to high beam, and pull toward
yourself (normal position) to return to low beam.
168 UNDERSTANDING YOUR INSTRUMENT PANEL