Page 176 of 506

Wind Buffeting
Wind buffeting can be described as the perception of
pressure on the ears or a helicopter-type sound in the
ears. Your vehicle may exhibit wind buffeting with the
windows down, or the sunroof (if equipped) in certain
open or partially open positions. This is a normal occur-
rence and can be minimized. If the buffeting occurs with
the rear windows open, then open the front and rear
windows together to minimize the buffeting. If the
buffeting occurs with the sunroof open, adjust the sun-
roof opening to minimize the buffeting or open any
window.
Sunroof Maintenance
Use only a non-abrasive cleaner and a soft cloth to clean
the glass panel.
Ignition Off Operation
For vehicles not equipped with the Electronic Vehicle
Information Center (EVIC), the power sunroof switchwill remain active for 45 seconds after the ignition switch
is turned to the LOCK position. Opening either front
door will cancel this feature.
For vehicles equipped with the EVIC, the power sunroof
switch will remain active for up to approximately ten
minutes after the ignition switch is turned to the LOCK
position. Opening either front door will cancel this
feature. The time is programmable. For details, refer to
“Delay Power Off to Accessories Until Exit,” under
“Personal Settings (Customer-Programmable Features)”
under “Electronic Vehicle Information Center (EVIC)” in
Section 4 of this manual.
SKY SLIDER�
FULL LENGTH OPEN ROOF
The Sky Slider� is a full-length, soft-top, power roof that
opens front to rear or rear to front.
174 UNDERSTANDING THE FEATURES OF YOUR VEHICLE
Page 178 of 506

WARNING!
Failure to follow these warnings can result in injuries
that are serious or fatal to you, your passengers, and
others around you:
•In an accident, there is a greater risk of being
thrown from a vehicle with the Sky Slider�open.
Always fasten your seat belt properly and make
sure all passengers are properly secured too.
•Before operating the Sky Slider,� make sure that
no moving parts of the Sky Slider� can injure a
person or animal.
•Never place any extremities (hands, feet, etc.) near
the Sky Slider� components or the roof area while
operating the Sky Slider.�
(Continued)
WARNING! (Continued)
•If potential danger exists while opening or closing
the Sky Slider�in Automatic Mode, press and
release the switch immediately to interrupt the
operation.
•If potential danger exists while opening or closing
the Sky Slider� in Operator Mode, release the
switch immediately to interrupt the operation.
•Do not allow small children to operate the Sky
Slider.�
•Never leave children in a vehicle, with the key in
the ignition switch. Occupants, particularly unat-
tended children, can become entrapped by the Sky
Slider� while operating the Sky Slider� switch.
Such entrapment may result in serious injury or
death.
176 UNDERSTANDING THE FEATURES OF YOUR VEHICLE
Page 179 of 506
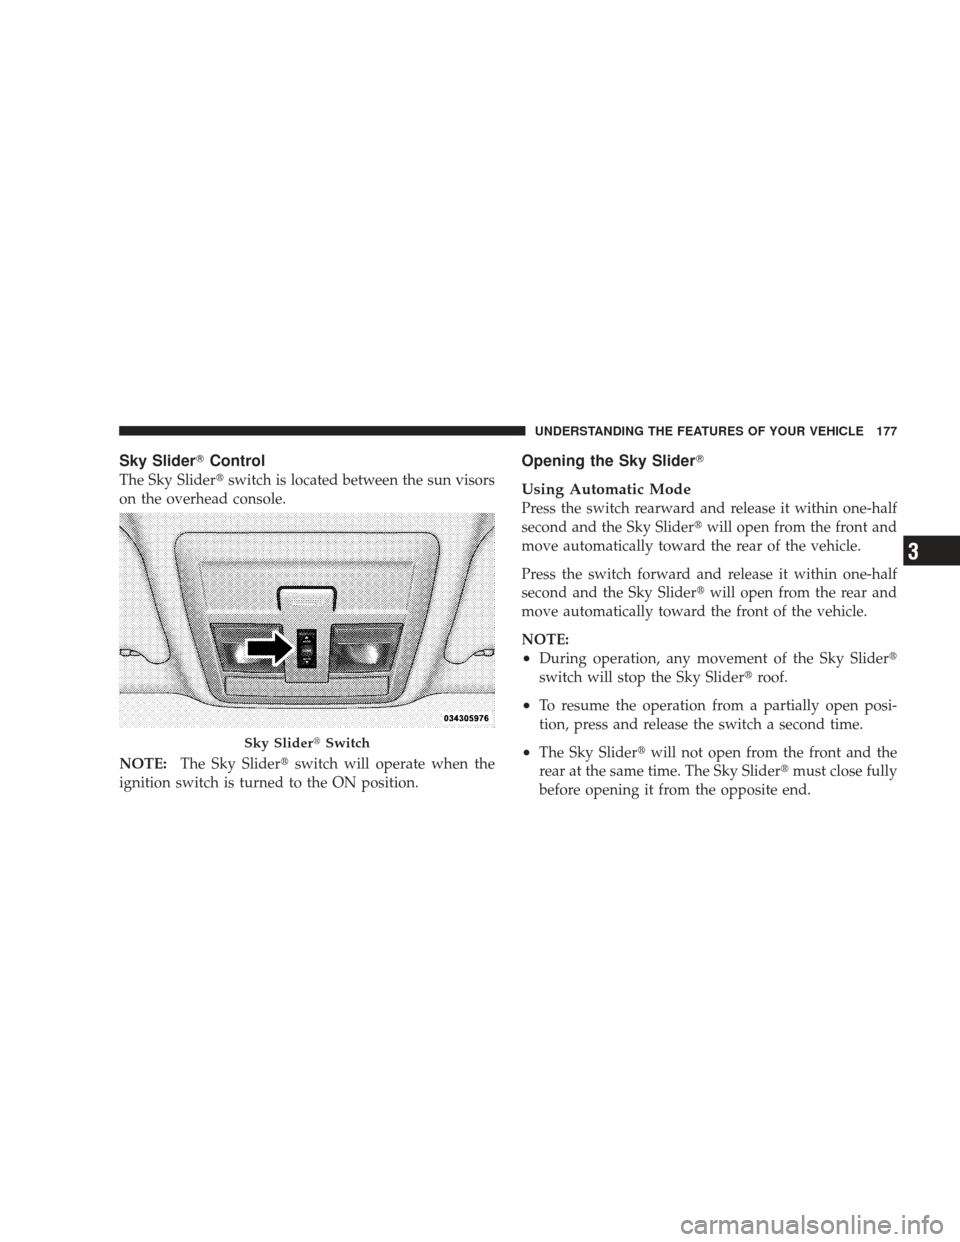
Sky Slider�Control
The Sky Slider� switch is located between the sun visors
on the overhead console.
NOTE: The Sky Slider� switch will operate when the
ignition switch is turned to the ON position.
Opening the Sky Slider�
Using Automatic Mode
Press the switch rearward and release it within one-half
second and the Sky Slider� will open from the front and
move automatically toward the rear of the vehicle.
Press the switch forward and release it within one-half
second and the Sky Slider� will open from the rear and
move automatically toward the front of the vehicle.
NOTE:
•During operation, any movement of the Sky Slider�
switch will stop the Sky Slider� roof.
•To resume the operation from a partially open posi-
tion, press and release the switch a second time.
•The Sky Slider�will not open from the front and the
rear at the same time. The Sky Slider� must close fully
before opening it from the opposite end.Sky Slider� Switch
UNDERSTANDING THE FEATURES OF YOUR VEHICLE 177
3
Page 182 of 506
ELECTRICAL POWER OUTLET
Your vehicle is equipped with a fused 12-Volt (DC) power
outlet. This power outlet is located on the instrument
panel, below the climate controls. It has power available
when the ignition switch is in the ON or ACC position.Insert the cigar lighter or accessory plug into the outlet
for use to ensure proper operation.
NOTE:
•To ensure proper operation a MOPAR�
knob and
element must be used.
•Do not exceed the maximum power of 160 Watts (13
Amps) at 12-Volts.
WARNING!
To avoid serious injury or death:
•Do not insert any objects into the receptacles.
•Do not touch with wet hands.
•Close the lid when not in use and while driving
the vehicle.
•If this outlet is mishandled, it may cause an
electric shock and failure.
Front Power Outlet
180 UNDERSTANDING THE FEATURES OF YOUR VEHICLE
Page 195 of 506

switch. Once released, the wiper will cycle three times,
return to the park position, and then resume normal
operation.
NOTE:The rear wiper will automatically return to the
park position if you turn OFF the ignition switch while it
is operating. The rear wiper will resume operation when
you turn the ignition switch to the ON position again.
CAUTION!
•Turn the rear wiper off when driving through an
automatic car wash. Damage to the rear wiper may
result if the rear wiper control is left in the on
position.
(Continued)
CAUTION! (Continued)
•In cold weather, always turn off the rear wiper
switch and allow the rear wiper to return to the
park position before turning off the engine. If the
rear wiper switch is left on and the rear wiper
freezes to the window, damage to the rear wiper
motor may occur when the vehicle is restarted.
•Always remove any buildup of snow that prevents
the rear wiper blade from returning to the park
position. If the rear wiper control is turned off and
the blade cannot return to the park position, dam-
age to the rear wiper motor may occur.
Rear Window Defroster
The rear window defroster button is located on the
climate control panel. Press this button to turn on
the rear window defroster and the heated outside mirrors
(if equipped). An indicator in the button will illuminate
when the rear window defroster is on. The rear window
UNDERSTANDING THE FEATURES OF YOUR VEHICLE 193
3
Page 204 of 506

INSTRUMENT CLUSTER DESCRIPTIONS
1. Fuel Gauge
The fuel gauge shows level of fuel in tank when ignition
switch is in the ON position.
2. Fuel Door ReminderThis symbol indicates the side of the vehicle
where the fuel cap is located.
3. Low Fuel Light This indicator lights when the fuel level drops to
approximately one-eighth tank.
4. Tire Pressure Monitoring Telltale Light Each tire, including the spare (if provided),
should be checked monthly, when cold and
inflated to the inflation pressure recommended
by the vehicle manufacturer on the vehicle
placard or tire inflation pressure label. (If your vehicle has tires of a different size than the size indicated on the
vehicle placard or tire inflation pressure label, you should
determine the proper tire inflation pressure for those
tires.)
As an added safety feature, your vehicle has been
equipped with a Tire Pressure Monitoring System
(TPMS) that illuminates a low tire pressure telltale when
one or more of your tires is significantly under-inflated.
Accordingly, when the low tire pressure telltale illumi-
nates, you should stop and check your tires as soon as
possible, and inflate them to the proper pressure. Driving
on a significantly under-inflated tire causes the tire to
overheat and can lead to tire failure. Under-inflation also
reduces fuel efficiency and tire tread life, and may affect
the vehicle’s handling and stopping ability.
Please note that the TPMS is not a substitute for proper
tire maintenance, and it is the driver ’s responsibility to
202 UNDERSTANDING YOUR INSTRUMENT PANEL
Page 206 of 506
 LightThis light informs you of a problem with the
Electronic Throttle Control (ETC) system. If a
problem is detected, the light will come on
while the engine is ru")
5. Electronic Throttle Control (ETC) LightThis light informs you of a problem with the
Electronic Throttle Control (ETC) system. If a
problem is detected, the light will come on
while the engine is running. Cycle the ignition
key when the vehicle has completely stopped and the
shift lever is placed in the PARK position. The light
should turn off. If the light remains lit with the engine
running, your vehicle will usually be drivable; however,
see an authorized dealer for service as soon as possible. If
the light is flashing when the engine is running, imme-
diate service is required and you may experience reduced
performance, an elevated/rough idle or engine stall and
your vehicle may require towing. The light will come on
when the ignition is first turned ON and remain on
briefly as a bulb check. If the light does not come on
during starting, have the system checked by an autho-
rized dealer. 6. Malfunction Indicator Light (MIL)
The Malfunction Indicator Light (MIL) is part of
an onboard diagnostic system, called OBD, that
monitors engine and automatic transmission con-
trol systems. The light will illuminate when the key is in
the ON position, before engine start. If the bulb does not
come on when turning the key from OFF to ON, have the
condition checked promptly.
Certain conditions such as a loose or missing gas cap,
poor fuel quality, etc., may illuminate the MIL after
engine start. The vehicle should be serviced if the light
stays on through several of your typical driving cycles. In
most situations, the vehicle will drive normally and will
not require towing.
If the MIL flashes when the engine is running, serious
conditions may exist that could lead to immediate loss of
power or severe catalytic converter damage. The vehicle
should be serviced as soon as possible if this occurs.
204 UNDERSTANDING YOUR INSTRUMENT PANEL
Page 207 of 506

7. High Beam IndicatorThis indicator shows that the high beam head-
lights are on. Pull the multifunction control lever
on the left side of the steering column toward you to
switch to low beam.
8. Front Fog Light Indicator — If Equipped This indicator will illuminate when the fog lights
are on.
9. Speedometer
Shows the vehicle speed.
10. Turn Signal Indicators The arrow will flash with the exterior turn signal
when the turn signal lever is operated.
If the vehicle electronics sense that the vehicle has
traveled about 1 mile (1.6 km) with the turn signals on, a continuous chime will sound to alert you to turn the
signals off. If either indicator flashes at a rapid rate, check
for a defective outside light bulb.
11. Electronic Stability Program (ESP) Indicator Light
/ Traction Control System (TCS) Indicator Light
If this indicator light flashes during accelera-
tion, apply as little throttle as possible. While
driving, ease up on the accelerator. Adapt your
speed and driving to the prevailing road con-
ditions, and do not switch off the Electronic Stability
Program (ESP), or Traction Control System (TCS).
12. Charging System Light This light shows the status of the electrical charg-
ing system. The light should come on when the
ignition switch is first turned ON and remain on briefly
as a bulb check. If the light stays on or comes on while
driving, turn off some of the vehicle’s non-essential
electrical devices or increase engine speed (if at idle). If
UNDERSTANDING YOUR INSTRUMENT PANEL 205
4
 power
outlet. This power outlet is located on the instrument
panel, below the climate controls. It has power available
when t")