2009 JAGUAR XF steering
[x] Cancel search: steeringPage 72 of 391

Steering wheel
72
Full command list
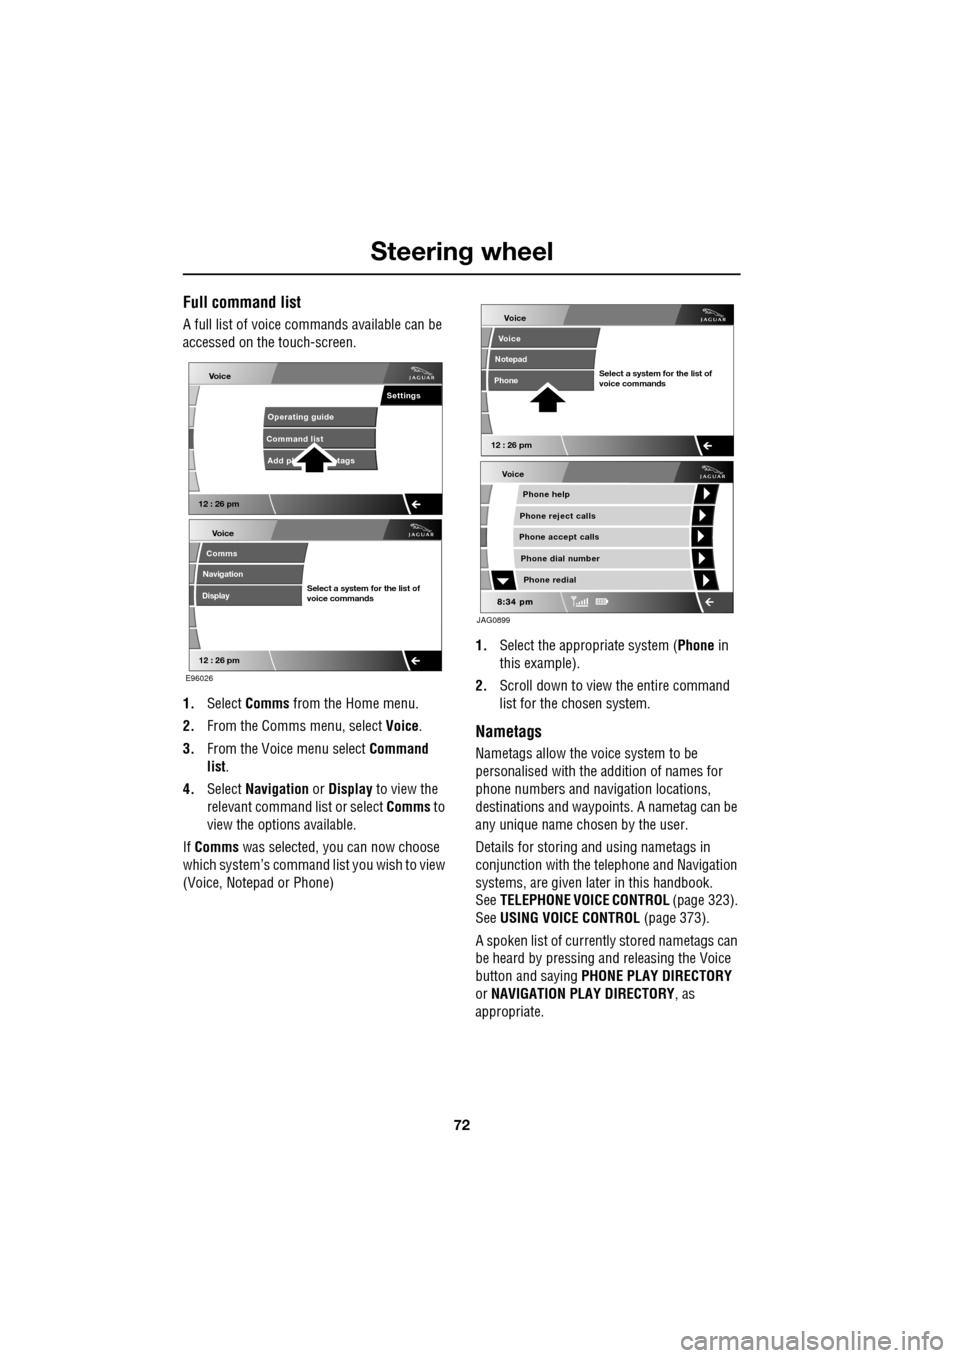
A full list of voice commands available can be
accessed on the touch-screen.
1. Select Comms from the Home menu.
2. From the Comms menu, select Voice.
3. From the Voice menu select Command
list.
4. Select Navigation or Display to view the
relevant command list or select Comms to
view the options available.
If Comms was selected, you can now choose
which system’s command list you wish to view
(Voice, Notepad or Phone) 1.
Select the appropriate system ( Phone in
this example).
2. Scroll down to view the entire command
list for the chosen system.
Nametags
Nametags allow the voice system to be
personalised with the addition of names for
phone numbers and navigation locations,
destinations and waypoi nts. A nametag can be
any unique name chosen by the user.
Details for storing and using nametags in
conjunction with the telephone and Navigation
systems, are given later in this handbook.
See TELEPHONE VOICE CONTROL (page 323).
See USING VOICE CONTROL (page 373).
A spoken list of current ly stored nametags can
be heard by pressing an d releasing the Voice
button and saying PHONE PLAY DIRECTORY
or NAVIGATION PLAY DIRECTORY , as
appropriate.
Voice
12 : 26 pm
Add ph tags
Command list Operating guide
Settings
E96026
Voice
12 : 26 pm
Select a system for the list of
voice commands
Comms
Navigation
Display
Voice
Phone help
Phone reject calls
Phone accept calls
Phone redial
Phone dial number
JAG0899
Voice
12 : 26 pm
Select a system for the list of
voice commands
Voice
Notepad
Phone
Page 73 of 391

73
Steering wheel
Notepad
The notepad facility enables the user to record
a note, up to a maximum of 30 seconds
duration, which can be subsequently recalled.
Note: To hear information on notepad
commands, press the Voice button, wait for the
tone to sound and then say NOTEPAD HELP.
Recording a note
1.Press and release the Voice button, wait
for the tone to sound, then say RECORD
NOTE .
2. Say the words of the note to be recorded,
then press and hold the Voice button to
end and save the note.
Note: The maximum length of a note is 30
seconds, after wh ich time the recording of the
note will be ended automatically.
Playing a note
Press and release the Voice button, wait for the
tone to sound, then say PLAY NOTEPAD. If
multiple notes are stored on the system, press
and release the Voice button during playback
and say NEXT, to skip to the next note.
Deleting notes
To delete an individual note, press and release
the Voice button during playback of the note to
be deleted and say DELETE.
To delete all notes stored on the system, press
and release the Voice button and say CLEAR
NOTEPAD .
Voice volume adjustment
The volume level for voice recognition can be
adjusted independently, either by using the
steering wheel controls or using the
touch-screen:
•Press the voice button on the steering
wheel, to initiate a voice session. Use the
volume control thumbwheel on the
steering wheel to adjust the volume, as
required.
• Select Vehicle from the touch-screen
Home menu, then select Veh. settings.
Find the correct entry from the menu of
infotainment volume settings and adjust as
required.
Voice commands
This is a list and a de scription of the basic
Voice commands used to operate the system.
A list and description of telephone and
Navigation system commands, is detailed later
in this handbook. See TELEPHONE VOICE
CONTROL (page 323). See NAVIGATION
SYSTEM VOICE COMMANDS (page 374).
Command Description
VOICE HELP Plays information on
operating the Voice
system.
VOICE TUTORIAL Initiates a four-part tutorial on use of the
Voice system.
DISPLAY HELP Plays information on touch-screen display
voice commands.
DISPLAY SHOW
PHONE The Phone menu is
displayed on the
touch-screen.
Page 74 of 391

Steering wheel
74
CRUISE CONTROL
1. SET - Rotate and releas e to engage cruise
control (at the vehicle's current speed).
With cruise control operating, rotate up or
down to increase or decrease the speed in
2 km/h (1 mph) steps.
2. CANCEL - Press to cancel cruise control.
The previously programmed set speed will
be retained and can be reselected by
pressing RESUME.
3. RESUME - Press to resume the previously
programmed set speed (e.g. after cruise
control has been cancelled).
4. GAP (ACC only) - Rotate up or down to
increase or decrease the time gap to the
vehicle ahead. The gap can be set to one of
four pre-defined inte rvals. The current
setting will be displayed in the message
centre.
For more information about cruise control:
See USING CRUISE CONTROL (page 156).
For more information about adaptive cruise
control (ACC): See USING ACC (page 159).
DISPLAY SHOW
NAVIGATION
The Navigation main
menu is displayed on the
touch-screen (the
navigation caution must
be accepted before the
menu is displayed).
DISPLAY ON Turns the touch-screen on.
DISPLAY OFF Turns the touch-screen off.
NOTEPAD HELP Play s information on
notepad commands.
RECORD NOTE Allows recording of a note, up to 30 seconds
long.
PLAY NOTEPAD Plays all currently stored notes.
CLEAR NOTEPAD Deletes all notes currently
stored in notepad.
Command Description
E9707923
41
Page 75 of 391

75
Lighting
LIGHTING CONTROL
Note: If the ignition system is switched off and
the lamps are left on, the message centre will
display LIGHTS ON.
The exterior lamps are controlled by the
left-hand column stalk switch.
The rotary collar on the stalk has three
positions for turning the exterior lamps on or
off and positions for auto lamps and exit delay.
Off
All exterior lamps off (except vehicles provided
with daylight running lamps).
Side lamps
Switches on the side lamps, tail, number plate
and any other marker lamps required by local
legislation. The instrument panel will also be lit.
Headlamps
Select this positi on to switch on the
headlamps. Headlamp flash:
Pull the switch towards the
steering wheel and release to flash the high
beam on and off. The high beam will remain on
for as long as the switch is held.
High beam: With the headlamps on, push the
switch away from the steering wheel to switch
to high beam.
The blue warning indicator on the instrument
panel will illuminate.
To turn high beam off and return to low beam,
pull the column switch towards the steering
wheel.
Note: If the rotary control switch is moved to
the OFF position, with hi gh beam still activated,
both low and high beam will be extinguished.
Both low and high beam will illuminate when
the headlamps are turned on again.
E91137
E91138
E91139
E91140
E91141
Page 81 of 391

81
Lighting
Note: For lamps controlled by proximity
sensors, the wearing of gloves may interfere
with operation. If you are wearing gloves, it
may be necessary to touch the proximity
switch to operate the lamps.
Ambience lighting
Ambience lighting. Automatically illuminates
when the headlamps are on. Ambience lighting
creates a blue glow ar ound the centre console
and front door armrests.
Luggage compartment lamp
Automatically illuminates when the luggage
compartment is opened.
APPROACH LAMPS
This feature is activated by pressing
the headlamp icon button on the
Jaguar Smart Key. See USING THE
REMOTE CONTROL (page 17). The headlamps
will remain on for 25 seconds or until the
button is pressed again, or until the engine
START/STOP button is pressed.
REMOVING A HEADLAMP
1. Open the bonnet. See OPENING AND
CLOSING THE BONNET (page 195).
2. Remove the two bolts from the top of the
headlamp unit.
3. Remove the retaining bolt located in the
wheel arch.
Note: To improve access to the wheel arch,
turn the steering wheel to full lock, in the
direction of the affected headlamp.
4. Pull the headlamp away slightly from the
body of the vehicle.CAUTION
It is recommended that the following
procedure should only be attempted by
a qualified technician. If in doubt, consult your
Dealer/Authorised Repairer.
Do not place the removed lamp unit face
down on hard or abrasive surfaces.
Doing so may scratch the surface of the lens.
3
2
2
E94719
2
4
Page 88 of 391

Wipers and washers
88
WINDSCREEN WIPERS
Note: If the wiper blades become stuck or
jammed, an electronic cut-out may temporarily
halt wiper operation. If this happens, switch off
the wipers and the ignition. Clear any
obstructions and free th e wiper blades, before
attempting to switch on the ignition.
Wiper operation
1. Windscreen wipers off and parked.
2. Rain sensor activated wipe.
3. Low speed wipe.
4. High speed wipe.
5. Rain sensor sensitivity control.
Rain sensor variable delay
1.Maximum sensitivity.
2. Rotate control to adjust sensitivity.
3. Minimum sensitivity.
With the rain sensor acti vated, the sensitivity of
the rain sensor can be adjusted. Rotate the
control upwards to reduce the sensitivity of the
rain sensor.
Single wipe
Pull the stalk towards the steering wheel for a
single wipe. Holding the sw itch in this position,
operates the wipers at normal speed until the
switch is released.
CAUTIONS
Do not operate the windscreen wipers
on a dry screen. The drag on the wiper
mechanism may cause damage.
In freezing or very hot conditions,
ensure that the wipers have not stuck to
the windscreen before operating. The drag on
the wiper mechanism may cause damage.
Remove any snow, ice or frost from the
windscreen, around the wiper arms and
blades, and the screen scuttle, before
operating the wipers. S now and ice can cause
damage to the wiper mechanism, if left
uncleared.
JAG1620
5
1
2
3
4
1
2
3
JAG1622
JAG1621
Page 91 of 391

91
Wipers and washers
CHANGING THE WIPER BLADES
Service position
The windscreen wiper service position allows
the wipers to be parked in a more accessible
position. This makes it easier to change wiper
blades.
Setting the service position
1.With the ignition switched off, pull the
wiper stalk towards the steering wheel to
the single wipe position. Hold the stalk in
this position.
2. Make sure the brake pedal is not applied
and, while still holding the wiper stalk in
the single wipe positi on, press the ignition
START/STOP button to switch on the
ignition.
The wipers will move to the vertical (service)
position. Release the wiper stalk.
To return the wiper blades to the operating
position, turn the ignition off.
CAUTIONS
When checking or changing the wiper
blades, they can be set to the service
position or parked normally.
E94746
JAG1625
1
2
Page 109 of 391

109
Information displays
TOUCH-SCREEN
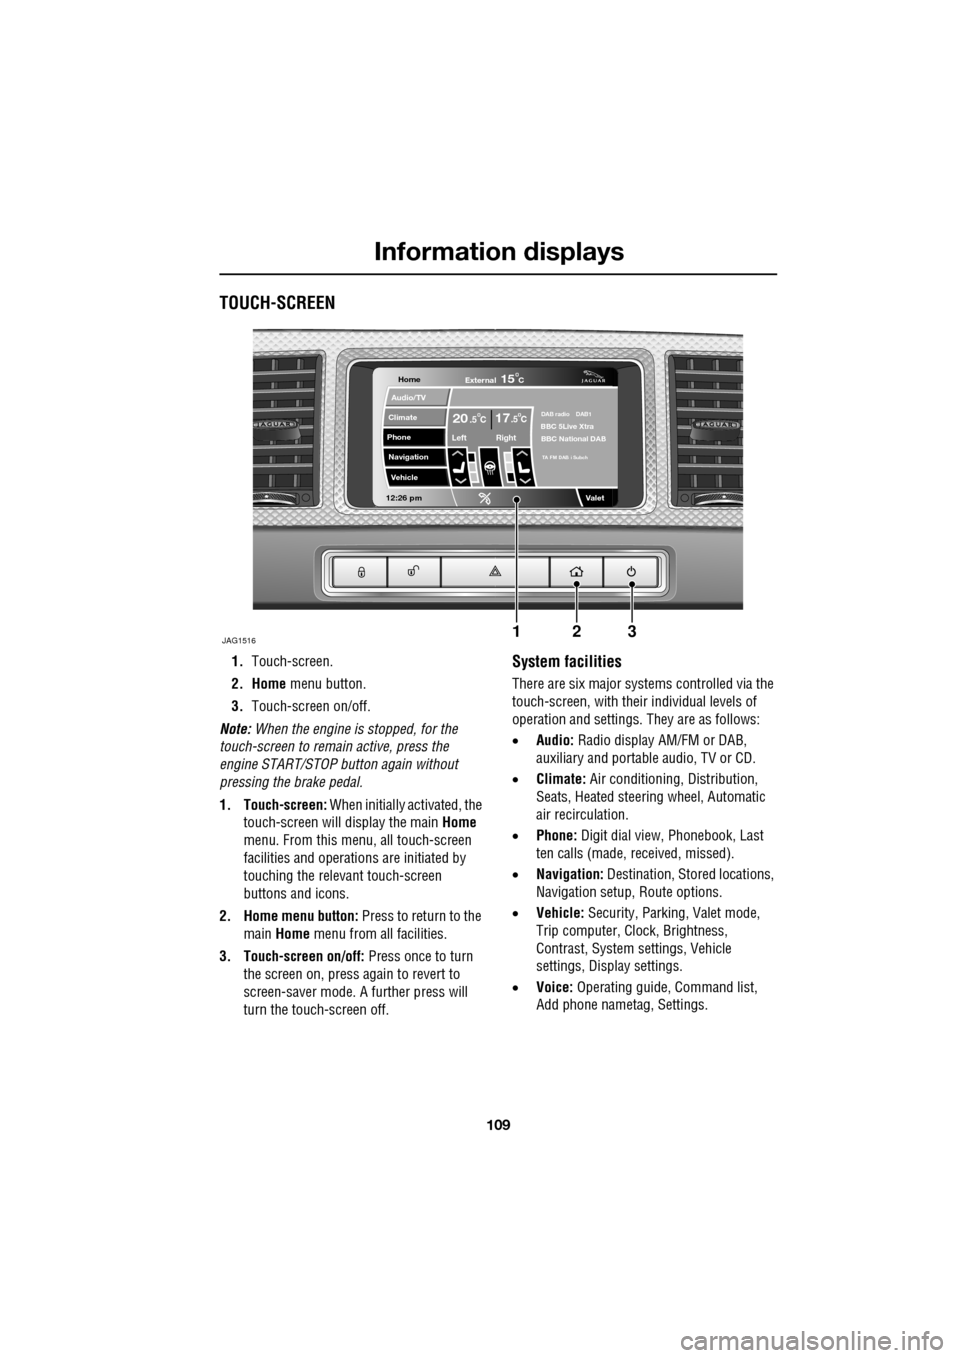
1.Touch-screen.
2. Home menu button.
3. Touch-screen on/off.
Note: When the engine is stopped, for the
touch-screen to remain active, press the
engine START/STOP button again without
pressing the brake pedal.
1. Touch-screen: When initially activated, the
touch-screen will display the main Home
menu. From this menu, all touch-screen
facilities and operati ons are initiated by
touching the relevant touch-screen
buttons and icons.
2. Home menu button: Press to return to the main Home menu from all facilities.
3. Touch-screen on/off: Press once to turn
the screen on, press again to revert to
screen-saver mode. A further press will
turn the touch-screen off.System facilities
There are six major systems controlled via the
touch-screen, with their individual levels of
operation and settings. They are as follows:
• Audio: Radio display AM/FM or DAB,
auxiliary and portable audio, TV or CD.
• Climate: Air conditioning, Distribution,
Seats, Heated steering wheel, Automatic
air recirculation.
• Phone: Digit dial view, Phonebook, Last
ten calls (made, received, missed).
• Navigation: Destination, St ored locations,
Navigation setup, Route options.
• Vehicle: Security, Parking, Valet mode,
Trip computer, Clock, Brightness,
Contrast, System settings, Vehicle
settings, Displa y settings.
• Voice: Operating guide, Command list,
Add phone nametag, Settings.
Home
Audio/TV
Climate
Phone
Navigation
Vehicle
Valet12:26 pm
JAG1516
External15C
Left Right
20 17CC.5 .5DAB radio DAB1BBC 5Live Xtra
BBC National DAB
TA FM DAB i Subch
123