2009 JAGUAR XF steering
[x] Cancel search: steeringPage 246 of 391

Fuses
246
F28 - - Not used.
F29 - - Not used.
F30 - - Not used.
F31 - - Not used.
F32 - - Not used.
F33 - - Not used.
F34 - - Not used.
F35 5A Tan Air conditioning compressor clutch.
F36 15A Blue Engine management system (diesel only).
20A Blue Engine management sy stem (V8 petrol only).
F37 15A Blue Ignition s ystem (petrol only).
F38 5A Tan Power steering.
F39 5A Tan Headlamp levelling system.
F40 15A Blue Water pump (Superc harged vehicles only).
F41 5A Tan Diesel - Emissions system.
10A Red Petrol - Engine management system.
F42 30A Green Diesel - Engi ne management system. Ignition supply.
10A Red Petrol - Engine management system. Ignition supply. Radiator
fan.
F43 5A Tan Diesel - Fuel system. 10A Red Petrol - Engine manageme nt system. Emission control.
F44 5A Tan Engine management system (diesel only)
15A Blue Fuel injectors (petrol only).
F45 100A Blue Radiator fan (diesel and V8 petrol only).
Fuse No Rating
(amps) Fuse
Colour Circuit
Page 247 of 391

247
Fuses
Passenger compartment fuse box
Fuse No Rating (amps) Fuse
Colour Circuit
F1 - - Not used.
F2 - - Not used.
F3 20A Blue Driver's seat adjustment.
F4 20A Blue Driver's seat adjustment.
F5 - - Not used.
F6 - - Not used.
F7 - - Not used.
F8 20A Blue Front passenger's seat adjustment.
F9 20A Blue Front passenger's seat adjustment.
F10 20A Blue Left-hand rear door controls.
F11 20A Blue Right-hand rear door controls.
F12 - - Not used.
F13 10A Red Steering column adjust.
F14 - - Not used.
F15 - - Not used.
F16 5A Tan Sunblind.
F17 - - Not used.
F18 - - Not used.
F19 - - Not used.
F20 5A Tan Remote control receiver.
F21 5A Tan Foot brake.
F22 5A Tan Electric parking brake.
F23 5A Tan Driver's seat. Audio system. Auto headlamps. Upper centre console switches.
F24 10A Red Front passen ger seat. Electric windows. Mirror adjustment.
F25 20A Yellow Driver's heated/climate seat
F26 15A Blue Trailer power connector. Road pricing system.
F27 20A Yellow Front passenger's heated/climate seat.
F28 15A Blue Auxiliary power socket.
F29 20A Yellow Keyless entry system.
F30 10A Red Air conditioning.
Page 251 of 391

251
Status after a collision
DRIVING AFTER A COLLISION
Before starting or driving
If the vehicle has been involved in an accident
it should be checked thoroughly before
attempting to start the engine or drive the
vehicle.
Check for:-
• Fuel leaks.
• Fluid leaks.
• Battery damage.
• Damage to wiring.
• Damage to lights.
• Damage to steering, suspension, wheels
or tyres.
• Sharp or protruding bodywork.
• Operation of doors and locks.
• Condition and operation of seat belts and
SRS components.
• Activation of the pe destrian protection
system.
• Condition of chil d seats and their
mounting/attach ment points.
Note: This list is not exhaustive.
Resetting the fuel cut-off
The fuel system cut-off forms part of the Safety
and Restraint System (SRS) fitted to your
vehicle. Following an impact, and depending on
the severity, the fuel pump may be switched
off.
1.Switch the ignition off, and wait for 10
seconds.
2. Without pressing the brake pedal, press
the engine START/STOP button, to switch
the electrical circuits on. Wait for 30
seconds.
3. Check the vehicle thoroughly for fuel leaks.
If a leak is detected switch the ignition off
immediately.
•The vehicle must not be started if a leak
is present. Seek qualified advice, and
have the vehicle recovered.
4. If no leaks are detected, start the engine.
WARNING
If the vehicle is involved in a collision
it should be checked by a Dealer/
Authorised repairer, or suitably
qualified personnel, before starting or driving.
WARNING
The fuel cut-off should never be reset
if you can smell fuel, or a leak can be
seen. Doing so can lead to a fire
which may cause personal injury or death.
Page 252 of 391

Status after a collision
252
When driving
When driving a vehicle which has been
involved in a collision use caution and pay extra
attention to the operation of the vehicle. If any
changes in vehicle operation after the collision
are noted when compared to it's operation
before the collision, do not continue to drive
the vehicle. Stop the vehi cle as soon as it is
safe to do so, and have the vehicle recovered.
Pay particular attent ion to changes in:-
• Steering.
• Braking.
• Unusual noises.
• Warning lights or messages displayed.
• Problems with electrical systems.
INSPECTING SAFETY SYSTEM
COMPONENTS
Following a collision the seat belt and
Supplementary Restrain t System components
should be inspected for damage and/or
deformity. The inspection and any subsequent
repair work should only be carried out by a
Dealer/Authorised Repair er, or other suitably
qualified personnel.
Components which require inspection
include:-
• Seat belt webbing and mechanisms.
• Seat belt pre-tensioners.
• Airbag covers and modules.
• Seat frames a nd mounting points.
• Child seats.
• Child seat anchor points.
• Pedestrian prot ection system.
Note: This list is not exhaustive.
In addition to the physical items checked, the
electronic control system and its associated
wiring should also be checked thoroughly. This
process will include a diagnostic check which
can only be carried out by a Dealer/Authorised
repairer or suitably qualified and equipped
persons.
WARNING
It is not recommended that the
vehicle be driven or used until all of
the occupant protection systems
have been checked.
Page 256 of 391

Vehicle recovery
256
TOWING THE VEHICLE ON FOUR
WHEELS
Note: The recommended recovery method is
to raise all four wheels.
Towing procedure
1. The vehicle should be parked on firm level
ground, with the parking brake on, and the
gear selector in P (Park).
2. Secure the towing attachment from the
recovery vehicle to the front towing eye.
See TOWING POINTS (page 253).
3. Dock the Jaguar Smart Key and switch on
the ignition. See GENERAL INFORMATION
(page 132). 4.
Apply the foot brake and release the
parking brake.
5. With the foot brake st ill applied, activate
the Emergency Park Release (EPR).
See TRANSPORTING THE VEHICLE
(page 254).
6. The vehicle can now be towed a maximum
of 0.8 km (0.5 miles) at a maximum speed
of 48 kmh (30 mph).
7. Upon arrival at the destination, ensure
wherever possible that the vehicle is
parked on firm level ground.
8. Lower the Emergency Park Release (EPR)
lever, to cancel EP R and to re-engage P
(Park).
9. Apply the parking brake.
10. Switch off the ignition and remove the
Jaguar Smart Key.
11. Remove the towing attachment from the
towing eye.
WARNINGS
Ensure that the remote control
remains docked whilst the vehicle is
being towed. Removing the remote
control will engage the steering lock, which
will prevent the vehicle from steering
correctly.
If the engine cannot be run whilst the
vehicle is being towed, there will be
no power assistance for the steering
or brakes. This will result in greater effort
being required to steer or slow the vehicle, and
greatly increased stopping distances.
CAUTIONS
The vehicle should only be towed in a
forward direction with all four wheels on
the ground.
The vehicle should only be towed for a
maximum of 0.8 km (0.5 miles), at a
maximum speed of 48 km/h (30 mph). Towing
for a greater distance or at a higher speed, may
result in serious damage to the transmission.
CAUTION
Leaving the ignition switched on for
extended periods will cause the battery
to drain.
WARNING
Use extreme caution when detaching
towing equipment. Vehicle movement
is possible which can result in serious
injuries.
Page 270 of 391

Audio unit overview
270
Steering wheel controls
1.Rotate up or down to increase or decrease
volume.
2. Rotate up or down and release repeatedly
to scroll through preset radio stations or
CD tracks. Rotate up and hold for two
seconds to select next strong radio station
or next loaded CD (if a six-disc system is
fitted).
3. SOURCE : Press repeatedly to scroll
through all audio sources.
4. Press to mute audio unit. This button is
also used to dial, answer or end calls in
phone mode and to st art a Voice session.
Sound system overview
There are three versions of the sound system:
• The standard Jaguar sound system
comprises a 140W sy stem with AM/FM
radio featuring EON, RDS, PTY, TA and
in-dash CD player with automatic volume
control, MP3 compatibility (six-disc
system only) and 8 speakers
• The Jaguar 320W Premium Sound System
system also includes a remote amplifier,
upgraded speakers plus an additional
subwoofer mounted in the rear of the
vehicle.
• The Bowers & Wilkins 440W Surround
Sound System has been developed in
conjunction with Bowe rs & Wilkins™ and
incorporates upgraded kevlar speakers,
additional mid range sp eakers mounted in
the front doors, an additional centre
speaker mounted in the fascia and
additional surround sound speakers to
support Dolby Prologic II Surround
Sound™.CAUTIONS
Care must be taken to avoid spilling or
splashing drinks onto the audio unit
controls, speakers or touch-screen. In the
event of such an occurrence, contact your
Dealer/Authorised Repairer.
The audio unit may be damaged if
unsuitable items, such as coins or credit
cards, are inserted into the CD load slot.
E94043
12
43
Page 271 of 391

271
Audio unit operation
ON/OFF CONTROL
The audio system can be used with the vehicle
ignition on or off, but will switch off
automatically when the ignition is switched off.
To operate the audio system when the ignition
has been switched off, press the On/off volume
control.
The audio system can be switched on in one of
two ways:
With the vehicle ignition on or off, press the
on/off control on the console, or;
With the vehicle ignition on and the
touch-screen active, select Audio/TV from the
Home menu. The touch-screen displays the current audio
settings. The informati
on displayed will depend
on the mode selected , e.g. AM/FM radio.
VOLUME CONTROL
The volume of the audio output can be adjusted
in one of two ways:
Rotate the audio on/off and volume control on
the audio console, or;
Rotate the volume control on the steering
wheel.
E94044
Home
Audio/TV
Climate
Phone
Navigation
VehicleExternal
ft Right
20 17CC
15C
.5 .5AUDIO OFF
Valet12 : 26 pmE94045
WARNING
Sustained exposure to high sound
levels can damage your hearing.
Home
Audio/TV
Climate
Phone
Navigation
VehicleExternal
Left Right
20 17CC
15C
.5 .5
DAB radio DAB1
BBC 5Live Xtra
BBC National DAB
TA FM DAB i Subch. PL II
Valet12 : 26 pmE94046
E94085
E94086
Page 275 of 391

275
Audio unit operation
STATION PRESET BUTTONS
Tuning stations
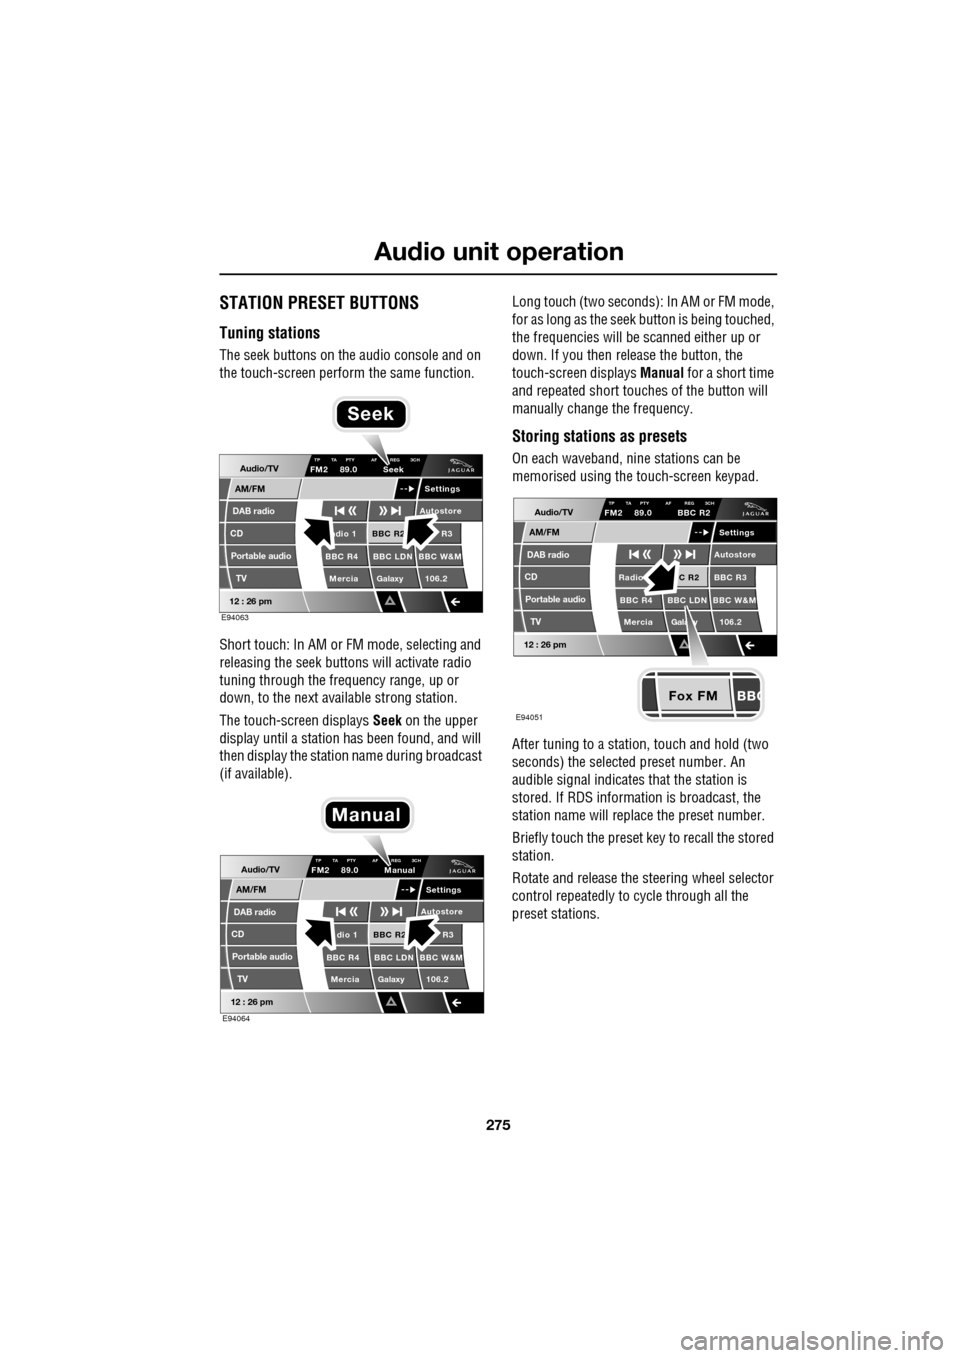
The seek buttons on the audio console and on
the touch-screen perform the same function.
Short touch: In AM or FM mode, selecting and
releasing the seek buttons will activate radio
tuning through the frequency range, up or
down, to the next available strong station.
The touch-screen displays Seek on the upper
display until a station has been found, and will
then display the station name during broadcast
(if available). Long touch (two seconds): In AM or FM mode,
for as long as the seek
button is being touched,
the frequencies will be scanned either up or
down. If you then release the button, the
touch-screen displays Manual for a short time
and repeated short touc hes of the button will
manually change the frequency.
Storing stations as presets
On each waveband, ni ne stations can be
memorised using the touch-screen keypad.
After tuning to a stati on, touch and hold (two
seconds) the selected preset number. An
audible signal indicates that the station is
stored. If RDS informat ion is broadcast, the
station name will replace the preset number.
Briefly touch the preset key to recall the stored
station.
Rotate and release the steering wheel selector
control repeatedly to cycle through all the
preset stations.Audio/TV
DAB radio
CD
AM/FM
12 : 26 pm
BBC R2 R3
BBC R4 BBC LDN BBC W&M Mercia Galaxy 106.2adio 1
Settings
Autostore
TP TA PTY AF REG 3CHFM2 89.0 Seek
Portable audio TV
E94063
Seek
Audio/TV
DAB radio
CD
AM/FM
12 : 26 pm
BBC R2 R3
BBC R4 BBC LDN BBC W&M Mercia Galaxy 106.2dio 1
Settings
Autostore
TP TA PTY AF REG 3CHFM2 89.0 Manual
Portable audio TV
E94064
Manual
Fox FM
Audio/TV
DAB radio
CD
AM/FM
12 : 26 pm
C R2 BBC R3
BBC R4 BBC LDN BBC W&M
Mercia Gala y 106.2Radio
Settings
Autostore
TP TA PTY AF REG 3CHFM2 89.0 BBC R2
Portable audio TV
E94051