2009 JAGUAR XF seat adjustment
[x] Cancel search: seat adjustmentPage 3 of 391

Contents
3
Introduction
SYMBOLS GLOSSARY ...................................... 9
LABEL LOCATIONS ........................................... 9
HEALTH AND SAFETY ..................................... 10
DATA RECORDING.......................................... 11
DISABILITY MODIFICATIONS ......................... 11
FASCIA AND CONTROLS ................................ 12
PARTS AND ACCESSORIES ............................ 14
Keys and remote controls
PRINCIPLE OF OPERATION ............................ 16
GENERAL INFORMATION ON RADIO
FREQUENCIES ................................................ 16
USING THE REMOTE CONTROL ..................... 17
UNLOCKING AND DISARMING THE VEHICLE. 18
LOCKING AND ARMING THE VEHICLE ........... 19
DOCKING/UNDOCKING THE JAGUAR SMART
KEY ................................................................. 20
PROGRAMMING THE REMOTE CONTROL...... 21
CHANGING THE REMOTE CONTROL BATTERY ...
24
EMERGENCY KEY BLADE ............................... 25
Locks
LOCKING AND UNLOCKING............................ 26
USING THE EMERGENCY KEY BLADE ............ 28
VALET MODE .................................................. 30
JAGUAR SMART KEY SYSTEM TRANSMITTERS
32
KEYLESS ENTRY ............................................ 33
GLOBAL OPENING AND CLOSING .................. 35
Alarm
ARMING THE ALARM ..................................... 37
DISARMING THE ALARM ............................... 38
SECURITY SENSORS ...................................... 39
Seats
SITTING IN THE CORRECT POSITION ............ 41
ELECTRIC SEATS ............................................ 42
HEAD RESTRAINTS ........................................ 44
REAR SEATS ................................................... 45
HEATED SEATS............................................... 47
CLIMATE SEATS ............................................. 48
Seat belts
PRINCIPLE OF OPERATION ............................ 49 SEAT BELT REMINDER .................................. 50
USING SEAT BELTS DURING PREGNANCY.... 51
FASTENING THE SEAT BELTS ........................ 51
SEAT BELT HEIGHT ADJUSTMENT ................ 52
Supplementary restraints system
PRINCIPLE OF OPERATION ............................ 53
AIRBAG WARNING LAMP .............................. 57
WHIPLASH PROTECTION ............................... 57
AIRBAG LABELS ............................................. 58
AIRBAG SERVICE INFORMATION................... 58
Child safety
CHILD SEATS ................................................. 59
CHILD SEAT POSITIONING ............................ 60
BOOSTER CUSHIONS ..................................... 61
CHILD SEAT ANCHOR POINTS ....................... 62
CHILD SAFETY LOCKS ................................... 65
Pedestrian protection
PRINCIPLE OF OPERATION ............................ 66
AFTER DEPLOYMENT OF THE PEDESTRIAN
PROTECTION SYSTEM ................................... 66
Steering wheel
ADJUSTING THE STEERING WHEEL .............. 67
HORN ............................................................. 68
HEATED STEERING WHEEL............................ 68
AUDIO CONTROL ........................................... 69
VOICE CONTROL ............................................ 69
CRUISE CONTROL.......................................... 74
Lighting
LIGHTING CONTROL ...................................... 75
AUTOLAMPS .................................................. 76
REAR FOG LAMPS.......................................... 77
HAZARD WARNING FLASHERS...................... 77
DIRECTION INDICATORS ............................... 78
HEADLAMPS - DRIVING ABROAD.................. 78
HEADLAMP LEVELLING ................................. 79
CORNERING OR STATIC BENDING LAMPS.... 79
INTERIOR LAMPS .......................................... 80
APPROACH LAMPS ........................................ 81
REMOVING A HEADLAMP .............................. 81
REMOVING A REAR LAMP ............................. 82
CHANGING A BULB ........................................ 83
HEADLAMP UNIT BULBS ............................... 83
Page 34 of 391

Locks
34
Keyless locking
The vehicle will not lock automatically.
The vehicle will only lock if all doors, luggage
compartment and bonnet are closed. If a lock
attempt is made with an open aperture, the
vehicle will not lock and two audible error
warnings will sound.
• To single-lock the vehicle, press the button
on the door handle once. The hazard
warning lamps will flash once as
confirmation (in some markets, an audible
warning will sound).
• To double-lock the ve hicle, press the
button twice within three seconds. The
hazard warning lamps will flash twice (with
a long second flash). In some markets, a
double audible warning will sound.
Note: Keyless locking will only activate if the
Jaguar Smart Key is outside the vehicle. If no
Smart Key is present, two audible error
warnings will sound.
Window global closing
Press and hold the button on the door handle
for three seconds, to lock the vehicle, arm the
alarm and also close all open windows and the
sunroof. The windows and sunroof will stop
closing when the button is released.
Convenience mode
When the door is opened using either the
Jaguar Smart Key or keyless entry, the
vehicle's electrical system initiates the
convenience mode. The following systems
become functional:
• Memory.
• Seat and steering column adjustment.
• Interior and exterior lighting.
• Message centre.
• Auxiliary power socket.
WARNING
Never double-lock the vehicle with
people, children or pets inside. In the
event of an emergency they would be
unable to escape and the emergency services
would be unable to release them quickly.
E93154
Page 43 of 391

43
Seats
1.Cushion length adjustment.
2. Bolster adjustment:
A. Bolster inflate.
B. Bolster deflate.
3. Lumbar support adjustment.
4. Seat back angle adjustment.
5. Head restraint height adjustment.
6. Height adjustment.
7. Fore and aft adjustment.
8. Cushion front tilt adjustment.
To adjust the seats, the Jaguar Smart Key must
be in the vehicle and the ignition turned on.Driving position memory
1. Memory preset 1.
2. Memory preset 2.
3. Memory Set button.
4. Indicator light.
Once you have adjusted the driver's seat,
steering column and exte rior mirrors for your
ideal driving position, the vehicle can
memorise these settings for future use.
1. Press the memory set button to activate
the memory function.
2. Press one of the preset buttons within five
seconds to memorise the current settings.
An audible chime will sound and MEMORY
1 (or 2) SETTINGS SAVED is displayed in
the message centre, to confirm the
settings have been memorised.
A seat position can onl y be memorised during
the five second active period.
Any existing settings for a memory preset will
be over-written when programming a memory
position.
Recalling a memorised position
Press the appropriate memory preset button (1
or 2), MEMORY 1 (or 2) SETTINGS RECALLED
will be displayed in the message centre.
WARNINGS
Do not adjust a seat while the vehicle
is moving. Failure to follow this
instruction could potentially cause
personal injury or loss of vehicle control.
Before making rearward, height or
reclining seat adjustments, check that
the rear passenger has adequate leg
room.
The driver and front passenger must
not ride with the seat fully reclined.
E93239
4
3
2
1
Page 44 of 391

Seats
44
HEAD RESTRAINTS
For information on adjusting power-operated
head restraints, refer to the Electric seats
section. SeeELECTRIC SEATS (page 42).
Whiplash protection
Both front seats are equi pped with Active Head
Restraints (AHR), which reduce the risk of neck
and spinal injury (whiplash) in the event of a
rear impact. See WHIPLASH PROTECTION
(page 57).
Head restraint tilt adjustment
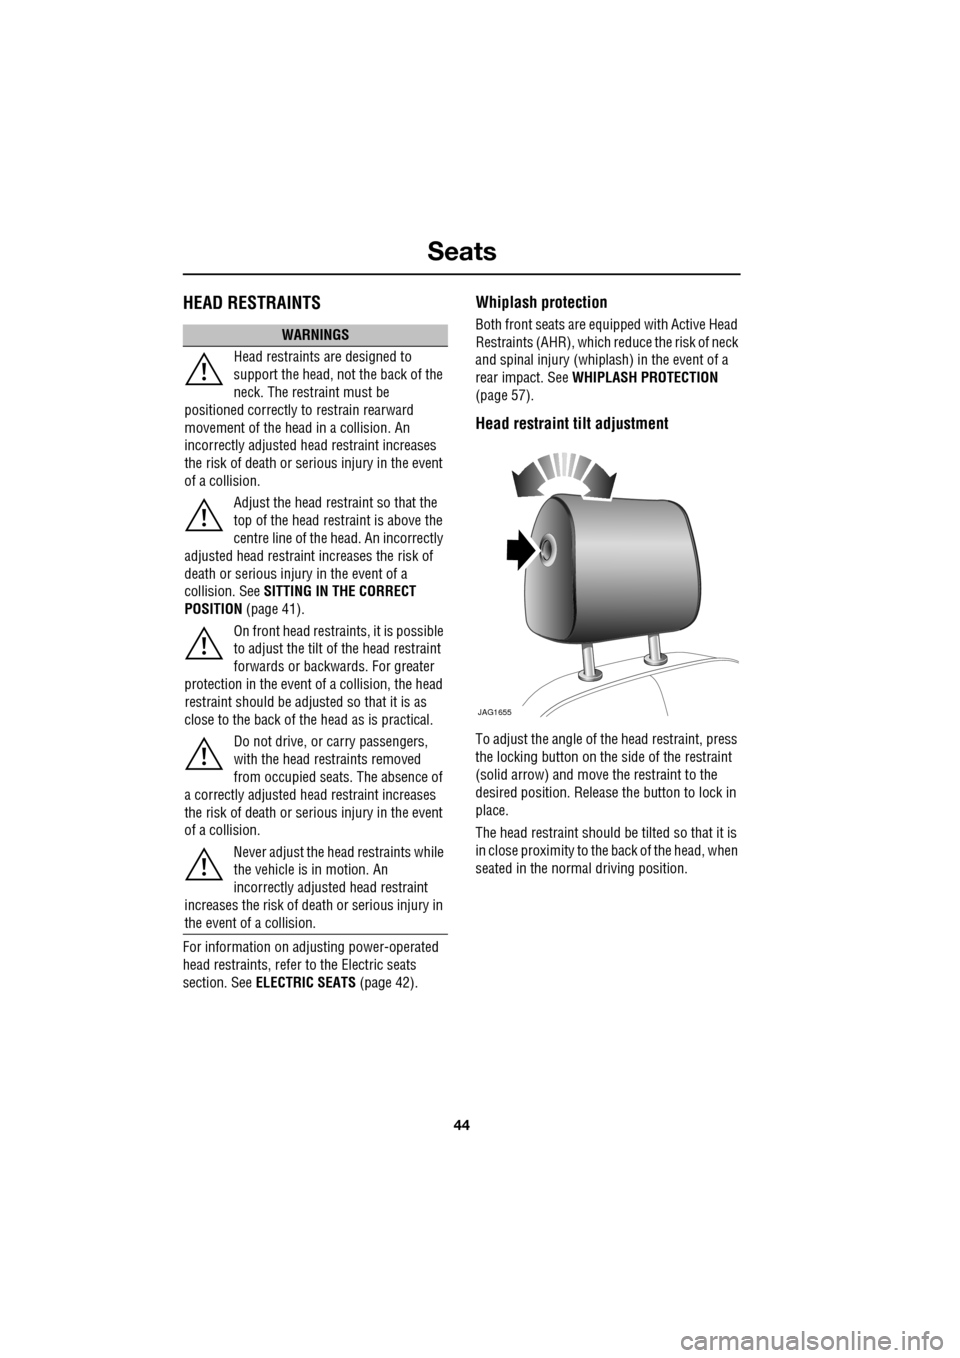
To adjust the angle of the head restraint, press
the locking button on the side of the restraint
(solid arrow) and move the restraint to the
desired position. Release the button to lock in
place.
The head restraint should be tilted so that it is
in close proximity to the back of the head, when
seated in the normal driving position.
WARNINGS
Head restraints are designed to
support the head, not the back of the
neck. The restraint must be
positioned correctly to restrain rearward
movement of the head in a collision. An
incorrectly adjusted head restraint increases
the risk of death or seri ous injury in the event
of a collision.
Adjust the head restraint so that the
top of the head restraint is above the
centre line of the head. An incorrectly
adjusted head restraint increases the risk of
death or serious injury in the event of a
collision. See SITTING IN THE CORRECT
POSITION (page 41).
On front head restra ints, it is possible
to adjust the tilt of the head restraint
forwards or backwards. For greater
protection in the event of a collision, the head
restraint should be adjust ed so that it is as
close to the back of the head as is practical.
Do not drive, or carry passengers,
with the head restraints removed
from occupied seat s. The absence of
a correctly adjusted head restraint increases
the risk of death or seri ous injury in the event
of a collision.
Never adjust the head restraints while
the vehicle is in motion. An
incorrectly adjusted head restraint
increases the risk of death or serious injury in
the event of a collision.
JAG1655
Page 52 of 391

Seat belts
52
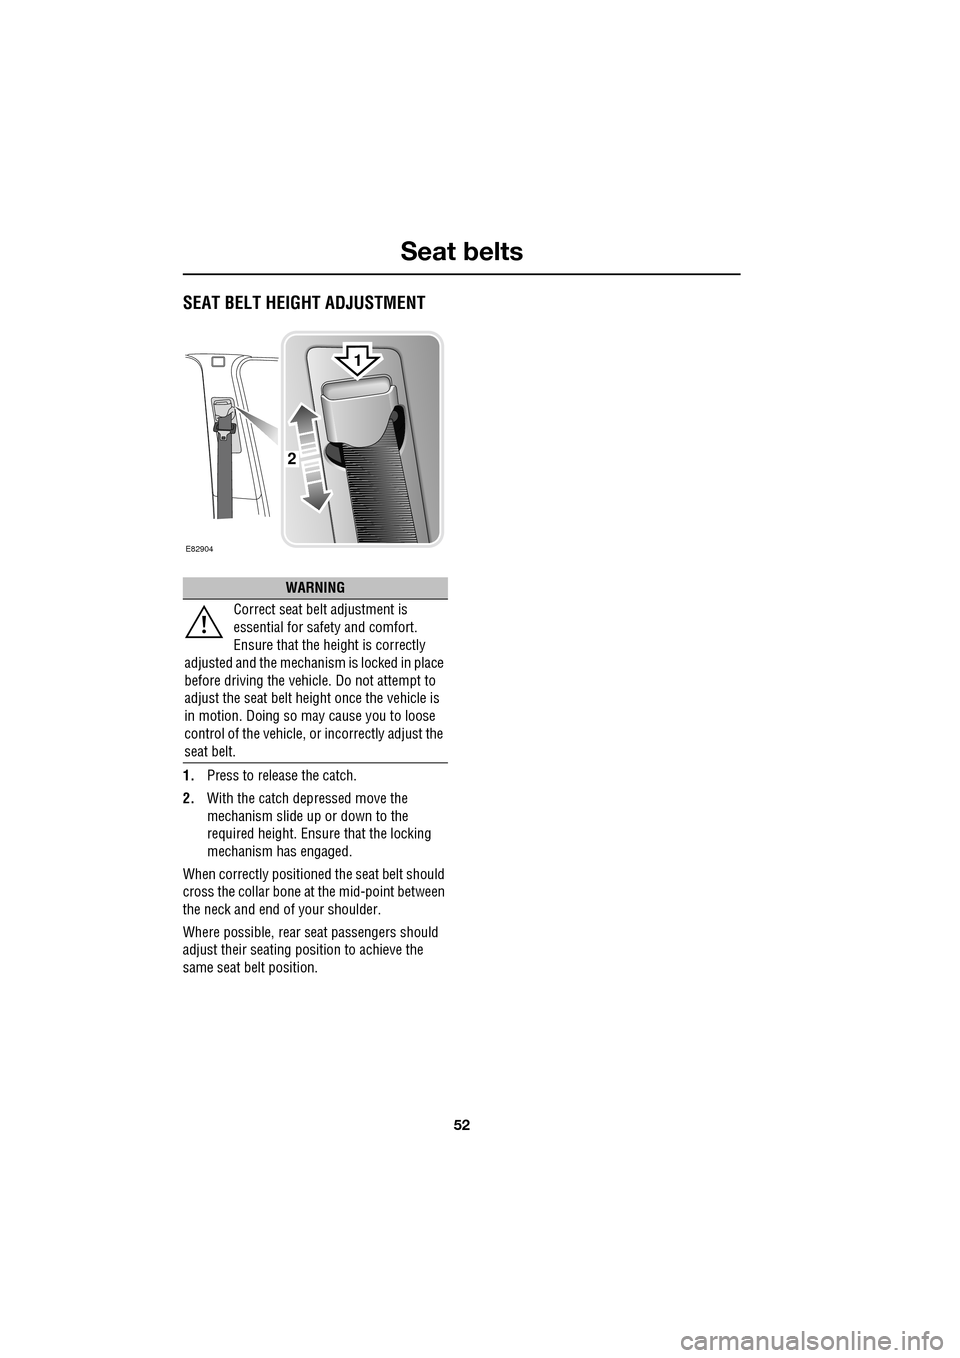
SEAT BELT HEIGHT ADJUSTMENT
1.Press to release the catch.
2. With the catch depressed move the
mechanism slide up or down to the
required height. Ensure that the locking
mechanism has engaged.
When correctly positione d the seat belt should
cross the collar bone at the mid-point between
the neck and end of your shoulder.
Where possible, rear seat passengers should
adjust their seating pos ition to achieve the
same seat belt position.
WARNING
Correct seat belt adjustment is
essential for safety and comfort.
Ensure that the height is correctly
adjusted and the mechanism is locked in place
before driving the vehicl e. Do not attempt to
adjust the seat belt height once the vehicle is
in motion. Doing so may cause you to loose
control of the vehicle, or incorrectly adjust the
seat belt.
E82904
2
1
Page 59 of 391

59
Child safety
CHILD SEATS
The seat belts fitted to your vehicle are
designed for adults and larger children. For
their safety, it is very important for all infants
and children under 12 years of age to be
restrained in a suitable child safety seat
appropriate to their age and size.
Children are always safest when seated in a
rear seating position.
If it is essential that a child travels in the front
passenger seat, Jaguar recommends that the
following preparations are made before fitting
the child restraint.
• Adjust the front passenger seat fully
rearwards.
• Adjust the lumbar support to its minimum
support position.
• Adjust the seat cushion to its highest
position. If cushion front tilt adjustment is
possible, adjust it to its lowest position.
• Adjust the seat back to the fully upright
position.
• Adjust the seat be lt adjustable upper
anchorage to its lowest position.
In some countries, legislation prohibits
children travelling in the front of a vehicle.
Ensure that you are familiar with the legislation
in force where the vehicle is being used and are
in full compliance.
WARNINGS
Do not use a child restraint on a seat
protected by an airbag in front of it.
There is a risk of death or serious
injury when the airbag deploys.
Crash statistics show that children
are safest when properly restrained in
a child or infant restraint system that
is secured in a rear seating position.
For optimum safety , children should
travel in the rear of the vehicle at all
times; front passenge r seat travel is
not recommended. However, if it is
essential that a child travels in the front, set the
vehicle seat fully rearward and seat the child in
an approved forward-facing child seat. Do not
use a rear-facing child seat - an inflating airbag
could impact with the seat and cause serious
injury.
Do not use a forward facing child seat
until the child using it is above the
minimum weight of 9 kg (20 lb.) and
able to sit up unaided. Up to the age of two, a
child's spine and neck are not sufficiently
developed to avoid injury in a frontal impact.
Do not allow a baby or infant to be
held or carried on the lap. The force of
a crash can increase effective body
weight by as much as thirty times, making it
impossible to hold onto the child.
Children typically require the use of a
booster seat appropriate to their age
and size, thereby enabling the seat
belts to be properly fitted, reducing the risk of
injury in a crash. Children could be
endangered in a crash if their child restraints
are not properly secured in the vehicle.Do not use a chil d seat that hooks
over the seat back. This type of seat
cannot be satisfacto rily secured and
is unlikely to be safe for your child.
WARNINGS
Page 118 of 391

Climate control
118
Blower speed
Set the blower speed as required by
adjusting the rotary control.
Press to turn the climate control
system on or off.
When operating in AUTO mode, blower speed
is controlled au tomatically and AUTO is
displayed on the touch-screen. Any adjustment
of the knob will cancel AUTO mode.
Note: In AUTO mode, if heating is required, the
blower only operates at low speed, until the
engine reaches normal operating temperature.
Recirculation
Press to turn recirculation on
or off. The button indicator
illuminates when recirculation
is turned on.
When selected, the air is recirculated inside the
vehicle. This helps to ma intain a high or low
temperature, and is useful for preventing
fumes from entering the vehicle.
Recirculation may also be selected in AUTO
mode, if the climate control system detects
high levels of pollution in the atmosphere
outside the vehicle (if a smog sensor is fitted).
Manual operation of the recirculation control
will override the automatic setting. This facility
can be switched off through the Settings menu
on the touch-screen.
Note: Prolonged use at low temperatures may
cause the windows to mist.
Air conditioning
Press the AUTO button to turn
the air conditioning on.
The air conditioning system is
controlled automatically in AUTO mode to
maintain the desired temperature and humidity
(even if higher temperature settings are
selected).
The air conditioning system is also switched on
automatically in defrost mode ( DEF) in order to
dehumidify the air.
Note: Water may collect unde rneath the vehicle
when parked. This is moisture expelled from
the interior of the vehicle by the air
conditioning system a nd is not cause for
concern.
Heated/climate seats and heated
steering wheel
The heated seats, climate seats and heated
steering wheel can be controlled from both the
Home and Climate menus on the touch-screen.
See HEATED SEATS (page 47). See CLIMATE
SEATS (page 48). See HEATED STEERING
WHEEL (page 68).
Page 247 of 391

247
Fuses
Passenger compartment fuse box
Fuse No Rating (amps) Fuse
Colour Circuit
F1 - - Not used.
F2 - - Not used.
F3 20A Blue Driver's seat adjustment.
F4 20A Blue Driver's seat adjustment.
F5 - - Not used.
F6 - - Not used.
F7 - - Not used.
F8 20A Blue Front passenger's seat adjustment.
F9 20A Blue Front passenger's seat adjustment.
F10 20A Blue Left-hand rear door controls.
F11 20A Blue Right-hand rear door controls.
F12 - - Not used.
F13 10A Red Steering column adjust.
F14 - - Not used.
F15 - - Not used.
F16 5A Tan Sunblind.
F17 - - Not used.
F18 - - Not used.
F19 - - Not used.
F20 5A Tan Remote control receiver.
F21 5A Tan Foot brake.
F22 5A Tan Electric parking brake.
F23 5A Tan Driver's seat. Audio system. Auto headlamps. Upper centre console switches.
F24 10A Red Front passen ger seat. Electric windows. Mirror adjustment.
F25 20A Yellow Driver's heated/climate seat
F26 15A Blue Trailer power connector. Road pricing system.
F27 20A Yellow Front passenger's heated/climate seat.
F28 15A Blue Auxiliary power socket.
F29 20A Yellow Keyless entry system.
F30 10A Red Air conditioning.