2009 INFINITI QX56 battery
[x] Cancel search: batteryPage 3689 of 4171
P0615 STARTER RELAYTM-41
< COMPONENT DIAGNOSIS >
CEF
G H
I
J
K L
M A
B
TM
N
O P
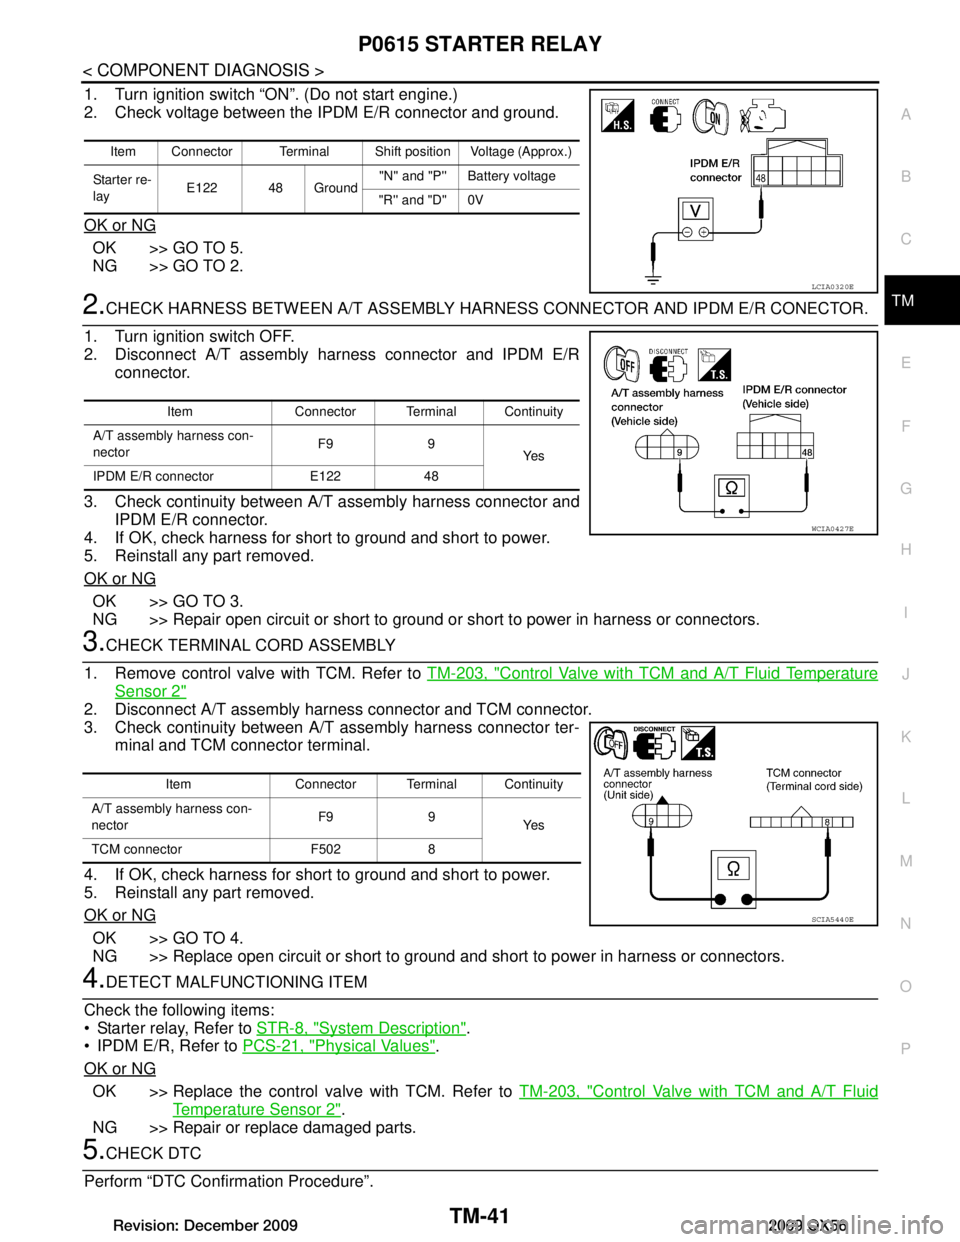
1. Turn ignition switch “ON”. (Do not start engine.)
2. Check voltage between the IPDM E/R connector and ground.
OK or NG
OK >> GO TO 5.
NG >> GO TO 2.
2.CHECK HARNESS BETWEEN A/T AS SEMBLY HARNESS CONNECTOR AND IPDM E/R CONECTOR.
1. Turn ignition switch OFF.
2. Disconnect A/T assembly harness connector and IPDM E/R connector.
3. Check continuity between A/T assembly harness connector and IPDM E/R connector.
4. If OK, check harness for short to ground and short to power.
5. Reinstall any part removed.
OK or NG
OK >> GO TO 3.
NG >> Repair open circuit or short to ground or short to power in harness or connectors.
3.CHECK TERMINAL CORD ASSEMBLY
1. Remove control valve with TCM. Refer to TM-203, "Control Valve with TCM and A/T Fluid Temperature
Sensor 2"
2. Disconnect A/T assembly harness connector and TCM connector.
3. Check continuity between A/T assembly harness connector ter-
minal and TCM connector terminal.
4. If OK, check harness for short to ground and short to power.
5. Reinstall any part removed.
OK or NG
OK >> GO TO 4.
NG >> Replace open circuit or short to ground and short to power in harness or connectors.
4.DETECT MALFUNCTIONING ITEM
Check the following items:
Starter relay, Refer to STR-8, "System Description"
.
IPDM E/R, Refer to PCS-21, "Physical Values"
.
OK or NG
OK >> Replace the control valve with TCM. Refer to TM-203, "Control Valve with TCM and A/T Fluid
Temperature Sensor 2".
NG >> Repair or replace damaged parts.
5.CHECK DTC
Perform “DTC Confirmation Procedure”.
Item Connector Terminal Shift position Voltage (Approx.)
Starter re-
lay E122 48 Ground "N'' and "P'' Battery voltage
"R'' and "D'' 0V
LCIA0320E
Item Connector Terminal Continuity
A/T assembly harness con-
nector F9 9
Ye s
IPDM E/R connector E122 48
WCIA0427E
Item Connector Terminal Continuity
A/T assembly harness con-
nector F9 9
Ye s
TCM connector F502 8
SCIA5440E
Revision: December 20092009 QX56
Page 3740 of 4171
TM-92
< COMPONENT DIAGNOSIS >
MAIN POWER SUPPLY AND GROUND CIRCUIT
MAIN POWER SUPPLY AND GROUND CIRCUIT
Diagnosis ProcedureINFOID:0000000003771975
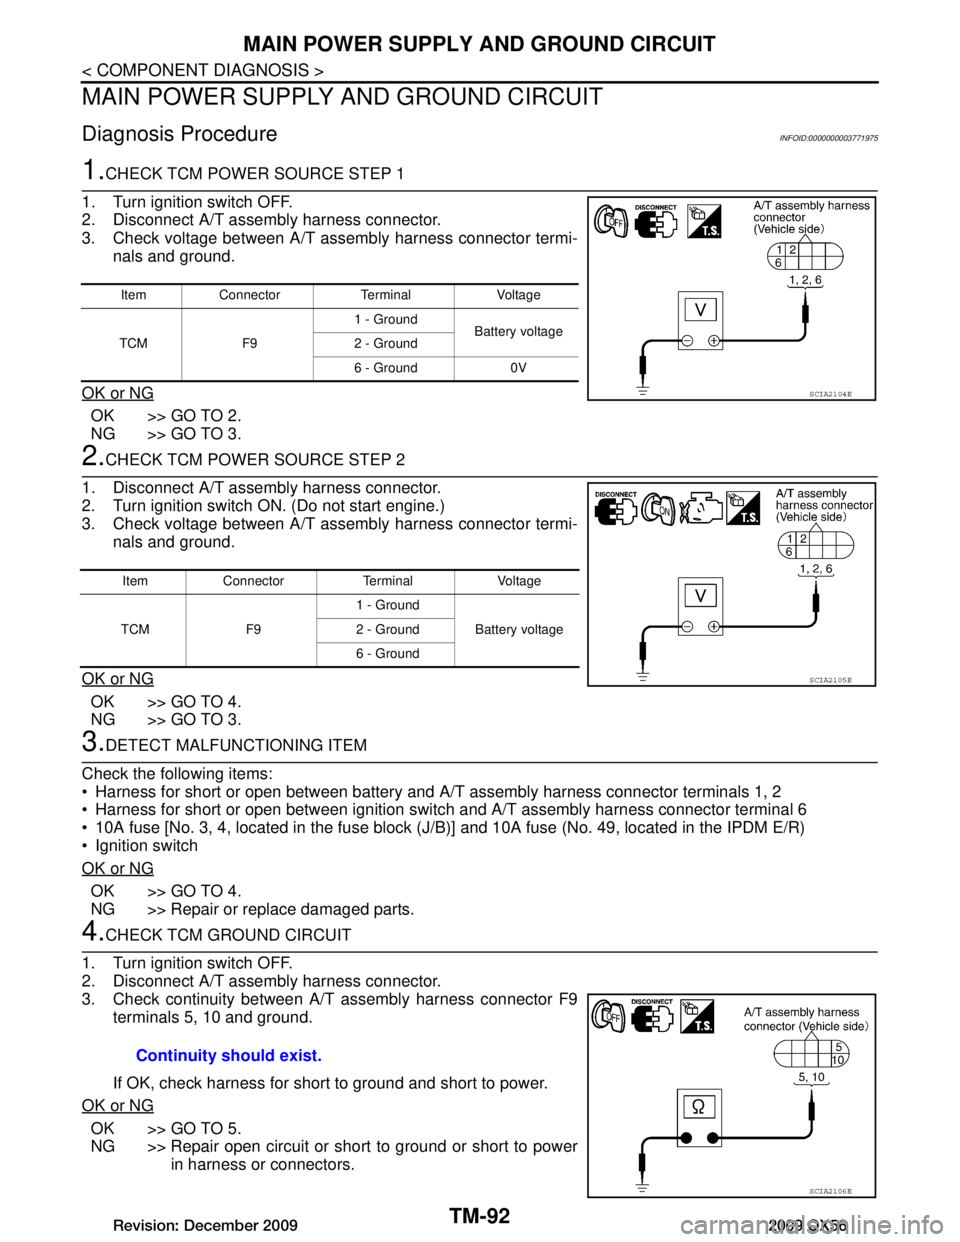
1.CHECK TCM POWER SOURCE STEP 1
1. Turn ignition switch OFF.
2. Disconnect A/T assembly harness connector.
3. Check voltage between A/T assembly harness connector termi- nals and ground.
OK or NG
OK >> GO TO 2.
NG >> GO TO 3.
2.CHECK TCM POWER SOURCE STEP 2
1. Disconnect A/T assembly harness connector.
2. Turn ignition switch ON. (Do not start engine.)
3. Check voltage between A/T assembly harness connector termi- nals and ground.
OK or NG
OK >> GO TO 4.
NG >> GO TO 3.
3.DETECT MALFUNCTIONING ITEM
Check the following items:
Harness for short or open between battery and A/T assembly harness connector terminals 1, 2
Harness for short or open between ignition switch and A/T assembly harness connector terminal 6
10A fuse [No. 3, 4, located in the fuse block (J /B)] and 10A fuse (No. 49, located in the IPDM E/R)
Ignition switch
OK or NG
OK >> GO TO 4.
NG >> Repair or replace damaged parts.
4.CHECK TCM GROUND CIRCUIT
1. Turn ignition switch OFF.
2. Disconnect A/T assembly harness connector.
3. Check continuity between A/T assembly harness connector F9 terminals 5, 10 and ground.
If OK, check harness for short to ground and short to power.
OK or NG
OK >> GO TO 5.
NG >> Repair open circuit or short to ground or short to power in harness or connectors.
Item Connector Terminal Voltage
TCM F9 1 - Ground
Battery voltage
2 - Ground
6 - Ground 0V
SCIA2104E
Item Connector Terminal Voltage
TCM F9 1 - Ground
Battery voltage
2 - Ground
6 - Ground
SCIA2105E
Continuity should exist.
SCIA2106E
Revision: December 20092009 QX56
Page 3744 of 4171
TM-96
< COMPONENT DIAGNOSIS >
TOW MODE SWITCH
TOW MODE SWITCH
DescriptionINFOID:0000000003771980
When tow mode switch is “ON”, tow mode switch signals are sent to TCM from combination meter by CAN
communication line.Then it`s a tow mode condition.
Diagnosis ProcedureINFOID:0000000003771981
1.CHECK CAN COMMUNICATION LINE
Perform the self-diagnosis. Refer to TM-32, "CONSULT-III Function (TRANSMISSION)"
.
Is any malfunction in the CAN communication indicated in the results?
YES >> Check CAN communication line. Refer to TM-39.
NO >> GO TO 2.
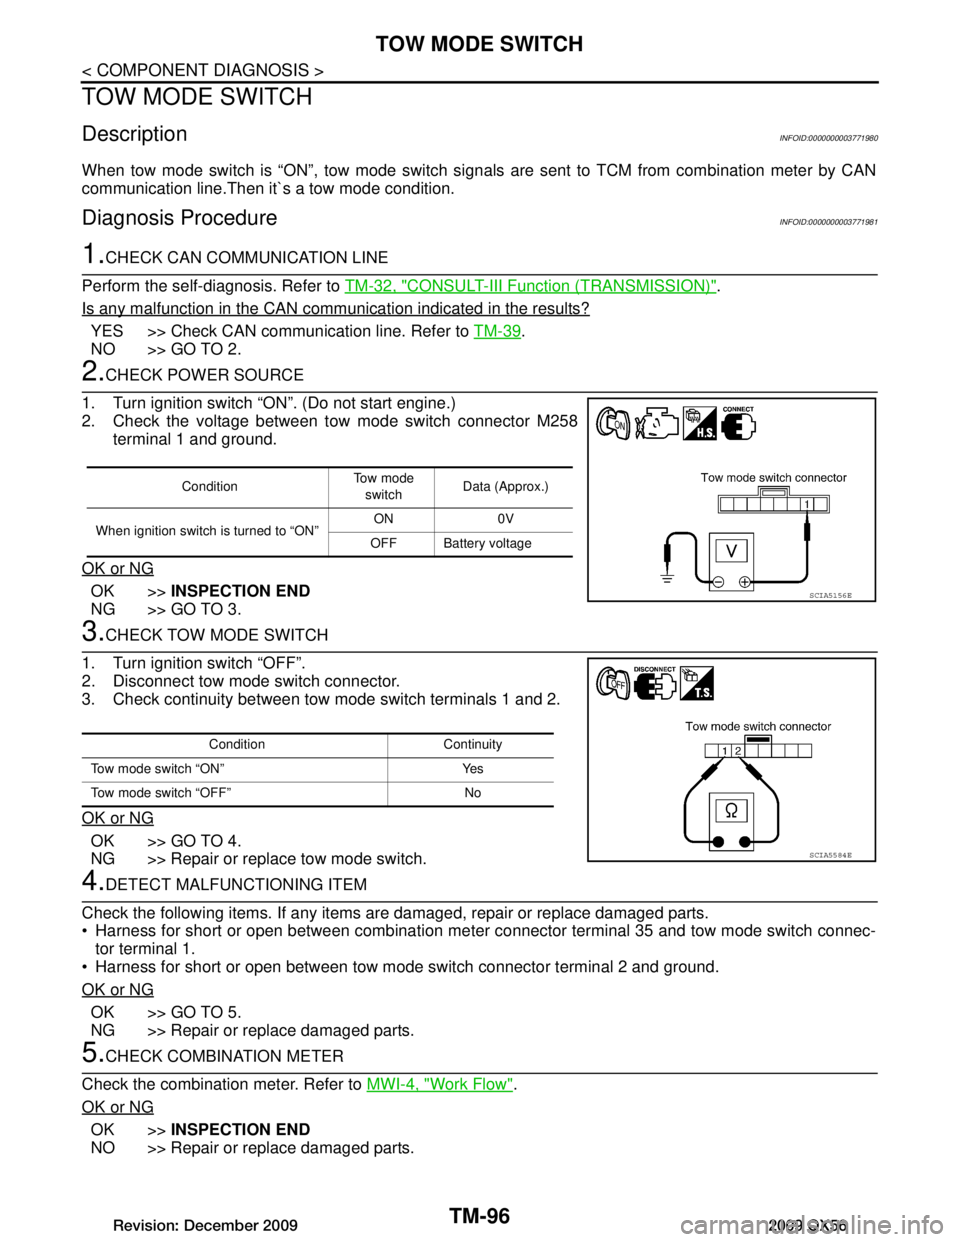
2.CHECK POWER SOURCE
1. Turn ignition switch “ON”. (Do not start engine.)
2. Check the voltage between tow mode switch connector M258 terminal 1 and ground.
OK or NG
OK >> INSPECTION END
NG >> GO TO 3.
3.CHECK TOW MODE SWITCH
1. Turn ignition switch “OFF”.
2. Disconnect tow mode switch connector.
3. Check continuity between tow mode switch terminals 1 and 2.
OK or NG
OK >> GO TO 4.
NG >> Repair or replace tow mode switch.
4.DETECT MALFUNCTIONING ITEM
Check the following items. If any items are damaged, repair or replace damaged parts.
Harness for short or open between combination meter connector terminal 35 and tow mode switch connec- tor terminal 1.
Harness for short or open between tow mode switch connector terminal 2 and ground.
OK or NG
OK >> GO TO 5.
NG >> Repair or replace damaged parts.
5.CHECK COMBINATION METER
Check the combination meter. Refer to MWI-4, "Work Flow"
.
OK or NG
OK >> INSPECTION END
NO >> Repair or replace damaged parts.
Condition To w m o d e
switch Data (Approx.)
When ignition switch is turned to “ON” ON 0V
OFF Battery voltage
SCIA5156E
Condition Continuity
Tow mode switch “ON” Yes
Tow mode switch “OFF” No
SCIA5584E
Revision: December 20092009 QX56
Page 3749 of 4171
A/T SHIFT LOCK SYSTEMTM-101
< COMPONENT DIAGNOSIS >
CEF
G H
I
J
K L
M A
B
TM
N
O P
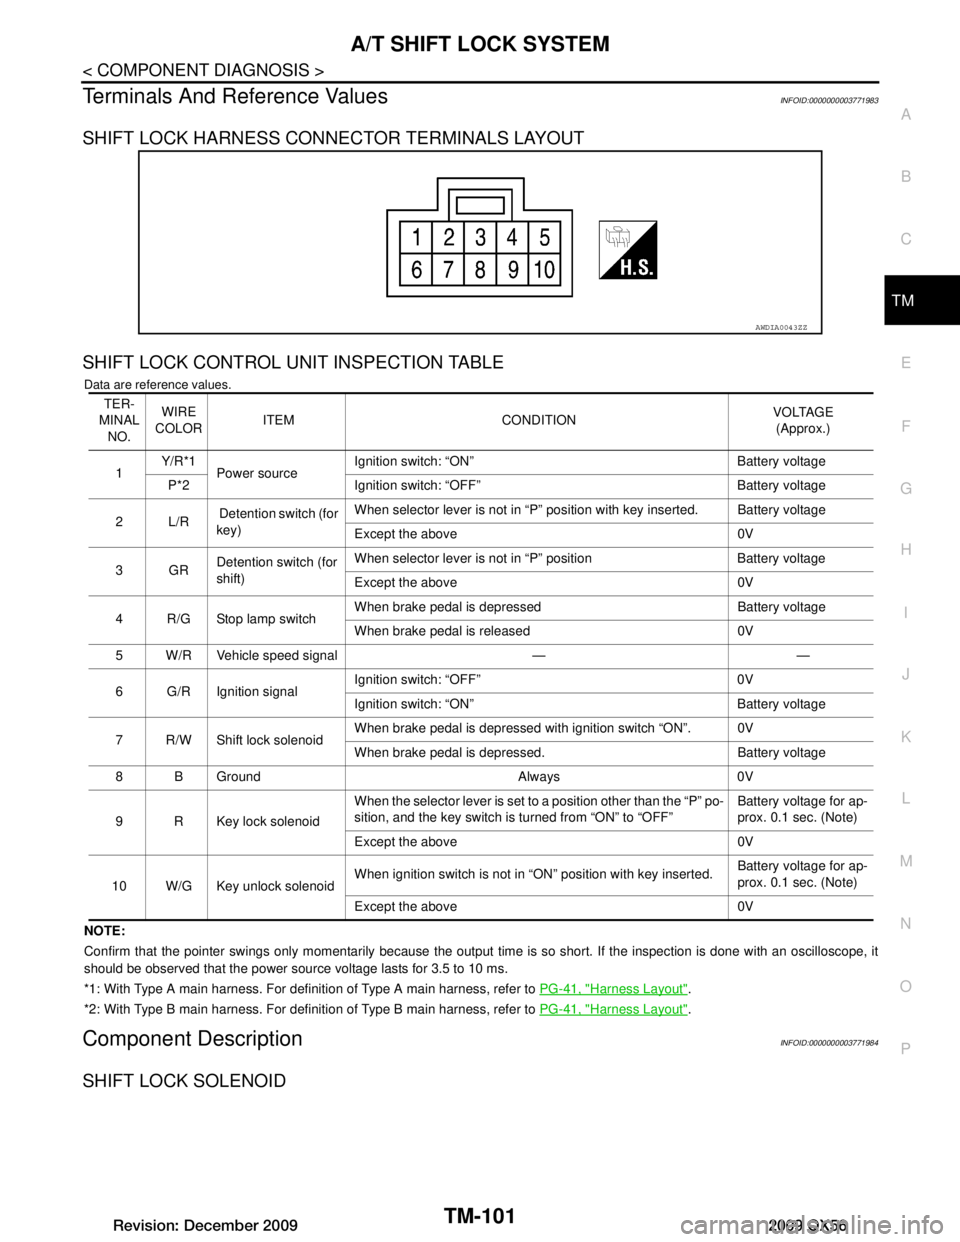
Terminals And Reference ValuesINFOID:0000000003771983
SHIFT LOCK HARNESS CONNECTOR TERMINALS LAYOUT
SHIFT LOCK CONTROL UNIT INSPECTION TABLE
Data are reference values.
NOTE:
Confirm that the pointer swings only momentarily because the output time is so short. If the inspection is done with an oscillo scope, it
should be observed that the power source voltage lasts for 3.5 to 10 ms.
*1: With Type A main harness. For definition of Type A main harness, refer to PG-41, "Harness Layout"
.
*2: With Type B main harness. For definition of Type B main harness, refer to PG-41, "Harness Layout"
.
Component DescriptionINFOID:0000000003771984
SHIFT LOCK SOLENOID
AWDIA0043ZZ
TER-
MINAL NO. WIRE
COLOR ITEM CONDITION VOLTAGE
(Approx.)
1 Y/R*1
Power source Ignition switch: “ON” Battery voltage
P*2 Ignition switch: “OFF” Battery voltage
2L/R Detention switch (for
key) When selector lever is not in “P” position with key inserted. Battery voltage
Except the above 0V
3GR Detention switch (for
shift) When selector lever is not in “P” position Battery voltage
Except the above 0V
4 R/G Stop lamp switch When brake pedal is depressed Battery voltage
When brake pedal is released 0V
5 W/R Vehicle speed signal — —
6 G/R Ignition signal Ignition switch: “OFF” 0V
Ignition switch: “ON” Battery voltage
7 R/W Shift lock solenoid When brake pedal is depressed with ignition switch “ON”. 0V
When brake pedal is depressed. Battery voltage
8 B Ground Always 0V
9 R Key lock solenoid When the selector lever is set to a position other than the “P” po-
sition, and the key switch is turned from “ON” to “OFF”
Battery voltage for ap-
prox. 0.1 sec. (Note)
Except the above 0V
10 W/G Key unlock solenoid When ignition switch is not in “ON” position with key inserted.
Battery voltage for ap-
prox. 0.1 sec. (Note)
Except the above 0V
Revision: December 20092009 QX56
Page 3750 of 4171

TM-102
< COMPONENT DIAGNOSIS >
A/T SHIFT LOCK SYSTEM
Check operation by applying battery voltage to A/T shift selectorterminal 9 and ground to terminal 10.
CAUTION:
Be sure to apply the voltage of the correct polarity to the
respective terminals. Otherwise, the part may be damaged.
PARK POSITION SWITCH
Check continuity between terminals of the A/T shift selector.
DETENT SWITCH
Check continuity between terminals of the A/T shift selector.
KEY LOCK SOLENOID
Key lock
Check operation by applying battery voltage to key switch and key lock solenoid terminal 6 and ground to terminal 5.
CAUTION:
Be careful not to cause burnout of the harness.
Key unlock
AWDIA0700ZZ
Condition Terminal No. Continuity
When selector lever is “P” position. 5 - 6No
When selector lever is not “P” position. Yes
AWDIA0567ZZ
Condition Terminal No. Continuity
When selector lever is “P” position. 3 - 4No
When selector lever is not “P” position. Yes
AWDIA0568ZZ
AWDIA0544ZZ
Revision: December 20092009 QX56
Page 3751 of 4171
A/T SHIFT LOCK SYSTEMTM-103
< COMPONENT DIAGNOSIS >
CEF
G H
I
J
K L
M A
B
TM
N
O P
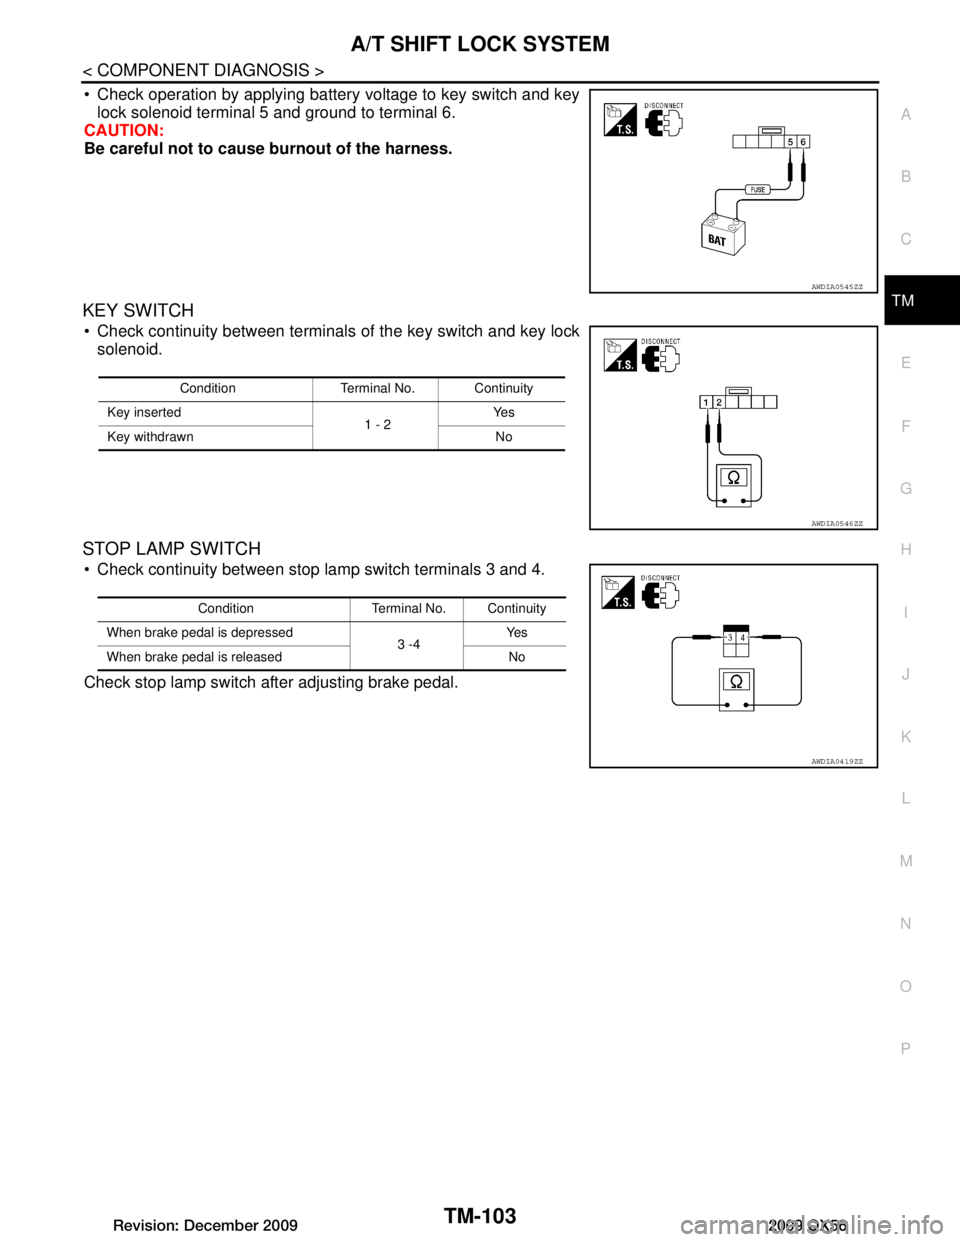
Check operation by applying battery voltage to key switch and key lock solenoid terminal 5 and ground to terminal 6.
CAUTION:
Be careful not to cause burnout of the harness.
KEY SWITCH
Check continuity between terminals of the key switch and key lock
solenoid.
STOP LAMP SWITCH
Check continuity between stop lamp switch terminals 3 and 4.
Check stop lamp switch after adjusting brake pedal.
AWDIA0545ZZ
Condition Terminal No. Continuity
Key inserted 1 - 2Ye s
Key withdrawn No
AWDIA0546ZZ
Condition Terminal No. Continuity
When brake pedal is depressed 3 -4Ye s
When brake pedal is released No
AWDIA0419ZZ
Revision: December 20092009 QX56
Page 3753 of 4171

TCM
TM-105
< ECU DIAGNOSIS >
C EF
G H
I
J
K L
M A
B
TM
N
O P
A/T ASSEMBLY HARNESS CONNECTOR TERMINAL LAYOUT
TERMINALS AND REFERENCE VALUES FOR TCM
Data are reference value and are meas ured between each terminal and ground.
ON OFF SOLLow coast brake engaged. Refer to
TM-9ON
Low coast brake disengaged. Refer to TM-9
OFF
STARTER RELAY Selector lever in
“N”,“P” position. ON
Selector lever in other position. OFF
ACCELE POSI Released accelerator pedal. 0.0/8
Fully depressed accelerator pedal. 8/8
CLSD THL POS Released accelerator pedal. ON
Fully depressed accelerator pedal. OFF
W/O THL POS Fully depressed accelerator pedal. ON
Released accelerator pedal. OFF
BRAKE SW Depressed brake pedal. ON
Released brake pedal. OFF
Item name Condition Display value (Approx.)
AWDIA0348ZZ
Te r m i n a l
No. Wire
color Item Condition Data (Approx.)
1P Power supply
(Memory back-up)
Always Battery voltage
2P Power supply
(Memory back-up) Always Battery voltage
3 L CAN-H – –
4G/W K-line (CONSULT-
III signal) The terminal is connected to the data link connector for CONSULT-III. –
5 B Ground Always 0V
6Y/RPower supply – Battery voltage
–0V
7R Back-up lamp re-
lay Selector lever in “R” position. 0V
Selector lever in other positions. Battery voltage
8 P CAN-L – –
9 B/R Starter relay Selector lever in “N”,“ P”
positions. Battery voltage
Selector lever in other positions. 0V
10 B Ground Always 0V
Revision: December 20092009 QX56
Page 3792 of 4171
TM-144
< SYMPTOM DIAGNOSIS >
SYSTEM SYMPTOM
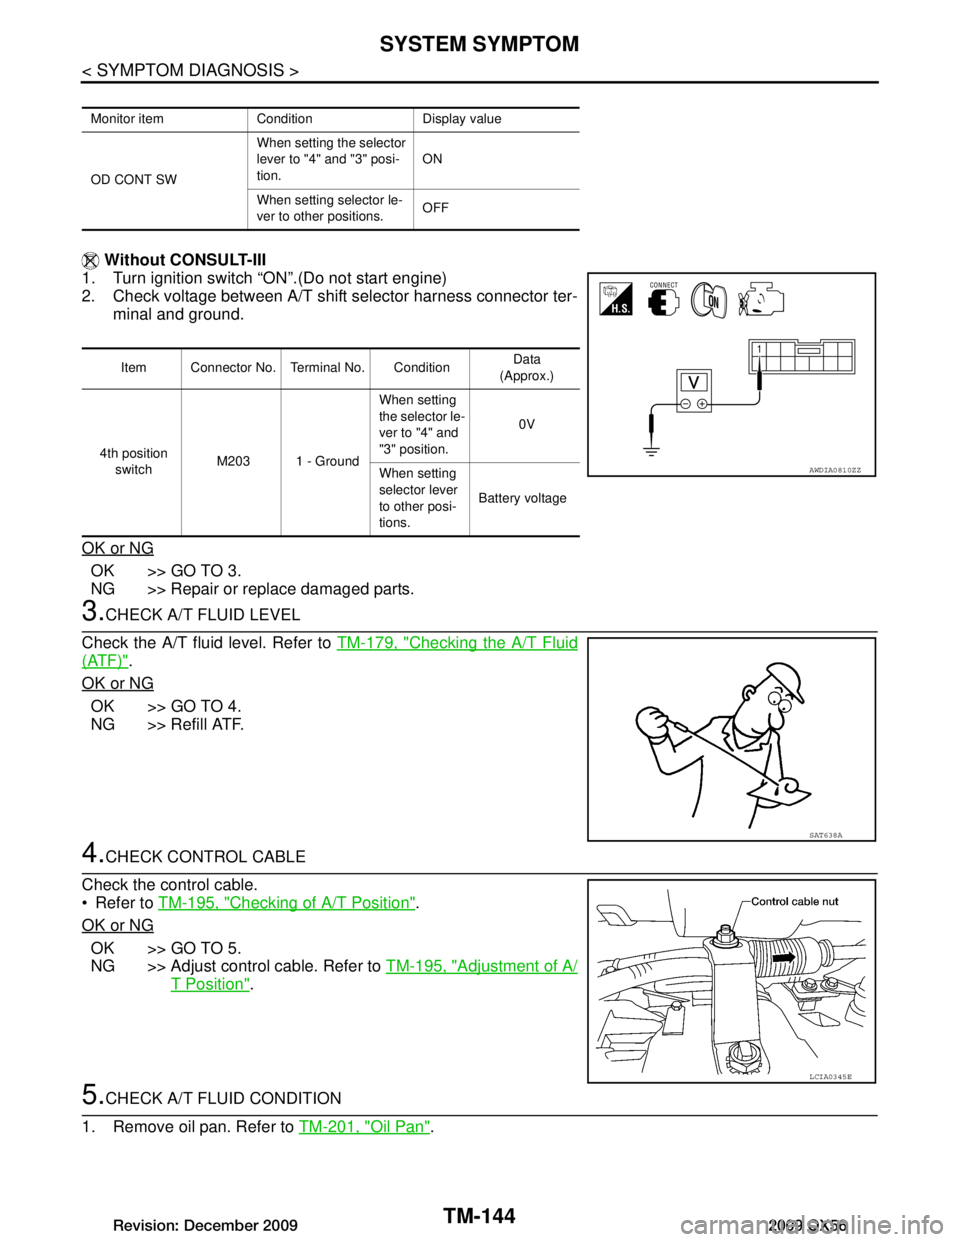
Without CONSULT-III
1. Turn ignition switch “ON”.(Do not start engine)
2. Check voltage between A/T shift selector harness connector ter- minal and ground.
OK or NG
OK >> GO TO 3.
NG >> Repair or replace damaged parts.
3.CHECK A/T FLUID LEVEL
Check the A/T fluid level. Refer to TM-179, "Checking the A/T Fluid
(ATF)".
OK or NG
OK >> GO TO 4.
NG >> Refill ATF.
4.CHECK CONTROL CABLE
Check the control cable.
Refer to TM-195, "Checking of A/T Position"
.
OK or NG
OK >> GO TO 5.
NG >> Adjust control cable. Refer to TM-195, "Adjustment of A/
T Position".
5.CHECK A/T FLUID CONDITION
1. Remove oil pan. Refer to TM-201, "Oil Pan"
.
Monitor item Condition Display value
OD CONT SWWhen setting the selector
lever to "4" and "3" posi-
tion.
ON
When setting selector le-
ver to other positions. OFF
Item Connector No. Terminal No. Condition Data
(Approx.)
4th position switch M203 1 - Ground When setting
the selector le-
ver to "4" and
"3" position.
0V
When setting
selector lever
to other posi-
tions. Battery voltage
AWDIA0810ZZ
SAT638A
LCIA0345E
Revision: December 20092009 QX56