Page 3140 of 4171

PRECAUTIONSRF-49
< PRECAUTION >
C
DE
F
G H
I
J
L
M A
B
RF
N
O P
5. When the repair work is completed, return the ignition switch to the ″LOCK ″ position before connecting
the battery cables. (At this time, the steering lock mechanism will engage.)
6. Perform a self-diagnosis check of al l control units using CONSULT-III.
PrecautionINFOID:0000000003776090
• Disconnect both battery cables in advance.
• Never tamper with or force air bag lid open, as this may adversely affect air bag performance.
• Be careful not to scratch pad and other parts.
• When removing or disassembling any part, be careful not to damage or deform it. Protect parts which may
get in the way with cloth.
• When removing parts with a screwdriver or other tool , protect parts by wrapping them with vinyl or tape.
• Keep removed parts protected with cloth.
• If a clip is deformed or damaged, replace it.
• If an unreusable part is removed, replace it with a new one.
• Tighten bolts and nuts firmly to the specified torque.
• After re-assembly has been completed, make sure each part functions correctly.
• Remove stains in the following way.
Water-soluble stains:
Dip a soft cloth in warm water, and then squeeze it tight ly. After wiping the stain, wipe with a soft dry cloth.
Oil stain:
Dissolve a synthetic detergent in warm water (density of 2 to 3% or less), dip the cloth, then clean off the stain
with the cloth. Next, dip the cloth in fresh water and squeeze it tightly. Then clean off the detergent completely.
Then wipe the area with a soft dry cloth.
• Do not use any organic solvent, such as thinner or benzine.
Revision: December 20092009 QX56
Page 3141 of 4171
RF-50
< PREPARATION >
PREPARATION
PREPARATION
PREPARATION
Special Service ToolINFOID:0000000003776091
The actual shapes of Kent-Moore tools may differ from those of special service tools illustrated here.
Commercial Service ToolINFOID:0000000003776092
Tool number
(Kent-Moore No.)
Tool name Description
—
(J-39570)
Chassis ear Locating the noise
—
(J-43980)
NISSAN Squeak and
Rattle Kit Repairing the cause of noise
SIIA0993E
SIIA0994E
(Kent-Moore No.)
Tool name
Description
(J-39565)
Engine ear Locating the noise
SIIA0995E
Revision: December 20092009 QX56
Page 3142 of 4171

SUNROOF SYSTEMRF-51
< ON-VEHICLE REPAIR >
C
DE
F
G H
I
J
L
M A
B
RF
N
O P
ON-VEHICLE REPAIR
SUNROOF SYSTEM
InspectionINFOID:0000000003776093
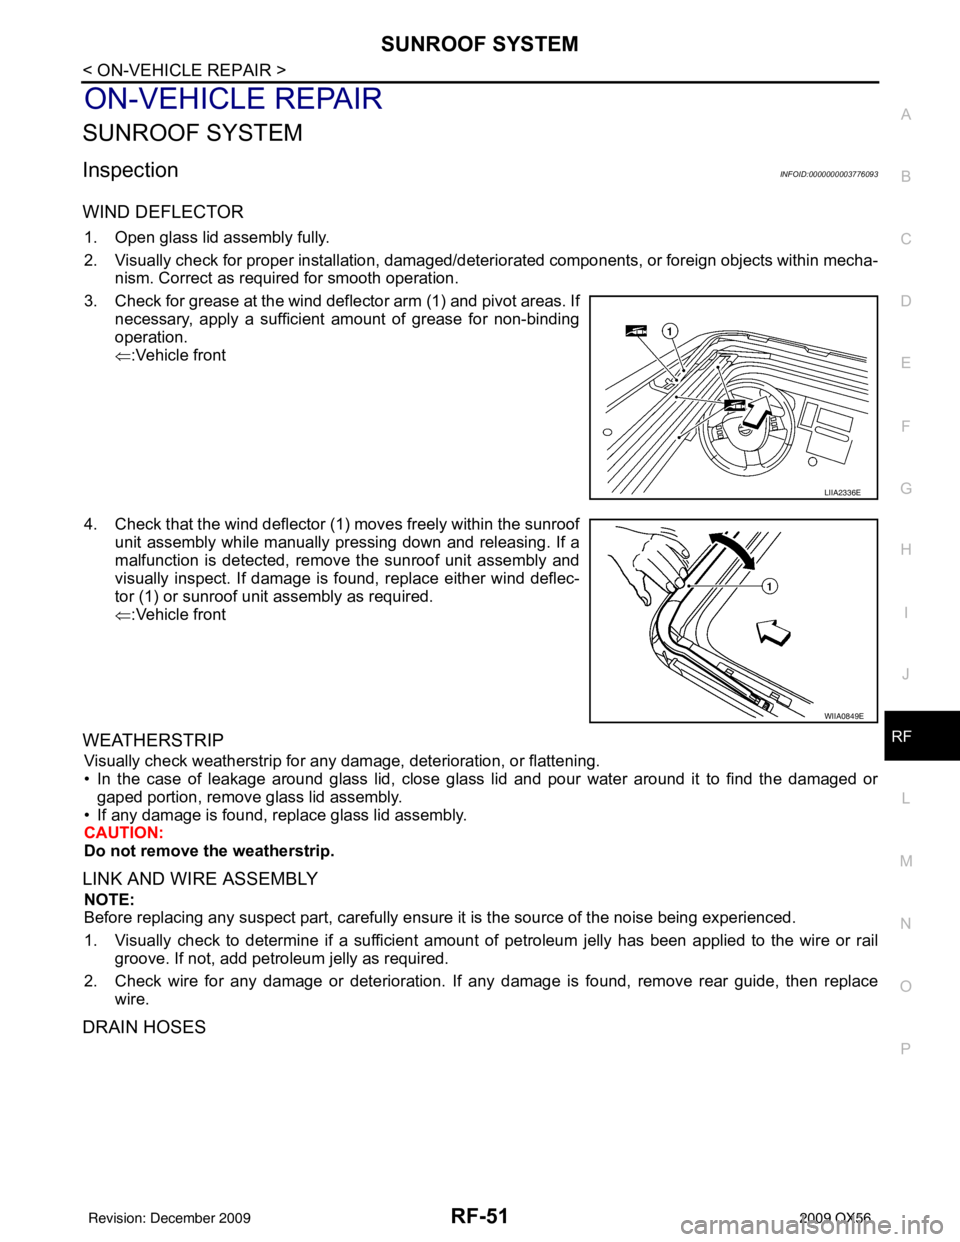
WIND DEFLECTOR
1. Open glass lid assembly fully.
2. Visually check for proper installation, damaged/deteriorated components, or foreign objects within mecha- nism. Correct as required for smooth operation.
3. Check for grease at the wind deflector arm (1) and pivot areas. If necessary, apply a sufficient amount of grease for non-binding
operation.
⇐:Vehicle front
4. Check that the wind deflector (1) moves freely within the sunroof unit assembly while manually pressing down and releasing. If a
malfunction is detected, remove the sunroof unit assembly and
visually inspect. If damage is found, replace either wind deflec-
tor (1) or sunroof unit assembly as required.
⇐:Vehicle front
WEATHERSTRIP
Visually check weatherstrip for any damage, deterioration, or flattening.
• In the case of leakage around glass lid, close glass lid and pour water around it to find the damaged or
gaped portion, remove glass lid assembly.
• If any damage is found, replace glass lid assembly.
CAUTION:
Do not remove the weatherstrip.
LINK AND WIRE ASSEMBLY
NOTE:
Before replacing any suspect part, carefully ensure it is the source of the noise being experienced.
1. Visually check to determine if a sufficient amount of petroleum jelly has been applied to the wire or rail
groove. If not, add petroleum jelly as required.
2. Check wire for any damage or deterioration. If any damage is found, remove rear guide, then replace
wire.
DRAIN HOSES
LIIA2336E
WIIA0849E
Revision: December 20092009 QX56
Page 3143 of 4171
RF-52
< ON-VEHICLE REPAIR >
SUNROOF SYSTEM
Removal
1. Remove the headlining. Refer to INT-17, "Removal and Installation".
2. Visually check the drain hoses for proper connections, damage or deterioration.
3. Remove each drain hose and check visually for damage, cracks or deterioration. • Pour water through the drain hose to check for damage.
If any damage is found, replace the drain hose.
Installation
Installation is in the reverse order of removal.
1. Rear drain hoses 2. Front drain hoses
WIIA0853E
LIIA0272E
Revision: December 20092009 QX56
Page 3144 of 4171

SUNROOF SYSTEMRF-53
< ON-VEHICLE REPAIR >
C
DE
F
G H
I
J
L
M A
B
RF
N
O P
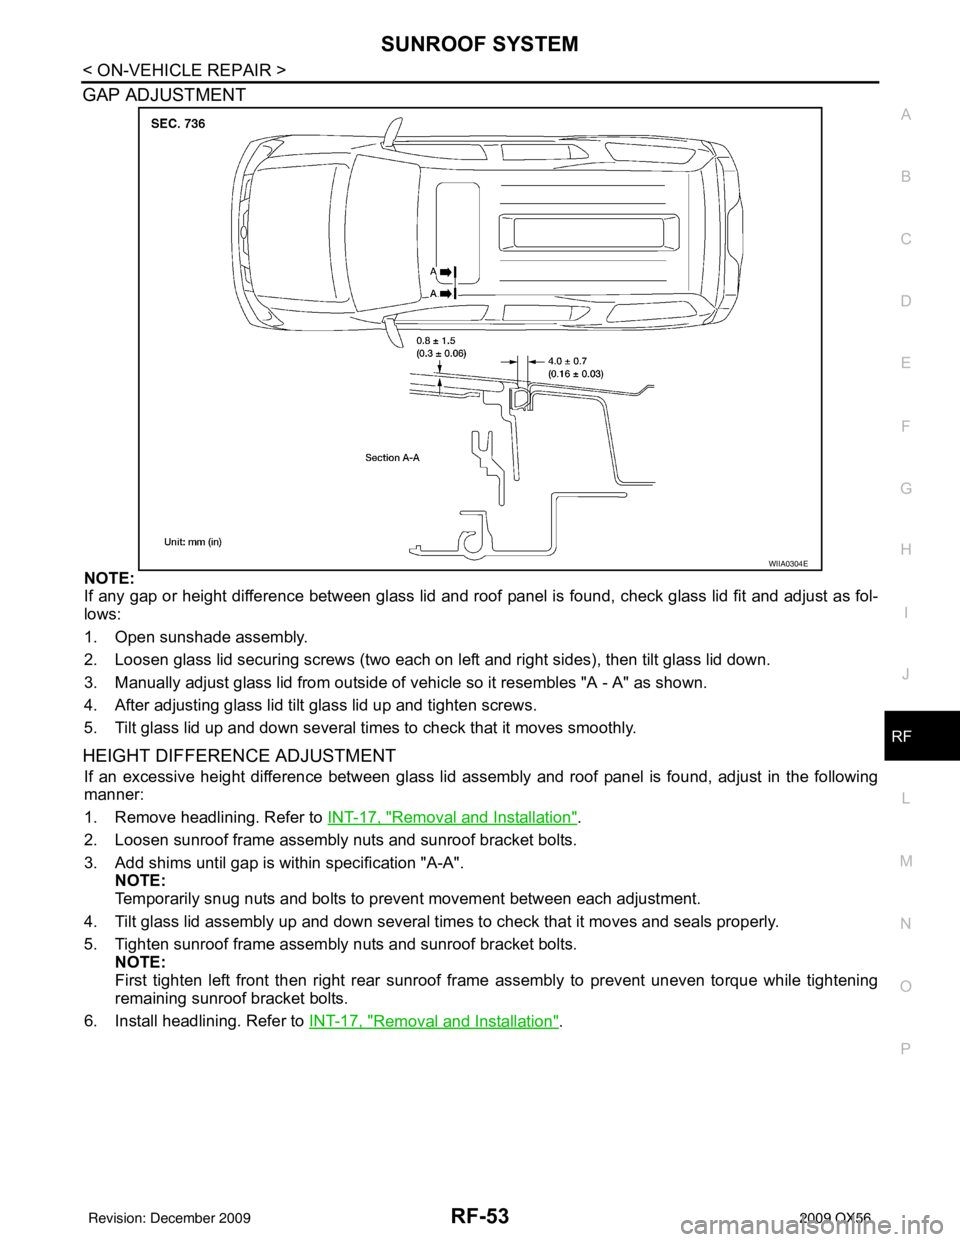
GAP ADJUSTMENT
NOTE:
If any gap or height difference between glass lid and roof panel is found, check glass lid fit and adjust as fol-
lows:
1. Open sunshade assembly.
2. Loosen glass lid securing screws (two each on left and right sides), then tilt glass lid down.
3. Manually adjust glass lid from outside of v ehicle so it resembles "A - A" as shown.
4. After adjusting glass lid tilt glass lid up and tighten screws.
5. Tilt glass lid up and down several times to check that it moves smoothly.
HEIGHT DIFFERE NCE ADJUSTMENT
If an excessive height difference between glass lid assemb ly and roof panel is found, adjust in the following
manner:
1. Remove headlining. Refer to INT-17, "
Removal and Installation".
2. Loosen sunroof frame assembly nuts and sunroof bracket bolts.
3. Add shims until gap is within specification "A-A". NOTE:
Temporarily snug nuts and bolts to prevent movement between each adjustment.
4. Tilt glass lid assembly up and down several times to check that it moves and seals properly.
5. Tighten sunroof frame assembly nuts and sunroof bracket bolts. NOTE:
First tighten left front then right rear sunroof frame assembly to prevent uneven torque while tightening
remaining sunroof bracket bolts.
6. Install headlining. Refer to INT-17, "
Removal and Installation".
WIIA0304E
Revision: December 20092009 QX56
Page 3145 of 4171
RF-54
< ON-VEHICLE REPAIR >
SUNROOF SYSTEM
Exploded View
INFOID:0000000003776094
1. Glass lid assembly 2. Wind deflector3. Rear drain hoses
4. Shade stoppers 5. Sunroof bracket 6. Sunshade assembly
7. Front drain hoses 8. Sunroof motor assembly9. Sunroof frame assembly
10. Overhead console bracket 11. Side cover LH 12. Side cover RH
WIIA0657E
Revision: December 20092009 QX56
Page 3146 of 4171

SUNROOF SYSTEMRF-55
< ON-VEHICLE REPAIR >
C
DE
F
G H
I
J
L
M A
B
RF
N
O P
CAUTION:
• Before removal, fully close the glass lid assembly. Then, after removal, do not move the motor
assembly.
• After installing or adjusting the sunroof and glass lid, check gap alignment and sunroof operation to
prevent malfunction.
• Handle glass lid with care so not to cause damage.
Removal and InstallationINFOID:0000000005877826
CAUTION:
• Always work with a helper.
• When taking sunroof unit out, use shop cloths to protect the seats and trim from damage.
• After installing the sunroof unit or glass lid, be sure to check gap adjustment to prevent any mal-
function.
SUNROOF FRAME ASSEMBLY
NOTE:
• For easier installation, mark each point before removal.
Removal
1. Remove headlining. Refer to INT-17, "Removal and Installation".
2. Remove the glass lid assembly. Follow the procedure for GLASS LID ASSEMBLY within this section.
3. Remove overhead console bracket.
4. Disconnect the front and rear drain hoses.
5. Remove front sunroof frame assembly bolts.
6. Remove sunroof frame assembly brackets.
7. Remove the side bolts and the sunroof frame assembly.
8. Remove the sunshade assembly as necessary. Fo llow the procedure for SUNSHADE ASSEMBLY within
this section.
Installation
1. Install the sunshade assembly.
2. Position the sunroof frame assembly and install the side bolts.
3. Install the sunroof brackets.
4. Install the front sunroof frame assembly bolts.
5. Connect front and rear drain hoses.
6. Install the overhead console bracket.
7. Install the glass lid assembly. Follow the procedure for GLASS LID ASSEMBLY within this section.
8. Install headlining. Refer to INT-17, "
Removal and Installation".
9. Perform initialization procedure. Refer to RF-5, "
ADDITIONAL SERVICE WHEN REPLACING CONTROL
UNIT : Special Repair Requirement".
GLASS LID ASSEMBLY
Removal
1. Open sunshade assembly.
2. Ensure glass lid assembly is closed.
3. Remove side cover LH and RH.
Revision: December 20092009 QX56
Page 3147 of 4171

RF-56
< ON-VEHICLE REPAIR >
SUNROOF SYSTEM
4. Remove the screws securing glass lid assembly to the sunroofframe assembly.
5. Remove the glass lid assembly.
Installation
1. Position glass lid assembly to sunroof frame assembly.
2. Install the glass lid assembly screws. (First tighten left front bolt, then tighten right rear bolt on glass lid
assembly to prevent it from moving while tightening other bolts.)
3. Adjust the glass lid assembly. Refer to RF-51, "
Inspection".
4. Install side cover LH and RH.
WIND DEFLECTOR
Removal
1. Open the sunroof.
2. Remove screws from the left, center, and right side wind deflec- tor holders.
3. Remove the wind deflector from the sunroof frame assembly.
Installation
Installation is in the reverse order of removal.
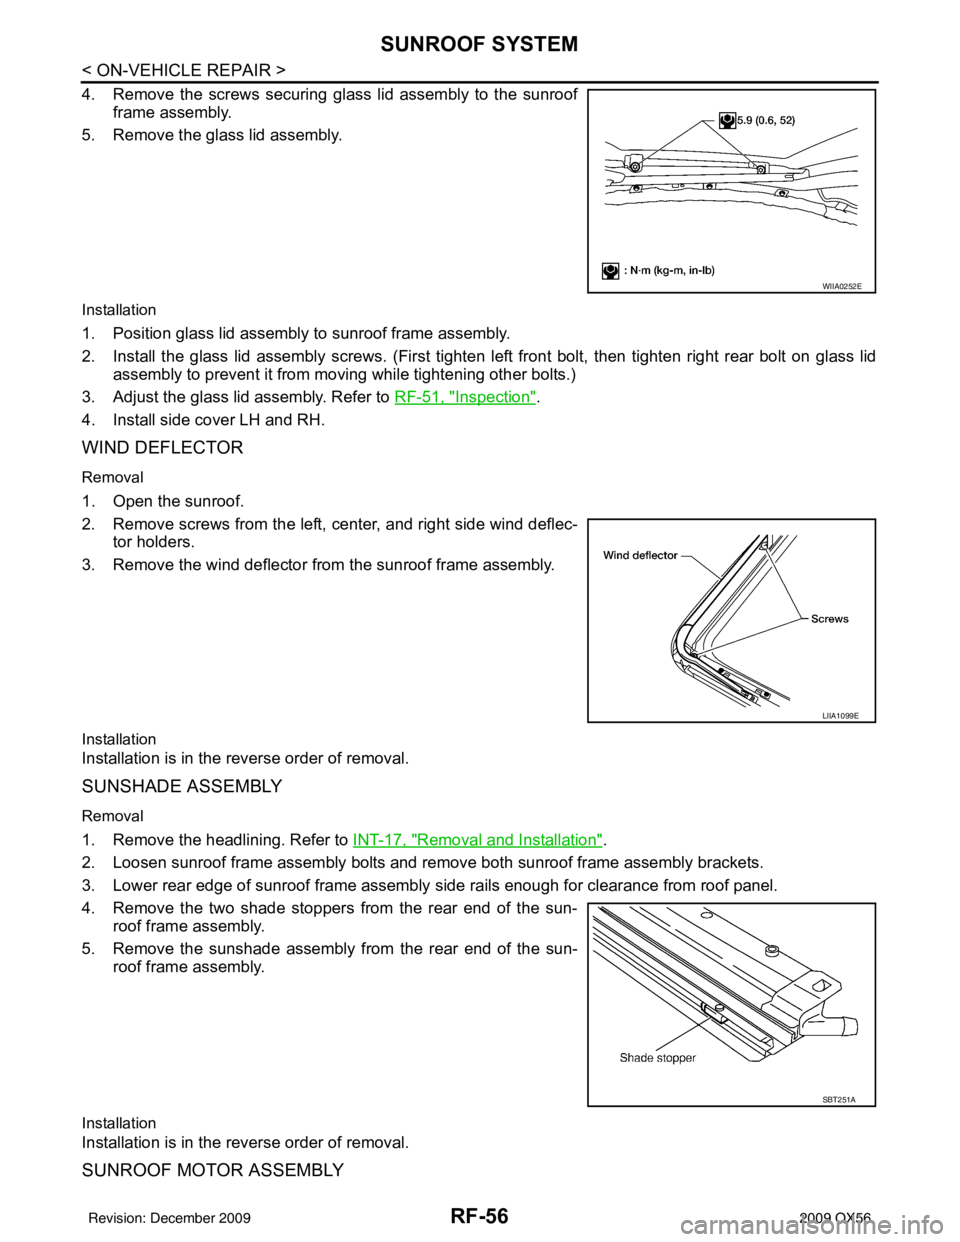
SUNSHADE ASSEMBLY
Removal
1. Remove the headlining. Refer to INT-17, "Removal and Installation".
2. Loosen sunroof frame assembly bolts and remove both sunroof frame assembly brackets.
3. Lower rear edge of sunroof frame assembly side rails enough for clearance from roof panel.
4. Remove the two shade stoppers from the rear end of the sun- roof frame assembly.
5. Remove the sunshade assembly from the rear end of the sun- roof frame assembly.
Installation
Installation is in the reverse order of removal.
SUNROOF MOTOR ASSEMBLY
WIIA0252E
LIIA1099E
SBT251A
Revision: December 20092009 QX56