Page 3842 of 4171
TM-194
< ON-VEHICLE MAINTENANCE >
ROAD TEST
When the transmission changes speed D3 → D4, return the accelerator pedal.
Does the A/T shift-up D3
→ D4 and apply the engine brake?
YES >> 1. Stop the vehicle. 2. See TM-194, "Cruise Test - Part 3"
.
NO >> Enter a check mark at “Vehicle Does Not Shift: D3 → D4” on the diagnostics worksheet, then con-
tinue the road test.
Cruise Test - Part 3INFOID:0000000003772031
1.CHECK SHIFT-DOWN
During D
5 driving, move gear selector from D → 4 → 3 → 2 → 1.
With CONSULT-III
Read the gear position.
Is downshifting correctly performed?
YES >> GO TO 2.
NO >> Enter a check mark at “Vehicle does not shift” at the corresponding position (5th → 4th, 4th → 3rd,
3rd → 2nd, 2nd → 1st) on the diagnostics worksheet, then continue the road test.
2.CHECK ENGINE BRAKE
Does engine braking effectively reduce speed in 1
1 position?
YES >> 1. Stop the vehicle. 2. Carry out the self-diagnostics. Refer to TM-32, "CONSULT-III Function (TRANSMISSION)"
.
NO >> Enter a check mark at “Vehicle Does Not Decelerate By Engine Brake” on the diagnostics work- sheet, then continue trouble diagnosis.
Vehicle Speed When Shifting GearsINFOID:0000000003772032
Refer to TM-290, "Vehicle Speed at Which Gear Shifting Occurs".
Vehicle Speed When Performing a nd Releasing Complete Lock-upINFOID:0000000003772033
Refer to TM-291, "Vehicle Speed at Which Lock-up Occurs/Releases".
Revision: December 20092009 QX56
Page 3849 of 4171
OIL PANTM-201
< ON-VEHICLE REPAIR >
CEF
G H
I
J
K L
M A
B
TM
N
O P
OIL PAN
Oil PanINFOID:0000000005880214
REMOVAL AND INSTALLATION
Removal
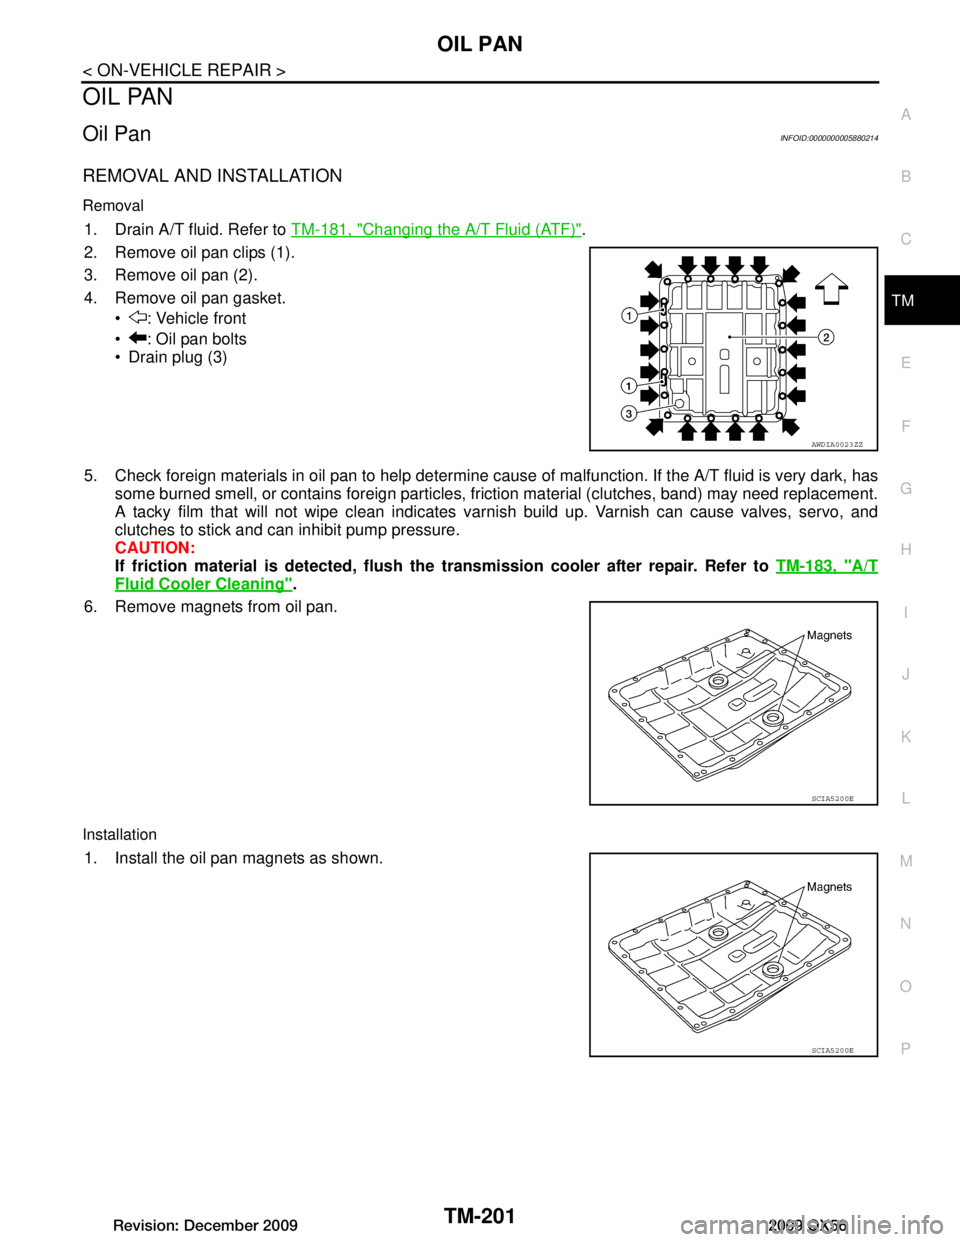
1. Drain A/T fluid. Refer to TM-181, "Changing the A/T Fluid (ATF)".
2. Remove oil pan clips (1).
3. Remove oil pan (2).
4. Remove oil pan gasket. : Vehicle front
: Oil pan bolts
Drain plug (3)
5. Check foreign materials in oil pan to help determine c ause of malfunction. If the A/T fluid is very dark, has
some burned smell, or contains foreign particles, friction material (clutches, band) may need replacement.
A tacky film that will not wipe clean indicates varnis h build up. Varnish can cause valves, servo, and
clutches to stick and can inhibit pump pressure.
CAUTION:
If friction material is detected, flush th e transmission cooler after repair. Refer to TM-183, "A/T
Fluid Cooler Cleaning".
6. Remove magnets from oil pan.
Installation
1. Install the oil pan magnets as shown.
AWDIA0023ZZ
SCIA5200E
SCIA5200E
Revision: December 20092009 QX56
Page 3850 of 4171
TM-202
< ON-VEHICLE REPAIR >
OIL PAN
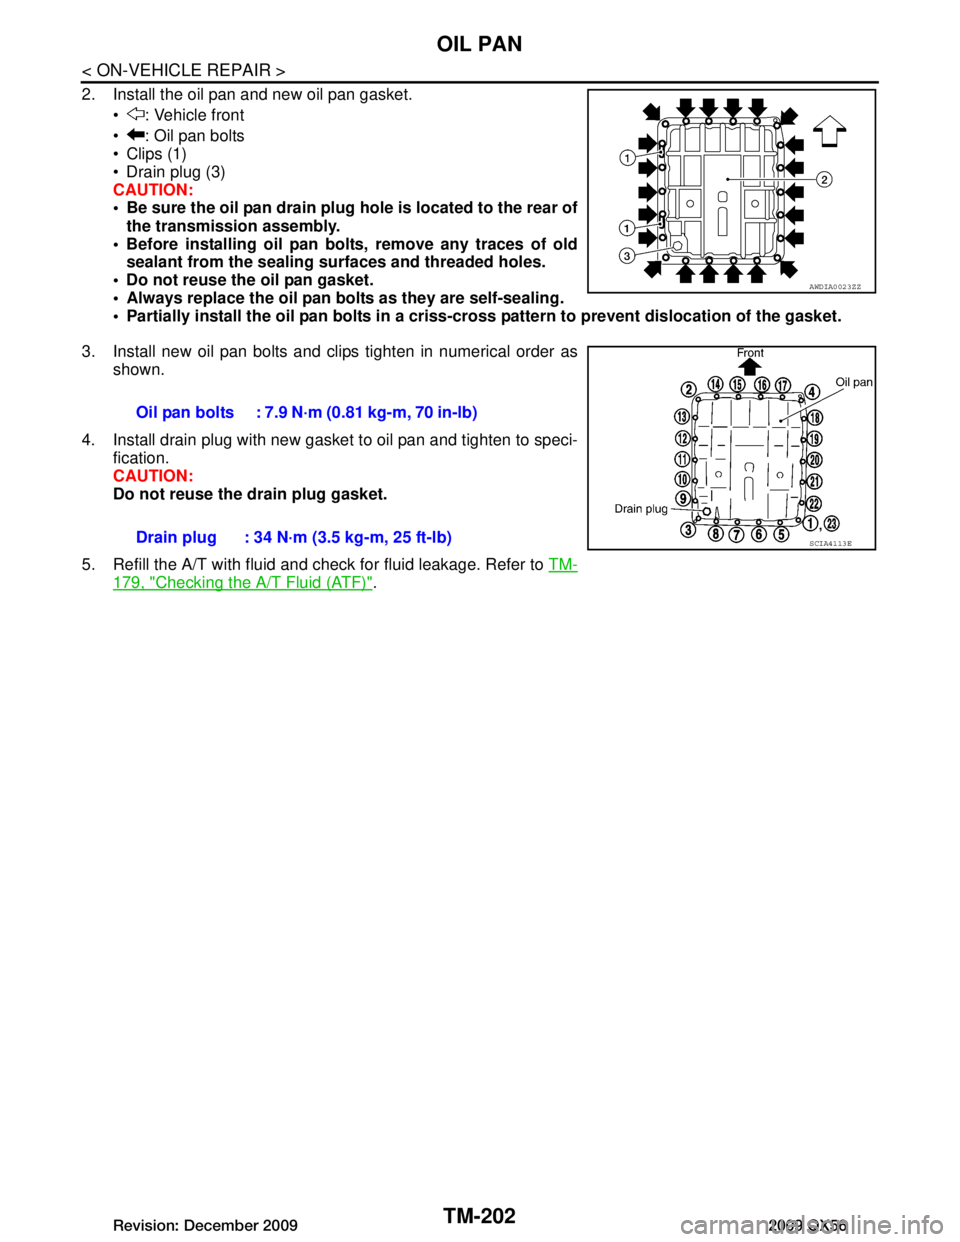
2. Install the oil pan and new oil pan gasket. : Vehicle front
: Oil pan bolts
Clips (1)
Drain plug (3)
CAUTION:
Be sure the oil pan drain plug hole is located to the rear ofthe transmission assembly.
Before installing oil pan bolts, remove any traces of old sealant from the sealing su rfaces and threaded holes.
Do not reuse the oil pan gasket.
Always replace the oil pan bolts as they are self-sealing.
Partially install the oil pan bolts in a criss- cross pattern to prevent dislocation of the gasket.
3. Install new oil pan bolts and clips tighten in numerical order as shown.
4. Install drain plug with new gasket to oil pan and tighten to speci- fication.
CAUTION:
Do not reuse the drain plug gasket.
5. Refill the A/T with fluid and check for fluid leakage. Refer to TM-
179, "Checking the A/T Fluid (ATF)".
AWDIA0023ZZ
Oil pan bolts : 7.9 N·m (0.81 kg-m, 70 in-lb)
Drain plug : 34 N·m (3.5 kg-m, 25 ft-lb)
SCIA4113E
Revision: December 20092009 QX56
Page 3851 of 4171
CONTROL VALVE WITH TCMTM-203
< ON-VEHICLE REPAIR >
CEF
G H
I
J
K L
M A
B
TM
N
O P
CONTROL VALVE WITH TCM
Control Valve with TCM and A/T Fluid Temperature Sensor 2INFOID:0000000004219688
COMPONENTS
CONTROL VALVE WITH TCM REMOVAL AND INSTALLATION
Removal
1. Disconnect negative battery terminal. Refer to PG-77, "Removal and Installation".
2. Drain A/T fluid. Refer to TM-181, "Changing the A/T Fluid (ATF)"
.
3. Disconnect A/T assembly harness connector.
1. Transmission 2. Snap ring 3. Sub-harness
4. Control valve with TCM 5. Bracket 6. A/T fluid temperature sensor 2
7. Oil pan gasket 8. Brackets 9. Oil pan bolt
10. Oil pan 11. Magnet 12. Drain plug
13. Drain plug gasket 14. A/T assembly harness connector 15. O-ring
AWDIA0024ZZ
Revision: December 20092009 QX56
Page 3853 of 4171
CONTROL VALVE WITH TCMTM-205
< ON-VEHICLE REPAIR >
CEF
G H
I
J
K L
M A
B
TM
N
O P
11. Remove bolts (A), (B) and (C) from control valve with TCM. : Front
12. Remove control valve with TCM from transmission case. CAUTION:
When removing, be careful with the manual valve notch and
manual plate height. Remove it vertically.
13. Remove A/T fluid temperature sensor 2 with bracket from con- trol valve with TCM.
14. Remove bracket from A/T fluid temperature sensor 2.
15. Remove O-ring from A/T assembly harness connector.
Bolt symbol Length mm (in) Number of bolts A 42 (1.65) 5
B 55 (2.17) 6
C 40 (1.57) 1
SCIA8074E
SCIA5142E
SCIA5253E
SCIA5264E
SCIA5155E
Revision: December 20092009 QX56
Page 3854 of 4171
TM-206
< ON-VEHICLE REPAIR >
CONTROL VALVE WITH TCM
16. Disconnect TCM connectors.CAUTION:
Do not damage connectors.
17. Remove A/T assembly harness connector from control valve with TCM using suitable tool.
18. Disconnect TCM connector and transmission range switch con- nector
CAUTION:
Do not damage connectors.
Installation
CAUTION:
After completing installation, check A/T fluid leakage and fluid level. Refer to TM-179, "Checking the A/
T Fluid (ATF)".
1. Connect TCM connector and trans mission range switch connec-
tor.
SCIA5447E
SCIA5448E
SCIA5449E
SCIA5449E
Revision: December 20092009 QX56
Page 3856 of 4171
TM-208
< ON-VEHICLE REPAIR >
CONTROL VALVE WITH TCM
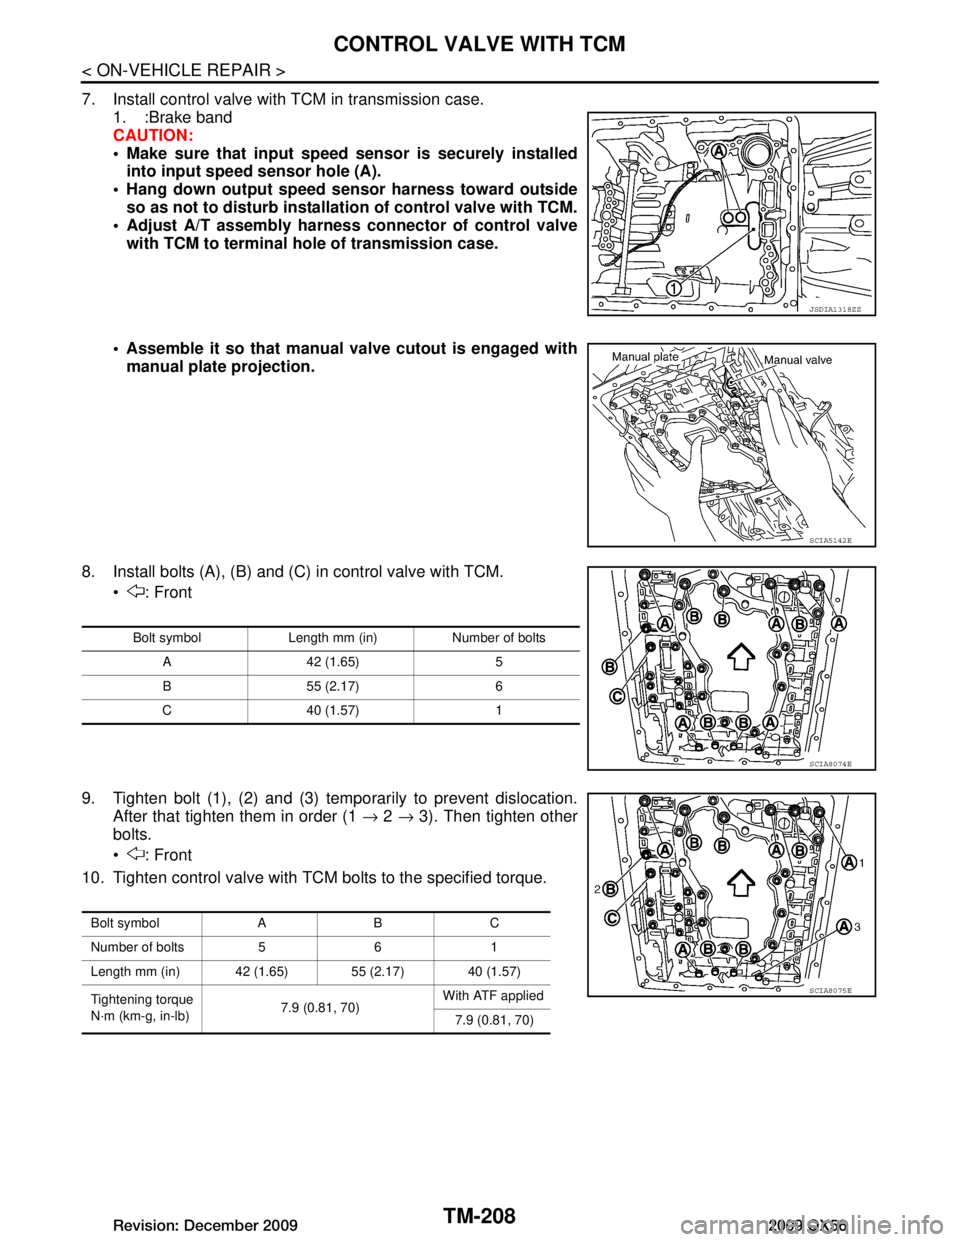
7. Install control valve with TCM in transmission case.1. :Brake band
CAUTION:
Make sure that input speed sensor is securely installed
into input speed sensor hole (A).
Hang down output speed sen sor harness toward outside
so as not to disturb installati on of control valve with TCM.
Adjust A/T assembly harness co nnector of control valve
with TCM to terminal hole of transmission case.
Assemble it so that manual valve cutout is engaged with manual plate projection.
8. Install bolts (A), (B) and (C) in control valve with TCM. : Front
9. Tighten bolt (1), (2) and (3) temporarily to prevent dislocation. After that tighten them in order (1 → 2 → 3). Then tighten other
bolts.
: Front
10. Tighten control valve with TCM bolts to the specified torque.
JSDIA1318ZZ
SCIA5142E
Bolt symbol Length mm (in) Number of bolts
A 42 (1.65) 5
B 55 (2.17) 6
C 40 (1.57) 1
SCIA8074E
Bolt symbol A B C
Number of bolts 5 6 1
Length mm (in) 42 (1.65) 55 (2.17) 40 (1.57)
Tightening torque
N·m (km-g, in-lb) 7.9 (0.81, 70)With ATF applied
7.9 (0.81, 70)
SCIA8075E
Revision: December 20092009 QX56
Page 3857 of 4171
CONTROL VALVE WITH TCMTM-209
< ON-VEHICLE REPAIR >
CEF
G H
I
J
K L
M A
B
TM
N
O P
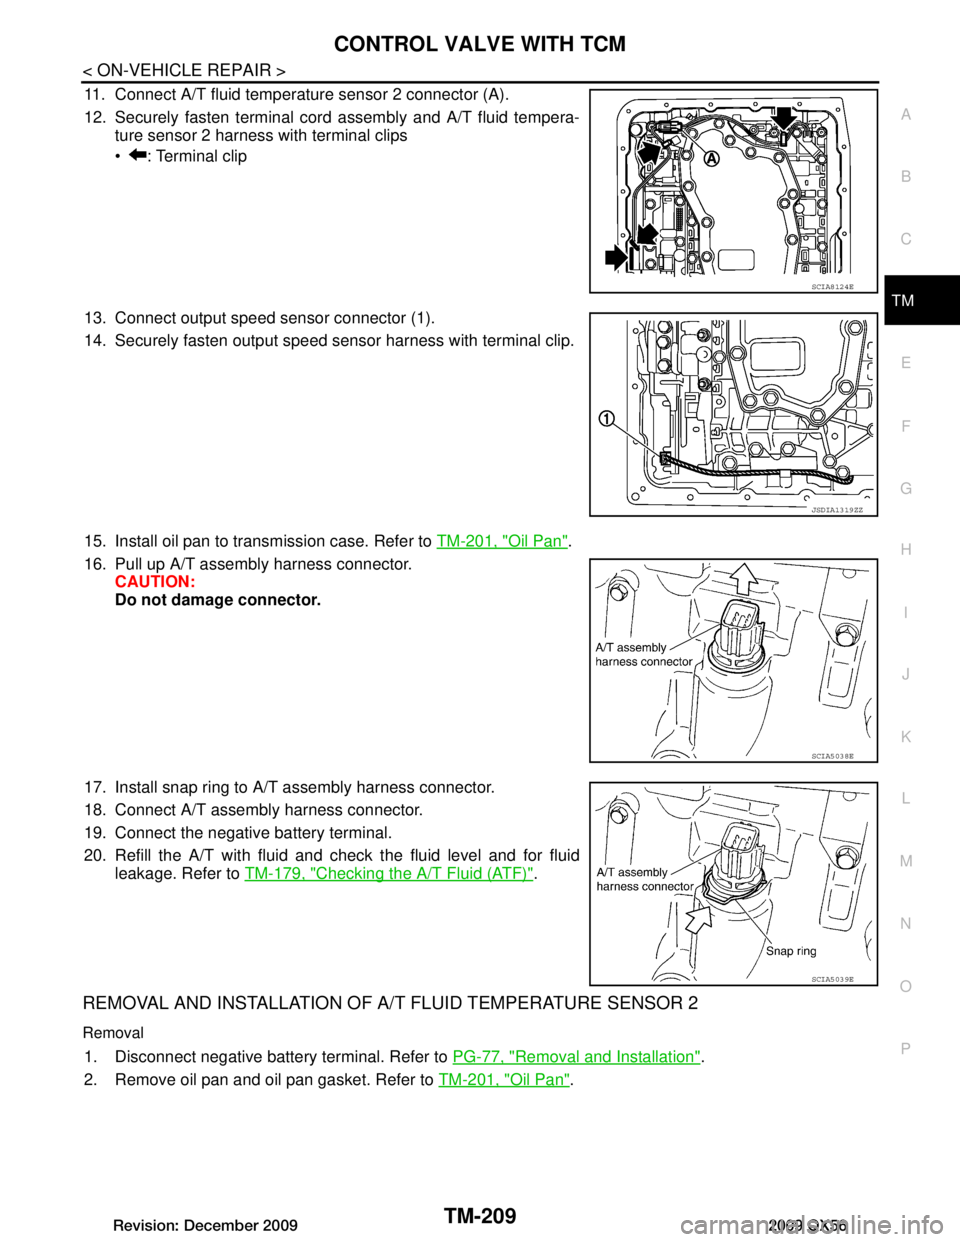
11. Connect A/T fluid temperature sensor 2 connector (A).
12. Securely fasten terminal cord assembly and A/T fluid tempera- ture sensor 2 harness with terminal clips
: Terminal clip
13. Connect output speed sensor connector (1).
14. Securely fasten output speed sensor harness with terminal clip.
15. Install oil pan to transmission case. Refer to TM-201, "Oil Pan"
.
16. Pull up A/T assembly harness connector. CAUTION:
Do not damage connector.
17. Install snap ring to A/T assembly harness connector.
18. Connect A/T assembly harness connector.
19. Connect the negative battery terminal.
20. Refill the A/T with fluid and check the fluid level and for fluid leakage. Refer to TM-179, "Checking the A/T Fluid (ATF)"
.
REMOVAL AND INSTALLATION OF A/ T FLUID TEMPERATURE SENSOR 2
Removal
1. Disconnect negative battery terminal. Refer to PG-77, "Removal and Installation".
2. Remove oil pan and oil pan gasket. Refer to TM-201, "Oil Pan"
.
SCIA8124E
JSDIA1319ZZ
SCIA5038E
SCIA5039E
Revision: December 20092009 QX56